Tag Archive for: performing

The Inner Ear

There are multiple definitions of what the inner ear can be, but for this article, I will use it based on my own experience.

In music production, the Inner Ear is the metaphorical space where intuition, emotion, and personal taste converge — it’s the internal compass that guides an artist to create without relying on external references or trends. It’s not about hearing with your ears, but listening with your instinct.

Where the outer ear takes in the world — what others are doing, what’s charting, what plugins are trending — the inner ear listens inward. It pays attention to the subtle spark of an idea, the unexpected resonance of a sound, or a feeling that demands to be expressed.

Cultivating the inner ear means trusting your musical decisions before others validate them. It’s about making art from within — raw, unfiltered, and often surprising, even to yourself.

The inner ear appears when one has worked with references for so long that they can now navigate on their own.

When I teach newcomers to music production, there are two main points I recommend starting with:

  1. Working with loops and samples. This allows the artist to understand sound curation and break the overwhelming feeling of wondering how to pick the right sounds.
  2. Working with references. That technique makes it easier to make arrangements and sound more organized while learning how songs are made.


These two approaches will remain useful at various points in a musician’s development, as they will address and resolve specific issues. Quite often, musicians need and want validation or sound like a particular artist, to be part of a label or community. Working with reference is the most effective solution to these challenges. One can argue that a mentor can also do the job, which is true, but that mentor is still an external validation instead of amplifying the inner one.

Some musicians build most of their careers on making music that fits in with others’ projects. What’s interesting is that for many musicians, this is, without a doubt, one of the best ways to survive, as you can follow trends, see what works, and get a piece of the action.

Questioning one’s ambitions is none of their business. Making music, especially if you’re venturing into the professional realm, is a harsh world where it gets easy to become cynical. But at one point, as someone who works in music, I encourage people to drop out of their survival mode or their routine and find their inner voice.


The Inner Voice


I’m bringing a second concept to this post by reflecting on the voice. In any music genre, the voice is not just about singing, but also about how they express their ideas through their music.


To clarify:

  • Inner Voice is what you say creatively — it’s your artistic expression, your identity, the message or emotional truth that comes out when you make music authentically. It’s what you want to express.

  • Inner Ear is how you listen to yourself — it’s your intuition, your ability to detect when something resonates or feels honest before external validation. It’s how you decide what’s worth expressing.

Think of the inner voice as the output and the inner ear as the input.
They’re two parts of the same internal dialogue: one speaks, the other listens.

For a producer:

  • The inner ear helps you recognize when a sound or groove “feels right” without needing a reference track.

  • The inner voice is what shapes that feeling into a musical idea that’s uniquely yours.


As you understand, the concept of these two goes hand in hand. When one artist starts and works with references, loops, and samples, they are mostly working with external factors, but still practicing being in touch with their inner voice. If I give the same sample pack to multiple people in a room, it will sound completely different in the end, because the participants will all have different inner world that alters the results. After doing that exercise with people, I saw how everyone has their vision of what sounds ok or not, which comes from their preferences in music, but where they have issues is mainly to be able to understand if their music can compare to others: sounding similar or relevant.


The Authenticity Paradox


Now and then, I come across artists who are deeply absorbed in their music-making art form, utterly detached from what is being created. Some of those people are so self-absorbed that they are technically off. This raises some potential issues, but also raises questions.

A good example is a heated email exchange I had with someone I gave feedback on their music. The person basically wanted to be told how good his music was but it had a lot of issues, technically. I provided a list of the issues, with details and how to fix it but that didn’t go down well as the guy took it the wrong way and felt insulted by my details.


If one is supposed to follow their inner voice and ear, does this mean they ignore technical conventions?

The answer is not straightforward. One doesn’t need to follow any conventions or rules, but this might result in issues when played in specific contexts. It might also not fit the music the artist likes. Now and then, I have a client who wants to do their own thing and ignores my recommendations. However, once their music is played in a car or club, compared to other songs, it falls short in terms of power and precision. That is the price to not follow a technical basis but this only happens when people compare themselves to something else. Some people don’t and will remain in their bubble, which is not an issue.


Voice vs. Echo: Creating Without a Reference


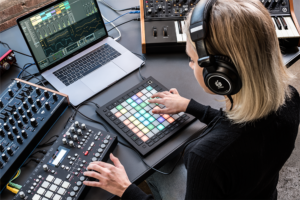
Creating without a reference is something many people do, and, as explained, can lead to issues. But when it comes to creativity, it can also be a good thing. The majority of artists I work with are people in the electronic music business. Many are DJS, but not all. For those clients, not working with a reference might be tricky; either you know perfectly how things should sound or have a clear idea in mind of how to set your sessions. What’s interesting for me with clients that I’ve worked for a long time is how they progress through a cycle of different phases. When it comes to the moment where they want to explore on their own, I feel we then enter a fragile but magical step into the unknown.

Working without a reference comes with no playbook. One has to find their way, and when I talk to those who work this way, it’s common to see they all operate through it in different ways. Some prefer starting with the rhythmic part of their song and then creating a melody. Others do the opposite. Depending on the genre, things may tend to go in a specific direction more than others. If you want to venture into that workflow for the first time, here are some points to consider:

  • Working in a non-linear is still relevant but if you can try to work fast, gather your ideas and wrap a first concept within a first session, that will feel more coherent.
  • Prepare your sessions in advance: gather sounds, presets, synths, and patches, and make sure you have everything ready so you don’t have to create and find all your sounds at once.
  • Keep in mind that when you’re in brainstorming mode, things may not sound right at first, but that doesn’t mean your ideas are bad.


I like to keep in mind this workflow:

  1. Ideas: Find melodies and sounds that you like and gather all rhythmic elements. You want to find everything your song is about.
  2. Sound: Fine-tune your sounds, swap samples and presets, and add layers.
  3. Effects: Colour your sounds with effects, distortion, EQing.
  4. Movement: Apply modulation here and there to add life.


When you have this in mind, you know that in phase 1, you might have some questionable ideas, but trusting the process will allow you to be patient and accept that your final idea might be something different. The issue people generally have is trying to complete those 4 steps within a session, which results in the four phases being done incorrectly, leading to discouragement. Quite often, music I love has straightforward ideas, but the work around them makes them sound much more elegant, complex and is just a smoke screen.

Regarding effects and movement, I encourage you to keep a notepad (either on your smartphone or in a paper version) to take notes on songs that inspire you. I sometimes hear a song and pay attention to the main melody, noticing a detail like a tremolo. I’ll note that down and apply it to some ongoing projects.


Let’s try some exercises.


Daily Sound Sketches (No Plan, No Pressure)

Set a timer for 15–20 minutes and create a sound or loop without any expectations of finishing or sharing it. The goal is to create something that pleases you, not to impress others. Skip templates and avoid genres. Trust your instincts and explore.

Why it works: It builds confidence in your gut choices and disconnects you from perfectionism or external judgment.


Record First, Analyze Later

Open a mic or MIDI controller, hit record, and improvise — melodies, textures, rhythms. Don’t stop to fix or judge. Afterward, listen back and highlight anything that feels “you.”

Why it works: This bypasses the inner critic, letting your subconscious ideas surface unfiltered.


Use Randomization as a Mirror

Load a random sample or synth patch. Randomize settings. Now sculpt it into something that feels like you. Let chaos be the starting point, and your taste be the sculptor.

Why it works: You’re not starting from taste — you’re arriving there. It sharpens your awareness of what feels aligned with your voice.


No References Rule (For a While)

Challenge yourself: go one month without listening to new releases, genre playlists, or YouTube producer walkthroughs. Instead, dig into silence, field recordings, or non-musical sources for ideas (poetry, dreams, textures).

Why it works: It detoxes your creative input and gives space for your impulses to grow louder.


Assign Emotion > Then Create

Before starting a session, write down a feeling, memory, or concept you want to express. Create sound to express that, rather than chasing a style. Use reverb, distortion, rhythm, or harmony as emotional tools.

Why it works: It reverses the usual flow — instead of emulating a genre, you’re using your emotional language as the foundation.


Tuning In: The Art of Making Music from Within


This is something I covered in a previous blog post, but I’ll share it again because it’s relevant to this one. There’s a weird thing that happens when you make music, where what you do doesn’t always match what you’d like to do. This dissonance can be frustrating for many people, as they feel they lack control over what they want to do. In a way, we shouldn’t have control over our output unless we are truly fluent in musical expression, both in theory and in performance. I like to remind people that whatever comes out of you at a moment when you’re trying to do something else is, in a way, your inner voice. As I explained previously, you can give the assignment to 5 people to work on one song using the same synth, and you’ll end up with different results, despite using the same tool. But if you ask them to do 5 songs, there will be a similar thread throughout the five experiments.

On the other hand, I see some clients who have the opposite problem, where each of their songs is entirely different and lacks coherence between them. I could say that the artist hasn’t yet discovered their inner voice, but that could be debatable. In a way, perhaps their inner voice is just diversified and has a lot to say or explore. Exploring all kinds of aesthetics is not an issue until you feel you want to be part of a community or a specific direction, then it becomes a bit complicated. The remedy for that is to focus on less variable playlist, spend time to understand what you want to emulate, expose yourself to multiple songs and then go back to the drawing board.

Whenever I make music, there’s a moment when I listen to music before creating, which always prepares my creative self to work within a particular aesthetic.

Should you want to explore being more in tune with yourself, here are a few exercises to try.


The One-Sound Challenge

Choose a single sound — a synth patch, a field recording, or even a drum hit — and spend 15 minutes exploring what emotional or musical message you can express using just that. Modify it, stretch it, loop it, layer it — but stay centered around the original sound.

Why it helps: It forces you to lean on your creativity and intuition instead of relying on variety or complexity.

Sonic Journaling

Start your session by writing for 5 minutes: “How do I feel right now?” Then make music as a translation of that mood. Don’t aim for something “good” — aim for something true to how you feel. Save the project and name it after the emotion or moment.

Why it helps: Builds the habit of associating inner states with sound — this is the root of an authentic inner voice.


Listen Without Labels

Pick a random track from a genre or country you have never listened to. Before reading the artist or title, play it and ask yourself:

  • What do I feel?

  • What stands out?

  • What would I change?

Don’t analyze — listen emotionally. Then do the same to your track-in-progress.

Why it helps: Refines your internal filter by separating style from feeling.


The Role Reversal

Ask: “If this track was made by someone else, would I still like it?”
Or: “If I played this to a friend, what part would I defend proudly?”
This shift helps identify what’s truly you, vs. what you added to fit in.

Why it helps: Clears out second-guessing and tunes you into what you believe in.


Unfinished Ideas Playlist

Make a folder of 10 unfinished projects that still spark something. Once a week, revisit them, but instead of finishing, ask yourself: what do these ideas say about me? Look for patterns — moods, grooves, textures — that keep reappearing.

Why it helps: Your inner voice is often hidden in the stuff you leave behind. Reframing these scraps as messages instead of failures can reveal your artistic fingerprint.


Have fun exploring.

Live Recording Of Electronic Music

It’s one thing to make songs by assembling them in the arranger of your DAW but playing your song to life is another thing. I have nothing against spending time in the arranger to make your song, but when I got interested in playing my music, I realized it was a totally different energy. When Ableton Live came out, we were crazy about using the given software in a live context. The software was still in BETA at version 0.5b. It was stable because it was pretty simple, but still, I feel it was a side of myself that was more adventurous than I am now.

In the early 2000s, I played live a few times a month, and I had this way of working that involved not doing the same set twice. I decided to force myself to find ways to be swift enough and count on my improvisational skills to juggle what I had into spontaneous performances. It wasn’t always the best, but it was impressive for that period. This meant that when we first realized we could play live from a laptop, that was a game changer.

Portability was one of the challenges we had. Imagine carrying a table full of gear to each gig. It was impossible without owning a car, and there wasn’t a single event where we forgot something or something went wrong. But it was part of the performance: if something was off or not working, that was a self-imposed limitation we had to cope with.

But that made me fluent at expressing myself out of the blue. If at one moment, at home, you’d figure out a nice loop, you’d stop for a minute, arm the recorder and then jam the song away. Sometimes 2-3 times but the first would always be the best.

Recording jams as songs was a way of creating, and much later in life, I rediscovered the pleasure of working that way. With the current state of technology, it’s easy to have too much gear, ideas, and material. All you need is a loop to start with.


I’ll cover a guide to how I prepare my sessions as well as my favorite piece of gear and soft tools.


Preparation, Organization, And Idea Gathering


This section is critical for the success of the recording and also for the fun aspect of the exercise. Some people don’t like organizing and prefer being spontaneous and wild, but good preparation will make things more fluid. There’s also the argument that organization comes as you rehearse, and I have to say this will happen indeed, but having a minimum done in advance will be a leap forward. One of the critical points related to recording your live song is that you kill two birds with one stone: by the end of the activity, your song will exist as a performance set and a song. I have many clients who only make songs in the arranger, and having in mind to do a live set makes it a bit unintuitive as you’ll need to deconstruct your song into a performance setup, which might not help. The solution people take is to play live with the side launcher, playing one scene at a time and basically replying to their song as it is.

I like to spend my studio time by always starting with a live jam that leads to a song. This way, you’re in the moment and’ll play the music as you feel it. The limitations of playing only certain things all at once help make the song focused and help you avoid adding too many elements and layers.


If I would guide you like a step-by-step method based on how I do it, here how it would go:

1- Focus on creating a 1 bar loop idea from MIDI material as your hook


Recently, I’ve been having a lot of fun with Navigator, a tool from Manifest Audio that lets you browse various MIDI phrases. I usually load a synth and browse various ideas that work with that sound. This usually turns into multiple ideas that are fun to work with and add content to support. From one bar, you can after duplicate it to 4 where bar 2 and 4 have variations, while bars 1 and 3 are the foundation. This is a suggestion, and you can explore combinations, but this method is an approach I see in multiple songs.


Navigator allows you to browse midi patterns

Duplicate it to 4 bars

2- Driving and Rolling Idea


The problem with Navigator is that it might generate random ideas that help find a sound or sound sequence, but since it’s a bit random, there might not be much rolling feeling. By rolling, I mean that it doesn’t naturally groove on its own, so adding a supportive idea for this works best if you have a percussive/rhythmic idea that can go on its own.


Either you punch it in, or you can use Euclidean patterns to have solid energy. If you want that idea to be expressive, you can start by putting down where you want the notes and then use a tool like Draw or Fluctuator to randomize the note values. This would be translated into a modular setup by having a sequence set to a step programmed like the ADDR.

3- Lower support


Once you have your main ideas programmed, you can add the steps in the lower end to fill that void. This can be done by adding a sub-oscillator to your main synth, which will then result in using the main melody but pitched down. But if you want your low end to not follow the main melody, you may have two choices: use the rolling method for energy or invert the main idea to create an answer.


4- Percussion


You can get carried away by adding too many layers here, so I usually approach it from two sides: Define the foundation and then set the decoration. You may not be used to these terms, so I will explain them. Your foundation should be the kick, snare/clap and hats. Depending of the genre and time signature, the foundation of a kick within one bar might also be where the accents are. The snare, which, for instance, typically falls on beat 2 and 4, will consolidate the groove and accent of the kick. The hihat might follow 1/4th of notes to 1/16th, where you can add a swing to give it a flowing or broken flow.


The interaction of these 3 can be seen as the foundational elements of your song. In other words, you define precisely how you want your first idea and the rolling one to flow on the given percussion that can help with the articulation.

Decorations are sporadic and sparse interventions that don’t take over the foundation but create subtle movements and accents by following it or embellishing it. They are also helpful for marking transitions, marking the end of sections, or filling space.


5 – Working with loops


If you have started your core making using some premade loop, you can start with the same approach as explained. I wouldn’t hesitate to follow the order of the previous steps. But once you have worked on your idea, you should now have a row of ideas that can be played. You will want to duplicate this row 3-4 times to have variations of the main loop. The idea is to alternate between variations to give depth and excitement to the initial core.

Some variation ideas:

  • Different loop length.
  • Introducing silences to create space.
  • Altering the rhythm by changing the position of certain sounds.
  • Changing pitch.
  • Use the envelopes of the various parameters with or without the clip’s length link option, which allows clips to feel longer than their current duration (e.g., it will break the loopiness).


You can also slice your loop or idea in a sampler and reorganize. I recommend that before jamming your idea, you have some main ideas and not get lost in fixing them while playing.

You might want to avoid following the session’s primary quantizing mode regarding variations. This setup means that when you press play on a loop, it will start at the beginning of the quantized position. By default, it should be 1 bar, which is helpful because it resets the loop’s position to the beginning of the bar, helping you have coherence should you be slightly lost. But for the variations, you could switch that to 1/4th, 1/2 or other, which means that when you press play on that clip, it will start on the following quantized note. This means that if you have a fill-as-one variation, you can introduce interventions that aren’t going to be starting at the beginning of the loop. But to do this effectively, you’ll need to activate the Legato mode. This means the loop’s playing point will continue where the previous clip was. It will give continuity.

The way I set this up is to define my base loop. That loop is where you will come back to as the core idea of your song or should things get too silly. Ideally, that base loop should follow the session’s global quantization at 1 bar. The variations will be set depending on your needs.


6- Modulations


This is my favorite part of the preparation. It consists of activating the modulation record button and then clicking on the arm button on the channel you wish to modulate.

This will allow you to manually record movements on some effects such as EQ, Utility, chorus or anything you want. The record option will pick up your movement and then loop it so you can boost sequences with the EQ, and then this will play in a loop, which can add a whole new range of variation to the original idea. You’ll need to unlink the envelope for a longer modulation duration.

I will then add modulation to every channel and clip, but I will also have one clip without any so it doesn’t get too crazy.

Another option is resampling. This means you can solo one channel and then apply all the changes you want while resampling. This will give you longer clips you can play as is or chop them into smaller clips for variations to jam with.


7- Follow Actions as Randomizer


This technique is quite known and fun. Take a clip (audio or midi) and duplicate it multiple times with a different play position or changes. You can then benefit from having follow actions on all of them to play randomly between the batches. By recording the results, you’ll have the same idea but arranged differently. This method is a way to remix clips or discover new hooks through a simple concept.

The Follow Action is fun when jamming or just when preparing. One way I like it is to have fills or melodies that play independently (aka generative melodies).

If you want your clips to remain short and play briefly before jumping, you’ll need to turn off the link and set the duration to something like 0.1.0 so that it plays only a note or so.

5- The Exciting Loop Method


The EL Method is about finding the simplest loop possible that excites you. Press the record button, then start jamming without a goal other than seeing if it’s fun. The recorded jam will be helpful as you can jam with the jam as if you have a partner leading the song, and then you can add new layers.

One suggestion is to start with your foundation, main idea and low end. This is the core of your song, and you can add the other layers after.

The idea is to jam your idea multiple times, recording every moment. You can then keep the best parts and edit the less-than-best.

That’s pretty much how you do it.


Bonus part: Gear

It’s common that when I teach beginners how to play electronic music, they think that it is only possible if they have a lot of gear and expensive material. Not having much often proves to be more productive, as you can focus on what matters. Even when performing live, I tend to focus on having as little as possible so I don’t lose myself, but if something goes wrong, I won’t have to look through a list of potential issues.

After performing live for almost 30 years using multiple setups, I would say that if you don’t have much, one good MIDI controller I recommend is the Novation Launch XL. This compact controller represents a mixing board where you can fade in and out elements or play with effects. As you jam using this, you’ll soon feel that automation and modulation with that tool give a much more organic movement than a mouse will. DJs who dive in production often miss the hands-on option that DJ mixing gives them. This is an excellent option for them to be able to add movement or play with levels, in a human way.

Ableton-Hardware Hybrid Setup

Producers often get comfortable in the computer and feel they are not getting enough, so they decide to invest in hardware.

Once you get good at something, it’s only natural to want to upgrade to the next level. You may get that feeling that you aren’t getting enough out of it, or that the medium is limiting in some way. With my students, often this feeling means leaping from a DAW like Abelton to a hardware-based setup. 

They often think that by doing so, they’re going to unlock a richer sound, and a more intuitive, instrumental interface. They believe they will be liberated, able to just jam out compositions without having to rely on an “unnatural” mouse click or MIDI mapping inside a DAW. 

The truth is that once they make this leap, and ditch Ableton for an Electron Octatrak, and a modular, they often find themselves being even more limited by the foreign user interface and the fact that modular doesn’t have an “undo” button, or patch saves.

That’s why I always recommend that they use an Ableton-hardware hybrid setup that incorporates the best of both worlds, where the tactile, plug and play nature of hardware meets the convenience of being able to easily save, and revert back to settings on the computer. 

Over the years, I think I have a pretty rounded philosophy of how to tackle this integration, which I would like to share with you in this post.

However, let’s talk about hardware first, so that you can understand its strengths and weaknesses. 

A photo of a simple example of an Ableton-hardware hybrid setup.


Myths About Hardware

It automatically Sounds Better

Just because something is hardware, doesn’t mean that it’s going to mythically sound better. In some cases, analog summing can fix some issues and enhance certain things but it can also be sounding different than digital and since our ears are used to the digital realm, it might be misleading. It’s not 2005 anymore; virtual instruments have grown leaps and bounds over the years. Even to a trained ear, it’s hard to tell the difference between an emulated TB303 and the Roland Cloud version. Analog does have charm and specific texture but it’s different than digital. Some people get confused once in front of certain pieces of gear.

However, there are things that happen with the sound in hardware that is difficult to emulate in software. For instance, the “ghost in the sound’ – that almost invisible hand that creates random, happy accidents due to the fact that you are working with pure electrical current, rather than a binary representation of it. 

This “hand” often results in sounds that are impossible to replicate, existing for only as long as they project from the speakers. To me, this is the magic of hardware – that unpredictability that exists for a fleeting moment, until it’s gone, never to be heard again, unless you capture it. 

In other words, analog has a sound that digital doesn’t have and that’s an aesthetic that pleases many people. Believe it or not, some people really do prefer the digital sound, mostly because our ears have got used to it.

However, what is this capability worth, if you can’t capture it properly? That’s why it’s imperative when buying hardware that you also buy a solid audio interface to be able to record the sound at the highest fidelity. Because at the end of the day, your hardware will only sound as good as the weakest part of the chain.

It’s More Intuitive

This is another fallacy. If anything, analog hardware can create a new set of problems, with the main problem being that you can’t just pull up a setting or patch. You also can’t revert back to a previous setting if something gets all messed up. 

Instead, you have to work backward in order to figure out where it went wrong. And if it’s analog, chances are that due to the “ghost in the machine” you won’t be able to get back to where you were. This results in endless hours of fruitless tinkering.

This also poses problems for live performance as well. I remember when I was performing at MUTEK with a modular setup. I was in the middle of soundcheck, jamming on my modular, getting lost in the frequencies. Then at the end of the check, I realized that I had to repatch everything back to where I wanted it for the beginning of the set. It was frustrating, to say the least. On a computer, I could have just reloaded the project. 

If you’re allergic to the mouse and sceen, perhaps hardware might be closer to your needs but it doesn’t mean it will be easier.

It’s DAWless

What is an MPC, Octotrak, Deluge if not a Digital Audio Workstation? They are digital, process audio, and they are a workshop. If anything, you are just substituting an intuitive interface that looks like a laptop, for a complicated interface that looks like a box with buttons on it (wait, isn’t that what a laptop is; just a box with buttons?). 

If you can’t stand the aesthetic of a laptop and want something sleeker, then that is your right as a creative. Just know, it’s way harder to drop a drum sample into an MPC than Ableton assisted by a Push or Maschine. If you hate the look of a laptop on stage, disguise it in a case.


How To Get The Most Out Of Your Hardware

Learn One Piece At A Time

People will often buy a lot of gear all at once without understanding their needs. Unless you are copying someone’s setup exactly from a YouTube video, and want their exact same sound, chances are people want their own thing to fit their artistic vision. 

So people will often be like ok, I need a synth, a drum machine, a set of effects, and a “brain” that I can route this all into. Then they set this all up, and realize that they are totally overwhelmed and have no idea how to use it, because there is no blueprint for it.

That’s why I recommend starting out with one piece of gear and getting really good at it. Once you know how it plays, then you can start thinking about the next part of the chain. 

So, let’s say you start with an analog synth. First, you must understand where all the filters are, and what they do. Understand how the oscillators sound, and how you can route them. Then you can consider your next addition.

So if you got a synth, the next thing you’re probably going to want is a way to sequence it. That is often a drum machine with a VC gate that can signal the synth to play (or not play) certain parameters. I recommend Beatstep Pro (Arturia) or Pioneer DJ Toraiz Squid. Of course, there are many you could add but those 2 are very versatile and fast to learn.

Once you figure that out, maybe you want an effect in order to get some more character out of the synth. Make sure that the effects that you buy are exactly what you want by testing it on the sequenced synthesizer. If they don’t create exactly what you want, then get new ones. No need to move on until you figure this out. 

By moving on too soon, you may just get tangled in your new setup, and not realize how to use it. Now you’re $5,000 deep into a headache, and not any more or less creative.

However, if you understand your pieces inside and out before expanding the chain, then you will run into fewer obstacles.

Record Everything

Remember, often with analog hardware, what you made will only exist at that moment. You may never be able to record that again. Therefore, make sure that you have plenty of space on whatever device you are recording onto because you should be recording nearly everything.

This works especially well if your creative process is to create a bunch of loops, and then assemble your loops into a song.

Truth be told, hardware doesn’t require endless MIDI mappings, and clicking, and is more instrumental, in a lot of ways. The knobs are properly dialed in with the circuits, and the keys are weighted to interact with the synth in ways that a standard MIDI controller may not be. Therefore, the loops that you create may very well be more interesting than anything you could have made with a soft-synth. 

Make Sure Your Recording Is Clean

Like I mentioned before, you need a good audio interface. I recommend Focusrite Scarlett or SSL2. These record at a high sample rate, and will capture the purest representation of what’s outputting from your setup. 

Also, you have to record it properly. Therefore, the signal has to come as close as possible to 0dB because the noise floor will always be the same on hardware. So if you’re recording at -6dB as you would with digital instruments, when your hardware recording is loaded into your “brain”, it will not seem loud enough in many cases. 

That’s because -6dB in the physical world is quiet. So, naturally, you will turn it up. However, when you turn it up you add 6dB of noise to the recording. Maybe you want this noise, but it won’t be accurate to the fidelity of your original recording. Therefore, always make sure that when recording, that it is as close to 0DB as possible.  

Realize You Will Be A Noob, Again

Just because you were a proficient Ableton user, doesn’t mean you will be a proficient hardware user. You will have to pick up the user manual again and start watching copious YouTube videos in order to get back up to speed. 

Your first stuff will probably sound terrible. This may be discouraging, but this is the reality you will have to accept. Just because you made electronic music “in the box”, doesn’t mean you will be able to “out of the box”

another photo of an Ableton-hardware hybrid setup

How To Get The Most Out Of An ABleton-Hardware Hybrid Setup


For the sake of this article, we’re going to assume you’re proficient with your DAW. In this article, we’ll use Ableton as our primary example. 

Play To Each Other’s Strengths

The goal with a hybrid setup is to buy what the computer can’t give you, and/or compliment what you’re doing on the computer with hardware. 

As you know, the process in Ableton is pretty intuitive, and not destructive in nature. If you screw something up, you can always undo, or revert to a previous version of the project.

It’s also way easier to visualize a song’s arrangement on Ableton than it is on an MPC. 

However, perhaps you like the playability of the MPC. Well, there is a solution to that – it’s called Ableton Push. I use it for basically everything; it’s amazing. It adds that tactile instrumentation that’s missing when dealing with a mouse. Additionally, all its MIDI mappings are designed to be standardized and intuitive with Ableton. 

Use Ableton As A Band Member

A good way to use Ableton in conjunction with your hardware is to use it as a session musician/band member. Write out a basic structure of a song on Ableton, MIDI clock it with your hardware, and then route your hardware into channels, and start jamming. Inside Ableton you can also create some complex effects chains that can modulate the hardware in unexpected ways, giving you something entirely fresh.

Use Ableton To Preserve Sounds

Another way you can use Ableton to compliment your hardware in an Ableton-hardware hybrid setup is to be able to have multiple versions of the same project that contains all the hardware loops that you recorded. Since Ableton’s environment isn’t destructive to waveforms like something like the MPC would be due to its limited hard drive space, you can modify the waveforms, without having to have multiple large files. Instead, you just have individual projects for different versions of the recording. 

Split Your Time Into Technical And Creative Sessions

This kind of works whether you are pure hardware, or using an Ableton-hardware hybrid setup. The fact remains, whenever you are integrating analog gear, there will be a setup process. You can’t just load settings. So you have to get all your patches set up, your effects set up and properly bypassed, your sequencer running, and your patterns in order. You then have to make sure that everything is playing back close to 0dB to avoid the dreaded noise. 

This will consume a good amount of brainpower. 

Therefore, once this is all ready, make sure to take a break. Go drink a beer, meditate, exercise, or do whatever you do to reset your mind.

Then come back and start jamming and being creative with your Ableton-hardware hybrid setup.

MIDI Controllers Are Your Friend

MIDI mapping is really easy on Ableton. Sure, it takes a little bit of time to set up, but it’s often nothing compared to the amount of time you will be tweaking hardware to get a similar result. Therefore, get some MIDI faders and knobs to control some internal processes in Ableton. 

MIDI will create that tactile sensation that hardware provides. The Push is, once again, a great way of accomplishing this, since it’s intuitive with Ableton. However, some people don’t want to spend that much money on a MIDI controller. In that case, there are dozens of great controllers out there that allow you to essentially create your own instruments on the fly.

Some suggestions: AKAI midimix, Novation Launch Control

These mappings will also affect your hardware as well, since you can map them to different internal faders that change the sound of the hardware, such as channel volume, or surgical EQ parameters. 


Ultimately, do what works best for your creative process. These are just my recommendations from my experiences using both exclusively, and then integrating the two. Just remember, there is a learning curve with everything, and things that were true for one, will not be for the other. There is no magic bullet when it comes to making music. Hardware won’t make you amazing, software won’t make you amazing. Only talent and dedication will.

Some links contain affiliate offers.