Favorite Equalizer For Electronic Music

People often ask me what my favorite equalizer for electronic music is, and my answer is that it depends on what their goal is, as well as their skill level. However, the EQs that I like for electronic music generally fit a certain set of criteria. Not every equalizer in this article fits all of the criteria, but here is a not-so-exhaustive list of things that I like to see when I’m purchasing a new EQ.

Keep in mind that all EQ’s are at their core, just filters, but some go above and beyond this. Equalizer settings for electronic music vary based on the timbres and styles, but each one of these will work universally for electronic music.


Criteria

  1. They have previews of the band that you can solo (you can press the button and hear the band on its own). This allows you to hear things more specifically.
  2. The plugin needs to be able to do oversampling.
  3. The plugin needs to be able solo the filter (EQ band).
  4. The EQ needs to have a mid and side mode, aka M/S mode.
  5. The EQ can switch from digital approach to analog. A digital EQ is very clean, and an analog is a little bit more organic and less precise.
  6. The EQ can be dynamic
  7. While all don’t have this feature, it’s nice if an EQ has a piano roll, so you can see how frequencies quantize to notes (this is a good way of seeing if a note will fit inside the track).


Fabfilter Pro-Q 3

A picture of one of the best equalizers for electronic music, in my opinion, the Fabfilter Pro Q 3

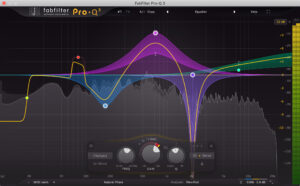
First on the list is the Fabfilter ProQ 3 – an affordable, easy-to-use EQ that hits most of the points I look for in an equalizer. It’s versatile, as in it can be used in both mastering and mixing. On top of state-of-the-art linear phase operation and the ability to get zero latency readouts on your EQ, you get natural phase modes, mid/side processing, and a bunch of other intuitive options.


A Neat Pro-Q 3 Trick


One of my favorite features is that if you have the ProQ 3 on multiple channels or busses, it can communicate with the ProQ 3’s on the other ones and let you know if there are conflicts in frequences.

Then, with the side processing (sidechain), you can easily duck precise frequencies, and you can even solo these frequencies to hear exactly how the sidechain is affecting the relationship between all the individual sounds. Or sometimes you don’t even need a sidechain, and you can just grab the curve and bring the conflicting frequency down.

Another neat trick with the Fabfilter ProQ 3 is that you can use it to split the stereo, and modify the same frequency at different amplitude levels on the stereo. So for instance, sometimes in a recording, you have a sound that mixes well on the right pan, and doesn’t quite mix perfectly on the left, but should be somewhat present on the left panning in order to fill out the stereo field.

With the ProQ 3, you can leave the level on the right channel as is, and on the left, alter the amplitude in order to fit the frequencies it’s conflicting with.

All of these reasons are why it’s a favorite equalizer for electronic music. It produces some of the best equalizer settings for bass, mids, and highs in all genres.


Wavefactory Trackspacer

A photo of Wavefactory's trackspacer, which allows you to have some of the best equalizer settings for electronic music without the hassle.

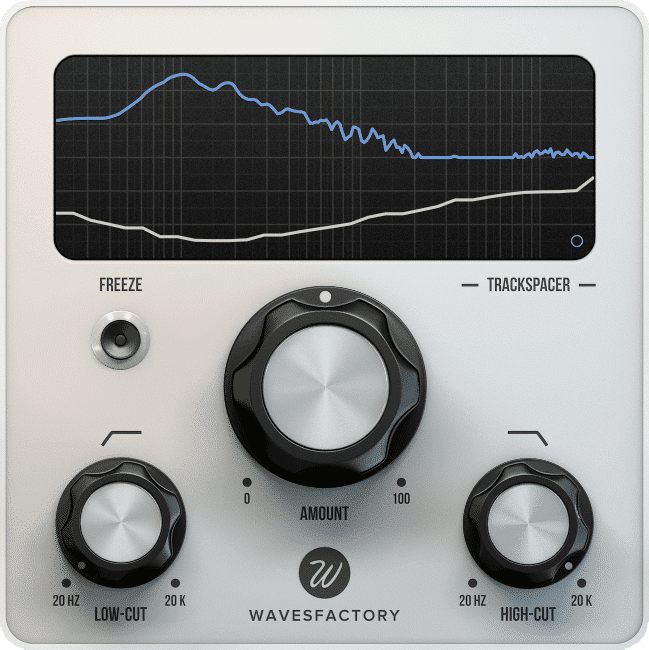
This one is not necessarily an EQ, but if you’re familiar with Wavefactory’s Trackspacer you can see why it would fit well within this list. Basically, it uses a mathematical formula in order to automatically figure out where conflicting frequencies are between two tracks and then it will apply precise side compression to the parts that are necessary to compress to get them to meld better.

You can even apply a low pass or a high pass filter to each end of the frequency spectrum to isolate what part of the sounds you want to compress. It’s ridiculously easy to use.


HornetVST Total EQ

a photo of HornetVST's Total EQ. It's one of my favorite equalizers for electronic music.

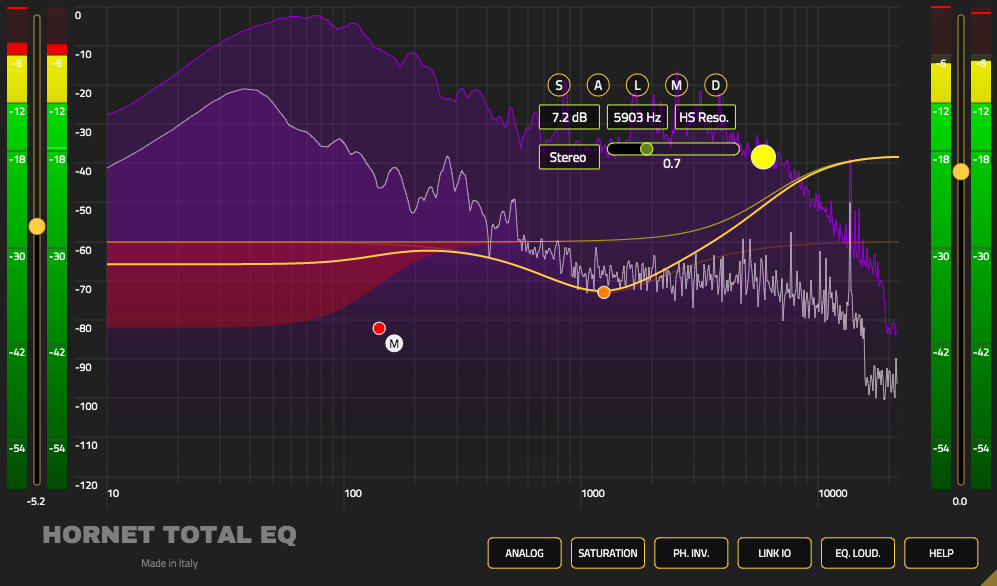
Not everyone has the money to invest in VSTs. However, HornetVST makes VSTs that are ridiculously cheap, and they often do sales, so you can get decent plugins for 5 bucks. 

The HornetVST Total EQ is similar to ProQ 3, sounds really good, and is easy to work with. Personally, I believe it’s better than Ableton stock EQ’s because you have a team working specifically on developing the best equalizer for electronic music (or all music at that matter).

While it doesn’t have all the gizmos and detail goodies that the ProQ 3 has, it’s still really good. For instance, it has 12 bands, a real-time spectrum analyzer, a whopping 17 different kinds of filters for each band, individual analog response and emulation for each band, band soloing (like in the ProQ 3), mono/stereo for each band, and a bunch more features.


Melda Productions – MAutoEQ

Image of one of my favorite equalizers for electronic music - the Melda Productions - MAuto EQ

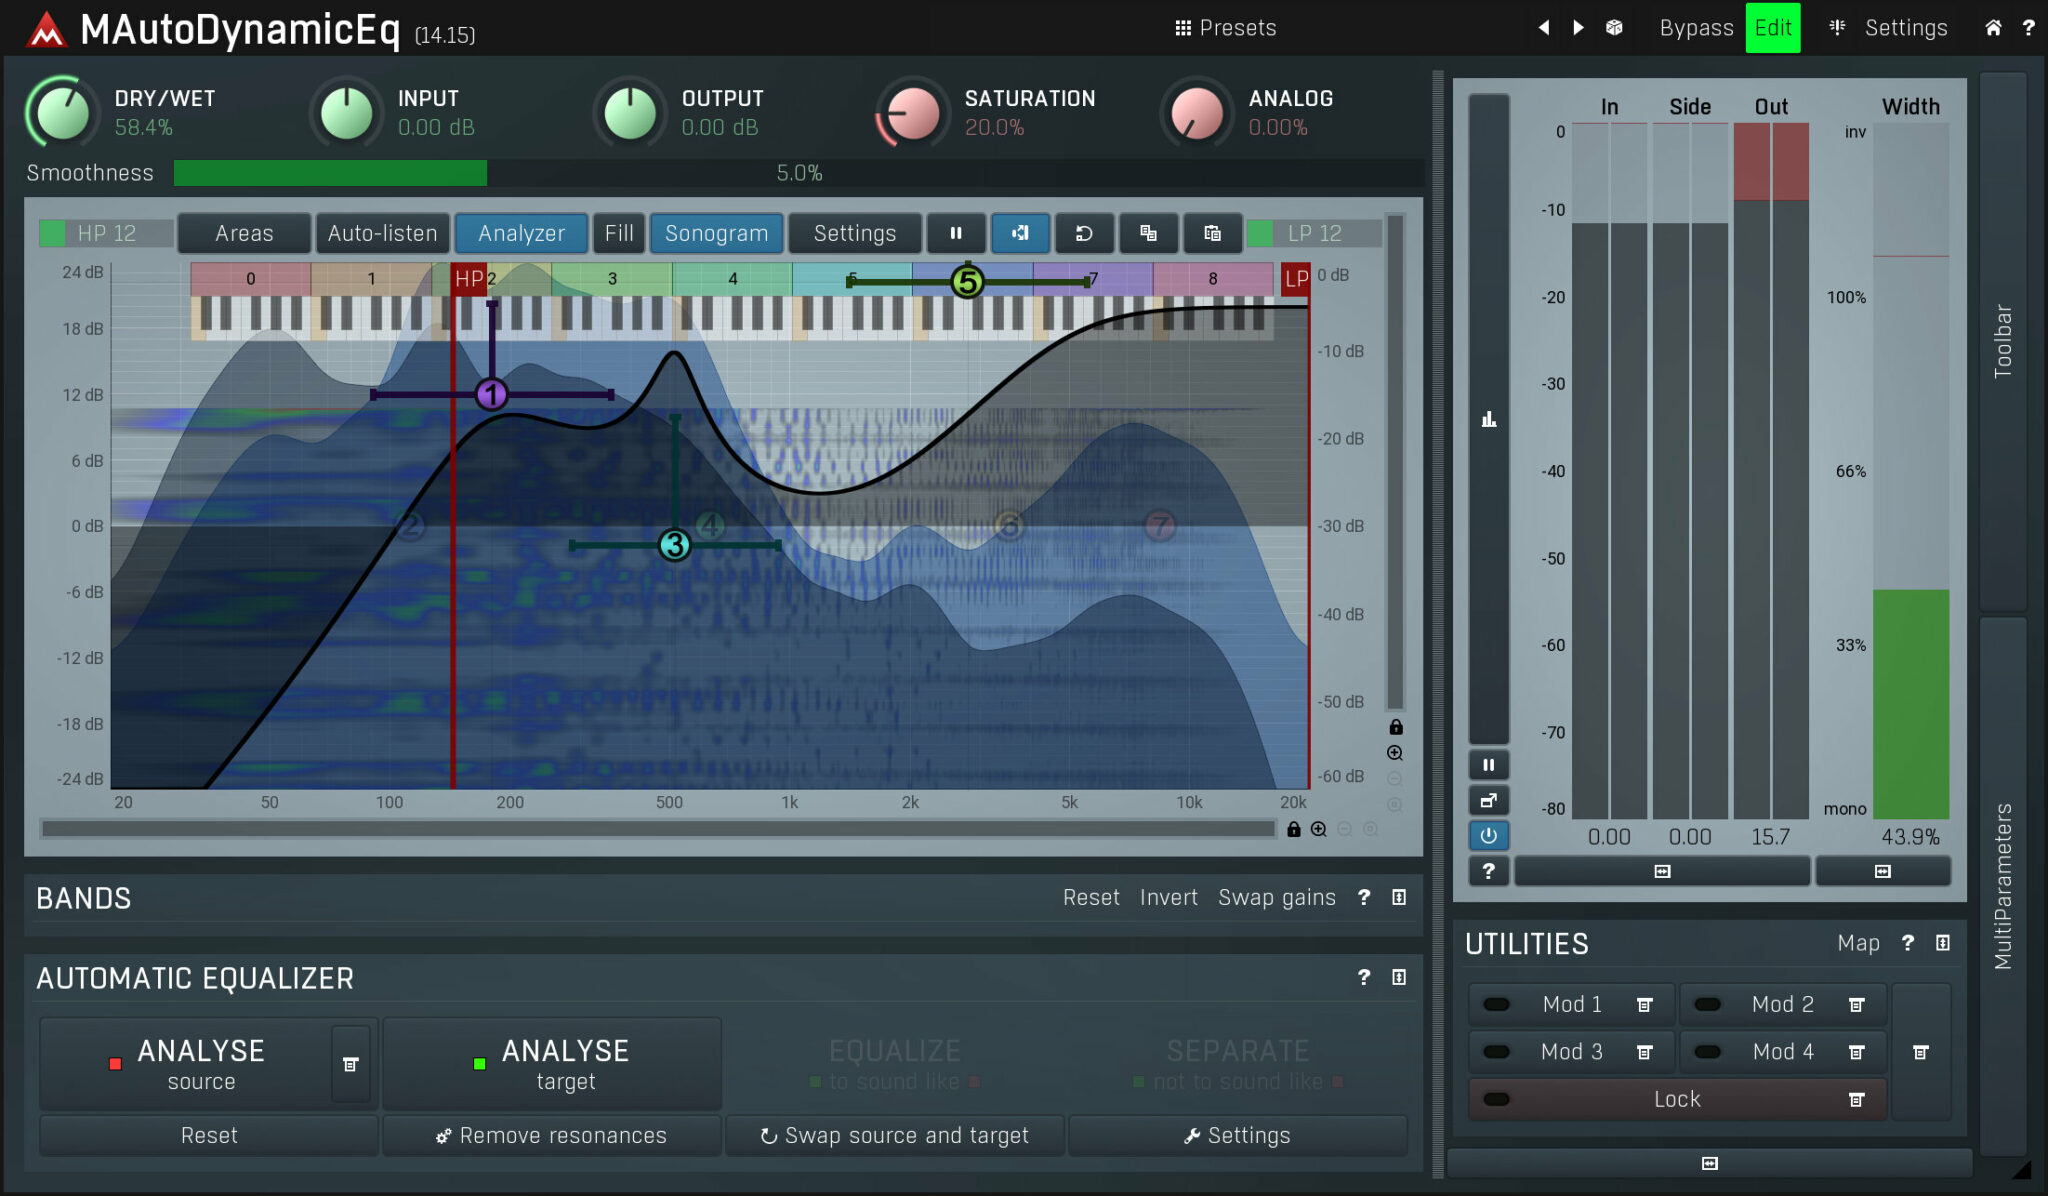
The thing that makes this EQ special is the MeldaProduction Filter Adaption (MFA) technology which uses a formula to analyze your recording and make suggestions based on your recording, another recording, or even a spectrum that you can “draw” inside the interface. It’s kind of the Photoshop of EQs, in a way. It can also be used extensively for mixing and mastering.

MAutoEqualizer can place a track into a mix using the spectral separation feature, where you can, like in Photoshop, pencil your preferred frequency response. MAutoEqualizer’s technology will search for the best settings and alter the parametric equalizer bands to fit the best form.

With a normal equalizer, you are listening to the spectrum and then increasing or decreasing the amplitude of the band to fit what you believe is the correct level, which can be a chore. With MAutoEqualizer it gives your ears a little bit of a break by setting things to levels based on its algorithmic predeterminations. 

Also, if you are allergic to resonance in your sound then this EQ is for you. One of the things it does best is listen to the incoming signal, where it then finds resonances that it can apply filtering suggestions to. Then with the wet/dry knob, you can determine how much resonance you want in the areas it pointed out. It’s really simple, and a favorite equalizer for electronic music.


Brainworks’ BX3

A photo of the Brainworks’ BX3, which produces some of the best equalizer settings for electronic music.

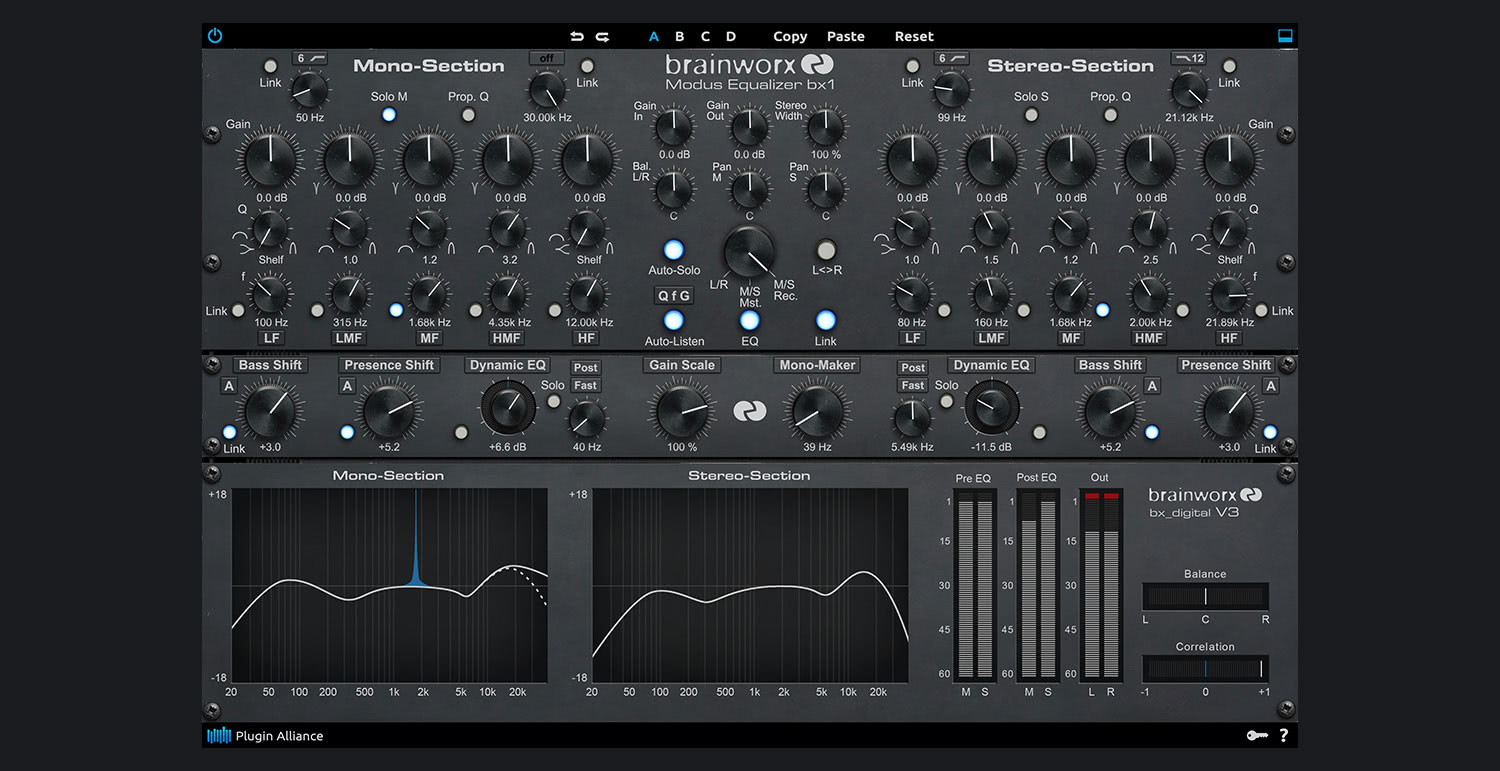
A mastering and mixing EQ I recommend is BX3 by Brainworks. It’s an extremely powerful, surgical EQ that I use extensively. It can make space, clean, and can really polish things up. This EQ is not meant for adding color or character to mixes, but rather making sure that everything sounds as clear and crisp as possible. It’s a bit difficult to use if you’re not super familiar with mixing and mastering, but it’s extremely powerful, making it a favorite equalizer for electronic music.

This EQ’s Auto Listen feature automatically solos each band’s Gain and Q (resonance) controls based on their respective settings while doing the same with the channel’s Frequency controller. By setting Gain, Q, and Frequency on an individual channel (L or R), Auto Solo switches the monitoring to that channel.

Your tweaks are illustrated with separate frequency-response graphs for each channel. With this feature, you may notice that your adjustments will become more visible and audible than ever before since it allows for some of the best equalizer settings for electronic music.


Brainworks’ AMEK200

photo of one of my favorite analog emulated EQ's for music, the Brainworks’ AMEK200.

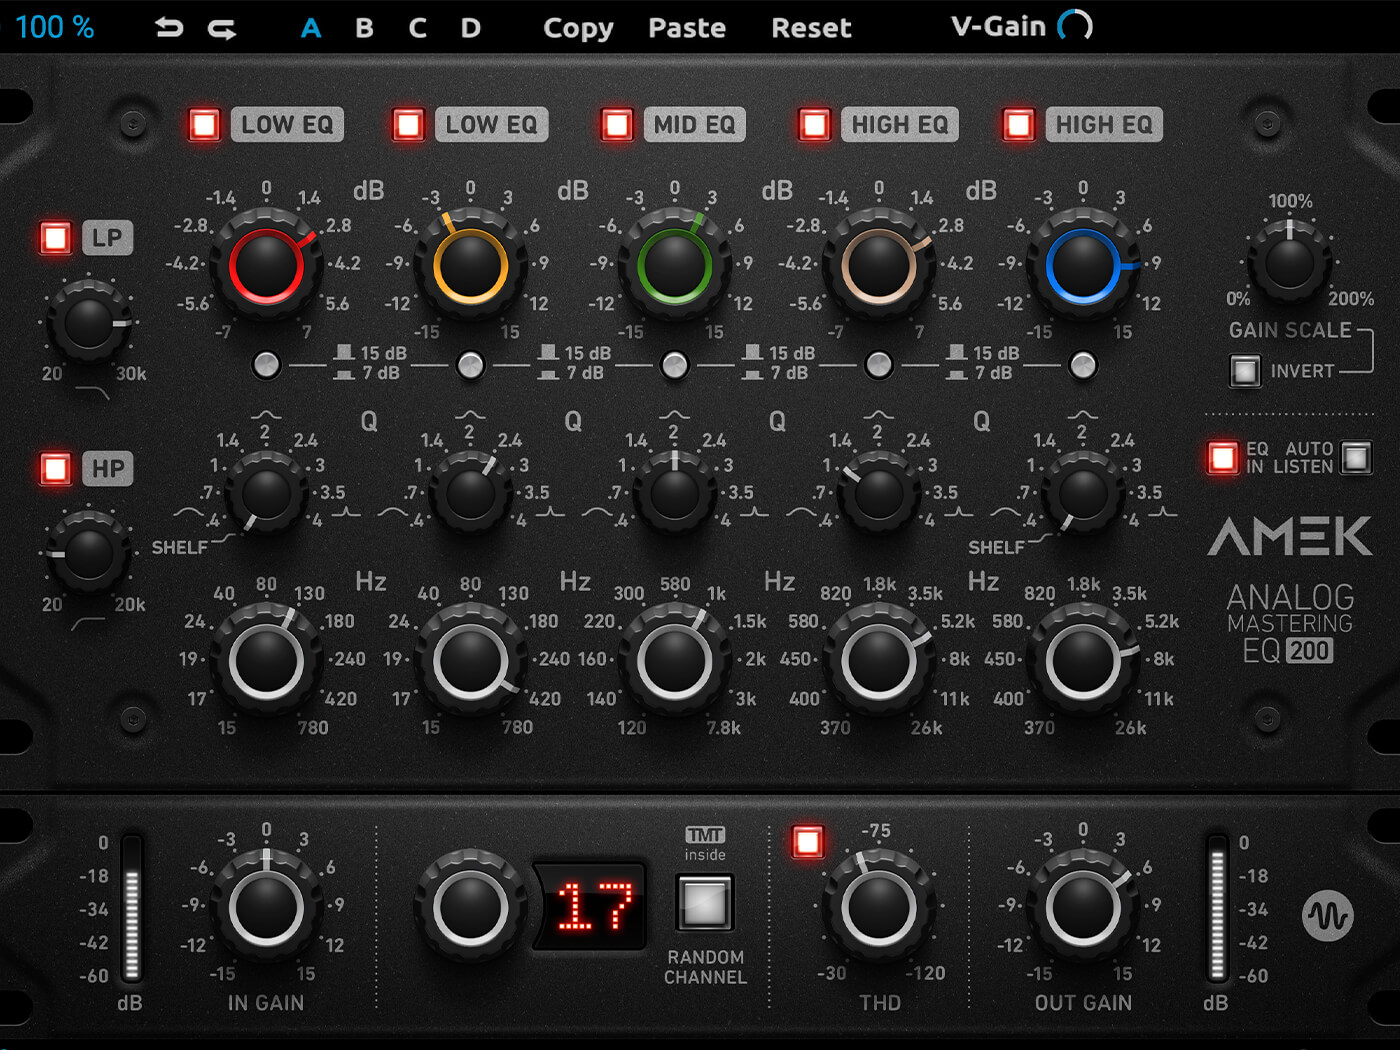
My favorite analog emulation EQ is AMEK200 by Brainworks. This is modeled after classic 70’s and 80’s mastering EQ’s, such as the GML 8200 and vintage SONTEC vintage EQs, but with some plugin specific upgrades, such as Auto-Listen features, variable high-pass and low-pass filters, and M/S processing.

All of these features result in a very transparent mix that does a really beautiful finishing. Note that the AMEK200 has no spectral readout, just knobs you twist, which is good for learning how to trust your ears.


So, which one is my favorite equalizer for electronic music?

There is no specific one. All of these plugins will allow for the best equalizer settings for music, whether that’s minimal house, techno, jazz, rock, hip-hop or k-pop. They all allow for the best equalizer settings for rolling bass, or entrancing mids, it just depends on your experience level, and your desire to learn and experiment.

This article contains affiliate links which I may make a commission off of.

Ableton-Hardware Hybrid Setup

Producers often get comfortable in the computer and feel they are not getting enough, so they decide to invest in hardware.

Once you get good at something, it’s only natural to want to upgrade to the next level. You may get that feeling that you aren’t getting enough out of it, or that the medium is limiting in some way. With my students, often this feeling means leaping from a DAW like Abelton to a hardware-based setup. 

They often think that by doing so, they’re going to unlock a richer sound, and a more intuitive, instrumental interface. They believe they will be liberated, able to just jam out compositions without having to rely on an “unnatural” mouse click or MIDI mapping inside a DAW. 

The truth is that once they make this leap, and ditch Ableton for an Electron Octatrak, and a modular, they often find themselves being even more limited by the foreign user interface and the fact that modular doesn’t have an “undo” button, or patch saves.

That’s why I always recommend that they use an Ableton-hardware hybrid setup that incorporates the best of both worlds, where the tactile, plug and play nature of hardware meets the convenience of being able to easily save, and revert back to settings on the computer. 

Over the years, I think I have a pretty rounded philosophy of how to tackle this integration, which I would like to share with you in this post.

However, let’s talk about hardware first, so that you can understand its strengths and weaknesses. 

A photo of a simple example of an Ableton-hardware hybrid setup.


Myths About Hardware

It automatically Sounds Better

Just because something is hardware, doesn’t mean that it’s going to mythically sound better. In some cases, analog summing can fix some issues and enhance certain things but it can also be sounding different than digital and since our ears are used to the digital realm, it might be misleading. It’s not 2005 anymore; virtual instruments have grown leaps and bounds over the years. Even to a trained ear, it’s hard to tell the difference between an emulated TB303 and the Roland Cloud version. Analog does have charm and specific texture but it’s different than digital. Some people get confused once in front of certain pieces of gear.

However, there are things that happen with the sound in hardware that is difficult to emulate in software. For instance, the “ghost in the sound’ – that almost invisible hand that creates random, happy accidents due to the fact that you are working with pure electrical current, rather than a binary representation of it. 

This “hand” often results in sounds that are impossible to replicate, existing for only as long as they project from the speakers. To me, this is the magic of hardware – that unpredictability that exists for a fleeting moment, until it’s gone, never to be heard again, unless you capture it. 

In other words, analog has a sound that digital doesn’t have and that’s an aesthetic that pleases many people. Believe it or not, some people really do prefer the digital sound, mostly because our ears have got used to it.

However, what is this capability worth, if you can’t capture it properly? That’s why it’s imperative when buying hardware that you also buy a solid audio interface to be able to record the sound at the highest fidelity. Because at the end of the day, your hardware will only sound as good as the weakest part of the chain.

It’s More Intuitive

This is another fallacy. If anything, analog hardware can create a new set of problems, with the main problem being that you can’t just pull up a setting or patch. You also can’t revert back to a previous setting if something gets all messed up. 

Instead, you have to work backward in order to figure out where it went wrong. And if it’s analog, chances are that due to the “ghost in the machine” you won’t be able to get back to where you were. This results in endless hours of fruitless tinkering.

This also poses problems for live performance as well. I remember when I was performing at MUTEK with a modular setup. I was in the middle of soundcheck, jamming on my modular, getting lost in the frequencies. Then at the end of the check, I realized that I had to repatch everything back to where I wanted it for the beginning of the set. It was frustrating, to say the least. On a computer, I could have just reloaded the project. 

If you’re allergic to the mouse and sceen, perhaps hardware might be closer to your needs but it doesn’t mean it will be easier.

It’s DAWless

What is an MPC, Octotrak, Deluge if not a Digital Audio Workstation? They are digital, process audio, and they are a workshop. If anything, you are just substituting an intuitive interface that looks like a laptop, for a complicated interface that looks like a box with buttons on it (wait, isn’t that what a laptop is; just a box with buttons?). 

If you can’t stand the aesthetic of a laptop and want something sleeker, then that is your right as a creative. Just know, it’s way harder to drop a drum sample into an MPC than Ableton assisted by a Push or Maschine. If you hate the look of a laptop on stage, disguise it in a case.


How To Get The Most Out Of Your Hardware

Learn One Piece At A Time

People will often buy a lot of gear all at once without understanding their needs. Unless you are copying someone’s setup exactly from a YouTube video, and want their exact same sound, chances are people want their own thing to fit their artistic vision. 

So people will often be like ok, I need a synth, a drum machine, a set of effects, and a “brain” that I can route this all into. Then they set this all up, and realize that they are totally overwhelmed and have no idea how to use it, because there is no blueprint for it.

That’s why I recommend starting out with one piece of gear and getting really good at it. Once you know how it plays, then you can start thinking about the next part of the chain. 

So, let’s say you start with an analog synth. First, you must understand where all the filters are, and what they do. Understand how the oscillators sound, and how you can route them. Then you can consider your next addition.

So if you got a synth, the next thing you’re probably going to want is a way to sequence it. That is often a drum machine with a VC gate that can signal the synth to play (or not play) certain parameters. I recommend Beatstep Pro (Arturia) or Pioneer DJ Toraiz Squid. Of course, there are many you could add but those 2 are very versatile and fast to learn.

Once you figure that out, maybe you want an effect in order to get some more character out of the synth. Make sure that the effects that you buy are exactly what you want by testing it on the sequenced synthesizer. If they don’t create exactly what you want, then get new ones. No need to move on until you figure this out. 

By moving on too soon, you may just get tangled in your new setup, and not realize how to use it. Now you’re $5,000 deep into a headache, and not any more or less creative.

However, if you understand your pieces inside and out before expanding the chain, then you will run into fewer obstacles.

Record Everything

Remember, often with analog hardware, what you made will only exist at that moment. You may never be able to record that again. Therefore, make sure that you have plenty of space on whatever device you are recording onto because you should be recording nearly everything.

This works especially well if your creative process is to create a bunch of loops, and then assemble your loops into a song.

Truth be told, hardware doesn’t require endless MIDI mappings, and clicking, and is more instrumental, in a lot of ways. The knobs are properly dialed in with the circuits, and the keys are weighted to interact with the synth in ways that a standard MIDI controller may not be. Therefore, the loops that you create may very well be more interesting than anything you could have made with a soft-synth. 

Make Sure Your Recording Is Clean

Like I mentioned before, you need a good audio interface. I recommend Focusrite Scarlett or SSL2. These record at a high sample rate, and will capture the purest representation of what’s outputting from your setup. 

Also, you have to record it properly. Therefore, the signal has to come as close as possible to 0dB because the noise floor will always be the same on hardware. So if you’re recording at -6dB as you would with digital instruments, when your hardware recording is loaded into your “brain”, it will not seem loud enough in many cases. 

That’s because -6dB in the physical world is quiet. So, naturally, you will turn it up. However, when you turn it up you add 6dB of noise to the recording. Maybe you want this noise, but it won’t be accurate to the fidelity of your original recording. Therefore, always make sure that when recording, that it is as close to 0DB as possible.  

Realize You Will Be A Noob, Again

Just because you were a proficient Ableton user, doesn’t mean you will be a proficient hardware user. You will have to pick up the user manual again and start watching copious YouTube videos in order to get back up to speed. 

Your first stuff will probably sound terrible. This may be discouraging, but this is the reality you will have to accept. Just because you made electronic music “in the box”, doesn’t mean you will be able to “out of the box”

another photo of an Ableton-hardware hybrid setup

How To Get The Most Out Of An ABleton-Hardware Hybrid Setup


For the sake of this article, we’re going to assume you’re proficient with your DAW. In this article, we’ll use Ableton as our primary example. 

Play To Each Other’s Strengths

The goal with a hybrid setup is to buy what the computer can’t give you, and/or compliment what you’re doing on the computer with hardware. 

As you know, the process in Ableton is pretty intuitive, and not destructive in nature. If you screw something up, you can always undo, or revert to a previous version of the project.

It’s also way easier to visualize a song’s arrangement on Ableton than it is on an MPC. 

However, perhaps you like the playability of the MPC. Well, there is a solution to that – it’s called Ableton Push. I use it for basically everything; it’s amazing. It adds that tactile instrumentation that’s missing when dealing with a mouse. Additionally, all its MIDI mappings are designed to be standardized and intuitive with Ableton. 

Use Ableton As A Band Member

A good way to use Ableton in conjunction with your hardware is to use it as a session musician/band member. Write out a basic structure of a song on Ableton, MIDI clock it with your hardware, and then route your hardware into channels, and start jamming. Inside Ableton you can also create some complex effects chains that can modulate the hardware in unexpected ways, giving you something entirely fresh.

Use Ableton To Preserve Sounds

Another way you can use Ableton to compliment your hardware in an Ableton-hardware hybrid setup is to be able to have multiple versions of the same project that contains all the hardware loops that you recorded. Since Ableton’s environment isn’t destructive to waveforms like something like the MPC would be due to its limited hard drive space, you can modify the waveforms, without having to have multiple large files. Instead, you just have individual projects for different versions of the recording. 

Split Your Time Into Technical And Creative Sessions

This kind of works whether you are pure hardware, or using an Ableton-hardware hybrid setup. The fact remains, whenever you are integrating analog gear, there will be a setup process. You can’t just load settings. So you have to get all your patches set up, your effects set up and properly bypassed, your sequencer running, and your patterns in order. You then have to make sure that everything is playing back close to 0dB to avoid the dreaded noise. 

This will consume a good amount of brainpower. 

Therefore, once this is all ready, make sure to take a break. Go drink a beer, meditate, exercise, or do whatever you do to reset your mind.

Then come back and start jamming and being creative with your Ableton-hardware hybrid setup.

MIDI Controllers Are Your Friend

MIDI mapping is really easy on Ableton. Sure, it takes a little bit of time to set up, but it’s often nothing compared to the amount of time you will be tweaking hardware to get a similar result. Therefore, get some MIDI faders and knobs to control some internal processes in Ableton. 

MIDI will create that tactile sensation that hardware provides. The Push is, once again, a great way of accomplishing this, since it’s intuitive with Ableton. However, some people don’t want to spend that much money on a MIDI controller. In that case, there are dozens of great controllers out there that allow you to essentially create your own instruments on the fly.

Some suggestions: AKAI midimix, Novation Launch Control

These mappings will also affect your hardware as well, since you can map them to different internal faders that change the sound of the hardware, such as channel volume, or surgical EQ parameters. 


Ultimately, do what works best for your creative process. These are just my recommendations from my experiences using both exclusively, and then integrating the two. Just remember, there is a learning curve with everything, and things that were true for one, will not be for the other. There is no magic bullet when it comes to making music. Hardware won’t make you amazing, software won’t make you amazing. Only talent and dedication will.

Some links contain affiliate offers.

My Music Production Tips and Tools for 2020

As 2019 comes to an end, I’d like to discuss some of the most important things that went on, things I’ve talked about the most, plugins I loved, topics discussed in coaching, and so on.

Productivity and Writer’s Block

I was pretty busy in the first half of the year. I released my 22nd album and two EPs. While these achievements look great on paper, I can tell you that it was probably one of my least productive years of the last decade. I had a writer’s block (on-and-off) since May, and was unable to really finish a song, so I mainly focused on working on collaborations or engineering. Being hit by writer’s block at this point of my life was unusual, but reminds me that no one is really immune to it.

Signs of Writer’s Block:

  • Everything you do feels or sounds like crap or is uninspiring.
  • Other people’s music is not really hitting the spot either or feels old.
  • Being unable to make music for more than 20-30 minutes. A feeling of discouragement comes in really fast.
  • Mostly unable to turn a loop into a song.

If you’ve been making music for more than ten years, the signs are slightly different:

  • Feeling like you’re repeating yourself over and over.
  • Not feeling satisfied with the techniques or gear you have.
  • Unable to finish music in general or not able to start.
  • Mostly struggling to polish existing songs.

My solutions to resolve writer’s block are not necessarily going to work for everyone, as there’s no cure-all. Everything passes at some point, but you can’t resolve writer’s block without going through it—you can’t get around it.

Suggestions for Resolving Writer’s Block

  • Completely change how you work by trying a new DAW.
  • Test tons of presets from your synths and learn how they’re programmed.
  • Learn about modular synthesis.
  • Try online sound banks such as Archive.org, freesound.org, or even YouTube’s obscure archives.

But more importantly, figure out what the block is in your writer’s block. Is it linked towards your expectations? In my case, it’s simply a question of finding the next concept to build an album upon. The way I discover concepts is by trying to reverse-engineer sound design. The quest to make something similar with the use of different tools to shape the sound is more important than the result itself. I see many people getting writer’s block from trying to identically replicate a sound they want and discarding other techniques.

The difficulty in replicating a technique comes from the “early beginnings of a new producer“, in which someone starts on the wrong foot. I’m always happy to have someone who wants to start producing come to me to make sure he/she will start off well.

How and Where to Start Producing

In 2019, new producers have infinite access to information and tools. Too much information means a few things:

  • Giving you the wrong first impression that everything is easy and doable.
  • Misleading you into investing into things sold as being essential, while they’re not.
  • Having so many choices makes the task of picking one overwhelming. If you have access to all the sounds you could ever dream of, where would you start?

Counter-Productive Tips New Producers are Often Told

  • If you work hard enough, you can learn anything.
  • You can learn and do everything yourself.
  • Not watching tutorials or reading articles is better than education because you learn as you go.
  • Make all your sounds by yourself so you can be original. Hello, down the rabbit hole.

I see people coming into production with the wrong intentions/goals. Of course, if you come with the idea that: a. things are easy and that b. you can learn everything yourself, people set unrealistic goals for themselves before they’ve ever created a loop.

In the last five years, I have been frequently reminded of a client who once came to me with an artist page on Soundcloud and Facebook with thousands of followers, a logo, professional photos, etc., but not a single minute of experience in music production. He had to make some music that could match the image he had been selling, and the first step felt huge.

The other side to early production is the artist who finishes a first song quickly and gets signed. With no experience, keeping up the pace of releasing is difficult, and the quick rise can be a situation that might be difficult to handle.

My Suggestions for People Who Want to Start Producing

  • Listen to a lot of music when you have the time, and attend shows. This is super important for multiple reasons: you’ll learn the relationship between what you hear on your headphones vs. a venue. This is important to develop your mixing skills—learning how people react to sounds and how artists perform music in a live context. This is valuable information for music-making.
  • Try to befriend people who make music as well, a mix of newcomers and older producers. This is super important for building a network of contacts to ask questions, swap music with, share gear, get a bunch of info that you can’t find yourself, and also to break-up periods of isolation.
  • Ask as many questions as you have. No shame, just ask. Ask a lot of how do you do this or that? What is the name of that sound? What effect can create that impression?
  • Have studio jams. This is the best way to learn. You’ll learn so much because you’ll run into so many problems that you’ll have to troubleshoot them, and that’s useful. Jamming also puts music-making into a context that is impossible to replicate—alone in a studio.
  • Try to make loops everyday. You can make them all into one project file or start a new one each time. It’s important to make many because it’s good to first practice how to start making a loop. If you make a lot, you’ll get more efficient, develop tricks, and get faster at finding your way through a new tool.
  • It’s more efficient to do 10-20 minutes everyday than a five-hour session on a weekend. The optimal focus time for your brain is around 30 minutes, so you get the best of yourself. Working for five hours isn’t recommended at all: you’ll feel like you did a lot but after that time, your ears can’t really judge what you’re doing. You can do five hours in a day, but on multiple tracks. I just feel that it’s not the best of yourself that will come out of long sessions on a single project, but you’ll learn.
  • When you can start a loop in 10 minutes and feel great about it, then you’ve leveled up and you can now go back to all the loops you made and practice turning them into a song. Next level comes when you can finish them in a breeze.
  • One song, one idea. If you make a decent loop, it’s probably the middle part of your song. How many layers do you have? What is the main idea? Can you, or a friend, sing that idea?
  • Don’t make a big deal about not finishing songs. It will come naturally if you take things one step at a time.
  • Forget releasing your music or getting signed by a label. If you focus on that, you’re just distracted from doing what you have to do which is to have skills to make music like you want.

Common Issues Other Than Writer’s Block

People often share other struggles in music-making with me like:

  1. A loop or idea feels boring or repetitive at some point in the song. First, don’t reveal your main idea too quickly. Second, create multiple variations of that loop (ex. changing the timing or adding effects). Third, add modulation to the sounds so they’re constantly changing.
  2. A song feels like something is missing. This might be because you’ve heard it too many times. Try leaving it alone for a month. Otherwise, here’s the a quick checklist: percussion, bass, pattern or melody, background, and a supporting idea. If you have all those, you should be more than okay. Otherwise, try to compare your song to a reference, concentrate on all sounds and see if you have about the same number.
  3. A track feels empty compared to references. Often resolved by creating a noise-floor. Try a reverb or a hiss at low level.
  4. Sounds never feel right. You might have bad samples. If you are convinced you should do everything yourself, you’ll indeed sound off, for a while. Try buying and using pre-made sounds. If you can’t make them, find some, and learn how to make killer loops and songs. As you go, you’ll eventually train your ear on how these sounds are made and will be able to make them. Honestly, even after 20 years, there are plenty of sounds I’m slightly not sure how to make even though I know, in theory, how to… it’s harder than it seems!
  5. Creating original ideas and not cheesy ones. If you listen to a lot of music, this will train your ear. If you listen to a lot of music before making music, it will put you in a mood. If you use a reference track, or even try to compose music over it, it can greatly help with this issue.

Essential Music Production Tools From 2019

EQ

Even though it was released in 2018, Fabfilter’s Pro-Q3 has won many prizes this year and has gained prominence with many major engineers. I’ve been watching a lot of tutorials from Mixing With The Masters, and Pro-Q3 is often the EQ of choice. You can use multiple instances to see how each channels are interacting between one-another, do some side-chaining, corrections, and shelving. You can turn any points into a dynamic filter too, which is very useful. If you have the budget, try to get an analog inspired EQ such as the PSP E27. These types of EQs aren’t parametric and can add a musical colour.

Compression

The compressor I loved the most this year was the Avalon from Universal Audio. So badass, so powerful, so useful…no need to say more. If you don’t have a UAD, I always turn to PSP Vintagewarmer 2. Not only does it compress well, it adds warmth—people want both.

The Do-It-All Utility of the Year

No doubts, it comes to Shaperbox 2. It is perfect for resolving many, many issues like modulation, side-chaining, movement, variations, creative ideas on the fly…it’s so good that I blindly bought it when I received it in my newsletter from CurveGuys.

Reverb

If there’s one effect to have on top of your stock plugins is a good reverb. There are many out there such as this gorgeous reverb by Fabfilter but I suggest the Convolution by Melda—it’s fantastic and will be useful for years.

Quote of the Year

We make music to come together, and yet spend so much time alone. Reach out to others, create new concepts and see how viewing music as something fun will build things organically.

SEE ALSO : Design Thinking for Music Production

The best EQ plugins and various EQ’ing tips (Pt. II)

In my previous post regarding the best EQ plugins, I covered some of my favorite EQs and some of their uses. After receiving many compliments about that post, I’ve decided to continue with a part two. In the following post, I’ll share a few tricks with you that you can easily do yourself when facing certain mixing situations, and I’ll also briefly outline compression.

Filters

In case you didn’t already know, EQs are filters; really complex mathematics which each developer has coded in more or less slightly different formulas. This explains why some EQs are really expensive: because of the time invested in perfecting the curves. Many people don’t realize it, but EQs do sound different from one another and you can tell once you have a high quality sound system.

“Most people don’t have a high quality system, so what’s the point…”, you say.

Well, if you use high quality tools, in the end, your regular sounds will be “upgraded” in quality too, which will eventually make a difference where ever you play them.

The number one tip for a better mix is to use filters; this alone can make dramatic improvements.

For instance, your kicks might sound muddy if you don’t remove the garbage frequencies that are below the fundamental note of it. If this sounds complicated, let me explain it in the most simple terms:

  1. Use your EQ and the first point on the left should be switched to filter, then low cut.
  2. The slope should be put to 24db/octave.
  3. Then roll it to 20hz to start with and then go up frequencies until you hear your kick losing power. If that happens, you’re now filtering too high and you have to roll back a bit.
  4. My general rule is to cut kicks at 20hz by default.

Now that tip was for kicks alone, but you should apply this idea to basically everything in your mix. However, besides the kick, I wouldn’t use a slope of 24db/octave on anything else unless there are big issues. It’s up to you to experiment but if you want to test something interesting, try 18 or 12 for cutting other sounds and you’ll see that this leaves less of a digital feel, giving your sounds clarity and warmth.

I’d also cut the highs where they’re not needed, but not too much either.

Percussion, melodies, and high pitched sounds such as hi-hats would benefit from a 6db/octave, high cut filter; this smooths things in a lovely way.

Some of my favorite filters for this kind of use are:

EVE-AT1 from Kuassa

SliceEQ by Kilohertz

PSP MasterQ2: Smooth!

Sharp cuts

Surgical, sharp and static cuts are very useful for a ringing resonance. Many people ask how to spot it these and how to know if it’s really something to cut or if the it’s something to do with the acoustic of the room. There’s no real way to know but to often cross validate with reference tracks.

So often, I get clients sending me a project in Ableton and I see really odd cuts. Is that bad?

Yes and no.

First off, if you use Ableton’s native EQ, switch it immediately to oversampling mode for better quality.

Second, cutting might change something in your environment but you’ll also permanently cut frequencies that might not be needed to change, which could also potentially induce phasing issues (i.e. during the entire length of the song).

*Note – do not use too many EQs in one chain because that will definitely cause phasing!

So, how do you spot one rogue frequency?

Sometimes I just use a spectrum meter to get hints if I can’t pinpoint where it is. Try to always use a spectrum meter on your master to have an overall indication of your mix. If you see some sounds that start to poke above 0dB, this *might* be a problem; not always, but it could. What you want to look for is one thin spike coming up out loud about +3-6dB. This might really be an issue.

My instinct would be to try to lower the volume of the sound itself if that’s possible. Sometimes it’s not and that’s when you use an EQ.

  1. Isolate the sound in the appropriate channel.
  2. Drop your EQ of choice (see below for suggestions).
  3. Pick an EQ point, set it to the frequency you spotted, then adjust the Q to 3-4. Cut 4dB to start with, but more if needed.
  4. On the EQ, there should be a output gain. If you have cut that frequency away, it might be great to just increase the gain by about the half of what you have cut away. Ideally I like to compress but we’ll get into that later.

TIP: Avoid sharp cuts in the low end. That can cause issues such as phasing, muddiness. If you really have to, make sure to use a mono-utility after.

I revealed some of my favorite EQ plugins in the first post in this series, but I’ll add some more:

Cambridge EQ by Universal Audio: Works amazing on synths and melodies.

AE600 by McDSP.

Voxengo CurveEQ: Solid on percussive content.

Valley cuts, boosts, and shelving

Many readings on the subject of EQ’ing only will recommend that if you need to boost, go moderate and try to have a very low Q to have an open curve. However, there are really no rules on what you should or shouldn’t do. Explore, fail, and be audacious, because sometimes great things come out of it.

My only red flag would be on those really complicated, several points EQ curves you can do in Fabfilter ProQ2. This sometimes induce weird resonances when you’ll bounce, which is no good for mastering unless you are OK with annoying people’s ears.

Also, think differently. If you’re going to use 3-5 points that are all boosting, then why not start by turning up the gain on your EQ’s output and cut down whatever you don’t want.

But if you boost, I like to have a Q below 1. It gives really interesting results!

  • For instance, try to boost 2-3db at 500hz to instantly give presence and body to a song.
  • Try it at 8khz to add a lush, bright presence to metallic percussion.
  • Boost at 1khz on your snare to make them pop out of your mix.

Experiment like this. At first it will appear subtle but with practice, great results will come.

My favorites of the moment:

Sie-Q by SoundToys for really doing beautiful shelving.

MEqualizer by MeldaProduction.


SEE ALSO :

Tips and recommendations for compression (Pt. 1)

Conversations with Clients: Luis Rivera

In Conversations with Clients, we bring you an honest and unfiltered look at Pheek’s services, straight from the mouths of those who know — and want you to know too! For this second piece in our series, I spoke with Luis Rivera (artist name LRb), a minimal techno producer based in Puebla, Mexico. 

♦   ♦   ♦

Hi Luis, thanks for taking the time to chat with us! To start off, why don’t you tell us how long you’ve been producing music for?

Well electronic music I’ve been producing in Ableton for 5 years now, but I started making songs with my sister when I was very young. I played the guitar and my sister sang and we used to record it on an old tape recorder my dad has. So I’ve been making songs and music all my life, but producing electronic music for 5 years.

Now tell me a bit about your projects. Do you have any releases yet or are you working on that?

No, actually I’m working with Pheek because we want to release an EP. That’s the idea behind me using his services, the song finalization and analog mastering services. There’s an app, a KORG app, and I started making songs with it, and I won a contest they had 4 years ago, which led to a release on a compilation of tracks. But I’m working right now on my first EP.

When did you realize that you wanted help with your EP?

Well the thing is, if you start making one kind of music, in my case it’s techno minimal, you tend to repeat the same things. Like in your workflow, you always start, in my case, with drum groove, and even with the drum groove, you always start with a perfect kick, then some hi-hats, then some claps, and you start doing things methodically. You can hear your tracks, and you think they’re all different, but if you leave them for 2 or 3 days and you hear them again, you’re like, “This sounds exactly the same as the track I made a month ago.” So to try to do things differently, you need help, somebody from the outside, an educated ear. I realized that I had 10 tracks that were pretty good for me, I had stuff that I really liked, but – I didn’t know if it needed polishing or what – but I didn’t want to leave the songs as they were. I thought I could improve them. So that was the point where I knew I needed help, but you need help that is very specialized in this type of music.

How long have you been working on the tracks that you’ll be releasing?

There are tracks that I’ve made in the past 2 to 3 years. When I started talking with Pheek, he suggested one thing. He told me, “You know, you should get those tracks out of the closet and listen to them again, with all the knowledge you have right now, with everything you’ve learned through the years, you’re gonna listen to them differently. Maybe you can combine your current drums or groove with a bass you really like from a song you did 3 years ago.” So I did exactly that, I spent 2 to 3 weeks listening to tracks I remember I liked – you don’t remember anything though, you don’t even remember making the track!

We’re looking right now at 8 tracks – the idea is to release 4 – but 80% of these are tracks that I did 3 years ago, and we’re reinventing and smashing things up, et cetera.

Luis Rivera (LRb) is using Pheek's song finalization and analog mastering services to prepare his first EP

How did you find out about Pheek’s services?

I am really a fan of his music. I had an album that was released by Minus and I really liked the tracks. Actually, they were very inspiring for me at the beginning of my work in electronic music, because I was more oriented towards dubstep and drum ‘n’ bass, and then eventually I started listening to house and techno music – I mean, I loved techno from when I was very little – but there was a track from Pheek on the record, and I started following him on Soundcloud and Facebook. I saw that he posted about his services, so I checked them out on his website, and I just sent him an email. It was super fast and easy. So it was very easy for me to establish contact with him.

Had you ever heard of song finalization services before or was this something new to you?

No, it was something completely new for me. And it was very attractive, but also very scary for me at the beginning. It was very attractive, because I thought I have an opportunity to have an artist, a real artist, whose music I really like, in the same genre I produce – and he has so many years of experience, et cetera, et cetera – so I thought it would be very, very productive for me to have someone like him hear my songs. But at the same time I was very scared, because I still want the songs to be my songs. I don’t want them to be completely changed or anything like that.

And what led you to decide in the end to book him?

Well you know, I simply said “okay, let’s try it.” I talked to Pheek two times before I sent him tracks. We were very clear on the idea I had for the EP, we talked about the general idea, the theme behind the EP. And then I just sent him the track, and he works very fast. Two or three days after he sent me his version, his arrangements, and I immediately loved them.

So it has been a very productive and very easy working relationship. I like to say to him – he laughs, but I like to tell him, “I’m not your client, I’m your friend, and let’s do this like we’re friends.” And it has been flow, flow, flow from there.

What was the thing that struck you the most about working with Pheek, was there anything that surprised you?

Well first of all, he’s always available. You would imagine that a person with his record label, with his mastering work – he does a lot of mastering for a lot of producers – you’re gonna think, “well he has a very busy agenda.” But he’s always available. That was the first thing that really connected with me, that I know I can ask him for advice on many other subjects, not just, “Okay, what arrangement did you do on this or that track?” I can ask him, “What are you listening to right now?” and stuff like that.

And second, definitely the arrangements, the things he sends back to me, they’re things you can only do with experience, with all those years you have working in the studio, mastering, hearing music. All those little things, in the end, they make a huge difference on your tracks. Like for example, I had a song that was driven with very dark synths, it has a very heavy bass, but I didn’t know where to put the percussions. I sent it to him, and 3 days later he sent me a song with just a ride on the percussion, just a cymbal, and it was amazing. He did 2 or 3 things there that were amazing, that completely changed the vibe of the song, and I really liked it. You know, those kinds of things, only a person with experience can really give you.

So in the longer term, what do you think you’ve gained from this experience of working with Pheek? What has it brought to your music production in a lasting way?

Oh a lot of stuff, it’s definitely a lot. Well actually, first, I hope I can continue working with him. He’s very active in other things too. Like right now we’re preparing the EP – we have some labels in mind – but the idea is to make this kind of big. He offers you help in that aspect too. So first of all I don’t wan’t this to be a one-time experience, I am definitely going to continue working with him. The mastering he does – his studio is filled with analog stuff, I produce mainly with analog instruments, and the sound is amazing when he sends back the songs.

But you know, those little pieces of advice, the way he sees things musically speaking, you learn a lot, you learn very very much, in very short conversations, and you can soak up all the knowledge he gives you. It’s like a graduate course!

Check out Luis Rivera (LRb) on Soundcloud here.

This interview has been edited.

Need Help To Finalize Your Unfinished Songs?

In this post, I will discuss the advantages of having someone else take a look at your unfinished tracks.

Time to finish those sleeping projects

Have you ever watched those renovation shows where an expert takes over a messy apartment and gives it a complete makeover? I know that for myself and most people I know, these shows make us dream. We love the transformation, the before and after, the journey to an incredible final product.

Now what if I told you there might be a future for all those unfinished songs of yours?

Are you one of those producers that have dozens of projects that were never finished?

Perhaps you are here because this rings a bell:


  • You get bored of the song you’re making.
  • You get a new idea that seems better than the one that you’re working on.
  • What you work on doesn’t sound like what you have in mind.

I hear these comments all the time from fellow producers or aspiring ones. Not being able to finish a song is a very common problem for all of us. The world goes by so quickly today, and being exposed to so much music on Soundcloud triggers our A.D.D. and stimulates the excitement to always want to do more. As an artist, you set expectations for your own work too high, which then leads to you getting overwhelmed and succumbing to procrastination.

Many people have ideas, but once they get on the computer they get lost in the details of sound design and start to feel very sluggish. Eventually, the hype disappears and the person gets bored.

The problem is, your song might actually be great, and you’re not realizing it!

Just like with mixing, sometimes asking someone else to take a look can be critical to pinpointing what was wrong.

I once said to a friend, “That chord here is just too loud and makes the rest of the sounds pale!” That was all he needed to hear to finish what became one of his favourite songs. I’m not taking any credit here: the important part was his curiosity and openness to asking for help.

That’s often the main obstacle here: asking for help.

Mainly because you think:

  • It won’t be my track if someone does it for me.
  • I won’t feel proud of it.
  • It’s not going to work, period.

I can tell you one thing, and that’s that when it comes to remixes, people usually work fast. Well guess what? Asking someone to take over a song that’s blocking you is just like asking for a remix. The only difference is that you’re the maestro who provides the creative direction.

You’ll also need to have enough trust to be able let go of things. This is for your own good.

In the meantime, here are a few tips of mine:

  • Set a deadline on when a song should be done.
  • Set reminders and alarms.
  • Don’t spend more than 30 minutes at a time on the song.
  • Impose limits on yourself.


I can help you produce your song and finish it. Fast.

One of my specialties is listening to an artist’s vision, and then using their creative direction to help bring their projects to fruition. With almost 20 completed albums in my portfolio, I’m ready and eager to put my experience to work for you. Book me today!


SEE ALSO: Getting Lost in the Sea of Tracks