Naming Your Tracks Matters More Than You Think
Music producers spend an enormous amount of time thinking about sound. Imagine how they feel about how to name their music.
They worry about arrangements, compression, mastering, promotion, social media, labels, streaming platforms, and whether their music will reach the right audience. There are countless aspects of music production that demand attention, and most artists would agree they could use help in at least one of them.
Yet there is one detail that is often overlooked, despite being just as important as many of the others: naming the music itself.
As a mastering engineer and label owner, I listen to an incredible amount of unreleased music every year. One thing I constantly notice is how many artists struggle with titles. Tracks arrive with names like “Untitled,” dates, random numbers, puns, jokes, project file names, or temporary placeholders that somehow survived until the final version.
The strange thing is that most artists understand the importance of artwork, visual presentation, and branding. Yet they often forget that the title is usually the very first thing a listener encounters before hearing a single second of music.
A title speaks before the music does.
The First Layer of Listening
Maybe this is a generational thing. I grew up in a time when discovering music was very different from how it is today. Streaming services did not exist. Most of the time, you could not preview an album before buying it. You would visit a record store, read reviews, study the artwork, and make a decision based on the limited information available. The Artwork mattered, Titles mattered.
Even the label a release appeared on mattered.
All of those elements worked together to create expectations. They helped you imagine the world you were about to enter before the needle touched the vinyl.
I still experience music that way. When I look at the new music on Apple Music, I’m drawn to the artwork, but the names also strike my imagination. When a title resonates with the artwork and the atmosphere being suggested, something happens in my mind. Curiosity appears. A story begins to form. I became interested before hearing the first sound. The title becomes an invitation.
Listeners may not consciously realize it, but words influence perception. We naturally search for meaning. We connect sounds to ideas, ideas to emotions, and emotions to memories. A strong title can subtly guide that process. It doesn’t dictate what someone should hear, but it simply opens a door.
Why Electronic Musicians Often Struggle
One of the most common objections I hear is that naming instrumental music is difficult. The argument makes sense at first. A songwriter can build a title from lyrics. A rapper can extract a phrase from a verse. A pop artist can often summarize a song’s central theme in a few words.
Electronic musicians frequently work with abstraction. A dub techno track might consist of echoes, textures, and rhythms. An ambient composition may have no obvious narrative. A minimal track can communicate through movement and tension rather than language.
So what exactly are you supposed to name it? Ironically, I think abstraction is precisely what makes titles more important.
When there are no lyrics to guide interpretation, the title becomes one of the few clues available to the listener. It provides context. It suggests an emotional direction. It offers a frame through which the music can be experienced. A title does not need to explain the track. It only needs to suggest a possible way of entering it.
Music Already Creates Images
One advantage I personally have is synaesthesia. Music naturally generates images, colours, words, and associations in my mind. The process also works in reverse: certain images can inspire sounds and musical ideas. While not everyone experiences synaesthesia in the same way, I suspect many musicians possess a similar ability without fully realizing it.
Think about what happens when you listen to a piece of music. Images, shapes, memories appear.
You might imagine a landscape, a season, a place, or even a particular colour palette. Sometimes the association is emotional rather than visual. You simply feel something. Music rarely exists as pure sound. The brain is constantly creating connections.
This is why naming tracks can become easier once you stop searching for literal meanings and start paying attention to the associations already present in your listening experience.
Instead of asking:
“What should I call this track?”
Try asking:
“What does this track remind me of?”
“What kind of place does it belong to?”
“What emotion keeps returning when I listen to it?”
“What image appears repeatedly?”
The answers often contain the title you’re looking for. One exercise I give to students is to make a song based on an image. But sometimes, I propose a quote or sentence.
Good Titles Come From Outside Music
Years ago, I asked a friend of mine how he consistently came up with brilliant titles. Before becoming a musician, he worked as a journalist. He writes, speaks publicly, follows current events, and reads extensively. Every release he puts out contains titles that feel memorable and intriguing. What struck me was that he wasn’t finding titles inside music.
He was finding them in culture. News articles. Poetry. Philosophy. Literature. Political discussions. Conversations. Small observations collected throughout daily life.
Over time, I adopted a similar approach.
One of the best habits a musician can develop is collecting words. So Try:
- Keep a notebook.
- Use your phone.
- Create a document.
- Whenever a phrase, concept, quote, or unusual expression catches your attention, save it.
Don’t worry about how it will be used. Many of these fragments will eventually become track titles, album names, or conceptual directions. The important thing is remaining curious about language. Most producers spend years training their ears. Very few spend time training their vocabulary.
But electronic music is used in modules. literally with modular synthesis, but also because we collect samples that we will use later, we create rhythmic loops that will eventually be used in a future song. We think about the chord progression that we will eventually pull out for that special song. I have an idea for compiling words and notes.
It’s just the same philosophy: you are gathering words that will be used at the proper time, literally with modular synthesis, but also because we collect samples that we will use at another time; we create rhythmic loops that will be used eventually in a future song. We think about the chord progression that we will eventually pull out for that special song. I have an idea for compiling words and notes. It’s just the same philosophy: you are gathering words that will be used at the proper time
Titles Help People Connect
A common misconception is that titles are merely decorative. In reality, they contribute to how people connect with music.
Successful artistic works often emerge from the intersection of several factors: timing, context, relevance, audience, and execution. Music does not exist in isolation from the world around it.
Words help establish those connections. Imagine a song exploring themes of environmental anxiety, human relationships with nature, or uncertainty about the future. If the title reflects ideas that people are already thinking about, it can create an immediate emotional bridge.
The listener feels recognized. The music becomes more than sound. It becomes a companion to a thought they were already carrying.
This doesn’t mean chasing trends or trying to manipulate audiences. It means acknowledging that language can help communicate ideas that music alone may leave open-ended.
The Hidden SEO of Music
This comparison might sound strange, but I often think of titles as a form of artistic SEO. When writing blog articles, we carefully choose words because we know people search for them. Music works differently, but not entirely.
Words still influence discoverability.
Words still influence curiosity.
Words still influence memory.
A listener is far more likely to remember a meaningful title than a sequence of numbers or a random placeholder. Even within underground electronic music, titles can contribute to visibility. Sometimes a phrase resonates with a cultural moment and it reflects a mood people are collectively experiencing. Sometimes it simply stands out enough to be remembered.
The point is not to optimize music like a search engine but to recognize that words carry weight. Ignoring titles means giving up one of the few opportunities you have to communicate before the music begins.
Taking Your Work Seriously
I often see artists treating titles as an afterthought. They become inside jokes, Temporary file names, Puns that only make sense to the creator.
There is nothing inherently wrong with that approach. Humour has its place. Playfulness has its place. But it is worth asking whether the title helps the music or simply avoids the responsibility of defining it.
Years ago, someone told me that naming tracks carefully was unnecessary because “it’s just dance music.” My response was simple: That is a choice.
Taking your work seriously is also a choice. Dance music can be playful, emotional, intellectual, political, poetic, abstract, spiritual, or deeply personal. The genre itself does not impose limitations.
The way you present it does. A thoughtful title signals that you have reflected on what you created. It suggests that the music means something to you. And often, that extra layer of intention is exactly what helps listeners connect with it.
Taking your music seriously doesn’t mean that you take yourself seriously. You can still have a humble approach. It just means that you are fully invested in what you do; taking your music seriously doesn’t mean that you take yourself seriously. You can still have a humble approach. It just means that you are fully invested in what you do
Building a Concept Before Naming the Tracks
One thing I’ve noticed over the years is that naming individual tracks becomes much easier once an album has a clear identity. When I work on a release, I rarely think of it as a collection of separate songs. Instead, I see it more like a film, a theatre production, or a book of short stories. There may be multiple chapters and different moods, but they all belong to the same universe.
Because of that, I often begin by trying to understand what the album is actually about. Not what genre it belongs to, but what it is trying to express. Sometimes I’ll write a few sentences describing the project’s emotional or conceptual core. Once I have those sentences, I start simplifying them. Can I summarize the whole idea in a single phrase? Can I reduce that phrase to one essential concept? Can I find a word that captures the entire spirit of the work?
That process has helped me repeatedly when searching for album titles. Once the album title exists, it becomes much easier to find names for the individual tracks because they can all orbit around the same central idea.
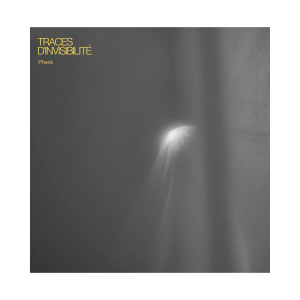
Traces D’Invisibilité (2026, Archipel)
A good example is my album Traces d’Invisibilité. The title emerged from a reflection on the nature of music itself. Music is invisible. While it is playing, it fills a space and affects us emotionally, yet it has no physical form. The moment it stops, it disappears. You cannot point at it or hold it in your hands. Yet despite its invisible nature, it leaves marks behind. It creates memories, emotions, and impressions that linger long after the sound is gone.
The title also reflected another observation that was important to me. Artists are everywhere in society. Music accompanies our lives constantly, whether we are shopping, commuting, working, or relaxing. Yet the people who create that music are often invisible. Their work is omnipresent, but they themselves remain unseen. The phrase Traces d’Invisibilité seemed to summarize both ideas at once. Once I had that title, many of the decisions about the album became easier because there was already a conceptual thread connecting everything.
Another example is Tones of Void. Unlike the previous album, the title arrived very naturally while I was working on the music. The record was created during a vacation period, and everything about the process felt unusually effortless. The music emerged quickly, almost without resistance, which is often the opposite of how we imagine creativity works.
When I listened back to the tracks, the title made immediate sense to me. The music felt like tones appearing from nowhere and dissolving back into nothingness. There was a spacious quality to the sounds, a sense of resonance emerging from emptiness. For me, dub techno has always carried that sensation. The echoes and reverberations create the impression of vast empty spaces where sounds drift and decay. The void becomes part of the music itself. The title simply gave words to something I was already hearing.
Research Is One of the Most Underrated Sources of Inspiration
Many musicians think titles must arrive magically. They imagine that a perfect name will suddenly appear while listening to a track. Sometimes that happens, but in my experience, research is just as valuable as inspiration.
For Tones of Void, I developed a simple system. I decided that all the track titles would be connected to rivers, locations, and natural elements found throughout Quebec and Canada. I have always felt that techno, despite its mechanical and electronic nature, shares something with the experience of being outdoors. There is a strange connection between repetition, natural cycles, weather patterns, forests, and flowing water. The more time I spend listening to electronic music in natural environments, the more obvious that relationship feels.
To find names, I spent hours reading through maps, geographical references, and Wikipedia entries. What started as a practical exercise quickly became fascinating in its own right. One article would lead to another. One location would reveal an interesting historical detail. A river name would evoke an image or a mood. Before long, I had accumulated far more ideas than I could possibly use.
Wikipedia remains one of my favourite creative tools for this reason. Most people think of it as a source of information, but it is also a source of connections. You can start with a simple topic and end up exploring concepts you never would have encountered otherwise. Even the random article feature can become a powerful source of inspiration.
The point is not necessarily to use the information literally. The point is to expose yourself to ideas. Every new concept expands the pool of material from which titles can emerge.
Randomization Works Just Like In Music
In 2013, I launched a website called Soundtracks. The idea was simple. Artists would receive a randomly generated concept composed of different words, references, themes, and suggestions. Their challenge was to create music inspired by that material.
What surprised me most was the feedback. Many participants reported that having a title before making music actually made the creative process easier. Instead of feeling overwhelmed by endless possibilities, they suddenly had a direction. The title acted like a compass. It didn’t dictate the outcome, but it provided enough structure to help the imagination focus.
This observation changed how I thought about creativity.
Many of the techniques I use in sound design rely on randomization. Whether through modular synthesis, generative systems, or experimental composition techniques, randomness often serves as a catalyst. It introduces unexpected possibilities that I would never have consciously designed myself.
Titles can function in exactly the same way.
If you generate a random phrase, a location, a concept, or even a single unusual word, your brain immediately begins searching for meaning. It starts asking questions. Why this word? What does it suggest? What kind of music belongs to it? Those questions often become more valuable than the answer itself.
Randomization is rarely useful when you’re searching for something specific. However, when you’re looking for a starting point, it can be remarkably effective.
What About Abstract Titles?
As I write this, Four Tet has released music with titles composed largely of symbols, emojis, and abstract characters. The artwork follows a similar philosophy. It embraces visual overload, fragmentation, and a deliberate rejection of traditional design conventions.
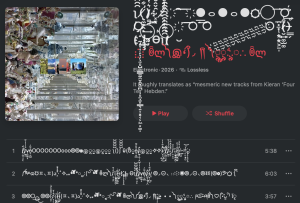
There is clearly an artistic statement behind that choice. We are currently living through a period where digital perfection, algorithmic generation, and AI-produced content are becoming increasingly dominant. Many artists are responding by moving toward aesthetics that feel messy, chaotic, imperfect, or intentionally difficult to interpret. You can see similar tendencies in graphic design, typography, fashion, and visual culture more broadly.
I completely understand why an artist would choose that direction.
At the same time, I find myself reacting differently as a listener. While I deeply admire Four Tet’s music, I struggle to form an emotional connection with tracks I cannot interpret. When I encounter a symbol or a sequence of characters with no obvious meaning, I lose one of the pathways through which I normally connect with a piece of music.
That does not make the approach wrong. It simply means it works differently.
Ultimately, every artist has to decide what role language will play in their work. Some artists want to provide clues. Others prefer to remove them entirely. Both choices are valid. The important thing is recognizing that they are choices.
Even refusing meaning is still a statement about meaning.
A Practical Method for Finding Better Titles
If you constantly struggle to name your music, I would suggest starting with intention. Whenever I give feedback to musicians, one of the first questions I ask is simple: what is the intention behind this piece of music?
Many people answer by describing technical details. They’ll talk about genre, influences, mixing choices, or production techniques. Those elements can be useful, but they don’t tell me why the music exists.
Instead, try describing the emotional purpose of the track.
What are you trying to communicate?
What experience are you trying to create?
What state of mind are you exploring?
Start with a single word. It might be something as simple as tension, nostalgia, confusion, distance, curiosity, serenity, transformation, longing, hope, or uncertainty.
Once you have that word, begin expanding outward. Read definitions. Look at synonyms. Search for historical references. Explore poetry, literature, philosophy, and visual art connected to that concept. Follow every interesting thread you discover.
What often happens is that the original word begins generating a network of related ideas. Within that network, titles start appearing naturally.
This approach works equally well for finished tracks and for music that has not yet been written. In fact, I often find it easier to begin with a title and let the music grow toward it. The title becomes a destination. The composition becomes a journey toward understanding why that destination mattered in the first place.
Naming Music Is Part of Making Music
Many artists treat naming as something that happens after the creative work is finished. I increasingly believe the opposite is true.
Titles are not packaging. They are not marketing. They are not administrative details that need to be completed before uploading music to Bandcamp or sending files to a label.
Titles are part of the creative process itself.
The moment you give a piece of music a name, you are defining a relationship between sound and meaning. You are offering listeners a way to enter the work. You are creating a bridge between something abstract and something recognizable.
A great title will not save weak music. But great music paired with a meaningful title can become much more memorable.
The next time you finish a track, resist the temptation to leave it as “Untitled” or “Version 3.” Spend time with it. Listen carefully. Ask yourself what it reminds you of. Pay attention to the images, emotions, places, and ideas that emerge. Read more. Collect words. Stay curious about language.
You may discover that naming music is not separate from making music at all.
It is simply another way of listening.


/indigomusic/media/post_attachments/wp-content/uploads/2025/02/The-Vitruvian-Man-and-the-Golden-Ratio-A-Mathematical-Masterpiece.png)

