Why 30 Minutes of Daily Studio Practice Beats 5-Hour Sessions
If you’re following me, you might have seen that 2025 ended with one of the longest writer’s blocks I had in years. As it ended, it was also beneficial because it prompted me to shift how I approached my daily studio practice as a music producer. Whenever a producer can’t seem to find their voice in their art, it’s often because they need to adjust or completely change their workflow.
One of the foundation pillars of workflow is how you use your studio time. While many producers want to spend an entire day in the studio, it is not the optimal use of their time. Better results come with shorter sessions.
1. The Trap of the Long Studio Session
Perhaps you have a job, maybe you have a family as well, but in both cases, making music during the week, after work and responsibilities have been taken care of, seems like a chore. Seeing your daily studio practice as a music producer can even feel like it’s feeding your imposter syndrome. After all, you don’t feel like you’re a musician since you’re not doing it full-time.
If you manage to squeeze some time here and there, the progress will feel underwhelming. If you read The Atomic Habits book, it says that improving by 1% a day will yield better results than trying to make a 25% improvement. The bigger chunk will feel more attractive because it will feel like you’ve done more, that it is more measurable.
This is why, once the weekend arrives, you’ll feel like you have an open Saturday, with 8 hours as a window into what a musician’s experience is like.
The romantic idea of the 8-hour studio day
Having all the time to play with dear plugins, search for sounds, and build loops is indeed fun. It can be a good way to browse an extensive library of sounds or explore multiple sample ideas. But playing with sounds is like playing with food; you can get saturated, where your inner critic might be completely biased.
You need that critic to be on top of things to make good decisions, select appropriate ideas and get a sense of self-validation. More and more research shows that an average employee performs better if their work day is crunched into 4h. Where we fall for the activity because it feels fun, it is still work for the brain.
Producers think that long sessions mean substantial progress, but it doesn’t work that way. It is neither linear nor like cleaning a house. Music production can easily go backwards without you realizing it, especially if your inner critic is saturated. Working longer sessions is the open door to often ruining what initially worked.
TIP: Breaks! Take plenty of them. The Pomodoro technique is also a great help.
2. Daily Practice Works Better
So far, this year has been highly productive because I adjusted my workflow. When a way of working is not providing the results I need, I will change it. That can take a bit more time to find the right formula, but there are some points that always work, especially when stuck.
The first element that always provides positive results is consistency. Whenever I’m lost and I get out of my lethargy, I rely on consistency to create momentum. One thing I started doing this year that had a big impact was working daily and, most importantly, recording ideas each day. It can be simple or not necessarily elaborated, but recording something brings something to the table and can be used.
TRY: Find a loop you like and just hit that record button. Jam it out and see what happens. Ideally, record a long take as well, where you try many things. Reaper has a fantastic tool named Global Sampler that lets you pick whatever you are doing. For Ableton, I would use Melda’s recorder as an equivalent.
Consistency Over Intensity
One of the biggest shifts you can make in your daily studio practice as a music producer is to stop thinking in terms of intensity and start thinking in terms of consistency. It feels like a chore at first but it can quickly become exciting as well. If you’re a creature of habit, make it always the same day, same time. Make it something non-negotiable within your relationships and responsibilities.
Here’s the trap: Intensity feels productive. A long session gives the impression that you’ve gone deep, that you’ve invested real time, that something meaningful should come out of it. But in practice, those sessions often drift. You open plugins, browse samples, tweak details, and before you know it, hours have passed without a clear result.
If you’re familiar with my methodology, you know I encourage my students to handle one production phase at a time, so the drift gets under control.
So, shorter sessions change that dynamic completely.
When you only have 30 minutes, your attention sharpens. There’s a sense of urgency. You don’t have the luxury to wander. You go straight to the point: shaping a sound, testing an idea, building a loop. The constraint removes hesitation and forces you into action.
Instead of asking “what should I do?”, you naturally start doing.
Photo by Liana Mikah on Unsplash
Practice builds expertise. Habits come from repetition. Reflexes appear with experience. Results build confidence.
This has a direct impact on decision-making. With limited time, you’re less likely to overthink or second-guess every move. You commit faster. You trust your instincts more. And ironically, those quicker decisions often lead to stronger results than hours of micro-adjustments.
It also reduces one of the biggest traps in modern production: endless browsing. With thousands of sounds and tools available, it’s easy to confuse exploration with progress. Short sessions put a boundary around that. You pick something, you use it, and you move forward.
But the most important effect is momentum.
Working daily—even in small increments- creates a continuous thread between sessions. Each time you reopen your DAW, you feel more in control and won’t be searching for the next thing you do. Your ideas stay alive, your ears stay engaged, and your creative direction becomes clearer over time.
3. The Brain Loves Repetition (Hello, Techno)
Creativity is often treated like something spontaneous—something that appears when inspiration strikes. We all see it appear out of nowhere, whether while walking your dog, driving, or in the shower. But in practice, it behaves much more like a skill that develops through repeated exposure. You want to be more in control of calling for inspiration, rather than just wishing for it to happen.
Every time you open your DAW, you’re training your ears, your taste, and your decision-making. The brain starts recognizing patterns faster, understanding relationships between sounds, and predicting what might work before you even try it. This doesn’t come from occasional long sessions. It comes from frequent contact with the process.
This can only happen if you don’t space your sessions and ideally, make a few short ones within a day. Daily engagement keeps your musical thinking active. Multiple sessions with time between each of them let your brain think and see the next moves from angles you wouldn’t take if you’d stay with the loop for an extended time. And something interesting happens between sessions.
When you work on music every day, even briefly, you stay connected to your ideas. You remember where you left off, what was working, and what needs to change. There’s no need to “warm up” or rediscover your direction each time. You’re already inside the process.
Your brain keeps working in the background. Solutions appear when you’re away from the studio—while walking, cooking, or doing something unrelated. A structure becomes obvious. A sound suddenly makes sense. What felt stuck the day before can feel clear the next day.
This is why daily practice is so powerful. You’re not relying on a single moment of inspiration—you’re building a continuous creative loop where each session feeds the next.
TRY: Improvise sessions at various times during the day. Even if you have a job, you can still do it. Sometimes, you’d be surprised by how a 10-minute exploration, where you make 1 decision, can have an impact later.
4. The Hidden Problem with Long Sessions
Spending 4 or 5 hours in the studio can feel productive, but there’s a point where the quality of your work starts to decline—often without you noticing.
The first issue: listening fatigue.
Your ears adapt quickly because of the hedonic adaptation we have as humans. After extended exposure, especially to repetitive loops, your perception shifts. Elements that once felt balanced start to blur together. You may boost frequencies that don’t need boosting, over-compress sounds, or lose your sense of dynamics entirely. What feels “better” in the moment often doesn’t hold up the next day.
TIP: Use visual representations to track issues even though people tell you to rely on your ears alone.
Second: perfectionism and over-editing.
With more time available, the temptation to tweak everything increases. You start adjusting details that weren’t a problem to begin with. A hi-hat gets nudged again and again. A synth is reprocessed multiple times. Instead of moving forward, you circle around the same idea, slowly draining its energy.
The common trap is that people often feel that their initial, simpler idea isn’t enough.
Finally, there’s the issue of diminishing creative returns.
The first hour is usually where the strongest ideas appear. The second might still be productive. But after that, progress tends to flatten. You’re putting in more time without gaining much in return. In some cases, you’re even moving backwards—losing the clarity and instinct that made the idea work in the first place.
Long sessions aren’t inherently bad, but they require awareness. Without it, they can turn into slow erosion: of your ears, your decisions, and the original spark that made the track interesting.
5. What a 30-Minute Studio Practice Can Look Like
One common misconception is that 30 minutes isn’t enough to “really do anything.” But the goal of a daily studio practice as a music producer isn’t to finish a track in one sitting—it’s to move something forward with a clear intention
Think of each session as a focused micro-task. While many creatives see planification as counterproductive, it’s actually a game-changer once in practice.
You might spend a session exploring sound design: take one synth or sample and push it in different directions. Map modulation, test envelopes, resample variations. No pressure to use the results immediately—just build material.
Another day, you focus on building a loop. One groove, one idea. Keep it simple, but make it convincing. This is often where the strongest hooks emerge.
You can also dedicate a session to arranging 16 bars. Take an existing loop and expand it slightly—add movement, transitions, or variation. You’re not finishing the track, just extending its life.
Some days can be more analytical. Open a track you admire and spend 30 minutes studying a reference track. Look at structure, energy flow, and sound placement. Try to recreate a small section or understand why it works.
Or go even more minimal: mix one element. Just the kick. Or the bass. Focus on balance, tone, and space without getting distracted by the rest.
This approach aligns with a studio exercise mindset. Each session has a clear intention, a limited scope, and a tangible outcome. Over time, these small actions compound into a library of ideas, skills, and finished material.
Learn more about my non-linear, Agile-inspired music production technique.
6. Small Sessions Build Big Catalogues (while Perfectionism shrinks it)
One of the most underestimated aspects of a daily studio practice as a music producer is how quickly small sessions accumulate.
Thirty minutes doesn’t feel like much in isolation. It can even feel insignificant compared to a long weekend session. But when that time is repeated daily, it compounds. A loop becomes an arrangement. An arrangement becomes a track. Over weeks, you’re no longer sitting on fragments—you’re building a catalogue.
The real trap is waiting for the “perfect day.” Those don’t exist, did you know that?
Many producers postpone creating because they feel they need a full block of time to do it properly. A free afternoon, a full day, the right mindset. But those moments are rare, and when they do arrive, they carry pressure. You expect results, which often leads to hesitation or overthinking.
Short sessions remove that pressure entirely. Working on small things and staying active is the best first move to break a writer’s block. They allow you to show up, do the work, and leave. No expectations beyond progress. And that’s where consistency quietly outperforms intensity.
A track finished over 10 short sessions is still a finished track, right?
In fact, those tracks often benefit from the breaks between sessions. You return with fresh ears, clearer judgment, and a better sense of direction. Instead of forcing decisions in one long stretch, you refine them over time.
What matters isn’t how long you worked on a track in a single day.
What matters is that you kept coming back to it until it was done.
TRY: Set a deadline or a limit on the number of iterations.
7. Let’s Design Your Daily Studio Practice
Have you been working in the same way since you started making music, X number of years ago? Perhaps you’re overdue for a workflow upgrade. If consistency is the goal, then your setup needs to support it. A daily studio practice as a music producer shouldn’t rely on motivation. It should be designed to be easy to start and easy to sustain.
Start here: The first step is to remove friction.
If opening your DAW feels like a chore, you’re already losing momentum. Have a template ready: your favourite tracks routed, a few instruments loaded, basic effects in place. The idea is simple—when you sit down, you should be able to start within seconds, not minutes. Some people never even close their DAW!
Next, define a small goal for each session. Write it down (I insist) on a piece of paper or sticky note.
Instead of vague intentions like “work on a track,” be specific and aim for measurable goals. Design one sound. Build one loop. Arrange 16 bars. Mixing, sound design, and composition—each session should have a clear focus. This keeps your attention sharp and prevents you from drifting. It also helps to separate exploration from finishing.
Mindset: Aim to improve by 1 to 3% at a time. This makes it impossible not to achieve it.
Trying to do both at once is one of the main reasons producers get stuck. One day can be about generating ideas, testing sounds, and experimenting. Another can be about refining, arranging, and committing decisions. Keeping these modes distinct reduces confusion and speeds up progress.
Finally, track your progress.
Not in a complicated way—just enough to stay aware. Save versions, export ideas, and keep a folder of sketches. When you can see what you’ve done over time, it reinforces the habit and gives you a sense of direction.
TRY: Render whatever you have done in a day at the end of every session. Instead of simply pressing save & quit, render first. Always.
A well-designed practice doesn’t rely on bursts of energy.
It creates a system where showing up is enough to keep things moving.
Conclusion — Consistency Beats Intensity
Long studio sessions feel heroic.
They give the impression that you’ve pushed hard, gone deep, and invested real time into your music. But that intensity is often inconsistent, unpredictable, and difficult to sustain.
Daily practice, on the other hand, is quiet. It doesn’t feel impressive in the moment. Thirty minutes can seem small, almost insignificant. But over time, it builds something much more valuable than a single productive day: it builds continuity, clarity, and control over your process.
Mastery doesn’t come from occasional bursts of effort.
It comes from repeated contact with your craft.
When you show up daily, you train your ears, refine your instincts, and develop a workflow that supports you even when inspiration fades. You stop relying on the perfect moment and start creating momentum instead.
In the end, it’s not about how long you spend in the studio.
It’s about how often you return.
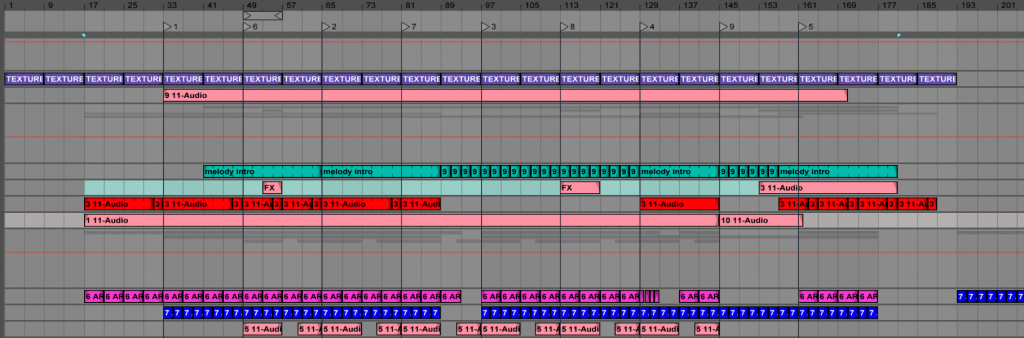

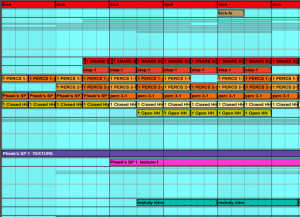
 I think my best live sets were good mostly because they had a core to work around that had some preparation, but also had a lot of room to improvise, dependent on how the actual event turned out. These sets were versatile; I could open an evening with them or play peak time, mostly because of how flexible they were. These sets were more or less made up of the same songs but the variations would be so easy to perform on the fly that I could really just follow what felt good to me in that moment in time. I’ve never really understood the point of having an overly prepared set. I’ve tried the prepared approach before and it just made the whole experience boring, because there would be no risk-taking; it also felt out of sync with whoever was listening. For example, imagine that your track has been built to have a drop, breakdown at one precise point and a moment of tension after, but if the dance floor is just starting to warm up when you drop, you might lose people’s attention or it might feel out of place.
 Set two variations of the hook with some complementary percussion. If you listen to a DJ set, especially techno or loop based music, you’ll see that it’s mainly a loop with variations. Try to have variations in your percussion, melody or bass. That way you can toggle between the hook and this part. I really really encourage you to listen to DJ sets to get ideas.
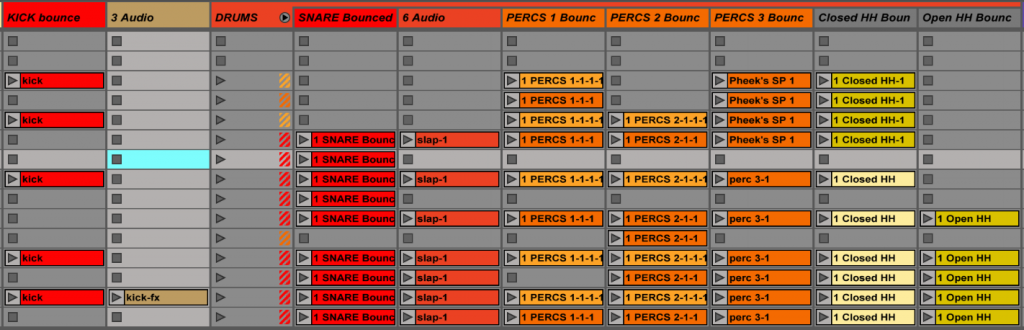