Playing Electronic Music Live – How to Prepare Your Live Set (Part 2)
After deciding the direction your live set will take, we will now discuss how to prepare a live electronic set in terms of how we approach each individual song, or moments as I call them. This article is the follow up to Playing Electronic Music Live – How to Prepare Your Live Set (Part 1)
Before continuing, make sure you have read the article linked above; after which you should have a better idea the style you’d like to play live. Since most electronic musicians are software users, we’ll start with that approach which is easier and allows for playing both at home for fun or in a club. A common mistake I often see from new artists who want to perform live is to make things too ambitious and overly complicated; the preparations become too demanding and actually playing the set loses its fun.
First idea in preparing your set: turn your tracks, finished or not, into moments to be played live.
In a previous post, I said that making many loops is something that eventually pays off. When you want to play live, it’s always best to have a lot of options on hand that you can trim, to see what works together and then turn these perhaps unfinished loops into new songs.
For years, I always had a main project file for playing live in which I would test drive any new ideas I would worked on done over a given period of time. This live set was like a laboratory for experimentation; it was where new ideas would sprout, where loops became completed tracks, and where some sounds were replaced or remixed into another track. In other words, I recommend turning your unused arrangement loops into a scene in Live, play them, and record the output. Rinse, repeat.
But where and how do I start?
For example, let’s take this simple arrangement and see what we can make out of it. Let’s say you have a track in the works or done, partially set up in an arrangement view (Note: Any DAW, in arrangement, not just Ableton); firstly, you’ll need to know how the track is structured.

Figure 1 – Arrangement view with markers
Do you want to play the track like your arranged it or do you want to have the parts so you can improvised with the different section?
As you can see in the above screenshot, I have inserted markers in my arrangement which represent the main changes between sections; everything is mostly organized in blocks. You’ll need to slice out these blocks to trigger them, and also what will become important is how you decide to play them. If some parts are heavily chopped, I would recommend that you either turn that section into an entire block, or if you want to jam those sounds you could add them to a Drum Rack. It depends if you want to do some jamming in your set or not. The point here is to have a better view of how your blocks exist so that when you are in the session view, the parts are easy to see.
1st TO DO:
- Stretch the little blocks that repeat to create bigger blocks that cover the area where they should be repeating (note: make sure the clip is in loop mode) .
- Use cmd+j to consolidate chopped blocks into bigger block. If some blocks have changes in them, consolidate them as is.
- Use colors to clarify where the blocks have changes. Say a block is repeating until a given time but then changes pitch; you could change the color of the one where the pitch is changed to symbolize this change.
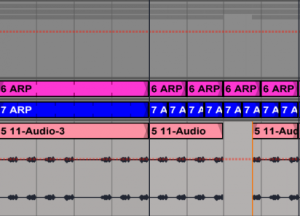
Figure 2 – Consolidated vs. Unconsolidated blocks
In Figure 2, the left section has been consolidated, and the right side hasn’t. You can the Duplicate left section to the right after consolidating this way.
This may appear time consuming, but it’s not that much extra work and it will pay off once you move everything to session view.
When you’re finished here, you need to bring the new blocks into the session view.
If you have groups, I’d suggest to ungroup them. The reason is that it is not only inconvenient to use groups in session view, but there are chances that your groups differ from one song to another, and in the end it might be more confusing than helpful. If you have grouped FX, I’d suggest you export the entire channel as a stem and decide later how to use it in a live context. You could perhaps decide to use FX during the live and so, not to bounce the channel. It’s hard for me to tell you what to do here.
2nd TO DO:
- Grab all clips using cmd+a, click to grab, press Tab and then drop them in the session view.
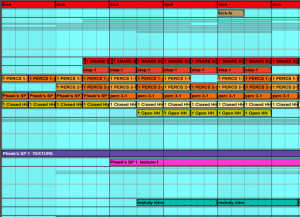
cmd+a, click to grab, press Tab and then drop them in the session view
- You might have a really large amount of clips. After moving things to session view you’ll see that some “scenes” are made up of the same clips. You’ll need to delete all scenes that are the same; you don’t need them. In the end, you might go from 60 possible scenes, to about 5 (!). In live situation, you want everything in front of you, and the simpler things are, the faster you’ll be able to get in the zone. You can also go from Scene A to B, to C to D in any order, which gives you the option to remix your music on the fly.
- Some people might have a huge number of channels grouped in 5-8 groups. Groups make things difficult to play live as they add a lot of complexity. I’d suggest you perhaps export the track’s stems for the groups and then chop them in sections as I explained above. This might also eventually invite you to reconsider how you use channels – I often feel like people use too many. I never use a single channel for a one hit that happens once in a song. I’ll have a reserved channel where I drop all the one-hit sounds. This can be a game changer for you if you use many as smaller projects are easier to understand and you’ll feel more focused (and use less CPU!)

Regarding the number of channels to use, you’ll need to do tests on your own set up before deciding how to do this. In the previous post on this topic, I was advised to be careful with the number of channels/tracks you use. Ideally you want to deal with a max of 12. To trim down the number of channels you are using in the event that you are already using more, you’ll need to mix down a few that are similar or combine channels that don’t have much going on. For example, I’d have a channel that would be a longer loop that would combine all FX and random hits. Playing it as a longer loop as opposed to a shorter one creates more of a live feel that isn’t as “loopy”.
Rehearse your session by hitting certain clips or triggering a scene to see what happens. Once you have removed the redundant scenes and trimmed down the number of channels, you’ll start having a first real glance of what your song looks like in terms of playing it live.
Of course, you’ll deal with the existential question of if you want to play the track “as is” or have a special version just for a live context.
Personally, I think it’s a bit boring to not offer something different in a live set, Two ways you can change things up are through pacing and jamming. jamming will be touched on more in part 3 as it is a very important part of preparation and can also be something that can also forever change your approach regarding how you make music.
Pacing will be the last part of the preparation of your live set. I will cover most of the preparation phase of pacing below, and the following blog post will be more concerned with how to play your live set.
 I think my best live sets were good mostly because they had a core to work around that had some preparation, but also had a lot of room to improvise, dependent on how the actual event turned out. These sets were versatile; I could open an evening with them or play peak time, mostly because of how flexible they were. These sets were more or less made up of the same songs but the variations would be so easy to perform on the fly that I could really just follow what felt good to me in that moment in time. I’ve never really understood the point of having an overly prepared set. I’ve tried the prepared approach before and it just made the whole experience boring, because there would be no risk-taking; it also felt out of sync with whoever was listening. For example, imagine that your track has been built to have a drop, breakdown at one precise point and a moment of tension after, but if the dance floor is just starting to warm up when you drop, you might lose people’s attention or it might feel out of place.
A well prepared set has moments for building tension, others to release, variations, and material to raise the intensity if needed, without it being a fixed bunch of parts that aren’t easily movable. Each songs need an intro and outro so that you can move from one song to another in a very flowing way, just like a DJ would do.
Last TO DO (3):
- Try to decide on the first scene of your songs. They shouldn’t be too busy but usually, you want a solid groove plus some teasers of the melody to come. Establishing the groove is always important to get people’s–what I call–dancefloor trust. That trust usually comes from kick-low end that is clear and precise, which people can relate to, no matter what happens in other parts of the frequency spectrum.
- Your intro should have openness and space. If you have a melody, try muting a part of it. This will allow the possibility of mixing a part of the melody of another song with the current song; they will be “talking to each other” by echoing. This happens when the first few notes of a melody are answering the last few notes of another melody. DJs love that in a song and by playing live, you’ll see why; you’ll discover “dialogs” between your tracks which could even teach you the good and bad of your track’s arrangements.
- Define the hook. The main hook of your song will follow the intro. It doesn’t mean you’ll drop the hook right away, as you can build towards there.
 Set two variations of the hook with some complementary percussion. If you listen to a DJ set, especially techno or loop based music, you’ll see that it’s mainly a loop with variations. Try to have variations in your percussion, melody or bass. That way you can toggle between the hook and this part. I really really encourage you to listen to DJ sets to get ideas.
- Create one tension-making moment. This can be a breakdown or a moment where something happens. I always loved to define this moment to be a scene where effects and atmosphere to create something exciting.
- Release the tension. This scene is basically what would be played after the breakdown or tension-making moment and it’s usually the hook with some more intensity and or variations. This scene should be the most important one.
- Outro. This is similar to the intro but it should be slightly different.
In the next post, we’ll go into more detail about the actual clips and how to create the perfect little “laboratory” for you to jam with. I’ll propose some ways to jam that will open doors to finally playing live and having all the fun that comes with it.
SEE ALSO : Playing Electronic Music Live – How to Prepare Your Live Set (Part 3)







Leave a Reply
Want to join the discussion?Feel free to contribute!