Tag Archive for: melodies

Upgrading Melodies with Articulation

In the diverse and ever-evolving world of electronic music, countless aspiring artists and producers are diving headfirst into the sea of music creation. With technology at their fingertips, creating music has never been more accessible. However, this ease of access can sometimes lead to a contentment with simplicity, especially for those who may not have a traditional background in music theory or composition. Yet, the realm of music, with its deep roots and intricate branches, offers a vast landscape of possibilities waiting to be explored.

It’s no wonder that trained musicians are often overlooking electronic music and will say it’s not “real music.”

I find that what makes an artist sound pro in their melodies compared to someone who start is often related to articulation, which we will cover in this post.

For many, the journey into music production begins with loops – those repeating sections of sound that form the backbone of many electronic tracks. Loops are the building blocks, the starting points from which entire tracks can emerge. But what happens when the novelty of looping fades, and the desire to craft something more complex and personal arises? This is where the concept of articulation comes into play, offering a gateway to elevate a simple loop into a rich tapestry of sound.

(Inside note: At the moment of writing this, Ableton just announced version 12 of Live. Some of the elements mentioned below will be covered in solid ways for that version but since I haven’t tested it yet, I can’t really expand on it yet.)

Articulation in Music to Elevate your ideas


Articulation in music refers to how notes are played or sung, influencing their transition, duration, and overall character. In electronic music, articulation can transform a basic loop into a nuanced and dynamic piece. If we were to compare two extremes, we could put on one side, loopy techno as not very articulate and on the other extreme, an experienced, jazz vocalist.

It is much more than just accent and velocity as many think. Those are just a fraction of what’s possible.

Let’s delve into the different types of articulation and how they can add depth and complexity to your music.


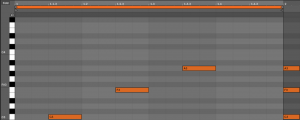
  • Staccato: This indicates that notes are played sharply and detached from each other. Staccato notes are typically short, light, and separate.
    • I find that in the low end range, kicks and bass notes have a much better clarity when short. You might not want short basses or kicks all the time, so you could alternate the gate length to have variation.
    • Melodies that are staccato work well with arpeggios  and bring a fast mood to a song, excitement and movement.
    • In melodies, staccato also gives the impression of bringing a delicate touch.
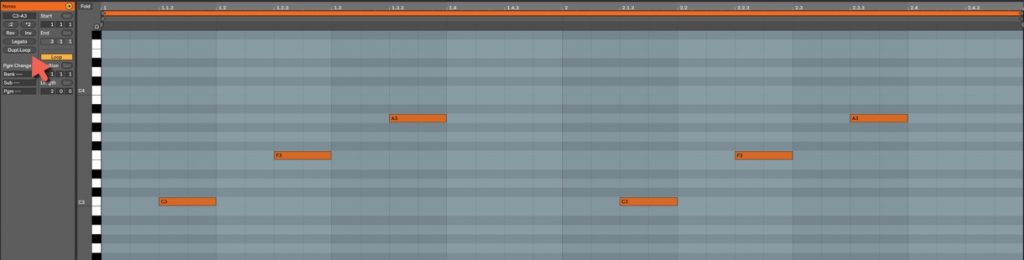
  • Legato: Opposite to staccato, legato articulation means that notes are played smoothly and connected, with no noticeable break in between. This often creates a flowing, lyrical quality in the music.
  • Accent: An accent mark indicates that a note should be played with more emphasis or force compared to the surrounding notes. It stands out due to a stronger attack. We often use it in percussion as we mark where the groove has emphasis.
    • Accents in a pattern accentuate the groove. If you are using some grooves, they also enhance accents at given points so consider that.
    • It can also be described as adding an assertive tone to a note.
  • Tenuto: This suggests that a note should be sustained for its full value, or slightly longer, often with a slight emphasis. It can add a sense of weight and importance to a note.
    • When programming a pattern, I like to keep my high point velocity around 100 (of 127) which gives headroom for notes with emphasis.
  • Marcato: This is a stronger form of an accent, where the note is played much louder and with a sharper attack. Marcato often creates a more pronounced and emphatic sound.
    • That one would be at 127 in velocity.
    • In music, there can be a part in marcato, meaning that a section is played with stronger impact.
  • Fermata: This indicates that a note or a rest should be held longer than its usual duration. The exact length is typically left to the discretion of the performer or conductor.
    • What makes a groove, an articulation are pauses. It’s good for dynamic range but just like when someone talks, pauses are crucial to understand the sense of a phrase.
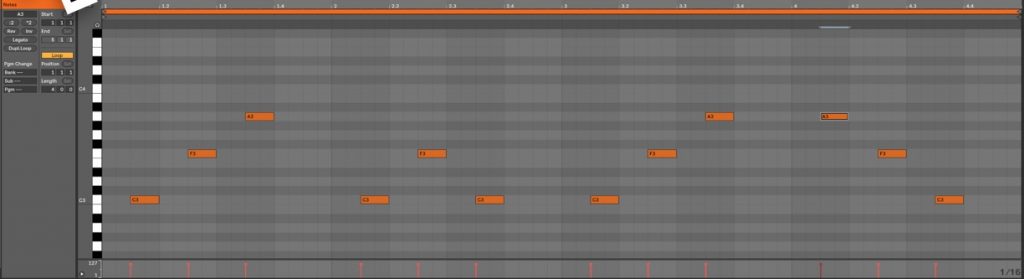
  • Portato: Also known as mezzo staccato, it’s a combination of legato and staccato. Notes are played somewhat detached, but not as sharply as staccato, and with a connection similar to legato.
  • Glissando: This is when a performer glides from one note to another, playing all the intermediate pitches. This is common in string instruments and the voice.
    • Often used for acid basslines.
  • Slur: Notes are being played, blended all together. I think it’s similar to a legato but it’s of a way of creating “syllables” sound where they’re a bit mashed up.
  • Trill: A rapid alternation between a note and the one above it, creating a fluttering sound.
    • I like to do this with a 2 notes arp.


Now, let’s explore how to apply these articulations in digital audio workstations like Ableton and modular environments like VCV Rack.


Examples

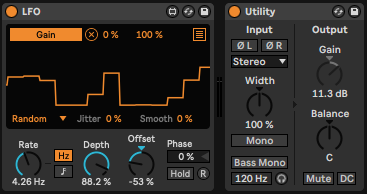
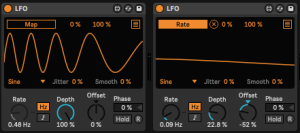
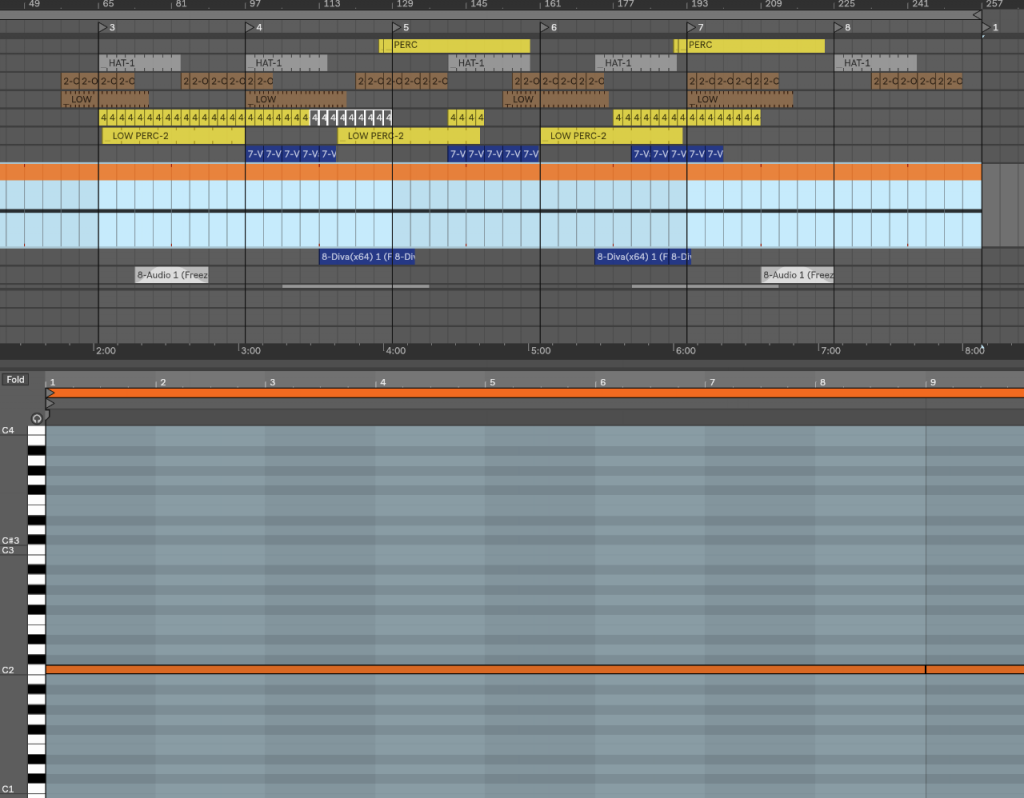
Staccato: In Ableton, you can achieve staccato by shortening the length of MIDI notes. You might also use a fast attack and release in an envelope on a synthesizer. There’s a MIDI tool named Note Length that can you can use to modify the duration. Any synths has an ADSR envelope and by playing with the decay/release, you can control the length, making any sound shorter, into staccato.

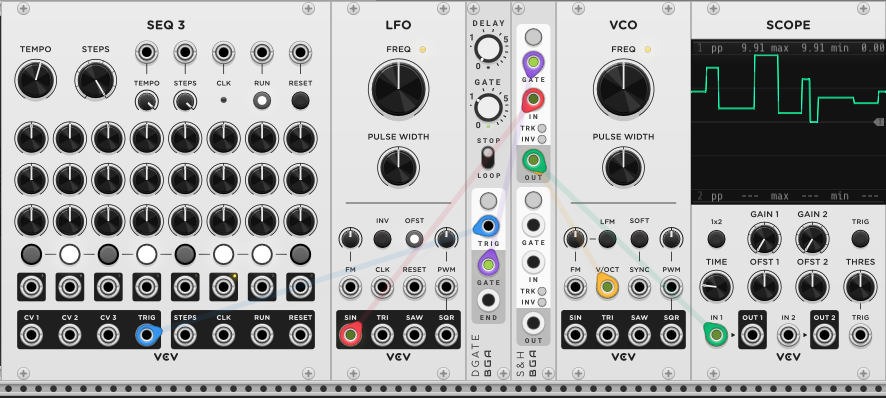
In VCV Rack, consider using a gate modifier or an envelope generator with a short decay to create sharp, short sounds.

When and why to use: Useful when you want to to introduce movement and a sense a density, in a rhythmical way. Short notes fill a space as well as leaving room for other elements. A good example would be tribal music.


Legato: For legato, ensure that MIDI notes overlap slightly in Ableton, and use a synth with a glide or portamento setting to smoothly transition between notes. When you use a midi clip, there’s an option for Legato that will stretch all notes to their longest option until it meets another note.

In VCV Rack, you can use a longer envelope decay and sustain, with a portamento module for smooth pitch transitions.

When and why to use: This can be good for thick melodies, pads, longer synth notes which create a nice background or the front part of a song.


Accent: In Ableton, you can increase the velocity of specific MIDI notes to create accents. You might also automate volume or use a transient shaper plugin. In VCV Rack, use a velocity sequencer module to modulate the amplitude or filter cutoff for accented notes. I like to pictur

When and why to use: As said, it’s useful in a groove but it can also be a sporadic moment in a song as well to create a sense of dramatic impact with a feel of heavy impact.


Tenuto: Emulate tenuto in Ableton by extending the length of MIDI notes slightly and using a slight increase in velocity. In VCV Rack, a combination of longer gate times and subtle amplitude modulation can help achieve this sustained emphasis.

When and why to use: Little arps do well to bring secondary melodies, enhancing, supporting the main one or simply to add decoration.


Marcato: For marcato, increase the velocity significantly in Ableton, and consider using a sharper attack on your envelope. In VCV Rack, use a combination of high-velocity settings and an envelope generator with a quick attack and a moderate decay.

When and why to use: Snappier attack on a sound makes it a bit more aggressive but is again, another way to induce drama and intensity in a melody.


Fermata: This is more about performance expression. In Ableton, you can extend the length of a note where a fermata occurs and perhaps automate a slight increase in volume or reverb. In VCV Rack, you might manually control the length of a note using a gate or hold module.

When and why to use: That’s an alternative way to bring


Portato: Combine the techniques of staccato and legato. In Ableton, this might mean programming MIDI notes with moderate length and slight overlap, and using a synth with a bit of glide. In VCV Rack, set up an envelope with a moderately fast decay and a bit of sustain, with a slight glide between notes.

Glissando: In Ableton, you can use pitch bend automation or a glide/portamento setting on a synthesizer. In VCV Rack, use a portamento or glide module, and create a sequence where the pitch CV smoothly transitions from one note to another.

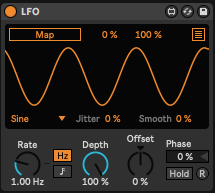
Trill: In Ableton, program rapid alternation between two MIDI notes. You might also use an arpeggiator set to a high rate. In VCV Rack, use a fast LFO or a sequencer to alternate between two pitches rapidly.


Exercises and Applications

  1. Experiment with Velocity: In both Ableton and VCV Rack, play around with the velocity of each note. Notice how changing the force behind a note alters the emotion and energy of your loop.
  2. Change Note Lengths: Experiment with shortening and lengthening notes within your loop. Observe how these changes affect the rhythm and flow.
  3. Use Automation for Dynamics: Automate volume, filters, or effects to add movement and life to your loops.
  4. Layer Different Articulations: Layer loops with different articulations. For instance, combine a staccato bassline with a legato lead melody.
  5. Play with Effects: Use reverb, delay, and modulation effects to enhance your articulations. A staccato note with a tail of reverb can create an entirely different feel.
  6. Morph Your Loops: Take a simple loop and create several variations, each with a different articulation style. This practice not only enhances your skills but also provides a plethora of material to work with. I do this as comping for effects but you can do this with midi notes as well.

By incorporating these articulations into your music production, even the simplest loops can blossom into complex, emotive

Arpeggios Technical Dive

In the vast world of music, arpeggios have served as an integral element in composition, bridging the gap between harmony and melody. By understanding its roots, one can appreciate its profound effect on modern electronic music.

Origins of Arpeggios

An arpeggio, derived from the Italian word “arpeggiare,” which means “to play on a harp,” refers to the playing of individual notes of a chord consecutively rather than simultaneously. Historically, arpeggios have roots in classical music. Classical guitarists, pianists, and harpists frequently employ them to express chord progressions melodically.

Functionally, an arpeggio can convey the essence of a chord while providing movement. It serves as a bridge between harmony, where notes are sounded simultaneously, and melody, where notes are played sequentially. This bridging effect imparts a richer texture to compositions, allowing for a smoother transition between harmonic and melodic sections.


Arpeggios in Electronic Music


With the evolution of electronic music, arpeggios found a new platform for exploration. When synths started to be commercialized, they more than often included an internal arpeggiator. Even smaller options like Casios had some simple one. Synthesizers, with their ability to shape and modulate sound, provided the perfect tool to push the boundaries of traditional arpeggios.


  1. Synthesizers and Arpeggiation: Many synthesizers, both hardware and software-based, come with built-in arpeggiators. These tools automatically create arpeggios based on the notes played and parameters set by the user. Parameters like direction (up, down, up-down), range (number of octaves covered), and pattern (the rhythmic sequence of the arpeggio) can be adjusted to achieve specific tonal effects.
  2. Arpeggio Plug-ins: Beyond built-in synthesizer capabilities, there are standalone software plug-ins dedicated to advanced arpeggiation. These tools offer extended control over how the arpeggio behaves and can be integrated into digital audio workstations (DAWs). They often come with pattern libraries, giving producers a starting point which can be tweaked further.
  3. Sequencing Arpeggios: Sequencers, commonly found in drum machines and DAWs, allow for the programming of notes in a specific sequence. This technique offers a manual approach to arpeggiation, allowing for unique and intricate patterns beyond the capabilities of traditional arpeggiators.

For many people, when musicians would first test a synth, they would at one point test the arpeggiator. In the 70’s until the 90’s, electronic music had more than often, some arpeggiation used. It could be for the bass or for the main hook.

The Impact on Electronic Music


Arpeggios in electronic music often lend rhythmic drive and melodic structure, especially in genres like trance, techno, and synthwave. The repetitive nature of these genres marries well with the cyclical patterns of arpeggios.


Additionally, with the sound-shaping capabilities of synthesizers, the tonal quality of arpeggios can be manipulated. By modulating aspects like filter cutoffs, resonance, and envelope parameters in real-time, arpeggios can evolve and transform throughout a track, adding dynamic interest.

A fascinating aspect of electronic music lies in the observation that many of its melodies are constructed from sequences which can be effectively replicated using an arpeggiator. This isn’t mere coincidence. Electronic music, with its repetitive structures and emphasis on timbral evolution, often favors linear, cyclical melodic patterns. An arpeggiator excels in this realm, offering a systematic approach to crafting these melodies.

Consider classic electronic tracks: many feature melodies that iterate over a set pattern of notes, evolving more through sound manipulation (like filter sweeps or resonance changes) than through note variation. This approach provides a consistent foundation upon which the rest of the track can evolve, allowing other elements, like rhythm and harmony, to play more dynamic roles.


Parallel and Modulated Patterns


1. Parallel Arpeggios:

  • Method: Start by setting two arpeggiators with the same note input but adjust one to operate in a higher octave range than the other. You’ll achieve a harmonized melodic pattern where both arpeggios play in tandem, producing a richer sound.
  • Experiment: Tweak the rhythm or gate length of one arpeggiator slightly. This introduces a phasing effect, where the two arpeggios drift in and out of sync, creating rhythmic tension and release. Another fun experiment to try would be to create a macro from an arpeggio and then you have a a tool that is also parallel. Make sure your receiving instrument is polyphonic because there will be many notes. I’d recommend trying the arpeggios on different speeds with a pitch/octave modifier so they play notes from different octaves.


2. Side-by-Side Arpeggios Modulating Each Other:

  • Method: Use one arpeggiator’s output to modulate parameters of a second arpeggiator or its associated synthesizer. For example, you can set the velocity output of Arpeggiator A to control the filter cutoff or resonance of Arpeggiator B’s synth.
  • Experiment: Introduce a slow LFO (Low-Frequency Oscillator) to modulate a parameter on Arpeggiator A (like its rate/speed). This will cause the modulations impacting Arpeggiator B to change over time, introducing evolving dynamics to the piece. I like to have the first Arp to be slow and random and the second one, faster, higher notes.

Power user super combo


TIP: Arpeggiators become super powerful if you use an Expression Control tool so that you can modulate the gate, steps, rate and distance. This will spit out hook ideas within a few minutes of jamming.

Plugins

There are multiple plugins that can be good alternatives to your DAW’s regular arpeggio. It’s always good to have 3rd party plugins so you can step out of the DAW’s generic sound.

Stepic

This is definitely inspired by the various modular options existing. They’re all regrouped under one plugin that does a bit what many different free tools do like Snake, but of course, the played root note will influence the sequence, which something like Snake doesn’t. Stepic is often used online in Ambient making tutorials. It is great for creating generative melodies and psychedelic melodies.


Cthulhu

Everything the guys of Xfer do, is always solid and well thought out. This one doesn’t disappoint. With so many presets existing out there, you can also randomize and quickly tweak your own sequence.


Seqund

AlexKid has done multiple tools for Ableton Live and each of them found their way into so many people’s workflow, either to start an idea or to have a quick placeholder. This one is similar to Stepic in a way, but just a different workflow. The UI is cleaner and easier to read than Stepic, making it a quick tool for adding decorative melodies or simple basslines. The randomizer has nice options for controlling its results.


Conclusion

From their origins in classical expressions to their modern applications in electronic music, arpeggios have remained a compelling tool for musicians. Through synthesizers and plugins, electronic music producers have a vast palette at their fingertips to experiment and innovate. As technology advances, it’s certain that the use and evolution of arpeggios in electronic landscapes will continue to captivate and inspire.

LFO Shapes: A Guide to Modulating Sound with Different Waveforms

Are you getting to the point where you’ve been playing with many samples and feel like that you want to tweak them a bit so you can give them character?

As you know, I teach music production and the “level 1” of music production involves playing with samples, loops and turn them into songs. Once you get good at it, you can start to to tweak those samples. But where to start?

Well, the main issue with samples is that they’re… dead. By dead, I mean they’re static because they’ve been recorded and if played in loop, there will be no variation, no changes. Music why, this repetition can be challenging to listen to as the brain gets annoyed by an idea it understood because it expect it to change. For people with ADHD, it can even be torture and since a lot of musicians have that condition, you can expect them to want something to happen.


“I’m concerned the listener will be bored by my song”, is one challenge I hear a lot when I training people.


The answer to that is to dive in sound design. One of the main point is to teach yourself to be able to hear changes in sound, because that is movement is what makes a sound always change. There are 2 main types of movement: one that is in sync with a tempo and one that is not.


To relate to how to bring movement to your music, let’s talk about a tool I abuse of and couldn’t see myself without it: Low Frequency Oscillators.


Why using it?

A Low Frequency Oscillator (LFO) is a fundamental component in the realm of audio synthesis and sound modulation. Operating at frequencies below the range of audible sound, an LFO generates waveforms that serve as control signals rather than sound sources themselves. These waveforms—such as sine, triangle, square, sawtooth, and random—ebb and flow in a repetitive manner, influencing various parameters of sound, including pitch, amplitude, and timbre. By imparting rhythmic or cyclical changes to these parameters, LFOs breathe life into static sounds, imbuing them with movement, texture, and complexity. Widely used in electronic music production and sound design, LFOs are pivotal tools for shaping sonic landscapes, adding dynamics, and creating evolving patterns that captivate the listener’s ear.

When you write your ideas/melodies, you can draw your automation for more precision, but the idea of using LFO’s, is to delegate some movement to the machine. Fast paced movement will bring some textures, while slow movement will blur the lines between where modulation starts and stops. Mid-speed will allow ear spotting changes.

LFO

In this blog post, we’ll dive into the world of LFO shapes and how they affect sound design. We’ll explore the characteristics of different LFO waveforms and how they sound when used to modulate a filter, both in fast and slow modulation scenarios. By the end of this guide, you’ll have a better understanding of how to use specific LFO shapes to achieve desired sonic effects.

Movement Uses:


1. Sine Wave: Smooth and Subtle

The sine wave is the simplest and most fundamental waveform, producing a smooth and gradual oscillation. When applied to modulate a filter, a sine wave can create gentle and subtle shifts in the sound. At a slow modulation rate, it imparts a calming, almost breathing-like quality to the sound. As the modulation rate increases, the sound becomes more pronounced, adding a sense of movement without being overly aggressive.


Sine movement are also the closest to nature.

  • Sine Wave: The Essence of Smoothness

The sine wave is a fundamental waveform that closely resembles the natural oscillations found in various phenomena, from the movement of pendulums to sound waves. Its smooth, rounded peaks and troughs replicate the behavior of many naturally occurring processes, giving it a sense of organic elegance.

  • Harmonic Content and Complexity:

The sine wave has the simplest harmonic content of all waveforms. It consists of a single frequency with no additional harmonics or overtones. This lack of complexity contributes to its inherently soothing and gentle quality. When the sine wave is used as an LFO shape to modulate a filter, it imparts a gradual, almost seamless movement to the sound. This characteristic is akin to the subtle changes in nature, such as the gentle ebb and flow of waves or the gradual shifts in wind patterns.

  • Emulating Natural Phenomena:

Many natural sounds, such as the chirping of birds, the rustling of leaves, and even human vocalizations, exhibit a certain level of smoothness and continuity in their vibrations. By using a sine wave LFO shape, you’re essentially mimicking these naturally occurring patterns of movement. This can make your synthesized sounds feel more in tune with the environment, adding an organic touch that’s often difficult to achieve with more complex waveforms.

  • Subtle Dynamics:

The slow, gradual modulation provided by a sine wave LFO can be likened to the subtlety of nature’s changes. Think of how the rising and setting of the sun or the changing seasons bring about transformations that are gentle yet noticeable over time. Similarly, the use of a sine wave LFO can introduce subtle dynamics to your soundscapes, creating an impression of evolving environments that are familiar and soothing to the ear.

  • Organic Aesthetic:

When crafting music or soundscapes, an organic aesthetic can be particularly appealing. It resonates with listeners on a subconscious level, invoking a sense of calm and comfort. By utilizing the natural sound qualities of a sine-shaped oscillator as an LFO shape, you’re infusing your compositions with an element of authenticity that can enhance their emotional impact.

The innate smoothness, harmonic simplicity, and resemblance to natural phenomena make the sine wave a powerful tool for creating organic and natural-sounding modulations. By incorporating sine-shaped LFOs into your sound design, you’re tapping into the essence of nature’s subtlety and fluidity, giving your compositions a more authentic and emotionally resonant quality. Since electronic music is often cold and very artificial sounding, to include something more organic can be a nice contrast.


2. Triangle Wave: Balanced and Versatile

The triangle wave combines the smoothness of the sine wave with more defined edges. This waveform is often used to achieve a balanced modulation effect. When modulating a filter with a triangle wave, the result is a sound that moves gradually between its highest and lowest points. At slow rates, it creates evolving textures, and at higher rates, it imparts a rhythmic quality without being too sharp.


3. Sawtooth Wave: Building and Dynamic

The sawtooth wave has a sharp ascending edge and a smooth descending edge. When used to modulate a filter, it produces a building and dynamic effect. At slow modulation rates, the sawtooth wave can create sweeping changes, gradually opening and closing the filter. When the modulation rate is increased, it generates an aggressive and impactful movement, ideal for creating dramatic transitions or evolving textures.


4. Square Wave: On-Off Intensity

The square wave alternates between two levels, creating an on-off pulsating effect. When applied to filter modulation, it introduces a distinct rhythmic quality to the sound. At slow rates, it produces a gating effect, with the sound fading in and out. As the modulation rate increases, the square wave generates a clear pulsating rhythm, suitable for adding rhythmic complexity to the sound.

Like any shape of an LFO, you can play with the depth of it’s output. If you keep the depth low for a square shape, you’ll have a nice variation but in two stages.


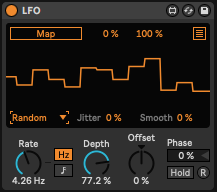
5. Random/Noise Wave: Chaotic and Experimental

The random or noise waveform introduces an element of chaos and unpredictability to modulation. When modulating a filter, it creates a sense of randomness and texture. At slower rates, it can add a subtle layer of complexity to the sound, mimicking natural variations. At faster rates, it produces a glitchy and experimental effect, making it perfect for unique soundscapes.

I recommend the use of random on sounds you never want to be the same twice such as the velocity of a sound, the length of a percussion, the tone of a pad. It is very useful to add variations, slow or fast.

TIP: Use the smooth option to have less abrupt changes.


6. Binary output: Computer Language

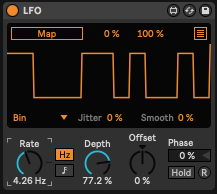
As of my last knowledge update in September 2021, Ableton Live’s “Binary” form might refer to a specific device, feature, or concept that was introduced after that time. However, if we’re discussing a feature related to binary operations or manipulation, here’s a general explanation of how binary operations might be used in a music production context:

1. Binary Operations:

Binary operations involve manipulating binary data, which consists of sequences of 1s and 0s. In music production software like Ableton Live, binary operations can be used to generate rhythmic patterns, create variations, and add complexity to your music. They can be particularly useful for creating glitchy, syncopated, or experimental rhythms.

2. Step Sequencers and Binary Rhythms:

Step sequencers are commonly used to create patterns of notes or events over time. In the context of music production, a binary step sequencer might allow you to turn steps on or off, creating a binary pattern. Each step represents a binary digit (1 or 0), which corresponds to a note or event being active or inactive.

For example, if you have a binary pattern of “101010,” it might translate to a repeating rhythm of long-short-long-short-long-short in a musical context. This can be a great way to generate interesting, irregular rhythms that deviate from traditional quantized patterns.

3. Creating Glitch Effects:

Binary manipulation can also be used to create glitch effects. By toggling certain bits on and off, you can introduce unexpected variations and unpredictability to your sounds. This is especially useful for genres like glitch, IDM, and experimental electronic music.

4. Sound Design:

Incorporating binary patterns into your sound design can lead to unique textures and timbres. You can use binary patterns to modulate various parameters of your synthesizers and effects, producing evolving and dynamic sounds.

5. Automation and Control:

If Ableton Live introduced a feature named “Binary,” it might also involve binary automation, where you can use binary patterns to automate various parameters in your project. This could add a layer of complexity and movement to your music over time.

Since my knowledge is based on information available up until September 2021, I recommend checking Ableton Live’s official documentation, user guides, or online resources for the most up-to-date and accurate information about the “Binary” feature in Ableton Live. This will provide you with step-by-step instructions on how to use it effectively in your music production workflow.


TIP: To hear better how a modulation is affecting sound, map the LFO to a Utility so you can hear amplitude (volume) modulation, which is easier to the ear since it is very obvious.


LFO Modulated LFO

The concept of using one LFO to modulate the speed of another LFO is a fun technique that can yield intricate and non-linear modulation patterns. Let’s explore how this works and why it leads to non-linear results:


LFO Modulation Basics:

Low Frequency Oscillators (LFOs) are typically used to modulate parameters such as pitch, amplitude, filter cutoff, and more. They generate waveforms at frequencies lower than those of audible sound, resulting in modulation that occurs over time. These waveforms include sine, triangle, sawtooth, square, and random waves, each with unique characteristics.

Modulating LFO Speed:

When you use one LFO to modulate the speed of another LFO, you’re introducing a layer of complexity to the modulation process. Instead of directly affecting the sound parameter itself, you’re altering the rate at which another LFO oscillates. This means that the rate of change in modulation becomes variable and dynamic.

Ever heard the sound of a bouncing ball? This can be achieved with this technique.


Non-Linear Effects:

The key to understanding the non-linear effects lies in how the modulation rates interact. When one LFO modulates the speed of another LFO, the resulting modulation pattern becomes intricate and less predictable than simple linear modulation.

Consider this scenario: Let’s say you have an LFO (LFO1) modulating the speed of a second LFO (LFO2). As LFO1 varies its speed, it introduces fluctuations in the rate at which LFO2 modulates the target parameter. The result is a complex interplay of modulation speeds that can lead to unexpected and non-linear outcomes.

For example, if LFO1 oscillates between fast and slow speeds, the modulation from LFO2 will speed up and slow down accordingly, leading to irregular and evolving modulation patterns. These irregularities create a sense of unpredictability and complexity in the modulation, which can add a unique and experimental flavor to your sound design.

Applications:

  • Texture and Movement: Modulating an LFO’s speed with another LFO can add layers of texture and movement to your soundscapes. The constantly changing modulation rates can create intricate sonic textures that evolve over time.
  • Dynamic Rhythms: The non-linear modulation introduced by this technique can result in dynamic and evolving rhythms. It’s a great way to inject rhythmic complexity into your music, perfect for genres like IDM, ambient, and experimental music.
  • Experimental Sound Design: If you’re aiming for experimental or otherworldly sounds, using one LFO to modulate the speed of another can lead to unconventional and unpredictable outcomes that can set your sound design apart.

In summary, using one LFO to modulate the speed of another LFO introduces a layer of complexity and unpredictability to your modulation patterns. This technique can lead to non-linear results that are rich in texture, movement, and dynamic rhythms. It’s a powerful tool for sound designers looking to push the boundaries of conventional modulation and create unique sonic landscapes.

TIP: How many LFOs should be used in a project isn’t important. But you’ll have more cohesion if you use a few “master LFOs” that control multiple parameters across the song as they will move all together elements, creating an orchestral effect.


LFOs as Melodies and Compositional Tool


Certainly, LFOs combined with a sample and hold module in the modular synth world can produce intriguing and unique melodies. The type of LFO waveform used in conjunction with the sample and hold module directly influences the character of the generated melodies.

If you look at a melody in the piano roll, you’ll see that notes go up and down or perhaps go up then down. Those are shapes an LFO can do.

How to set it up?

Send the output of the LFO to a Sample and hold. You can ping the sample and hold at the moment you want a note to play. The sample and hold will look at the data sent by the LFO at the moment it was pinged and then output the note which can be sent to an oscillator.


Let’s see how different LFO shapes contribute to specific types of melodies:

1. Sawtooth LFO: Progressive Ascending Melodies

Using a sawtooth LFO with a sample and hold module can create melodies that ascend progressively. As the sawtooth LFO ramps up, it triggers the sample and hold to capture and hold the voltage at specific points. The resulting melody will have a rising, stair-step quality, with each note being slightly higher than the previous one. This combination is well-suited for building anticipation and tension in a composition.


2. Square LFO: Stepped and Rhythmic Patterns

A square LFO paired with a sample and hold module generates stepped and rhythmic melodies. The square wave’s on-off nature causes abrupt shifts in the sampled voltage, creating distinctive steps in the melody. When used at different rates, the square LFO imparts a rhythmic quality to the melodies, making them danceable and syncopated.


3. Triangle LFO: Smooth and Flowing Melodies

A triangle LFO combined with a sample and hold module produces melodies with a smooth and flowing character. The triangle waveform’s gradual rise and fall influence the sampled voltage, resulting in melodies that transition between notes in a less abrupt manner compared to square or sawtooth waves. This combination is ideal for creating melodies that evoke a sense of fluidity and motion.


4. Random/Noise LFO: Chaotic and Experimental Melodies

Pairing a random or noise LFO with a sample and hold module leads to chaotic and experimental melodies. The unpredictable nature of the random waveform causes the sample and hold module to capture varying voltages, resulting in melodies that seem to wander unpredictably. This combination is perfect for generating avant-garde or ambient melodies that challenge traditional musical expectations.


5. Sine LFO: Serene and Ethereal Melodies

Utilizing a sine LFO with a sample and hold module produces serene and ethereal melodies. The sine waveform’s smooth undulations translate into gentle fluctuations in the captured voltage. The resulting melodies are subtle and soothing, with a dreamlike quality that’s well-suited for ambient or meditative compositions.


Thanks for reading my tribute to a often overlooked tool in music and now you know why I’m in love with all the possibilities behind it.


Learning how to make melodies

One of most difficult things for a self-taught musician to get the hang of is writing melodies. Even for a trained musician I believe melody is still a challenge; using theoretical knowledge to come up with the right melodic vocabulary to really express what one wants to express can be difficult. When I started to make music more seriously, I was hanging out with a few friends like Mateo Murphy, Mitchel Akiyama, and Tim Hecker. At the time, Mitch taught music theory and piano. I once asked him if he could teach me as well, because I wasn’t feeling confident with melodies at that time. Learning more theory really felt it was the right thing to do; if I was going to write music, I thought more theory would be for sure be an essential part of improving.

Mitch loved my music and after thinking about it, said:

There’s nothing wrong with your melodies. I understand you might not like them, but learning more music theory doesn’t mean that you’ll like them more. I think [music] classes would pull you in the wrong direction and I’m more interested to hear what you’ll do on your own in the years to come.

This is one of the most surprising things I’ve probably been told, even in the time that’s passed since Mitch gave me this feedback. At first I was confused if Mitch’s answer meant that I already knew enough “naturally”, or that I had a “beginner’s mind” which was lucky or naively interesting to him. In art, having a naive approach can have certain charm but can also be awkwardly odd. I read a quote from Picasso during my studies in arts that has stayed with me (I did theater and stage comedy for years before making music). Picasso once said “it took me four years to paint like Raphael but a lifetime to paint like a child.”

Children create and express themselves in a very spontaneous way, and I believe that Picasso was referring to their state of mind. Tim Hecker had the same kind of vision, and if you listen to his music, you’ll hear a lot of letting go in how things happen, but his approach is still controlled. While he was doing a lot of granular synthesis in metal music, I was dealing with melodies coming from a sound source or sample.

The beauty of electronic music is how we sample music to reinterpret it into a different form. Some will use a sample as-is, others prefer changing it a bit, and then there are the people who change it completely. In all cases, working from a source gives an artist healthy limitations in working with other tones and notes that must all work together.

One thing you can do is use Ableton’s Sampler and slice out parts from a musical loop you like, then with the MIDI notes you can change the order around and you’ll automatically have something new. If you don’t like the sound (say a piano) but you like the notes, then you can bounce the new melody and use Ableton’s melody extractor to have new MIDI to send to a synth or sampler using a different sound.

Next comes the need to add extra notes, but what if they’re off? What if they’re completely messing everything up? Again, what seems to most people like the best answer to this problem lies in learning more music theory.

There are multiple ways in which knowing more theory would potentially help, but let’s first consider some facts.

First off, if you like electronic music or more low key music, I’m sure you all know some songs that have very little musical content. Some songs are made on 2-3 notes/chords and can still pull it off. So why not try to see how far you can go with whatever material you already have before making it more complex? You’d be surprised sometimes that less might actually be better. The clearer the message, the more powerful the bond you can create with the listener, and sometimes this implies to reducing melodies to essentials.

However, some people think that if you stick with only simple content, you’ll never really evolve as a musician. I don’t believe this. I could say the same thing about sound design, synth design, mixing, and mastering. You can’t expect to know everything so fast and that you’ll instantly be great at it. But the more you work with one thing, the more comfortable you become. Once you have a good base skill set, you start to take risks that intuitively lead you to the results you are looking for. Same thing goes for percussion design. People often think that using a sample is not being creative, but it actually makes you study the best sample for a particular percussive element, and when you find great ones, then you’ll want to know how they’re made. If you start by designing sounds before sampling, you are venturing into territory where your references might be poor. And again, this also goes for melodies and production.

In other words, it’s more important to practice and actually finish songs; keep it low key and constantly be on the lookout to find inspiring references or source material.

Again, some will say that music theory would do no harm in helping. Of course it won’t, and if you dig, you can find multiple music theory classes or tutorials online. There are also plugins like Scaler that can help you with propositions. But for me, I find myself agreeing with Mitch and encourage people to try to approach melodies more personally.

One of my current musician buddies is Bryan Highbloom who is a jazz musician who I’ve collaborated with. With his 40+ years of playing, he’s seen a lot of shows and explored many different approaches [to music], so I often like to ask him questions to hear his views. Yesterday I asked him about the importance of progressions, theory, and such.

The most exciting time of my life when I started to learn to play was when guys like Coltrane came up with something that was completely different from anyone else. He had his own vocabulary. At the time, people were really fed up of doing the same progression, scales, and routines. It felt like we were making music for others to get, not music the way we want to make it. Coltrane was fresh. He knew what he was doing, but it was also because he wanted to break rules and get out of the cage. I’m a free jazz guy. I like to try new things all the time. I feel like I see more that way and then it gives me ideas for the next jam based on what was inspiring me. But the thing is to be in the moment and to record yourself, all the time.

Though he didn’t mention it specifically, listening to past sessions we’ve recorded, he liked to have a melody frozen in time, something you don’t catch and have to let go. But with MIDI, we usually trim out the parts we like less and move them around. So in a way, to get interesting content you need to spend a lot of time in the arranger and move things around. Trust your ears – they should know when something is off. If you’re unsure, use Ableton’s Scales and you know you’ll be in tune.

From my circle of friends, Mateo was on the other side of the spectrum with his approach to melody. His view was that it was important to have structured melodies and that it would have to “work” harmonically speaking. His background and main interest at that time was DJ’ing, so melodic and harmonic structures were essential to help him achieve his sets. I like to have one person I talk to that has a different view, because it keeps me structured in my work and stops it from being too all over the place. Mateo’s and my common interest for DJ-oriented music has always been there, and having that always in the back of my head made me think about pushing my boundaries somewhere between Mitch’s vision and something more accessible.

This is why I learned about progression and theory only when I felt I needed to have one point clarified when I really needed it. But not to create an entire melody, all at once.

I once had a contract where I was asked to finish a melodic song. The first thing that I noticed was that the melody was out of tune and sounded very off. But the client loved it as it was. I showed him that just by adding scales, we could “remove” off keys so he sees the real tones of his phrase. But of course, this would change the vibe completely, which was not what he wanted. We both asked a few people to validate the track, and while everyone pointed out that there was a problem, the client wanted to keep it the way it was.

The moral of this story is, if you’re in doubt about a melody, ask around. If you’re tone deaf, it’s important to learn this about yourself sooner rather than later, and work to improve it. But then again, if you actually love dissonance that’s all well and good, but be ready to face a lot of frowns. Not being good at writing melodies doesn’t mean you can’t get anything done, maybe you have other strengths that you can focus on!

SEE ALSO : A Guide to Percussion

Basic tips for writing melodies

In our Facebook group, I was asked to share some tips about writing melodies and how to approach this process while arranging. In electronic music, many artists are self-taught and the concept of music from a melodic and harmonic perspective is often built over intuitive understandings and reading online tutorials, which is helpful, but perhaps lacking guidance for making techno or ambient music. Here are a some simple but useful tips for writing melodies that you can do using Ableton:

Find the root key

Each song has a root key. If you look on Beatport for instance, it will indicate the root key so DJs who mix in key will be able to know what they’re dealing with.

A track in G minor on Beatport.

DJ’ing in key is something I love to do once I have a bunch of really interesting sounds I want to bring into a song. Basically, if you follow my non-linear production technique, you’ll work on sound design for a while and when things get shaped into a pattern, you might want to introduce some melodic elements which will help everything come together. This is often where self-taught producers start to experience problems because their song feels like it’s all over the place and lacks an overall direction.

With writing melodies, where should you start?

First, you should decide on the root key. For instance, let’s say you choose C on your keyboard; I would leave that note playing through the entire song at first and then work around it. This means that the fundamental note of your song will be in C, as well as your bass and the other elements you’ll develop around it.

Tip: Use the Fixed grid of 8 bars to make it easier to make longer notes.

Scales, chords

I’m not going to dive into music theory so perhaps you want to do a bit of reading on the subject of scales if you’re not familiar with them, but after picking up your root key, I strongly suggest you use scales and/or chords to decide on how to develop your melodies. Using scales in Ableton will limit the notes you play to the ones that are included in the scaling – this really helps to make sure your melodies don’t sound “off” while building the overall emotion of your song.

Once you get comfortable with scales, you can have them change throughout the song to change emotion and give modal color to the melodies.

As for chords, it’s the same sort of thing. Fore example, if you pick a minor chord (three notes played simultaneously) with a root of C, you’ll immediately have a choice of a three notes to include in your melody. If you keep the song in that key/chord, you don’t have to play all three notes at once to have the chord itself.

How can I determine the notes of a chord or scale?

Insert the scale tool to Ableton or any equivalent plugin (note: there are many alternatives online if you google it). Then you can reference the notes that are from the chord by inserting phantom notes from your sequence, then you can play hit play. The beauty of using Ableton Scales is that if you place a note that is outside of the chord triad, the plugin will re-align it to where it should be, keeping you from sounding off.

The 1 octave, 1 bar motif technique

This method no secret to anyone, but still a truly personal way to write a melody. I usually create a three-note motif to start with, make sure it’s only using one octave, and not longer than one bar. Honestly, I can listen to this motif for a long time and – for myself – just while listening to it new ideas will emerge, pretty much automatically.

What I like about Ableton’s MIDI tools is how easy it makes it to build evolving ideas. The “Duplicate loop” tool makes it easy to create evolving patterns.

My initial loop will be duplicated and in the second bar, I’ll add new notes that came into my mind.

…and so on until your motif evolves to have your chorus, verse, etc. Basic melody writing isn’t really much more than that.

I usually like to copy the motif to a lower octave later on to generate a bass line.

TIP: Try flipping or reversing a pattern for fun results.

ADSR, Velocity and groove

Now that your melodic sequence is built, it will be important to give it life by adding a groove template on it. This will be valuable to make the melody less mechanical and more human-like. I usually like to add other plugins:

  • Note length: play with the lengths from shorter to longer; sometimes having variations like this is also a great way to do transitions from section-to-section.
  • Velocity: complementary to the groove template, this really allows for random velocity to kick in which can create elements of surprise. Make sure to freeze/flatten your sequence so you don’t have different versions every time!
  • ADSR: Don’t forget to modulate your melody using variation in the envelop such as the attack through the release. This is a nice variation to the note length and can give a feeling the melody plays backwards.
  • Arpeggiators: useful to generate some extra ideas to the existing motif. Try it with the diverse random options.
  • Melodic Steps: quite a power horse tool to generate ideas. Try it and see how it evolves.

Let me know of your own techniques for writing melodies and perhaps I can add more ideas here!