Pheek’s Guide To Making Dub Techno

I think making Dub Techno is one of the most requested blog posts I have been asked to do, and for years, I resisted it. I think there was some sort of shyness and perhaps, a lack of technical vocabulary on where to begin when teaching others how to make Dub Techno. But I think it’s time to take a chance and open up on all the ideas I compiled about my beloved Dub Techno direction.

This post won’t necessarily explain how to do the typical dub techno. While I’ll cover some of the most asked questions about it, I want to expand on the philosophy and aesthetic itself so you can take the best part of it and merge it into how you work.

Origins of Dub Techno

Before we get into how to make dub techno, it’s very important to me to honor the artists who were behind the genre and to talk about where the genre started. For this, there are some nice videos by Dub Monitor. There are these 2 videos that explain the origins of dub techno better than I could about how the genre started and how it developed.

Dub techno is a subgenre that emerged from the fusion of two influential musical styles: dub and techno. Dub music itself has its origins in Jamaica in the late 1960s, with pioneers like King Tubby and Lee “Scratch” Perry. Dub music is characterized by its heavy use of effects, echo, reverb, and the manipulation of existing tracks, often stripping away vocals to emphasize the rhythm and instrumental elements.


The Techno Connection: Techno, on the other hand, had its beginnings in Detroit in the early 1980s, with artists like Juan Atkins, Derrick May, and Kevin Saunderson. Techno is known for its repetitive beats, synthetic sounds, and a futuristic, often industrial, aesthetic.


The Emergence of Dub Techno: Dub techno began to take shape in the early 1990s when electronic musicians started experimenting with the fusion of dub’s spacious and echo-laden soundscapes with the rhythmic patterns and synthetic textures of techno, thus making dub techno. The result was a genre that retained the hypnotic beats of techno but incorporated the atmospheric and dub-infused elements.


Basic characteristics to consider while making dub techno: Dub techno is characterized by a few key elements:

  • Reverberating Soundscapes: Dub techno producers use extensive reverb and delay effects to create deep and immersive sonic environments. These effects give the music a sense of spaciousness and depth.
  • Minimalism: Similar to techno, dub techno often relies on minimalistic compositions with a focus on repetition. The use of minimal elements allows for a meditative and trance-inducing quality.
  • Subdued Rhythms: While techno can have a pounding and relentless rhythm, dub techno tends to have more subdued and laid-back beats. The rhythm is often more relaxed and groovy.
  • Incorporation of Dub Techniques: Dub techno incorporates dub’s signature techniques like echo, dropouts, and phase shifting to create a sense of movement and exploration within the music.


Notable Pioneers: Some of the early pioneers of dub techno include Basic Channel, a German duo consisting of Moritz von Oswald and Mark Ernestus, and their various aliases like Maurizio and Quadrant. These artists were instrumental in shaping the genre and creating its distinctive sound.


Global Influence: Dub techno’s influence quickly spread beyond Germany, with artists and labels from around the world embracing the genre. Labels like Chain Reaction and Echocord played a significant role in promoting the making of dub techno, and artists from countries like Sweden, Finland, and Japan contributed to its global appeal.


Obsessing on the “How-To” While Making Dub Techno

Over the last 25 years, I’ve come upon multiple and countless discussions online about how the genre is made. People would discuss what piece of equipment was used and be obsessed with recreating the original sound. While this is a state of mind that I totally get – because I also get obsessed about how certain sounds are made – I can’t help myself asking why would you want to redo the exact same results. In a way, it explains why the genre never died in the last decades. There are always people who keep making dub techno.

I think there are a few motivations to join the sound of dub techno. On one side I see it as a self-soothing experience and on the other, by passion, to join others who also make it.

But my take is that people are puzzled about how something that sounds so simple can actually be so mind-boggling to do.

The Main Aspects Of Making Dub Techno

I’d like to cover multiple techniques and strategies to infuse your music with the dub techno approach while also making sure we apply certain tweaks that can make your music have a similar aesthetic.

The first thing to explain is that there are 3 main categories to consider while making dub techno:

  1. Sound Design
  2. Modulation
  3. Colour.

Dub techno has its own touch and sound which will be explored below.

Dub Techno sound design

One of the main characteristics of dub techno comes from the pads and stabs that are fuzzy, melancholic, and enigmatic. In itself, those pads aren’t necessarily that complex to do. I found numerous tutorials on YouTube and have 3 of the ones I prefer. I find they’re well explained and show in similar ways, how to reproduce them.


How To Make Dub Techno Chords

As you see in those tutorials, the way the synth is configured, is rather simple  – it’s usually one chord that repeats, but it has specific modulation and color, as I explained earlier. Once you start experimenting with this pad, you’ll already be in business and have the basis for making dub techno.

But honestly, when I found out how to do it, I thought it would make more sense to be inspired by those techniques but to go a bit deeper into the sound design.

In my past dub albums Tones of Void, Intra, and White Raven, I basically used a bunch of synths but kept them very dark in tone (eg. lower notes around 1-3 octaves) with not too many harmonics (eg. filtered). Once you understand that any synths can do that, you won’t be limited to the classic sound of dub techno.

How to make dub techno melodies

When it comes to melody-making, there are multiple approaches. There’s the classic one note (yes, one note) from the old school dub techno (Basic Channel, Chain Reaction) and there is also a more structured approach (Pablo Bolivar, Yagya), almost pop-oriented dub techno. Both work but the harmonic nature of the melodies are often in a minor key, with the root key of D being often a popular choice.

How to make dub techno bass

While making dub techno, bass is often, also very simple, with it being than often than not a one-note thing. Simply using sine oscillators and pushing them forward in the mix will often be the aesthetic of dub.

Dub Techno synth options

As we saw in the 3 videos, dub can easily be created in any context with any soft synth. Over the years, I have tried and tested many of them. While the native plugins of Ableton can do the job, VCV has been my playground but it’s not for everyone even if it’s free and there are so many tutorials out there. Here are some of the soft synths people love.

  • Diva:  So many tracks I hear in mastering use Diva. It has a distinct sound but in a good way. It sounds warm, and lush, and is close to some hardware options. It’s pricy but you get that sound we love.
  • Pigments: Pigments is versatile, open, powerful, and extremely creative. There is a huge playground here with the option of a preset store within the synth itself.  You need to work a bit to get the dub sound but it sounds nice.
  • TAL-U-NO-LX Synth: Juno has been used over the years as a default synth for dub techno, mainly the chords. This synth option works well and is close to the real thing.
  • Go2: Cheap in price but with big results. Even the presets will give you some nice options to start with. I love this one.
  • Blue-III: Rob Papen again and this one is deep. Not for the beginner as you can easily get lost in it but the sounds you get are very impressive.
  • Prophet VS-V: Not many people know but it was said that the Prophet VS was what the early guys of Chain Reaction were using. When there was a VST version of it, we were all drooling. While it is very powerful and nice, it is not the easiest to program. But the sound is very impressive.
  • Prophet 5: This is a synth we all used for years in the early 2000s when we wanted the dub sound. It aged so well and it’s fun to use. You get tons of options for synths, pads, and stabs. Recommended and often on sale.
  • Orange Vocoder: This is not a synth per se, as it is of course, a vocoder but this was used by so many people as you can basically throw any sound in it and this plugin will turn it into a lush synth sound. Really powerful and a nice alternative to just synths.


Dub is a vibe and an aesthetic, not a bible. You take the aesthetic and apply it to any sound.

Once you pick your aesthetic, you can apply the concept to any synths you have.

What you need is to create and amplify your harmonics with saturation (tube and tape do great), then have a colored filter and sent to delay and reverb for cosmetics. This means that if you have any synth of yours, you can make it dirty with a saturation and then filter it. The reverb will then do the trick.

What will make a difference is to juggle with the most genres of saturation: distortion, amp and saturation itself. Using a combination of the 3 will bring really lovely colours but be careful not to overcook your sounds. Keep in mind that in mastering, it will be boosted so what sounds like a pleasant distortion can become overwhelming later on.

Some of my saturation go-tos are below.

Saturation plugins used in making dub techno

  • Surge XT: (FREE!) This is a collective of developers who managed to create a badass synth and free, high-quality, effects. Their Chow Tape is quite amazing but also all other distortion/saturation tools. A must-have and hey, it’s free.
  • RC-20: This one came in popular in the lofi hip-hop community as a de facto plugin to have. It adds lofi vibes but this is an element dub techno also has so the cross use is totally on point.
  • Reamp: The guys behind this are very solid and this one has a beautiful series of plugins which are all very solid. I like the colour this one has.
  • Saturn 2: Anything Fabfilter is a leader in its domain. Saturn is not an exception, as it is very good at what it does, which is to make anything too pretty, a bit uglier, dirtier.
  • PSP Saturator: PSP is one of my favorite company for their plugins. I love their EQs and compressor and this saturator does a great job on pads.
  • Satin: This is such a handy tool here. It is tape saturation/simulation, but also a tape delay which can create weird reverbs and wobbly signals. Once you start using it, you’ll be using it all the time.

Reverb plugins for dub techno

While Ableton’s reverbs option can do the job, I always rely on third-party VST for that part. It’s hard not to mention Valhalla plugins for this. The Supermassive is free and the Digital Reverb is sort of a perfect match for dub. If you have to pick, I would recommend experimenting with “plate” models and some use of a “hall” as well for sustained notes.

Whatever you do, to me, Dub Techno really starts with a heavy use of reverb, which has to be modulated, filtered, and distorted. Understanding how to use your reverb and combining it with a delay will ensure that you have a proper dub mood. If you pick the reverb properly, you almost could say that you have 50% of your job done. The rest are the sum of a lot of details but when you have your reverb done right, you’ll automatically feel you’re making dub.

Anyone who knows me has heard my affectionate passion for reverbs. I compiled some of my favorites for Dub Techno.


The saturation tools native to Ableton aren’t too bad but can be recognizable easily by an educated ear.

  • Lexicon 224: I’m a big fan of Lexicon. It has a character and tone that I love. Not sure what it is, but the grain and how it feels just does it for me.
  • Springs: Spring reverb is a type that makes sounds sent through it, sound liquid. This works well with percussive sounds and you’ll feel like some classic dub vibes.
  • Fabfilter Pro-R: This one is amazing for spaces. It is a powerful tool to shape grandiose halls and give tremendous space.
  • Adaptiverb: There’s different tools on that ones that makes it unique. It has a big array of presets that are tuned to a root key, which can create pads out of unusual sounds. Quite unique.
  • SP2016: I call this one a Cadillac of reverbs. It’s elegant, warm, very ear pleasant and very visual. I feel immersed when using it.
  • bx_rooms: Extremely versatile but the interface can be intimidating. It has lovely options for different room types.
  • Blackhole: This one is spooky, deep, powerful. It is a reverb that makes you go in space as it sounds pretty sci-fi, rich, and gigantic sometimes.


Now reverbs for dub are essential but you’ll need delays as well. You can either use long delays or short. There’s no right or wrong but the use of delays helps you take very simple sounds and create repetition, which transforms the straight-forward pattern into psychedelic equations. Delays, combined with reverb, create a thick background and will make any sound – which feel empty at first – fill with a velvety, dreamy carpet. I think for a lot of fans of the genre, it’s a quality they’re after.

Echo and Hybrid Reverb in Ableton. They can do a long run if you don’t want to break your piggy bank.

Additional plugins for making dub techno (delays, pitch modulators, etc).

  • Diffuse: These guys are dub lovers and this tool here is a go-to for reverb/delay as it’s an emulation of the famous Roland Space Echo which was in so many studios.
  • Modnetic: Same guys as above. This one is a combination of all your need in one place to turn a single, boring sound, into a dub tune.
  • Echorec: The guys at Pulsar are very competent at recreating hardware toys and they created a tape delay with self-oscilating, magnetic fields and all you wish for in a dirty delay.
  • Galaxy Tape Echo: This is UAD’s recreation of the Roland Space Echo and it is really well done.
  • Tal Dub-X: As the name implies, this is a station with all the options to turn a simple delay into a modulated one.
  • Echo Cat: Another beautiful emulation of a tape delay. But a really solid one.
  • PSP 42: Popularized by Richie Hawtin in the early 2000s, where he’d loop-delay sounds and pitch them up/down, the PSP42 was used abusively in all his sets for years. Rich was basically doing dub techniques in his own way.


Modulation in dub techno

If you just take any synth sounds and send it to your effect chains, you have done the first step but it won’t be complete until you make it move, react, and evolve into modulations. There is a lot to take in in this section because this is also one of the most discussed topics in my blog – I have covered it inside out already but you now know why, because Dub Techno is all about modulations. Once you dip your toe in those waters, you’ll become excited about it and apply it everywhere.

If you watched those tutorials on how they make the dub pads and chords, you’ll see that they use modulation on the filter. There is both use of an envelope and LFO to modulate the frequency of the filter but also its resonance. That’s just the tip of the iceberg to me. If there is a parameter on a plugin, I like to think that it shouldn’t remain static and have it move, even a little bit.

But of course, a lot of this can be handled by my favorite “Swiss army knife”, Shaperbox which is designed for modulation on all levels. A must-have.

When to use envelopes and LFOs when making dub techno

Well, if it’s a modulation that is reacting to an incoming signal such as when a sound comes in, I want the filter to react, then you’ll use an envelope. That kind of modulation is excellent for accentuating or attenuating sounds, creating a more organic feel to the processed sound.

If you want constant movement, LFOs are excellent for that. They just move to the tempo or not. They give the illusion that things are constantly on the go and help blur the lines of linear arrangements.

There’s one precious bundle that I love from Make Noiss that has so many little tools, perfect for modulation and midi signal processing. Not to forget my friends at Manifest Audio and their large array of max patches as well that are perfect for modulation but they also curated many racks for dub.

The 3 Amigos are here to turn a static idea into an animated figure.

Colours of Dub Techno

I know you might be confused by colour here as we discussed of saturation as a form of colour but this is the last touch. The colours here are from different sources else than saturation and also, very complementary. What I’m referring to are the effects of the chorus, phaser, flanger, tremolo, vibrato, auto-pan, harmonizer, wobbler, and also, one of the most important parts which is the hiss. Apart from that last one, all those effects are often heavily used in dub and it’s quite a nice touch to pick one or 2 on your sounds.

These guys are a lot of fun and sound pretty lovely.

Chorus, phaser, and vibrato

Chorus, phaser, and vibrato work really well with synths, pads, stabs, and chords. They give this engaging, trippy, stereo effect that quite often, makes a dull sound jump out of the mix. Keep an eye to make sure you don’t get phasing issues which would be an overuse of one of those effects. Phasing is quite common in dub and I often fix those issues in mastering. It’s better to control it when decorating your mix.

Flanger

Flanger gives this jet-sound feel to anything. It brings pfshhh sound to metallic or noisy sounds and can be quite psychedelic if used at a low level. I like it on hats and delays.

Tremolo

Tremolos are sort of a secret sauce that everyone underuses. It’s basically a slow or fast modulation of the amplitude of a sound. It is a superb tool for creating 3D feel where you feel sounds go away from you and come back. It turns anything linear into a lively, feeling motion. At a faster speed, it can even be used as a swing/velocity for percussion. Combine it with an auto-pan and you have head spinning spaced out moments.

The hiss part is quite important as well. The noise floor is something deep in the DNA of dub. There are multiple noise makers. You can dig the internet for noise sources, recordings or noise-making tools (RC-20). Satin has a nice hiss that you can use as well.

Conclusion

Making dub techno should be a playground of experimentation. It’s a genre that I approach with a very open mind and so do many other fans as well. While often people feel like they’re just repeating the clichés and perhaps nothing new comes out of it, then I’d say, dig deeper. There are some gems from people who push the boundaries of the genre.

LFO Shapes: A Guide to Modulating Sound with Different Waveforms

Are you getting to the point where you’ve been playing with many samples and feel like that you want to tweak them a bit so you can give them character?

As you know, I teach music production and the “level 1” of music production involves playing with samples, loops and turn them into songs. Once you get good at it, you can start to to tweak those samples. But where to start?

Well, the main issue with samples is that they’re… dead. By dead, I mean they’re static because they’ve been recorded and if played in loop, there will be no variation, no changes. Music why, this repetition can be challenging to listen to as the brain gets annoyed by an idea it understood because it expect it to change. For people with ADHD, it can even be torture and since a lot of musicians have that condition, you can expect them to want something to happen.


“I’m concerned the listener will be bored by my song”, is one challenge I hear a lot when I training people.


The answer to that is to dive in sound design. One of the main point is to teach yourself to be able to hear changes in sound, because that is movement is what makes a sound always change. There are 2 main types of movement: one that is in sync with a tempo and one that is not.


To relate to how to bring movement to your music, let’s talk about a tool I abuse of and couldn’t see myself without it: Low Frequency Oscillators.


Why using it?

A Low Frequency Oscillator (LFO) is a fundamental component in the realm of audio synthesis and sound modulation. Operating at frequencies below the range of audible sound, an LFO generates waveforms that serve as control signals rather than sound sources themselves. These waveforms—such as sine, triangle, square, sawtooth, and random—ebb and flow in a repetitive manner, influencing various parameters of sound, including pitch, amplitude, and timbre. By imparting rhythmic or cyclical changes to these parameters, LFOs breathe life into static sounds, imbuing them with movement, texture, and complexity. Widely used in electronic music production and sound design, LFOs are pivotal tools for shaping sonic landscapes, adding dynamics, and creating evolving patterns that captivate the listener’s ear.

When you write your ideas/melodies, you can draw your automation for more precision, but the idea of using LFO’s, is to delegate some movement to the machine. Fast paced movement will bring some textures, while slow movement will blur the lines between where modulation starts and stops. Mid-speed will allow ear spotting changes.

LFO

In this blog post, we’ll dive into the world of LFO shapes and how they affect sound design. We’ll explore the characteristics of different LFO waveforms and how they sound when used to modulate a filter, both in fast and slow modulation scenarios. By the end of this guide, you’ll have a better understanding of how to use specific LFO shapes to achieve desired sonic effects.

Movement Uses:


1. Sine Wave: Smooth and Subtle

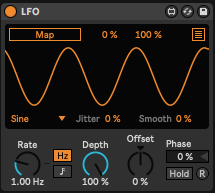
The sine wave is the simplest and most fundamental waveform, producing a smooth and gradual oscillation. When applied to modulate a filter, a sine wave can create gentle and subtle shifts in the sound. At a slow modulation rate, it imparts a calming, almost breathing-like quality to the sound. As the modulation rate increases, the sound becomes more pronounced, adding a sense of movement without being overly aggressive.


Sine movement are also the closest to nature.

  • Sine Wave: The Essence of Smoothness

The sine wave is a fundamental waveform that closely resembles the natural oscillations found in various phenomena, from the movement of pendulums to sound waves. Its smooth, rounded peaks and troughs replicate the behavior of many naturally occurring processes, giving it a sense of organic elegance.

  • Harmonic Content and Complexity:

The sine wave has the simplest harmonic content of all waveforms. It consists of a single frequency with no additional harmonics or overtones. This lack of complexity contributes to its inherently soothing and gentle quality. When the sine wave is used as an LFO shape to modulate a filter, it imparts a gradual, almost seamless movement to the sound. This characteristic is akin to the subtle changes in nature, such as the gentle ebb and flow of waves or the gradual shifts in wind patterns.

  • Emulating Natural Phenomena:

Many natural sounds, such as the chirping of birds, the rustling of leaves, and even human vocalizations, exhibit a certain level of smoothness and continuity in their vibrations. By using a sine wave LFO shape, you’re essentially mimicking these naturally occurring patterns of movement. This can make your synthesized sounds feel more in tune with the environment, adding an organic touch that’s often difficult to achieve with more complex waveforms.

  • Subtle Dynamics:

The slow, gradual modulation provided by a sine wave LFO can be likened to the subtlety of nature’s changes. Think of how the rising and setting of the sun or the changing seasons bring about transformations that are gentle yet noticeable over time. Similarly, the use of a sine wave LFO can introduce subtle dynamics to your soundscapes, creating an impression of evolving environments that are familiar and soothing to the ear.

  • Organic Aesthetic:

When crafting music or soundscapes, an organic aesthetic can be particularly appealing. It resonates with listeners on a subconscious level, invoking a sense of calm and comfort. By utilizing the natural sound qualities of a sine-shaped oscillator as an LFO shape, you’re infusing your compositions with an element of authenticity that can enhance their emotional impact.

The innate smoothness, harmonic simplicity, and resemblance to natural phenomena make the sine wave a powerful tool for creating organic and natural-sounding modulations. By incorporating sine-shaped LFOs into your sound design, you’re tapping into the essence of nature’s subtlety and fluidity, giving your compositions a more authentic and emotionally resonant quality. Since electronic music is often cold and very artificial sounding, to include something more organic can be a nice contrast.


2. Triangle Wave: Balanced and Versatile

The triangle wave combines the smoothness of the sine wave with more defined edges. This waveform is often used to achieve a balanced modulation effect. When modulating a filter with a triangle wave, the result is a sound that moves gradually between its highest and lowest points. At slow rates, it creates evolving textures, and at higher rates, it imparts a rhythmic quality without being too sharp.


3. Sawtooth Wave: Building and Dynamic

The sawtooth wave has a sharp ascending edge and a smooth descending edge. When used to modulate a filter, it produces a building and dynamic effect. At slow modulation rates, the sawtooth wave can create sweeping changes, gradually opening and closing the filter. When the modulation rate is increased, it generates an aggressive and impactful movement, ideal for creating dramatic transitions or evolving textures.


4. Square Wave: On-Off Intensity

The square wave alternates between two levels, creating an on-off pulsating effect. When applied to filter modulation, it introduces a distinct rhythmic quality to the sound. At slow rates, it produces a gating effect, with the sound fading in and out. As the modulation rate increases, the square wave generates a clear pulsating rhythm, suitable for adding rhythmic complexity to the sound.

Like any shape of an LFO, you can play with the depth of it’s output. If you keep the depth low for a square shape, you’ll have a nice variation but in two stages.


5. Random/Noise Wave: Chaotic and Experimental
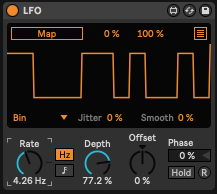
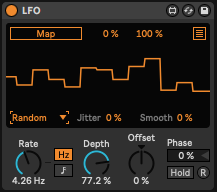
The random or noise waveform introduces an element of chaos and unpredictability to modulation. When modulating a filter, it creates a sense of randomness and texture. At slower rates, it can add a subtle layer of complexity to the sound, mimicking natural variations. At faster rates, it produces a glitchy and experimental effect, making it perfect for unique soundscapes.

I recommend the use of random on sounds you never want to be the same twice such as the velocity of a sound, the length of a percussion, the tone of a pad. It is very useful to add variations, slow or fast.

TIP: Use the smooth option to have less abrupt changes.


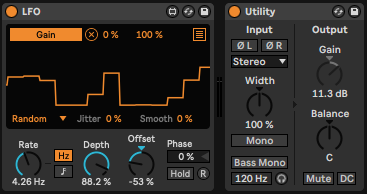
6. Binary output: Computer Language

As of my last knowledge update in September 2021, Ableton Live’s “Binary” form might refer to a specific device, feature, or concept that was introduced after that time. However, if we’re discussing a feature related to binary operations or manipulation, here’s a general explanation of how binary operations might be used in a music production context:
1. Binary Operations:

Binary operations involve manipulating binary data, which consists of sequences of 1s and 0s. In music production software like Ableton Live, binary operations can be used to generate rhythmic patterns, create variations, and add complexity to your music. They can be particularly useful for creating glitchy, syncopated, or experimental rhythms.

2. Step Sequencers and Binary Rhythms:

Step sequencers are commonly used to create patterns of notes or events over time. In the context of music production, a binary step sequencer might allow you to turn steps on or off, creating a binary pattern. Each step represents a binary digit (1 or 0), which corresponds to a note or event being active or inactive.

For example, if you have a binary pattern of “101010,” it might translate to a repeating rhythm of long-short-long-short-long-short in a musical context. This can be a great way to generate interesting, irregular rhythms that deviate from traditional quantized patterns.

3. Creating Glitch Effects:

Binary manipulation can also be used to create glitch effects. By toggling certain bits on and off, you can introduce unexpected variations and unpredictability to your sounds. This is especially useful for genres like glitch, IDM, and experimental electronic music.

4. Sound Design:

Incorporating binary patterns into your sound design can lead to unique textures and timbres. You can use binary patterns to modulate various parameters of your synthesizers and effects, producing evolving and dynamic sounds.

5. Automation and Control:

If Ableton Live introduced a feature named “Binary,” it might also involve binary automation, where you can use binary patterns to automate various parameters in your project. This could add a layer of complexity and movement to your music over time.

Since my knowledge is based on information available up until September 2021, I recommend checking Ableton Live’s official documentation, user guides, or online resources for the most up-to-date and accurate information about the “Binary” feature in Ableton Live. This will provide you with step-by-step instructions on how to use it effectively in your music production workflow.


TIP: To hear better how a modulation is affecting sound, map the LFO to a Utility so you can hear amplitude (volume) modulation, which is easier to the ear since it is very obvious.


LFO Modulated LFO

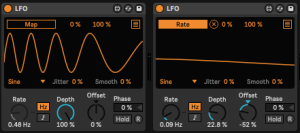
The concept of using one LFO to modulate the speed of another LFO is a fun technique that can yield intricate and non-linear modulation patterns. Let’s explore how this works and why it leads to non-linear results:


LFO Modulation Basics:

Low Frequency Oscillators (LFOs) are typically used to modulate parameters such as pitch, amplitude, filter cutoff, and more. They generate waveforms at frequencies lower than those of audible sound, resulting in modulation that occurs over time. These waveforms include sine, triangle, sawtooth, square, and random waves, each with unique characteristics.

Modulating LFO Speed:

When you use one LFO to modulate the speed of another LFO, you’re introducing a layer of complexity to the modulation process. Instead of directly affecting the sound parameter itself, you’re altering the rate at which another LFO oscillates. This means that the rate of change in modulation becomes variable and dynamic.

Ever heard the sound of a bouncing ball? This can be achieved with this technique.


Non-Linear Effects:

The key to understanding the non-linear effects lies in how the modulation rates interact. When one LFO modulates the speed of another LFO, the resulting modulation pattern becomes intricate and less predictable than simple linear modulation.

Consider this scenario: Let’s say you have an LFO (LFO1) modulating the speed of a second LFO (LFO2). As LFO1 varies its speed, it introduces fluctuations in the rate at which LFO2 modulates the target parameter. The result is a complex interplay of modulation speeds that can lead to unexpected and non-linear outcomes.

For example, if LFO1 oscillates between fast and slow speeds, the modulation from LFO2 will speed up and slow down accordingly, leading to irregular and evolving modulation patterns. These irregularities create a sense of unpredictability and complexity in the modulation, which can add a unique and experimental flavor to your sound design.

Applications:

  • Texture and Movement: Modulating an LFO’s speed with another LFO can add layers of texture and movement to your soundscapes. The constantly changing modulation rates can create intricate sonic textures that evolve over time.
  • Dynamic Rhythms: The non-linear modulation introduced by this technique can result in dynamic and evolving rhythms. It’s a great way to inject rhythmic complexity into your music, perfect for genres like IDM, ambient, and experimental music.
  • Experimental Sound Design: If you’re aiming for experimental or otherworldly sounds, using one LFO to modulate the speed of another can lead to unconventional and unpredictable outcomes that can set your sound design apart.

In summary, using one LFO to modulate the speed of another LFO introduces a layer of complexity and unpredictability to your modulation patterns. This technique can lead to non-linear results that are rich in texture, movement, and dynamic rhythms. It’s a powerful tool for sound designers looking to push the boundaries of conventional modulation and create unique sonic landscapes.

TIP: How many LFOs should be used in a project isn’t important. But you’ll have more cohesion if you use a few “master LFOs” that control multiple parameters across the song as they will move all together elements, creating an orchestral effect.


LFOs as Melodies and Compositional Tool


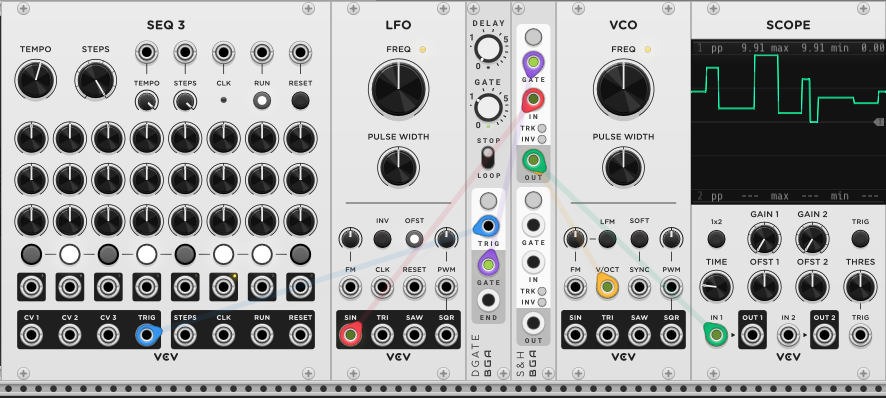
Certainly, LFOs combined with a sample and hold module in the modular synth world can produce intriguing and unique melodies. The type of LFO waveform used in conjunction with the sample and hold module directly influences the character of the generated melodies.

If you look at a melody in the piano roll, you’ll see that notes go up and down or perhaps go up then down. Those are shapes an LFO can do.

How to set it up?

Send the output of the LFO to a Sample and hold. You can ping the sample and hold at the moment you want a note to play. The sample and hold will look at the data sent by the LFO at the moment it was pinged and then output the note which can be sent to an oscillator.


Let’s see how different LFO shapes contribute to specific types of melodies:

1. Sawtooth LFO: Progressive Ascending Melodies

Using a sawtooth LFO with a sample and hold module can create melodies that ascend progressively. As the sawtooth LFO ramps up, it triggers the sample and hold to capture and hold the voltage at specific points. The resulting melody will have a rising, stair-step quality, with each note being slightly higher than the previous one. This combination is well-suited for building anticipation and tension in a composition.


2. Square LFO: Stepped and Rhythmic Patterns

A square LFO paired with a sample and hold module generates stepped and rhythmic melodies. The square wave’s on-off nature causes abrupt shifts in the sampled voltage, creating distinctive steps in the melody. When used at different rates, the square LFO imparts a rhythmic quality to the melodies, making them danceable and syncopated.


3. Triangle LFO: Smooth and Flowing Melodies

A triangle LFO combined with a sample and hold module produces melodies with a smooth and flowing character. The triangle waveform’s gradual rise and fall influence the sampled voltage, resulting in melodies that transition between notes in a less abrupt manner compared to square or sawtooth waves. This combination is ideal for creating melodies that evoke a sense of fluidity and motion.


4. Random/Noise LFO: Chaotic and Experimental Melodies

Pairing a random or noise LFO with a sample and hold module leads to chaotic and experimental melodies. The unpredictable nature of the random waveform causes the sample and hold module to capture varying voltages, resulting in melodies that seem to wander unpredictably. This combination is perfect for generating avant-garde or ambient melodies that challenge traditional musical expectations.


5. Sine LFO: Serene and Ethereal Melodies

Utilizing a sine LFO with a sample and hold module produces serene and ethereal melodies. The sine waveform’s smooth undulations translate into gentle fluctuations in the captured voltage. The resulting melodies are subtle and soothing, with a dreamlike quality that’s well-suited for ambient or meditative compositions.


Thanks for reading my tribute to a often overlooked tool in music and now you know why I’m in love with all the possibilities behind it.


How To Make An EP

In my coaching group, someone asked:

So, how do you make an EP ( I ask this thing regarding the atmosphere, like all the tracks should be in the same way let’s say, or create a story)? I find it really hard, if I count my last 10 projects, all of them are really different. How can I approach this kind of vibe for more tracks? Can you tell me how to make an EP?

I replied a quick answer but I thought it would make sense to expand on this because the real answer of how to make an EP is a bit longer and covers multiple things. Why? Because as a producer, a music lover and label owner, there’s nothing that frustrates me more than having an EP that has no soul, no concept and no direction. It feels bland and empty. There are different kind of EPs you can find out there and all of them will find an ear but I get picky. Let’s see some successful EP types:

The utility:

This type of EP is more for DJs and has a collection of tracks with the function to be played in sets.

The compilation:

Either various or 1, this one is simply a collection of random tracks picked from unsigned material.

The conceptual:

Sometimes an artist has a patch, a system or a way of working that will make a series of songs sound the same, which a few songs will united because of the direction.

The last one is the preferred type of EP I want. If I listen to it on Spotify, I sometimes like the non-linearity experience of shuffling it. To me, it is successful if I can listen to this EP that way in repeat and not get bored or even better, wanting to dig for more music from the artist. As there are multiple people who enjoy an EP just as much as an album, there is value to make one. People were saying that streaming services killed these types of releases but I really think otherwise. As a label owner, if I see someone who put enough energy to do an album, it certainly shows a lot of maturity that makes it special to my eyes. These, whether instinctual, or planned, are perfect examples of how to make an EP.


Chicken Or The Egg: How to Make An EP from What I Have Vs Starting From Scratch

Many people make music on a regular basis with the idea to eventually publish it. If you think about it, if you go from one project to another, you certainly will explore different moods, techniques, softwares and ideas. If you work on hardware gear, your music will mostly have some sort of common aesthetic though but with the computer, it gets pretty much all over the place since you have access to so many tools and samples.

It’s a bit more difficult to keep something coherent and you can easily start making music that is completely different from previous song you did. If you remember some past posts I did about my approach of working in a non-linear way, you’ll be working here and there and you may borrow some ideas from a song that is not working to another one that needs something specific.

The idea of how to make an EP is, to my understanding, is to try and propose 3-4 songs that have the same direction and aesthetic. This is one of the idea behind my approach to always try to work on multiple songs, bring them to about 90% and export them to a folder as a reference.

Later on, when working on an EP or album, I’ll go in that folder, listen to the tracks. Then I’ll know which ones have relatives and similar ideas, so I can work on the last 10% that is lacking to call it done. Whenever clients come to me that they can’t finish songs, there’s need to clarify that it is not necessary a bad thing. You can practice wrapping them but it is not essential. Same thing for all the fuss about what if I do this or that. I believe those questions can be answered once you have let the song ripe for a few weeks.


How To Make An EP – Purpose And Direction

photo of how to make an EP record

Credit: Blocks

One of the things we talked about a lot on this blog is how there’s not many secrets to music making if you can analyze a reference song. When it comes down to it, how to make an EP is sometimes as simple as referring to previous artist’s formulas. Many people I work with are concerned that a reference track will taint their art direction in a way that will make them not sound like themselves.

The thing that is making smile is how those people are more likely to come to me and share they’re lost. You can use reference EP/LP as a way to pick your songs that are going to be part of the same project. For instance, perhaps a very important EP for you had 5 tracks, where 2 songs were ambient and the others had a different take. Perhaps that is something that you can consider.

The way I see the use of a reference project in this condition is that you get your framework around it and then discard it. How many tracks on an EP is a matter of preference, based on whatever your goal is for the EP.

A thing that boggles people a lot are when they start thinking about what the listener expects. There’s equally a balance between people who want the same type of music from an artist from release to release, and another who wants the artist to keep a core but evolve, change, and not repeat formulas. This can also be the same kind of balance of how people want an album or an EP – All tracks slightly the same or all the tracks very different from to another.

Where do you situate yourself in this?

Wherever you feel like. You don’t have to worry too much because no matter what, some people will like and some will dislike anyway. One approach I have is to imagine the project for a friend in particular. How would they like it? Or a DJ… what is it that they like?

Sometimes I find that a good exercise to compile some tracks all together for an EP is to think of my current purpose. How do these tracks answer my own need, today, when recording an EP?


Mindset

How to make an EP starts and ends with mindset. There are different moments where you will have time to make music. I like to approach my session with an intention otherwise I quickly lose my session either troubleshooting issues or getting lost in details that aren’t useful at the end of the day. The different intentions could be listed as:

What I Do

The mistake a rookie producer will do is to approach the use of his time without an intention and deal with whatever comes up. It works most of the time but you’re not using your time wisely. If you start a session with one thing in mind, you won’t get distracted by chasing something else that is taking you away from what you’re trying to achieve. Your mind can do something really well if you put all your energy to it. In that sense, I have developed a natural self-confidence that whatever happens, a future-me is going to fix it or recover it at some point.

photo of how to make an EP

Credit: Nguyen Dang Hoang Nhu

Having this approach is an open call to work on multiple projects and songs all at once, and makes the process of how to make an EP easier. You’ll create a huge pool of sounds and ideas that is ready for the moments where you want to feel creative and make loops, core to a song.

It’s important to capture the song mood and try to finalize it quickly so you don’t overwork it but you can also create a bunch of skeleton ideas that you’ll wrap later. Keep in mind that if you make music on a regular basis, you’re improving yourself and the future-you will be more skilled that your current-you.

That mindset has been my best approach in the last year when thinking about how to make an EP, allowing me to create a lot of music. To grind my skills to a point where I can, in full inspiration, make a song from scratch, gets easy. The other mindset I find useful is to record little live moments as often as possible.

The reason behind this is to know how it feels to jam, to play, to live the song instead of mouse-cliking it away. This is particularly important so you can perhaps imagine your music fitting an artist’s podcasts and sets. You want to have that fun factor as well as being essential for an artist to have your music in his arsenal.

Another benefit from having a focused mindset is that when it comes to working on an EP or LP, the 2 mindsets that will really benefit that will be the optimizing part as well as the finalization. I’d rather have 10 unfinished songs and then pick 4, wrap them based on a single aesthetic to unify them than have 10 finished songs that are not really coherent all together. If you shop for music often and look for EP, what grabs your attention and what kind of EP makes you go wow on it?


Aesthetics

Now that you know that you can have a bunch of songs almost done and that the last 10% of polishing can bring your entire project in a direction, I hear you asking how that last detail can be achieved. There are different things you can do but usually what unifies a project, if we refer to techniques, we can classify that into different clusters:

Sound design related

A good example is how the use of a same set of sounds can create unity. For instance, a 808 drum kit for all the songs gives a sense that all songs are the same for its core but you can add different ideas around it. Same for a synth in particular, where Mathew Jonson is a good example. In that sense, building a percussion kit is really useful.

There are multiple ways to build one but my favourite way is to use XO by XLN because it creates a map of all the sounds I have and also put them in a way that similar ones are closer on that map. So you can not only create a kit based on another but you always have the flexibility to search a huge selection and not go to far off. It’s the kind of tool that I’d be dreaming about but not only they made it happen but they made it better than what I would I have done it.

how to make an EP effects photo

Effect driven

The main effects that can bring a project together, from subtle to drastic, are the ones that are coloured. Think of reverb for Dub and distortion for breakbeats or lofi effects for some old school house. They are the key the the key signature of the genre, and help define how to make an EP that’s similar. Sometimes it’s interesting to grab all tracks part of the EP and use the same effect rack that you can create. It’s easy to import into each of them and you can save a few presets that are easily set.

There are multiple aesthetic related plugins you can use and try. I would also not hesitate to simply drop it ON the master bus (yes, I’m serious) which will give you a very coloured version that you can dial back after. But like I often say, you need to push things exaggerated to see how far you can otherwise, if you go with 2-3% of wet signal at a time, you’ll never really see the full picture. I find that a multi-effect like RC-20 by XLN can give you a really good idea of your song in a new space. It adds saturation and noisefloor. It makes your song sound as if it was taken from a dubplate. Pretty impressive.

Tone

One thing I see when I master an EP from an artist is a coherence with the tone. When there’s not, I usually emphasis it so it feels better. It’s weird to have a super bright song amidst a few dark ones. If it’s artistic, ok it can work but it makes the listening experience a bit bumpy. If you use Fabfilter Pro-Q3, You can apply one EQ curve from a song to another. Sometimes you can have a curve for an EP that you apply on all songs. That can provide some interesting results.

Complementary stories

In a past post I was saying how you can layer all your tracks and see how they would be mixed from a DJ’s point of view. Have you tried layering them to see if some nice combinations are possible?

Templates

As explained before, I like to save the arrangements of a song to keep them as templates for future ones. Really handy to speed up the process from a loop to a song.


Sound Design and Arrangements Series Pt. 4: Emphasis and Proportion

This post is part of a series: Part 1 | Part 2 | Part 3 | Part 4

In this post I thought I’d dive into two principles that I find go hand-in-hand: emphasis and proportion. Let’s start by defining what they mean, then how we can use them in what we love doing—music production.

In past articles I’ve talked about how to start a song. While there’s no right or wrong answer here, we can agree on certain points for the core of a song. Let me ask you a straight-up question to start with, which is, when you think of your all-time favourite song, what automatically comes to your mind as its most memorable part?

All kind of answers can come up, and perhaps you’re hearing the song in your mind while reading this. Maybe you remember the chorus, the main riff (motif), or have a part of the song where a specific emotion is evoked in you; you might even be thinking about a purely technical part.

Whatever you remember from that song was your point of focus. The focal point of the listener is what grabs attention and keeps it engaged.

Emphasis is a strategy that aims to draw the listener’s attention to a specific design element or an element in question. You could have emphasis on multiple focal points, but the more you have, the less emphasis impact you’ll have.

When producing a song, I like to ask, what is the star of this song? What is the motif, the main idea? What’s going to catch your attention first and keep you engaged? When listening to a song, you might have different layers and ideas succeeding one another, but of course, they can’t all grab a listener’s attention, as you can only really focus on 1-2 elements at a time. As explained in past articles, the listener will follow the arrangements exactly like one would follow the story line of a movie.

I see emphasis is from two perspectives: from the tonic side and/or from the storytelling part.

The tonic part is where you have your phrase (melody) and there is a part that is “louder” than the others. So, let’s say we take one sentence and change the tonic accent, it will change it’s meaning (caps represents the tonic):

  • I like carrots.
  • I LIKE carrots.
  • I like CARROTS.
  • but also, I LIke carROTS!

We have here 3 different tonic emphases, and in each, the focal point of the listener is shifted to a specific word. When we talk, we change the tonic naturally—emphasis on a specific word is to put importance on it for the listener. It can be used as weight, on insisting your position about a topic, or to clarify one word.

The same is also true for timing:

  • I like… carrots.
  • I… like carrots.

Or spacing perhaps the syllables to create another type of tonic:

  • I li..ke carrots.
  • I like car…rots.

Pausing creates tension as you wait. If you can focus on one idea and articulate it in various ways, you can imagine that your motif will keep the interest of the listener.

Now imagine these ideas transposed to your melodic phrase; you can play with the velocity, but also create emphasis by pausing, delaying, and accentuating it.

Potential solutions to add emphasis: velocity, swing, randomness.

In our coaching group on Facebook, I often see people try to focus on everything a song should have, but without a main idea and therefore without emphasis, listeners have a hard time getting hooked on any part of it. You can do anything you want in music, yes, but perhaps if you listen to your favourite songs, you might notice that they usually have a strong hook or something to suck you in.

Tip: Strip down your track to the bare minimum but so that it’s still recognizable as the same song. Are you left with the melody or is it something else? What’s unique about your song?

While this post is not going to discuss motifs and hooks in detail, since it was previously covered multiple times on this blog, I’d like discuss how emphasis can be used to bring a hook/motif to life.

To emphasize a specific sound, hook, or motif, you can use any of these techniques:

  1. Amplitude: One sound is 25-75% lower or higher in gain than another. Think of different drum sounds in a kit.
  2. Brightness: Brightness mostly starts at around 8khz. A filter or EQ boost around that area and higher will feel like magic. Same for multi-band saturation. This is why cutting or taming sounds compared to the one you want brighter will help contribute to emphasis.
  3. Thickness: If you take multiple samples, percussive for example, and compress some in parallel (eg. 50% wet) very aggressively with a ratio of 8:1, you will definitely see a difference.
  4. Dynamics: Using an envelope, map it to some parameters of your plugins to have them interact with the incoming signal.

However, all of these techniques depend on one thing: whatever you put emphasis on must have an “edge” in comparison to the other sounds. In ambient or techno with multiple sounds, you’ll want to make sure to setup routing in your production even before mixing your song. I like to group all elements that are decorative so they are treated as if they’d be a bit more distant. For example, for that group you could start by cutting most of the highs at around 10k with a gentle filter curve, then control the transients with a transient shaper by making them less aggressive and then have a reverb that focuses on a late response, which will create a distance. You can then lower the gain of the entire group to taste to get more of a background feel from all those sounds. Something like Trackspacer could also very useful here to create space between the main idea and your other sounds.

To support emphasis, you need proportion. In sound design, I like to think of proportion as an element of design more than a pragmatic thing. If you think of a drum set, all hits are really at different volume levels—you never see a drummer hit everything at the same volume level; they probably wouldn’t even if they could because it just doesn’t sound right. This is a version of proportion that can be applied to any of your sequences, percussion, and other ideas—it’s often related to velocity.

I also see proportion in the wet/dry knob of your effects. How much do you want to add or remove?

For the listener to understand the importance and emphasis of an effect, you’ll need to counter-balance it with something proportionally lower. If you want the listener to hear how powerful a sound is, try using another one that is very weak; the contrast will amplify it.

Proportion comes from different aspects. Arrangements take over from the mix in a dynamic way. So, if you think of your song as having an introduction, middle, and ending, proportion can also be address from a time-based perspective in arrangements. While there’s nothing wrong with linear arrangements, which are some of the friendliest DJ tools possible, they are perhaps not strongest example of proportion in music.

Here are just a few examples of how you can address proportion in your productions with some simple little tweaks:

  • When mixing your elements, look at the volume metering on the Master channel. You want your main element to be coming the loudest and then you’ll mix in the other ones. You can group all your other elements besides the main element and have them slightly ducking with a compressor. I’ve been really enjoying the Smart Compressor by Sonimus. It does a great job at ducking frequencies, a bit like Track Spacer but, cleaner since it provides a internal assistant.
  • If you’ve missed past articles, one technique I’ve outlined is the 75-50-25 technique, as I’ve named it. Once you have your main element coming in, you’ll want other channels to be either a bit lower (75%), half of the main (50%), or in the back (25%). This will really shape a spatial mix to really provide space and proportion for the main element.
  • I find that if you want emphasis, there’s nothing better to bring in some life in it and I’d recommend you use a tool like Shaperbox 2. I would automate the volume over 4 bars. I find that 4 bars is the main target for electronic music, mostly for the organization and variation it needs to keep the listener engaged. If it changes every 2 bars, the listener will notice, but every 4 bars, with a progression, it will create the idea that there’s always a variation. Also, I like to create fades in different plateaus of automation. You can have a slant between bar 1 and 2, then jump to a different level on 3 and a slow move for 4. This is very exciting for the ear. Pair that with filtering automation, and you’ll have real action. Emphasis will work well if this type of automation is happening on your main element, but it’s hard to do on all channels because it becomes distracting.
  • Supporting elements can share similar reverb or effects with the main idea for unity.
  • Dynamics are helpful for articulation and emphasis. The new Saturn 2 is pretty incredible for this—it can tweak the saturation based on an incoming signal.

Sound Design and Arrangements Series Pt. 3: Repetition

This post is part of a series: Part 1 | Part 2 | Part 3

This post focuses on how I approach repetition in my music, as well as how I perceive it when working on clients’ music. While this is a very obvious topic for electronic music oriented towards dance, where patterns repeat, I understand that as an artist, it can be a very personal topic. Each genre has a way of approaching repetition, and if you’ve been browsing this blog, you will recognize some concepts previously covered that I’d encourage you to look into in more detail. I’d like to approach repetition in music by reviewing your workflow to avoid wasting time on things that can be automated.

Tempo

Using tempo to deliver a message is a very delicate subject. Often before I played live in a venue, I would spend some time on the dancefloor and analyze the mood and the dancers’ needs. I’d check out what speed a DJ’s set was, how fast he’s mix in and out, and the reaction of the crowd. It has always surprised me how playing at 122 BPM vs 123 BPM can shift the mood; I really can’t explain why. But when I’d make a song, I’d keep in mind that DJs could speed it up or slow it down—an important factor affecting energy. I find that increments of 5 make a huge change in the density of the sound in the club. If you slow down very complex patterns, the sounds have room between themselves which also gives the listeners to perceive the sound differently.

Whatever tempo you’ll be using, I highly recommend that you look into using gating for your short percussion or use an envelope maker like Shaperbox 2 to really shape the space between your sounds and have some “white space” between each of them. If you go for a dense atmosphere, I would recommend that you use very fast release compression and make use of parallel compression as well to make sure you’re not over crowding your song.

Sound Repetition

Once we find something we love, we tend to want to repeat it for the entire length of a song. This is, of course, a bit much for someone who listens to it. People expect change—for sounds to have variants and to be sucked in with perhaps something unexpected from the sound. Also, John Cage would disagree and suggest that an idea could be repeated for 10 minutes and the listener would be liking it, but I honestly haven’t heard many songs (through experience or work) that kept me that interested for that long.

The question is, how frequently can an idea be repeated?

It depends of a lot of factors, and while I don’t claim to know the truth, there are techniques to keep in mind. I’d like to teach you how to learn the best way for your music. Let me explain some of my own personal rules—my “reality check” for the validity of a song and the questions around repetition.

First impressions never fail: This is really important. 99% of people I work with start losing perspective and trust in their song’s potential by doing extended sessions on production. This means, when you first open a project you worked on, what hits you at first is what you should fix in that session. Once this is done, save it under another name and then close it. If you can space your sessions out by a few days or weeks (best option), then you can check your first impression of the song again and see if there’s something new clashing.

Hunting for problems will haunt you: There’s always something to fix in your song. Even when you think it’s done, there will always be something. At one point, you have to let go an embrace imperfection. Many people fall into the mindset of searching for problems because they think they missed something. Chances are, they’ll be fixing unnecessary things. What you actually think you’re missing will be details that are technically out of your current knowledge. Usually I do what I call a “stupid check” on my music which is to verify levels, phase issues, clipping and resonances. The rest is detail tweaking that I do in one session only. After that, I pass it to a friend to have his impression. Usually, this will do it.

Listen with your eyes closed: Are you able to listen to all of your song with your eyes closed upon first listen? If yes, your repetition is working, otherwise, fix, then move on.

Generating Supportive Content and Variations

In music production mode, if you want to be efficient and creative, you need to have a lot of different options. So let’s say that your motif/hook is a synth pattern you’ve made, what I would suggest is to have multiple variations of that.

In this video, Tom showcases a way of working that is really similar to how I work (and how many other people work). It’s something that is a bit long to do but once you switch to create mode, it becomes really fun and efficient. The only thing is, I personally find that he’s not using repetition enough, and while this is super useful for making short, slower songs that have a pop drive like in the video, it is not great for building tension. Too much change is entertaining, but you really have to flex your creative muscles to keep it engaging. I would rather have a loop playing to the point where the listener goes from “it should change now” to “I want this to change now.” So perhaps there will be a change after 3-4 bars in your loop. This is up to you to explore.

How do you create variations?

There’s no fast way or shortcut, creating good variations takes time and patience. It also take a few sound design sessions to come up with interesting results. To do this, randomizing effects is pretty much the best starting point and then you tweak to taste.

  1. MIDI Tools – The best way to start editing, is to start by tweaking your MIDI signal with different options. The MIDI tools included in Ableton at first are really useful. Dropping an arpeggio, note length change, or random notes and chords are pretty amazing to just change a simple 2-note melody into something with substance. One plugin that came out recently I’ve been very impressed with is Scaler 2. I like how deep it goes with all the different scales, artist presets (useful for a non-academic musician like me) and all the different ways to take melodies and have templates ready to be tweaked for your song. One way to commit to what you have is to resample everything like Tom did in his video. Eventually, I like to scrap the MIDI channel because otherwise I’ll keep going with new ideas and they’ll probably never be used. If you resample everything, you have your sound frozen in time, you can cut and arrange it to fit in the song at the moment it fits best.
  2. Audio Mangling – Once you have your MIDI idea bounced, it’s time to play with it for even more ideas. There are two kind of ideas you can use to approach your movement: fast tweaks or slow. When it comes to fast event, like a filter sweeping or reverb send, I used to do it all by hand; it would take ages. The fastest way out there is to take a muti-effect plugin and then randomize everything, while resampling it. The one that I found to be the most useful for that is Looperator by Sugar Bytes. Internally you can have random ideas generated, quick adjusting, wet/dry control and easily go from very wild to mellow. It’s possible to make fast effect tweaks (common to EDM or dubstep) but slower too. Combine this with the Texture plugin to add layers of content to anything. For instance, instead of simply having a background noise, you melt it into some omnipresence in the song so it can react to it, making your constant noise alive and reactive. The background is a good way to make anything repetitive, feel less repetitive because the ears detect it as something changing but it constantly moves its focus from foreground to background.
  3. Editing – This is the most painful step for me but luckily I found a way to make it more interesting thanks to the Serato Sampler. This amazing tool allows, like the Ableton sampler, to slice and map, and rearrange. You can combine it with a sequencer like Riffer or Rozzler (Free Max patch) to create new combinations. Why Serato instead of the stock plugin? Well, it’s just easy—I just want to “snap and go”, if you know what I mean, and this demands no adjustments.

Editing is really where it you can differentiate veteran from rookie producers. My suggestion to new comers would be a simple list of different ideas.

  • Decide on internal rules: Some people like to have precise rules that are set early in the song and then that will be respected through the song. I do it because it helps me understand the song’s idea. If you change too much, it may fall in the realm of “experimental” and maybe this isn’t what you had in mind. Every now and then, when booked for track finalization, people have a problem with the last third or quarter of their song. They lose focus and try to extrapolate or create new ideas. If you create enough material in the beginning, you’re going to make the last stretch easier. But when people are lost, I usually listen to the first minute of the song and go “let’s see what you had in mind at first” as a way to wrap it up around that logic. Basic rules can be created by deciding on a pattern and a series of effects that happen, more or less, at the same time, or a sequence of elements or sections. Pop has very precise rules for sections, while techno “rules” are more related to the selection of sounds and the patterns created.
  • Process, process, process: If I have one channel of claps or a different sound, I want to have variations of it, from subtle to extreme. Why? Because even simple ones are going to make a difference. It’s what makes a real human drummer feel captivating (if he or she is good!), because their playing slightly changes each time, even when playing a loop. Looperator is a good tool but you could also use the stock plugins and just use the presets to start with and resample, move knobs as you process and you can get some nice effects already.
  • Duplicate everything: Each channel should have duplicates where you can drop all your wet takes. You can put them all on mute and test unmuting to see how it goes.
  • MIDI controllers for the win: Map everything that you want to tweak and then record the movements of yourself playing. Usually will give you a bit of of a human feel compared to something created by a mouse click. You want to break that habit.
  • Use your eyes: I find that working with the clips visually and making patterns is a good way to see if you are using your internal rules and see if you use too many sounds.

Now, after all this, how do we know if a song’s repetition is good enough, and how do we know if it’s linear?

Validating with a reference is quick way to check, but if you take breaks and distance your sessions, that would be effective too. But the internal rules are, to me, what makes this work properly. I think the biggest challenge people face is that in spending too much time on a track they get bored and want to push things, add layers, change the rules and what perhaps felt fresh at first will be changed to a point where you’re not using the repetition principle to its full potential. The best example of someone being a master of repetition is Steve Reich and his masterpiece Music for 18 Musicians. There’s nothing more captivating of how one can create so much by playing with repetition.

Some effects in here would be reproduced with delays, phasers, the delay on the channel and such. You can also use the humanize patch to add a bit of delay randomly. I would strongly encourage you to listen to this a few times to fill yourself up with inspiration.

Sound Design and Arrangements Series Pt.1: Contrast

I’ve been wanting to do a series of posts about arrangements because I’m passionate about this aspect of music production, but also because I noticed many of the people I work with struggle with arrangements in their work. There are so many different approaches and techniques to arranging—everyone has their own, and that’s sort of the goal I’d like to drive home in this series. I invite you to make a fresh start in developing a personal signature, aesthetic, vocabulary, and personality.

This post is not for people who are just beginning with arrangements, but if you are, it still contains information that could be interesting to consider down the road.

What do I Mean by “Contrast” in the Context of Arrangements?

In design, contrast refers to elements (two or more) that have certain differences, and their differences are used to grab attention or to evoke an emotion. When I teach my students about contrast, the easiest example to understand and summarize this concept is a difference of amplitude (volume). In movies, to create surprise, excitement, or tension, the amplitude will be low, and then rise either quickly or slowly, supporting the images in the emotion that is present.

In many electronic music songs, we have heard (too often) noise used as a rising element to create a tension. Noise builds became a caricature of themselves at some point given their overuse—but it’s a good example, nonetheless.

How is Contrast Used in Sound Design?

I spend my days working with musicians—contrast comes into play in different circumstances.

Within a single sound, it can be fast or slow changes from one extreme to another. I like to visualize this by analyzing a sound through different axes to help me understand what can be done to it.

  • Attack: Does it start abruptly or slowly?
  • Decay/Amplitude: Does it get really loud or is it more subtle?
  • Frequency/Pitch: Is it high, medium, low?
  • Release/Length: Short – Medium – Long – Constant?
  • Positioning: is it far or near? Low or higher in front of me?

Good contrast, generally, is to have two extremes in some of these domains. Think of a clap in a long reverb, as an example of how a super fast attack with a long release can create something unreal, and therefore, attention-grabbing. A sound that changes pitch is another form of contrast, as we go from one state to another.

Another way of thinking about contrast is to think about how pretty much all complex sounds are the combination of multiple sounds layered. When done properly, they feel as one, and when it’s done with contrast, the contrasting layer adds a movement, texture, or something dynamic that revives the initial sound. Of course, short sounds are more difficult to inject contrast into, but if you think of a bird’s chirp, which is basically the equivalent of a sine wave with a fast attack envelop on the pitch, it’s sounds are short but incredibly fast moving, too.

If you think about using contrast within a sound itself, the fastest way to make this happen is to use a sampler and really take advantage of the use of envelops, mod wheel assignment, and of course LFOs, but it’s really through the use of the envelops that you’ll be able to produce a reaction to what’s happening, sonically.

As I mentioned, the easiest way to produce contrast is by using two sounds that different characteristics, for example, short vs. a long, bright vs. dark one, sad vs. happy, far vs. close, etc. When you use two sounds, you give the listener the chance to have elements to compare, and the ear can easily perceive the difference.

When you select sounds to express your main idea, think of the characteristics in each sound you’re using. Myself, I usually pick my sounds in pairs, then in batches of four. I’ll start by finding one, and the next one will be related to the first. I’ll keep in mind the axis of both sounds when I select them and usually start with longer samples, because I know I can truncate them.

In the morning I usually work on mastering, and in the afternoon, I’ll work on mixing. The reason is, when you work on mastering, you get to work on all kinds of mixes; they have issues that I need to fix to make the master ready for distribution. By paying attention to the mix, I often deal with difficult frequencies and will spend my time controlling resonances that poke through once the song is boosted.

When I’m mixing, often I deal with a selection of sounds that were initially picked by the producer I am working with. The better the samples, the easier will be the mix and in the end, the better the song will feel. What makes a sound be great comes from different things:

  • Quality of the sample: clarity, low resonances, not compressed but dense, well-balanced and clear sounding, open.
  • High resolution: 24 or 32-bits, with some headroom.
  • No unnecessary use of low quality effects: no cheap reverb, no EQ being pushed exaggeratedly that will expose filter flaws, no weird M/S gimmicks.
  • Controlled transients: nothing that hurts the ears in any way.

You want to hunt down samples that not too short, because you want to be able to pick it’s length. You won’t need a sample that covers all frequencies—you’ll want to feel invited to layer multiple sounds all together without any conflicts or have one shelf of frequencies to be overly saturated.

When I listen to a lot of mixes, the first thing that I look for is the overall contrast between the sounds. If they lack contrast, they will be mostly mushed together and difficult to mix, and harder to understand.

In theory, a song is a big sound design experiment that is being assembled through the mix. If everything is on one axis, such as making everything loud, you lose the contrast and make your song one-dimensional.

How is Contrast Used in Arrangements?

If contrast in sound design is within one single sound, it’s through and entire song or section that we can approach contrast in arrangements. A song can have different sections—in pop, think “chorus”, “verse”, etc., which are very distinct sections that can be used in any context as moments through the song. You can move from one to another, and the more of a distinction between one another, the more contrast your storytelling will have.

Is this type of contrast essential? No, but it can engage the listener. This is why, for a lot of people, the breakdown and drop in electronic music is very exciting, because there’s a gap and difference and the experience to go from one to another, is intense and fun (especially on a big sound system).

In techno, linearity is a part of the genre because songs are usually part of a DJ set and made to be assembled and layered with other tracks, to create something new. Huge contrast shifts can be awkward, so it’s avoided by some—tracks emit contrast very slowly and subtly, instead of a sudden drastic change.

So, what makes a song interesting, to me, or to anyone, is the main idea’s content, based on the listener’s needs. What do I mean exactly?

  • A DJ might be looking for song of a specific genre and want its hook to match another songs he/she has.
  • Some people want to have a song that expresses an emotion to be able to connect with it (ex. nostalgic vibes).
  • Some other people might want to have some music similar to songs they like, but slightly different, while others, to be exposed to completely new ideas.

When I listen to the songs I work on, my first task is to quickly understand what the composer is trying to say/do. If the person is trying to make a dance-oriented, peak-time song, I’ll work on the dynamics to be able to match music of the same genre and make sure all rhythmic elements work all together.

The precision in the sound design is quite essential to convey a message, whatever it might be. Sometimes I hear a melody and because of the sample used, it makes me frown—a good melody but weird selection of sounds results in an awkward message.

It’s like you trying to impress a first date with a compliment/gift that doesn’t make sense—you wouldn’t tell someone his/her nose is really big…?!

The combination of good sound design and supporting your idea, is executed by arrangements. The whole combination of multiple sounds through a mix is what creates a piece.

Some examples of contrast use within arrangements could be:

  • Different intensity between sections, either in volume or density.
  • Different tones, emotions.
  • Changes in the time signature, or rhythm.
  • Changes in how sounds move, appear, or evolve.
  • Alternating the pattern, sequence, or hook, adding extra elements to fill gaps, holes, or silences.

One of the biggest differences between making electronic music 30 years ago and the present, was that back then, you’d make music with what you could find. Now we have access to everything, so how do you decide what to do when there are no limits?

I find that when you remove all technical limitations like sound selection from your session, you can focus on design and storytelling. Same goes for if you feel like you have managed to understand your technical requirements and now want to dig deeper—then you can start with contrast.

To summarize this, use contrast within a sound to give it life, either by slow or fast movements. Create contrast in your arrangements by having differences between sections of your song—play with macro changes vs. micro changes.

Working with Loopcloud

Making music in 1990 involved working with samplers, a very basic Atari computer running Cubase, and sampling sounds from tape cassettes here and there to make music. We’d also add synth lines over what we had, but we were really limited in what we could do. You have no idea how exhausting making a simple loop could be—it sometimes took a whole afternoon. Plus, we’d have to leave everything running to continue later without losing anything. If you fast forward 10 years, it was much easier, but to find samples you needed or that you couldn’t make yourself, you’d buy samples on CDs or sample music you liked—it still wasn’t super easy.

When I decided to start working with people on their music as a producer, there’s one thing that became essential, which was the organization of my files: samples with tags so I could find them easily. When I work on a full album while working on 2-3 other projects for clients, if I’m not organized when I have a flash of inspiration, my flow will be lost.

Enter Loopcloud into my life, and I haven’t been the same—no joke.

What’s Loopcloud and How Does it Work?

First and foremost, Loopcloud is a desktop app that syncs with your DAW. It’s also a sample organizer and online store for any samples you might be missing. So, the app contains your samples and the cloud’s library—it’s like a door to a library where you can find pretty much every single sound you need. The best way to use it is to open the Loopcloud VST in your DAW and then go on the app to browse for sounds you need. If you do that in a song you’re working on, it will sync your BPM and then you can also tell it what key your song is in (if that applies). If you find loops that aren’t in key, you can also force the app to tune it to the key of your song. Then you just simply drag the sample you found in Loopcloud and drop it directly in your DAW—it’s pretty magical.


The Different Ways I Use Loopcloud

  1. Finding a specific missing sound for a song. You can spend 30-40 minutes trying to do a drum roll properly, tweaking a synth to sound exactly like some deep house leads you like, etc. With Loopcloud, I sometimes find 2-3 samples that are similar to what I envision and layer them to create something new.
  2. Exploring genres you usually shy away from. If you’ve been collecting and buying samples based on one genre, sometimes it’s very interesting to venture off into other genres that you aren’t familiar with and find sounds that are different from what you’d usually use. It’s normal to be picky with sound-fetching, and you might not be interested in buying a full pack of a genre you might never use. Now you can get a single sample—a vocal or a weird world instrument—to create unusual soundscapes. Using organic sounding, acoustic percussion over your digital sounds can add a nice extra touch.
  3. Test a sound in context. Since the Loopcloud’s audio-out is rewired in your DAW, you can add effects on it to see, for instance, how a hook will sound once compressed or with a delay. Normally, it’s hard to know exactly how the samples you’re about to buy will fit in there, but with a Loopcloud channel, it opens up a lot of options. However, sounds are watermarked for piracy control so don’t expect to record them from there!
  4. Randomize ideas. With more randomized samples, you can try a lot of different things in your work that you’d normally not be looking for—with Loopcloud you can test them and see what happens. There’s a great discovery aspect here that often makes me smile.
  5. Testing multiple options in arrangements. Sometimes in a moment where you know something is missing, but you’re not sure if this or that would be the thing that makes the difference, you can check out loops that might provide you with a better perspective of what you can do.
  6. Use Loopcloud’s sample editor to fine tune a loop. While there are a lot of loops in Loopcloud, you can rearrange sounds in the editor and also add some integrated effects to tweak the perfect sample. The multi-layer function allows you to have up to 8 loops playing. This is really an added value to your library, giving yourself a lot of options to tweak original material from, perhaps even very simple content.
  7. Test one sample alone in a context. You can pick one sample and with Loopcloud’s inner sequencer and create a pattern to hear how it would sound. This is pretty killer, as sometimes you’re missing that one thing. This is, by far, way faster than Ableton’s browser, so with all your samples you have along with those you don’t have, there’s absolutely no way to fail in finding good sounds. Perhaps, having too many sounds might become an issue!

If haven’t read about it in this blog already, for 2020 I will be making one song per week as part of a personal challenge that I’m doing on WeeklyBeats, and it’s been a life changing experience. Music is one of the central parts of my life, both my lifestyle and working life, but putting my own music first was a bit of a challenge because I’ve been dedicating a lot of my time to clients—but this has also paid off in many ways. The first benefit of taking a break from my own music was to review in detail how I start a new song.

Loopcloud is a very useful tool to be able to start new songs from scratch. Basically, how I work is that I need first a core groove to be able to jam new potential ideas. The groove can be generic or simple, but I need something different each time. To make something new and refreshing is difficult if I’m stuck with a certain set of sounds, synths, and habits. Having access to random banks of new grooves is mind-blowing because it’s as easy as popping-open the app to see what today’s flavor will be. Perhaps ethnic, world beats, with a funk background and house bass? I’m the only one responsible to make it work, and if I let my brain tell myself “no”, then I know I’m missing out.

To start a track and to begin sketching, here’s how Loopcloud can help:

  • Try a base BPM and key to the song. This can of course be changed, but if you can start with that, you can then also find samples to work with.
  • Think of a genre you want to work with. This is just to remove a lot of potential distraction. If you think of techno, this will eliminate a huge number of decisions you have to take.
  • Pick a sub-genre or influence. If you’re a purist, this might be for you. I suggest picking a second genre to go fetch cross-genre sounds. Ex. Arabic melodies with house.
  • Decide on your rhythmic signature, such as 4/4 or breakbeats or anything else. Build a core loop to work with. Loopcloud also lets you pick one.
  • Collect a large group of sounds for your song. This should be, bass, main melody, supporting ideas, effects, stabs, transitional elements and background. I usually make sure I have 3-4 sounds for each of them, ideally in key to the song.

Is Working With Loopcloud Making Music Production “Easier” a Trap for Producers?

I don’t think it is. I find that the more people making music, the more refreshing ideas get invented. This starts with making music increasingly accessible, which Loopcloud does. In the hands of experienced producers, tools give us more time to focus on important details and things we like the most. In my case, I noticed I gained a lot of speed in starting new ideas or tweaking my client’s needs. I have more control and I also can share ideas with my clients before sending them a project so we’re on the same page.

Does Having Access to so Many Sounds Limit Creativity?

No, quite the opposite. If I have more material to work with, I find there are fewer obstacles to creating richer songs. One of the things I explain to many new music producers is that working with quality samples trains your ear on how to pick quality material, which gives you top results. For instance, once you realize that best hi-hats often have a certain air in the highs, you’ll combine the transients of certain hats you have with some others you found through your searches. You’ll soon be able to create your own percussive combination of layers 3-4 sounds to get another very odd sound design. Same for melodies. But it’s really hard to start learning sound design on your own if you’re not familiar with what really works. Once you learn, you can then work to reverse-engineer the sounds that work best. But to do that, there’s nothing like having access to a huge library, like what Loopcloud offers.

In the end, what music comes down to is only a few things: reproducing melodies/atmospheres/experiences you want, with the best flow possible. That requires experience, patience and the use of quality material.


Update: June 2021

Loopcloud recently released version 6 of the platform, which extends its sampling capabilities by incorporating artificial intelligence to match harmonic and rhythmic samples, similar sound matching, and enhanced search filters so that you can find a sample easier without having to do the dreaded “scroll and listen.” In addition to their enhanced algorithm, Loopcloud 6 comes loaded with tons more samples to increase artistic expression.

Sound Matching

Whenever you select a sound, a list of adjacent loops will appear that should work well with the one you selected. This algorithm will also look through your sample collection and find sounds that will compliment them too. So, if you have a sound that you have been using as a signature, Loopcloud’s updated algorithm will pump out a list of recommended sounds that may help expand that pallet, whether that is harmonically or rhythmically. This could be the spark that gets you to the next step in your game, while saving you a hell of a lot of time, all by working with Loopcloud.

More Advanced Search Filters

Perhaps you already have an idea of what you want in a sound, but are having a hard time building it from scratch. Loopcloud 6 has advanced their search filters in order to make working with Loopcloud and finding that particular sound more seamless. You can search for the tone, length, stereo, BPM, swing, rhythmic density, attack, and decay in order to track down that elusive tone in your head. You will probably not be able to find exactly what you need, but even if you find something adjacent, that can inspire a whole new universe of creative thought. 

Find Familiar Sounds

This feature does just as it says. If you have a sound that you like and click the “find similar sounds” button, Loopcloud 6 will populate a list of sounds that it thinks are similar to it. This makes working with Loopcloud a valuable tool for quickly cycling through sounds that may fit your timbral palette. 

Three New Effects

Working with Loopcloud just got more diverse, with its additions of compressor, Tonebox, and EQ effects. You can tweak the parameters of these effects or select a preset on any of the sounds to tailor your sound in unique ways before exporting it to your DAW.

Easier Sorting

If you want, Loopcloud’s AI will combine your sounds into theme-friendly folders so they are easier to find.


Links may contain affiliate offers.


Does Your Mix Sound Too Clean? Unpolish It.

If you think about it, it’s pretty astonishing to consider the number of tools that exists to make our music sound more professional. Since the 90s—when the DAW became more affordable and easily attainable for the bedroom producer—technology has been working to provide us with problem-solving tools to get rid of unwanted noises, issues, and other difficult tasks. We now face a point where there are so many tools out there, that when confronting a problem, it’s not about how you’ll solve it, but about which tool you’ll pick. Some plugins will not only solve a particular problem, but will also go the extra mile and offer you solutions for things you didn’t even know you needed.

The quantity and quality of modern tools out there have led myself, and others I’ve discussed this topic with, to a few observations regarding the current state of music. A lot of music now sounds “perfect” and polished to a point where it might be too clean. Just like effects in movies, deep learning, and photoshopped models—it feels like we’re lacking a bit of human touch. On top of the tools, engineers (like me) are more and more common and affordable, which makes it easier for people to get the last details of their work wrapped up. For many, music sounding “too clean” is not an issue whatsoever, but for others—mainly those who are into lofi, experimental, and old-school sounding music—the digital cleanliness can feel like a bit much.

If you think about it, we even have AI-assisted mastering options out there, but mastering plugins are also available for your DAW (Elements by Izotope does an OK job), as well as interactive EQs or channels strips to help you with your mixing (Neutron, FabFilter Pro-Q3), and noise removers and audio restoration plugins (RX Suite by Izotope). We’ve been striving to sound as clean as possible, as perfect as a machine can sound, and with increased accessibility, technology gives us the possibility to really have things sound as perfect as we can dream of.

So where should you stop?

Monitoring

You can only sound as perfect as what you can hear. If your monitoring isn’t perfect, you might not be able to achieve a perfect sounding mix. I know some people who intentionally will work with less-precise monitoring—it could be on earbuds/Airpods (not the Pro version), laptop speakers, cheap headphones, or simple computer speakers. Engineers usually test their final mix on lower-grade systems to make sure it will translate well in non-ideal settings. Starting out mixing this way also works; if you make music on low or consumer-level monitoring, you’ll be missing some feedback, which can actually turn out to be a good thing for your sound.

When producing on lower-grade speakers however, it also means you might not polish parts that actually need fixing. One of the frequency zones that always needs attention is the low-end—not paying proper attention to mixing it can be problematic in certain contexts, such as clubs. In other words, making bass-heavy music without validating the low-end is risky, because compared to other songs of the same genre that do sound “perfect”, your mix might have huge differences, which could sound off. In my opinion, if you want an “unpolished” sound, you should still give the low-end proper attention if it’s an important part of your song.

However, having self-imposed limitations, such as in your monitoring, is a good way to add a healthy dose of sloppiness to your mix.

Technical Understanding

The more you learn, the more you realize you really don’t know much. It’s perfectly fine not to know everything. Each song is a representation of where you are at the moment with your music production. I never try to accomplish a “masterpiece”. The more time and energy I put into a song to make it sound “perfect”, the more I realize I’ve sort of screwed up the main idea I had in the first place. Quickly-produced music is never perfect, but its spontaneity usually connects with people. I see people on Facebook amazed with music I’d consider technically boring from a production perspective, but the emotion these works capture strikes people more than the perfection of a mix.

Every time I search for something music-related, I learn something new. There are also some things I’m okay with not doing “the proper way”. I don’t think my music should be a showcase of my skills, but more of a reflection of the emotions I have in that moment.

I often see people over-using high-pass filters in their mixes, which makes their music feel thin or cold, or using EQs side-by-side that could introduce phasing issues…but does fixing these things actually matter? I’ve made some really raw music without any EQs at all (Tones of Void was recorded live without any polishing), which sounded really raw and was my most complimented work in the last 10 years of my productions.

Similarly, a lot of producers know very little music theory—how important is it? I’ve never gone to school for music and it’s only recently that I started wanting to learn more about it. Clients often ask me questions like “is it okay if I do this?” To which I reply that there is no right or wrong. Following rules might actually lead you to sounding too generic, if you’re technically-influenced.

The resurgence of tape in production and the rise of lofi love is great thing for music. People on Reverb are buying more and more old tape decks, four-tracks, and recording entire albums on them. One thing I love is the warmth it brings and the hiss as well (note: I get sad when clients ask me to remove any hiss). Some even have a shelving-EQ that can create a nice tone. Using an external mixer for your mixes can also create a very nice color, even on cheaper ones. Perhaps you shouldn’t be looking for the best sounding piece of equipment to improve your sound!

References

If your usual references are music that is really clean-sounding, you’ll be influenced to sound the same. I like that at the moment I see younger producers who are interested in uncompressed music, and like to have as much of a dynamic range as possible in their work; this is the opposite of the early 2000s when people thought loudness was the way to go—a trend that made a lot of beautiful music sound ugly as hell. Now some of the top producers have been passing their love for open dynamics on to the people who follow them, and that opens up a really large spectrum for exploring the subtle art of mixing.

When music is too clean and safe, it also becomes too sterile for many peoples’ tastes. If your references are only the cleanest sounds possible, perhaps you should explore the world of dub techno, lofi, and strange experimental music on Bandcamp—you’ll start to understand how music can exist in other ways.

SEE ALSO : How to balance a mix

Making Digital Synths Sound Analog

In exploring online electronic music production groups and forums, you’ll see a lot of hate around the use of presets. Some people think it’s a lazy way to get things done, and others that it’s just less creative and adds to the pool of music that all sounds the same. I have no shame saying that I myself use presets. I use presets to help myself understand concepts, how my tools work, and to give myself ideas that are outside of my normal routine. However, I don’t use presets “as-is”; generally—at the very least—I’ll run the sounds through a hurricane of colouring tools. I’m mostly drawn to very, very bizarre sounds that presets are usually not made for, except for some made by Richard Devine (but he usually goes too far).

Personally, my biggest pet-peeve with presets comes from cold-feeling digital synths or pads—they sound like Kraft Dinner served cold with canned peas; plain and horrible. Not only do I dislike these sounds themselves, but I can’t get over the fact that very simple things could have been done to enhance them, which is why I am writing this post.

Why Digital Presets Sound Cold and Bland

Analog equipment involves slight, microscopic, ever-changing modulations. Digital plugins and presets do not have these variations—they operate in a linear way. Think of an analog watch—the hands slide from one number to another without pause. A digital watch jumps sharply from one number to another without anything in the middle. This is the simplest analogy I can think of to help you understand why digital synths often sound surgical and cold, and inversely, why analog synths sound round and warm.

There are things you can do with tools to remove a digital or cold feeling, which mostly involves embracing the world of subtleties and tiny modulations. Don’t be afraid to push things to the point of feeling slightly “ugly”. Let me explain:

One of the things that’s become more obvious for me lately is how a tiny bit of distortion and clipping can bring a lot more of precision to a sound in a mix. I’ve always been a fan of saturation (sometimes my clients tell me to reduce it a bit); in case you didn’t know, saturation is a mild form of distortion—wave-shaping that you can really push in a very subtle way. Subtle distortion sort of breaks a signal’s linearity, or coldness. Recently, I was in a studio with my friend Jason—a brilliant sound designer—and asked him how he turns something cold into something more analog sounding. While he could have applied a bunch of effects and processing to a sound, he said he was more interested in creating multiple layers around the pad or digital sound.

A good way to combat the cold side of digital sounding synths is to add a good dose of acoustic samples, field recordings or other organic sounding findings around it. The combination of digital and organic really guides the perception [of the listener] away from the digital aesthetic.

What makes some acoustic recording samples feel warm is a combination of a bunch of things. The quality of the microphone, for example, can translate a lot of the details and capture more depth. The sample rate of the recorder will also make a huge difference. Microphones are often overlooked, but they basically determine the level of precision in your recording; if it’s extremely precise, with a lot of high-end information, it will contribute in the definition of the sound quality. Another thing to consider is the preamp of the recorder. There’s a world of difference between preamps, and having high quality one will certainly add a lot to sounds. If your sounds are thin and lacking substance, you can also use preamp plugins. Some of the best out there are from Universal Audio, but you can also rely on Arturia’s preamp emulation for something quite impressive as well.

I had a talk with someone who was saying that one of the things that made Romanian techno so good was the combination of the acoustic kicks with the analog ones, to which I added that without good preamps, the acoustic kicks would sound like garbage.

If you have raw synthetic sounds, you can also pass them through some convolution—this helps create a space around it. The mConvolution Reverb by Melda is quite spectacular. It also has some microphone impulse response which mimics as if the sound had been recorded in a space. You can make it multi-band so you can assign specific bands to have a specific reverb type(s). This allows you to be very creative, and if you leave it at a very low wet rate, it will infuse the sound with a nice, warm presence.

Regarding warm presence, again, with distortion, I’d encourage you to look into trying various distortion plugins and use them with a wet factor of about 3-5% max. Depending on the plugin, you’ll see how they add a little bit of color to a sound. My way of using distortion is usually bringing it up to about 20% and then rolling down until I barely hear it. You want to hear it a bit, but not much.

Some nice distortion plugins I like include Decapitator by SoundToys, mDistortionMB by Melda, Wave Box by AudioThing, Saturn by Fabfilter.

Get Out of “The Box”

There’s no doubt that moving outside your computer will infuse your sound with some texture, presence, and some analog feel.

Use a little mixer for summing. If your sound card (audio interface) has multiple outputs, then you can send them to a little mixing board where you can group your channels into different buses. For instance, you can split them into a channel for kick (mono), stereo channels for bass and melodic elements, and another one for percussion. If your board has more channels, you can experiment with different things, but just these sound groups are a great start; the mixing board will give you a rawer feel than your DAW alone. For simple, affordable boards, look into Mackie’s latest series—pretty impressive and absolutely affordable.

Use external saturation. People love Elektron’s Analog Heat. It’s a good external distortion and does a pretty solid job of adding colour to sounds, out of the box. You can also look into using distortion pedals, reverb, or invest in a 500 series lunchbox and get some saturation modules—there are many to look into.

Use VHS, cassette, or tape. Some of my friends have been searching local pawn shops for cassette decks or old VCRs; they offer a static saturation that you can explore. There’s a whole world of possibilities too when you compress the recorded result—you’ll create something weird sometimes, but it will give you a lofi feel.

If you have other suggestions, please share!

SEE ALSO : “How do I get started with modular?”

Creating Depth in Music

I don’t know many people who took theatre in school, or aspired to become an actor or comedian. For me, having a background in theatre has shaped my vision of music, performance, and storytelling. In Québec, we have a “theatre sport” called Improvisation, where teams meet in a rink to create stories and characters, out of the blue. After practicing this for 20 years or so, it’s shaped how I perceive songs and sets. There are so many parallels to music in theatre: how a story develops, the use of a main character, supporting roles, etc., all of which can be applied to the use of sounds in a track.

A story is never great without quality supporting roles. Support adds depth to any story, and richness to the main character. Think of all the evil nemeses James Bond has faced—the more colorful they were, the more memorable the story, and the same goes for songs.

You might have a strong idea for your song, but if it has a good supporting idea or two, then you’ll end up with a song that keeps you engaged until the end.

I’ve been really into minimalist music lately; I like music that has a solid core idea that evolves. I was reading a really nice post on Reddit about Dub Techno where one of the main criterion discussed was the importance of simplicity. Simplicity doesn’t make something dull or dumb—in music it can be a reduction of all unnecessary elements, in dub techno resulting in a conversation between the deep bass and the pads and other layers.

If you’re immersed in electronic music, you’re generally used hearing multiple layers and often multiple conversations between sounds. Percussion layers will be often related to themselves, but the main idea is usually supported by a second layer. I often hear this in some indie rock songs too, especially ones that have some electronic elements in them. The way the human ear works, is that we will always hear the main component of a song as the centre of attention, but attention will shift back-and-forth between different layers. The advantage of having depth in music is that it encourages repeat listening. For a listener to replay a song and hear something new is exciting; some songs will grow on them even though they may have felt overwhelming during the first listen.

How can you create secondary ideas and “supporting roles”?

There are multiple ways to do to add depth to your songs.

Negative Space

The most important part when you program or write a melody, is to leave some empty space in it, which I call “negative spacing.” This space is where your secondary ideas can appear, supporting or replying to the main idea. I usually start by writing a complex melody, and then will remove some notes that I will use elsewhere, either in a second synth, bass, or percussive elements. Here are some suggestions as to what you can do with the MIDI notes you remove from the first draft of your melody:

  • Use the same MIDI notes from your melody, but apply them to multiple synths or other sounds to create variations and multiple layers that all work together.
  • Use the MIDI tool chords and arpeggios to build evolving ideas that come from the same root.
  • Look into some MIDI-generating Max for Live patches that can give you alternative ideas. I’ve had some fun with patches like Magenta, but also with the VST Riffer or Random Riff Generator which are really interesting.

The “Fruit of the Tree” Exercise

This is an exercise that is a bit time-consuming that I have a love/hate relationship with. You spend time playing the main idea through intense sound altering plugins. So, if your main idea is a melody, imagine you send it through granular synthesis, pitch-shifting, a harmonizer, random amplitude modulation, etc.—you’ll end up with a bunch of messed up material that can be shaped into a secondary idea while still being related to your original idea. The idea is to transform what you have into something slightly different. There are multiple plugins you can look into for achieving this:

  • Vocoders, mTransform, mHarmonizer, mMorph: These all work by merging an incoming signal and with a second signal. So, let’s say you have your main idea or melody—you can feed it into something completely different, such as a voice, some forest sounds, textures, or percussion, and you’ll obtain pretty original results.
  • Shaperbox 2 is the ultimate toolbox to completely transform your sound by slicing, gating, and filtering it, with the help of LFOs. This is pretty much my go-to to create alternative tools quickly. One thing I like to do a lot, is to run two side-by-side on different channels, and then use them to create movement that answers one another. For instance, one will duck while the other plays. You can also use side-chaining in the newest version, which can create lovely reactivity, if you use it along with the filter to shape the tone by an incoming sound. This allows you to do low-pass gating, for instance, which isn’t really in Ableton’s basic tools.

Background Sounds

The lack of background sounds, or noise-floor, always leaves people with the impression that there’s something missing in a track. This can be resolved with a reverb at low volume that leaves a nice overall roundness if you keep it pretty dark in its tone. Low reverb creates an impression that a song is also doubled, or wide. Another good way to make background sounds is to load up a bunch of sounds that can be played multiple times in different sections of your song, at very low volume. I was checking out this producer who does EDM/festival music, and he would use sounds of people cheering at a very low volume in moments where the chorus of the song would hit, to create more density and excitement. However, at a high volume, this approach can conversely create a “wall of noise”, so it should be crafted carefully.

If you simply drop a background sound into a project, such as forest sounds, you’re missing out on one of the most enjoyable activities in making music, which is to create your own live sounds. A forest has a bunch of—what seems like—random sounds. You can alter this, and say have a basic 5-second background of noise-floor and then decide when the bird chirping comes in via automation and perhaps have them sync to the tempo. This creates a bit of a groove too. A good exercise is to try to create sounds that emulate nature as you’ll have a bit more control over the sounds (and you’ll learn more about sound design in the process).

Ghost Notes

Ghost notes are mostly discussed as they relate to percussion, but they can be used, as a technique, with anything. A common example of ghost notes is their use in hi-hats, as a bunch of in-between hats at a very low volume to fill up space, which stretches the groove and but avoids too much negative space. Aside from using this technique on the low end—where sounds need a lot of space and room to breathe—make sure everything doesn’t sound mushy. The use of a delay in 16th or 32th notes can be a good way to create ghost notes.

A tap delay, where you can program where the delays fall, is also super fun in terms of creating ghost notes, as you can use one to make complex poly-rhythms. However, I suggest cutting some part of the high-end from the delays to avoid clashing with the main transients, and make sure the volume is very low. Using a AUX/Send bus for delays can be quite useful.

SEE ALSO : Improving intensity in music

Improving intensity in music

Intensity in music can be a tricky balancing act. In our Facebook group, one member recently asked about how he could improve the intensity and excitement of his tracks. He makes electronic music, and feels that compared to some producers he likes, his music doesn’t match in terms of excitement. After asking him a few questions, I realized that the tracks he shared as examples he wanted to emulate were mostly songs with high levels of density, and perhaps not the levels of intensity I thought he was referring to. The term “intensity” is very different from one genre to another; in this post, I’ll try to cover some of the different ways we relate to intensity, and also some tricks and tips as to how to make your tracks more intense-feeling.

Loudness

One of the main aspects of intensity is the loudness or volume of a song. Humans are often tricked into thinking that loudness directly correlates to the intensity of a song. Concerts at high volumes give music a physical sonic experience that people like. Artists often try to replicate the live experience through volume levels or even compression.

However, when making music, there are a lot of other things one needs to pay attention to in the process—loudness should be the very last thing to worry about. Volume/loudness levels can only be adjusted once your mix is proper and flawless. Some people play with mastering tools such as Izotope Ozone 9 as a mastering assistant to help push songs up to a higher level, but if you think loudness is the key to intensity, you might run into issues. Heavily boosting the loudness of a song ruins all the finer details that were worked on so much, via too much compression.

If you want to play with the perceived loudness experience, one thing you can do is make sure that your mid-range frequencies are mixed at sufficient levels, or even perhaps a bit louder than what you’d usually do. Humans will always hear something with a good mid presence as “louder”, even if the overall loudness is lower. A plugin like Intensity by Zynaptiq can really help bring intensity to a song, but can also do subtle wonders at lower levels.

Another thing you can do is play with saturation. This gives a gritty feel to your track’s sounds, adding textures, depth, and relative power as well. Harmonics by Softubes is often my go-to plugin when it comes to applying saturation to mids. It really brings out an organic brightness in sounds that almost always sounds good. Saturation also creates the impression that something is louder, but not in a compressed way.

Density

Similar to loudness, is density: how many sounds you have in your mix at a given time that have very little difference in volume. You could have multiple percussive sounds, for example, and all of them equally loud. Doing this occupies a lot of room in your mix and makes sounds feel more like they’re at the forefront. The denser a mix, the less room there is for depth, but a dense mix can have a lot of immediate power.

For certain techno songs, density is often in the form of a wall of machine-gun type hi-hats which are always going. This creates excitement in the highs. In tribal music, density comes from percussive sounds, but in the mids, and in dubstep, it’s pretty much all about the low end (although dubstep tends to overcharge the full frequency spectrum).

An interesting genre that people often simply refer to as ambient, is drone music. Drone, in a loud venue, becomes a pure noise show so intense, it can give you very powerful body sensation. At MUTEK, I almost puked after a drone show.

If you want an alternative way to create density, other than simply using a lot of tracks, you can also play with the decay of your sounds. Longer hats, kicks, claps, and other percussive sounds will add intensity via density. If you have certain sonic limitations, decay can also be “created” with a gated reverb which will add a tail, but I’d encourage you to use a darker tone.

Background and noise floor

If you go to the most quiet place you can think of and record with a field recorder, you’ll still hear noise in your recordings at a very low level. In general, there’s always some sort of noise surrounding us. It can be the fan of your computer, a car passing by your apartment, people talking in the background in a quiet coffee shop. When you put your headphones on and make music, you might have the impression that your music feels empty and that usually comes from a lack of noise floor. In Dub Techno, songs are often washed in a sea of reverb, which creates a space that feels comforting. Using a long reverb can create a low level of noise that is naturally pleasant to the ear, but there are also other ways to create a noise floor:

  • In many minimal tracks, people will mix in field recordings. You can find a lot of field recordings for free online. They can be from anywhere, but you can event record noise from where you live and use that (some producers love to have a microphone in their studio to pick up noises of themselves as they work). You can also spend time creating your own invented field recordings using day to day sounds that you mix with a white noise and reverb, then lower the volume to -24db or lower.
  • Use hardware equipment and use a compressor to bring up the noise.
  • Take a synth and use a noise oscillator to create a floor. You can then add volume automation to it to give it life, like side-chain compression.

In the tracks the member of our group shared which I mentioned at the beginning of this post, the noise floor was just as loud as the main sounds, which then created an impression that the song was really, really dense, loud, and busy.

Powerful low end

One thing people often do for intensity is create really powerful kicks or basses. They’ll have them mixed way louder than the rest of the track, but this often results in a muddy mix, as the details will then feel covered or too low. But in many genres, the importance of a solid kick is often directly related to the intensity of the song. A tip—the clap or snare, should also be equally intense, with a presence in the mids; this relationship will make the track feel very assertive and punchy.

Creating a powerful kick is not an easy task, but you can achieve better results with a combination of Neutron‘s transient shaper and multiband compressor. This will allow you to shape your kick so it’s fat and round. But even if you end up with the most powerful kick you can create, a mix can still feel like it’s lacking intensity unless the kick is properly mixed. Proper mixing of a kick’s low end can often be done by high-pass filtering or EQ’ing some parts of the bass so it doesn’t mask the kick. You can also use a tool like the Volume Shaper or Track Spacer to give clarity to the kick.

Exciting effects

Transitional effects, fills, and rises/falls are always a popular way to create excitement in your track. These are often effects you can use straight from presets and simply apply them on random sounds that are already in your project. I usually like to have two channels per percussive sound I use. Not only for layering, but sometimes the second channel of a percussion will have an effect that I’ll use once or twice. You can have dedicated channels that are effects only, and then drop sounds from your song into that channel. This can be done with a send/aux channel too, but I like to have a FX-channel on its own, as it’s more visually clear.

Popular effects that can help create intensity and excitement include delays, panning, reversing sounds, and reverb, but if you’re looking into something out of the ordinary, I suggest you look into unusual multi-effect plugins such as SphereQuad, Tantra, Fracture XT, Movement, and mRhythmizerMB.

Dynamics

A lot of people don’t seem to understand dynamics, and what they mean in music. Dynamics are often simply interpreted as compression, but if you really use dynamics in an exciting way, you need to think about it as the contrast or range between two levels. Imagine someone whispers something in your ear, and then, all of a sudden, starts talking really loudly; it will create a shock or surprise. Differences in sound are a good way to create surprise and intensity—the greater the difference between the two sounds, the louder or more intense the second sound will feel, or vice-versa. You could have section or certain sounds in your song that are quieter for a moment and then get louder. Dynamics don’t necessarily always refer to volume, however. For example, you can create a moment in a song in mono, and then go to full stereo mode—this difference is also surprising for the listener.

Finally, one thing to keep in mind about intensity in music: if you immediately give away everything your song is about in the first few seconds of a track, you’re mostly likely going to screw up the ability to create intensity, tension, and excitement in the entire work—it will be really hard to keep a listener interested for the entire duration of a song if he or she has already heard your “climax”.

SEE ALSO : Textures Sample Pack

Creating a music sketch

In this post, I’d like to explain how making a music sketch can help you to stay on track when creating a song or track, much like how a painter creates an initial sketch of his/her subject. I’ve explained in previous posts that the traditional way of making music goes something like this:

  1. Record and assemble sounds to work from.
  2. Find your motif.
  3. Make and edit the arrangements.
  4. Mix.

Here we’re talking about a way of making music that was popularized in the 1960s and is still used frequently today. But what happens when you have the ability to do everything yourself, and from your computer alone? Can you successfully tackle all of these tasks simultaneously?

When I do workshops, process and workflow are generally questionable topics to address because everyone has different point of view and way of working. However, to me it always comes down to one thing—how productive and satisfied an artist is with his or her finished work. Satisfaction is pretty much the only thing that matters, but I often see people struggle with their workflow, mostly because they keep juggling between different stages of music-making and get lost in the process (sometimes even losing their original idea altogether). For example, an artist might start working with an initial idea, but then get lost in sound design, which then leads them to working on mixing, and then sooner or later the original idea doesn’t feel right anymore. For some people, perhaps its better to do things one at a time; the old before-the-personal-computer way still works. But what if breaking your workflow into distinct stages still doesn’t work? Is there another alternative approach?

In working with different artists and making music myself, I’ve come to a different approach: creating a music sketch—a take on the classic stage-based process I just mentioned. Recently, this approach has been giving me a lot of good results—I’d like to discuss it so you can try it yourself.

Sketching your songs and designs

I completed many drawing classes in college because I was studying art. If you observe a teacher or professional painter working, you’ll see that when they create a realistic painting of a subject, they’ll use a pencil first and sketch it out, doodling lines within a wire-frame to get an idea of where things are. Sketching is a good way to keep perspective in mind, and to get an idea of framing and composition. The same sketching process can be used in music-making.

When I have an idea, I like to sketch out a “ghost arrangement”. Sometimes I even sketch out some sound design. The trap a lot of people fall into when making a song—particularly in electronic music—is to strive to create a perfect loop right from the start. Some people get lost in the process easily which is, honestly, really not important. People work on a “perfect loop” endlessly in the early stages of making a song because when you are just starting a song, the loop will have no context and it will be much more difficult to create something satisfying. By quickly giving your loop a context through a sketch-type process by arranging or giving the project a bit more direction, you’ll hear what’s wrong or missing.

I’m of the belief that having something half-done as you’re working can be acceptable instead of constantly striving for perfection. I think this way because I know I’ll revisit a song many times, tweaking it a little more each time.

Sketching a song can be done by understanding at the beginning of the process that you’ll work through stages of music-making more quickly and roughly, knowing you’ll fix things later on. This is more in line with how life actually goes: we live our lives knowing some problems will get solved over time, and that there are many things we don’t know at a particular moment in time. In making music, some people become crazy control freaks, wanting to own every single detail, leading them down rabbit hole of perfectionist stagnation, in my opinion.

Creating a sketch in a project is simple. Since I work with a lot of sound design, I usually pick something that strikes a chord in me…awakens an emotion somehow. Since this will be my main idea, next I’ll try to decide how it will be use as a phrase in my song. In order to get that structured, I need to know how the main percussion will go, so I’ll drop-in a favourite kick (usually a plain 808) and a snare/clap. These two simple, percussive sounds are intentionally generic because I will swap them out during the mixing process. You want just a kick in there to have an idea of the rhythm, and the snare clarifies the swing/groove.

Why are the basic kick and snare swapped out later?

I swap out the snare and kick later because I find that I need my whole song to be really clear before I can decide on the exact tone of a kick. A kick can dramatically change the whole perspective of a song, depending on how it’s made. Same thing goes for a snare—it’s rare I’ll change the actual timing of the samples, but the sound itself pretty much always changes down the line.

For the rest of the percussion, I’ll sketch out a groove with random sounds that may or may not change later on, but I use sounds I know are not the core of my song.

With bass, I usually work the same way; I have notes that support the main idea but the design/tone of the bass itself has room to be tweaked later.

As for arrangements, when creating a music sketch I will make a general structure as to what goes where, when some sounds should start playing or end, and will have the conclusion roughly established.

Design and tweak

Tweaking is where magic happens—this is where, in fact, a lot of people usually start their music-writing process. Tweaking and designing is a phase where you clarify your main idea by creating context. I usually work around the middle part of the song; the heart of the idea, then work on the main idea’s sound design. I layer the main idea with details, add movement and velocity changes.

  • Layering can be done by duplicating the channel a few times and EQing the sub-channels differently. Group them and add a few empty channels where you can add more sounds at lower volume.
  • Movement can imply changes in the length of the sound’s duration (I recommend Gatekeeper for quick ideas), panning (PanShaper 2 is great), frequency filtering, and volume changes (Check mVibratoMB for great volume modulation). The other option is to add effects such as chorus, flanger, phaser, that modulate with a speed adjustment. Some really great modulators would be the mFlangerMB (because you can pick which frequency range to affect—I use this for high pitched sounds), chorus (mChorusMB) to open the mids, and phasers (Phasor Snapin) for short length sounds. Another precious tool is the LFO by XFER—basically you want the plugin to have a wet/dry option and keep it at a pretty low wet signal.
  • Groove/swing. This is something I usually do later—I find that adjusting it in the last stretch of sketching provides the best results. The compression might need to be tweaked a bit, but in general the groove becomes much easier to fix once everything is in place.
  • Manual automation. Engineers will tell you that the best compression is done by hand, and compressors are there for fast tweaks that you can’t do. Same for automation, I find that to be able to make your transition and movement using a MIDI controller is a really nice finishing touch that is perfect in this stage.

Basically, the rule of finalizing design is that whatever was there as a sketch has to be tweaked, one sound/channel at a time. Don’t leave anything unattended—this can manifest from a fear of “messing things up”.

When tweaking specific sounds from the original sketch, you should either swap out the original sound completely, or layer it somehow to polish it. I always recommend layering before swapping. I find that fat, thick samples are always the combination of 3 sounds, which make it sound rich. When I work on mixing or arrangements for my clients and I see the clap being a single, simple layer, I have to work on it much more using compression, sometimes doubling the sample itself, which in the end, gives it a new presence. Doubling a sound—or even tripling it—gives you a lot more options. For example, if you modulate the gain of only one of the doubles, you not only make the sound thicker but also give it movement and variation.

All this said, I would recommend making sure your arrangements are solid before spending a lot of time in design. Once you start designing, if your arrangements have a certain structure, you’ll be able to design your song and sounds specifically according to each section (eg. intro, middle, chorus, outro) which gives your song even more personality. Sound design completed after a good sketch can be very impactful when the conditions are right.

Try sketching your own song and let me know how it goes!

SEE ALSO : Creating Timeless Music

Live recording with the Ableton session view

Many people who sit in from of a computer to make music find this style of music work counter-productive or “too nerdy”, and will always prefer using gear, instruments, and live sounds to create music. If you’re finding your workflow too rigid when working in the arrangements view of a DAW and feel like your usual song structures are “too square”, it’s good to remind yourself that there are other ways to make music.

If you feel limited in your current production style, finding a better way might come from exploring alternatives.

This is partly why modular synth music feels free—tweaking a machine you can’t entirely control with often unexpected results. Similarly, in DJ’ing, the DJ is the master of when a song starts, stops, and how to control certain outputs. One of the best ways to see where you yourself stands is to understand what brings you excitement when you make music. I often hear stories of people struggling with an inner voice telling them how music should be made The Right WayTM and they’ll sit in front of their DAW hoping something happens, but what comes out feels weak, boring and not worthy of any energy. These individuals have been misled in what is believed to be The Right WayTM (though for some the DAW approach works).

The last thing you want to do if you’re bored of DAW-based production is to jump straight in the modular world, especially if you don’t know much about it. Even though you may have read a lot about modular, you might get started with it and not really enjoy it either, which is a waste of time and money.

Explore low-cost alternatives

My view and approach to finding a new way to produce your music is through low-cost gear or instruments, and a drive to explore less predictable music-making methods. When it comes to knowing how to make music, I always insist that what you should master first is the knowledge of your personal tools and how to get the best of them. It takes time and patience, but this approach starts you on a road to success with controllable results instead of facing a long list of failures resulting from never truly being an expert at any tool you use.

Using live audio recordings in Ableton Live (and other DAWs)

It’s easy to forget that you can totally turn your production methods with Ableton Live (or any DAW, for that matter) upside-down without spending a dime. One of the most powerful aspects of DAWs—though sometimes under-utilized in electronic music—are their ability to process live recordings. “Real”, original audio recordings feel more organic than pre-made samples or boring MIDI blocks. So, how can you go about working with live recordings in an effective way?

Gather your loops for source material to jam with

Pre-made loops

There’s a lot of bad-mouthing out there regarding the use of pre-made loops. If you use them “as-is”, you risk having the same loops as other people’s songs, and perhaps be accused of not being original. However, don’t write-off pre-made loops completely—there are many advantages to using them.

  • Search for quality loops. If you hunt for loops, chances are you’ll find some that sound great, and perhaps some will also have at least one sound that you might be interested in. It’s important that you train your ear to what good quality sounds are, and that you are able to see how they are sequenced and processed.
  • Slice the loops into smaller pieces. Once you have a loop, right click to use the option of Slice to MIDI. Once sliced, you can trigger the sounds you want to keep and reprogram them.
  • Drop the slices in a sampler. Using the sampler, you can also isolate one part of the loop, and by playing a note, you can control its pitch—another way to recycle sounds from pre-made loops.
  • Use envelopes. In the clip itself, you can draw automation for gain/volume, and have part of the loop playing while silencing other parts. You can also automate pitch if you want. The fun part in using envelopes is to create automation that isn’t linked to the length to the clip itself—a good way to create strange results or polyrhythms.
  • Adjust the length. You can make tiny loops out of long ones, and you can create strange rhythms by having the loop points a bit “off”.

Recording your own loops

If you are one of those people who doesn’t like tweaking things on a screen, of course you can always record organic sounds yourself, and create source material from those recordings instead of using pre-made loops created by someone else. Once you have recordings saved, you can always tweak them in a similar fashion to the methods we just discussed.

How many sounds or samples should you create for your song?

Collecting and creating quality sounds from pre-made loops takes a fair bit of time and research. You need to do part of the sound design yourself in order have decent material to make your song. As an example, below I’ve created a list of what I believe to be “the bare minimum” to create in terms of loops and slices before to have a productive jam. Keep in mind that this is for mostly electronic music, but it could also apply to other genres:

  • A 2-bar loop minimum of kick or low end sounds that mark the tempo.
  • A 2-4 bar loop of low end material. This can be bass, filtered low synths, toms, etc.
  • 3-5 loops of rhythmic elements to be used as percussive material. For percussive sounds, I strongly encourage you to have at least A/B structure, as in 1 bar of sequence and then a variation in the second. The AAAB pattern is also a great way to keep ears interested.
  • 1 main idea—as long as you like—which will be your hook. Often this can be a short phrase, a melody, or something one can sing. Main ideas work well if they can evolve and develop.
  • 2 sub-ideas to support the main idea. This can be through call-and-response with the main idea, or something in the background. These ideas are secondary to provide support, not to stand out.

I know this seems like a grocery list, and it feels perhaps still very far from the main topic of this post, but keep in mind that if you’re not so found of doing all this, you can also get pre-made loops to practice programming sequences with PUSH.

The power of the session view and recording yourself jamming

Ableton’s session view

Often misunderstood and misused, Ableton’s session view is a very powerful panel that allows you to jam, play, improvise and explore.

Start by building scenes, starting with the main idea from your song. Imagine your song and how it might sound right in the middle of it, when everything is playing together. I know it can be a bit confusing to imagine, but this helps you generate ideas. The second row of the session view could, for example, be the same clips as the first arranged differently. Following that, perhaps you add more new ideas, and so on. Just make sure that row X with, lets say kicks, only has kicks—one sound per column. Basically, you want 10 lines of material to jam with; then once you have this, you jam.

Now that you’re ready, hit the record button and record yourself jamming. Don’t aim for perfection, don’t aim to make a song at all, just jam and eventually you’ll end up with great moments you can use.

TIP: Change the global quantization to 1 bar or less and experiment with how it goes.

When you press the record button while in the session view, everything will be tracked and recorded on the arrangement view. Afterwards, you can slice out the best parts of your jam, and then arrange them in a way that makes the song interesting, while avoiding feeling too “on the grid”. You might even end up with material for multiple songs. I strongly encourage you to read about the creative process I use to start and finish tracks, but working out of jams is very pleasing. I often use jams myself when I have a lot of loops and aren’t sure how to use them in a song.

SEE ALSO : Integrating a modular setup with your DAW

Using Modular Can Change the Way You View Music Production

Are “sound design” and “sequencing” mutually exclusive concepts? Do you always do one before you do the other? What about composition—how does that fit in? Are all of these concepts fixed, or do they bend and flex and bleed into one another?

The answers to these questions might depend on the specific workflows, techniques, and equipment you use.

Take, for example, an arpeggiator in a synth patch. There are two layers of sequencing to produce an arpeggio: the first layer is a sustained chord, the second layer is the arpeggiator. Make the arpeggiator run extremely fast, in terms of audio rate, and we no longer have an audible sequence made up of a number of discrete notes, but a complex waveform with a single fundamental. Just like that, sequencing has become sound design.

These two practices—sequencing and sound design—are more ambiguous than they seem.

Perhaps we only see them as distinct from each other because of the workflows that we’re funneled towards by the technologies we use. Most of the machines and software we use to make electronic music reflect the designer’s expectations about how we work: sound design is what we are doing when we fill up the banks of patch slots on our synths; sequencing is what we do when we fill up the banks of pattern slots on our sequencers.

The ubiquity of MIDI also promotes the view of sequencing as an activity that has no connection to sound design. Because MIDI cannot be heard directly, and only deals with pitch, note length, and velocity, we tend to think that that’s all sequencing is. But in a CV and Gate environment, sequencers can do more than sequence notes—they can sequence any number of events, from filter cutoff adjustments to clock speed or the parameters of other sequencers.

Modular can change the way you see organized sound

Spend some time exploring a modular synthesizer and these sharply distinct concepts quickly start to break down and blur together.

Most people don’t appreciate how fundamentally, conceptually different CV and gate is to MIDI. MIDI is a language, which has been designed to according to certain preconceptions (the tempered scale being the most obvious one). CV and gate, on the other hand, are the same stuff that audio is made of…voltage, acting directly upon circuits with no layer of interpretation in between. Thus, a square wave is not only an LFO when slowed down, or a tone when sped up, but it is also a gate.

What that square wave is depends entirely on how you are using it.

You can say the same thing about most modules. They are what you use them for.

Maths from MakeNoise. It’s a modulator. No, it’s a sound source. No, it’s a modulator.

To go back to our original example: a sequencer can be clocked at a rate that produces a distinct note, and that clock’s speed can itself be modulated by an LFO, so the voice that the sequencer is triggering goes from a discrete note sequence, to a complex waveform tone, and back again. The sound itself goes from sequence to sound effect and back to sequence…

Do you find this way of looking at music-making productive and enjoyable, or do you prefer to stick to your well-trodden workflows? Does abandoning the sound design – sequencing – composition paradigm sound like a refreshing, freeing change to you? Or does it sound like a recipe for never finishing another track ever?

SEE ALSO : “How do I get started with modular?”

Are Music Schools Worth The Investment?

Whether or not music schools are worth the money might spur a heated debate—schools worldwide might not like what I’m about to say, but I think that this topic needs to be addressed. What’s outlined in this post is based on my personal experience(s); I invite anyone who want to discuss this topic further, to contact me if necessary.

Music schools: an overview

Many people over the last few years have been asking me about my opinion regarding enrolling in music production schools. There are many production and engineering schools in the world, and a lot of them ask for a lot of money to attend. In Montreal, we have Musitechnic (where I have previously taught mastering and production) and Recording Arts. Most major cities around the world have at least one engineering school and if not, people can still study electro-acoustics at Universities. University takes at least 3 years to get a degree; most private schools will condense the material over 1 year. During that time, the physics of sound will be studied, mixing, music production in DAWs, recording, and sometimes mastering. While each of these subject usually take years to really master, the introduction to each can be very useful as you’ll learn the terms and logic of how these tasks work and what they are for.

If the teachers are good at explaining their topic(s) and have a solid background, there’s nothing quite like being in the presence of someone with a great deal of experience, not only for the valuable information they provide, but also, the interpersonal context. Having a good teacher will pay off if you ask questions and are curious. While I don’t teach at Musitechnic anymore, some of my past students are still in contact with me and ask me questions—I even hired some for internships. I’ve often been told by many students that they remembered more from hearing about their teacher’s experience(s) than the class content or material.

One issue with audio teachers I hear about a lot is that many times, teachers might be stuck in a specific era or on a precise genre, which might be difficult for a student to relate to; there might be a culture clash or a generation gap between themselves and the teacher.

For instance, if a school has teachers who are from the rock scene, many people who are interested in electronic music or hip hop will have a really hard time connecting with them. Similarly, sometimes the teachers who make electronic music can even be from a totally different sphere as well, and mentalities and approaches can clash.

The advantages of attending a school or program

There are, however, many beneficial outcomes from attending a music school:

  • you’ll get a solid foundation of the understanding of audio engineering, and get validation from experts.
  • you’ll end up getting a certificate that is recognized in the industry.
  • you’ll have access to resources, equipment and experienced teachers that you might not otherwise find.

The main issue I have with some music schools is how they sell “the dream”, in most cases. The reality of the music industry is really harsh. For instance, a school might tell students that when they graduate, they can open a studio or work for one. While after graduating you might have some skills and experience that you didn’t have before, nothing guarantees that people will come to you to have their music mixed. That said, getting your first client(s) will eventually bring in other clients and opportunities.

“What’s the best way to get a full time job in the music industry or to become an engineer?” I’m often asked, and I’m very careful about how I answer this question. I described my thoughts on finding full-time work in the music industry in a previous post, but I’ll share some points about this topic again here and how it relates to music schools:

  • Whatever anyone tells you or teaches you, even if you applied what they say to the finest level of detail, it’s likely that things still won’t work out the way you envision them. I know this sounds pessimistic, but the reality is that no path will provide the same results for anyone else in the music/audio world.
  • The industry is constantly changing and schools aren’t always following fast enough. If you want to make things work, you need to make sure that you can teach yourself new skills, and fast—being self-sufficient is critical to “make it” out there.
  • Doing things and learning alone is as difficult as going to school, but will be less expensive. The thing a school will provide is a foundation of knowledge that is—without question—valuable. For instance, the physics of sound won’t change in the future (unless one day we have some revolutionary finding that contradict the current model; this is not going to come in anytime soon).
  • Clients don’t always care where you’re from or what your background is, as long as they get results they like. Your reputation and portfolio might speak more for itself than saying you went to “School of X”. Where schools or your background can be a deal-breaker though, is if you apply to specific industries, such as video game companies, and maybe you already have some experience with the software they use—companies will see that as a bonus. But I know sound designers for some of those companies who’ve told me that your portfolio of work matters more. For instance, one friend told me that they really like when a candidate takes a video and then completely re-makes the audio and sound design for it; this is more important than even understanding specific software which can always be learned at a later time.
  • The most important thing is to make music, daily, and to record ideas, on a regular basis. Finishing songs that are quality (see my previous post about getting signed to labels) and having them exposed through releases with labels, by posting them on Youtube channels, self-releasing on Bandcamp, or filling up your profile on Soundcloud can all be critical to reaching potential clients. One of the main reasons I am able to work as an audio engineer and have my own clients is mostly due to the reputation as a musician I built a while ago. I often get emails of people who say they love my music and that was one of the main reasons they want their music to be worked by me specifically. Not many schools really teach the process of developing aesthetics (i.e. “your sound”) or the releasing process. While some do, both of those topics also change quickly, and you need to adapt. I’ve been feeling like every 6 months something changes significantly, but knowing some basics of how to release music certainly helps.

Would I tell someone not to attend a music school?

Certainly not. Some people do well in a school environment, and similarly, some people don’t do well at all on their own. So knowing where you fit most is certainly valuable in your own decision-making about schools. Perhaps a bit of both worlds would be beneficial.

Will a school get you a job in the audio world?

Absolutely not—this is a myth that I feel we need to address. It’s not okay to tell this to students or to market schools this way; it would be as absurd as saying that everyone who graduates from acting schools will find roles in movies and make a living from acting.

What are the alternatives to music schools?

If you don’t think music school is for you—because you don’t have the budget for it, or you’re concerned about the job market after, or even because you’re not someone who can handle class—there are still other options for you:

  • Take online classes. This is a no-brainer because there are a huge number of online classes, courses, and schools online, and you can even look for an international school. You can also work on classes during a time that fits into your schedule. This means you can invest some of your time off from work into it. Slate Digital has some nice online classes, as well as ADSR.
  • Become a YouTube fiend. YouTube has a lot of great content if you’re good at finding what you need. You can create a personal playlist of videos that address either a technique or a topic that is useful. There are also videos where you see people actually working, and they’re usually insightful.
  • Get a mentor. People like myself or others in the industry are usually happy to take students under their wing. While you can find most information online, one advantage of having a mentor is to speed up the search for precise information. How can you learn a precise technique for a problem if you don’t even know what it is? Well, someone with experience can teach you the vocabulary, teach you how to spot a specific sound, and teach you how to find information about it. “How do they make that sound?“, I sometimes hear, as some stuff feels magical to students until I explain that it’s a specific plugin. In my coaching group, we even have a pinned topic where we talk about certain sounds and how they’re made.

I hope this helps you make your own judgments about music schools!

SEE ALSO : On Going DAWless

Building a great groove

Have you ever been on a dance-floor and heard a track that connects with you in a very physical way? Physical connection creates a sort of energy that is infectious and makes you want to dance until your feet give up. This feeling is all about the groove in a track; creating a groove makes the combination of elements and arrangement feel just right to keep you dancing. What follows in this post is my personal take on groove, and the steps I’ve learned that I think work best to create a great groove.

Taking into account that everyone has a particular taste, a groove that can give me this irrevocable urge to dance may not do the same for you, and on the other hand, you may relate to other tracks in the same way which don’t do anything for me. To better understand groove, I recommend that you take a step back and subject yourself to some critical listening.

Critical listening includes listening to some reference tracks with your eyes closed and making mental notes of what seems to work best. How do the elements in the track relate to one another? What kinds of sounds are used? Is the groove driving or swing-y? Listening this way will give you great ideas with regards to what works and what feels forced for you personally. I cannot stress this point enough. Have you ever made a track which you felt was “good” but didn’t create a sense of physical movement or urge to dance? Review the groove and change it, and you’ll hear an improvement.

Based on my own personal taste, I feel that when it comes to groove, less is more in terms of what works best. Subtlety coupled with taking extra care in the sound design/sample-selection stage will help your ideas flow smoothly. Understand which sounds you want to be the “protagonists” from the get-go, and you will be able to fill the space much more naturally. 

Workflow for creating a groove

  1. Build a simple pattern. After designing some sounds you feel are nice, take them and start constructing the foundation of your groove. While most of the time drums and percussion are associated with the groove, they are not the only parts which have to work in order to have a nice flow. Pheek’s Guide to Percussion has some great tips on call and response—a concept you must focus on quite a bit to build a solid groove.
  2. Once you have your pattern, add some variations to it. A variation could be muting the kick every eighth bar, or having a hat come in and out sporadically, or even changing the note of a synth stab you are using for the groove. You’ll notice that your groove already feels more complete once you add some variations. Micro-variations help to keep the listener interested as the pattern evolves a bit within itself.
  3. Swing is your best friend! It doesn’t matter if you’re working inside the box or with hardware—take your pattern and apply some swing to it, whether it be via Ableton groove pool or just micro-timing changes (moving things just a tad off grid), this will make this pattern feel less robotic which is what we are going for. This last point is very important for a nice groove, but some kinds of music don’t apply this technique as aggressively because they are just hard hitting and energy driven, but many others rely on these small details and time changes to give a human touch to the pattern. 
  4. Add some effects to your sounds. Instead of programming each MIDI note or step, add some delays—both triplets and eighth notes work well—with some very short feedback and dry/wet. Here’s where you can go crazy experimenting—you will notice that when you use these delays and reverbs your sound begins to morph and ghost notes appear in the background, which make things feel fuller and glued together.
  5. To continue morphing it, apply some modulations and LFOs to control different aspects of a sound; from panning to volume, modulation allows a pattern to evolve on a macro-scale and creates movement, which is crucial in creating a great groove. 

Don’t forget that it’s important that all your elements work well together. If you feel something is out of place, take a couple of minutes to review it—experiment and you’ll create “happy mistakes” which end up being great. I like to use the word coherence to describe how things work together in a track. If a track has a coherent groove in which the drums, bass-line, synths, and other parts work well together, then it will be infectious. Many people use the coherence approach, and you can go crazy with it. Again, listen to some references and use them as a starting point while asking yourself the important questions:

How much swing does the pattern have?

How does the bass-line relate to the percussion and main drums?

Are synths being used rhythmically or as background sounds?

Don’t be afraid to revise a groove, but also learn when to compromise—after a session take a break and come back to it with fresh ears. If your groove is solid, you will feel it. If not, you’ll have an easier time fixing it when your perspective is fresh.

SEE ALSO : Honing your production skills before releasing music

Is sampling wrong?

Sampling in electronic music involves two main types: using another person’s idea (e.g. using a harpist’s melody for your deep techno song, or sampling electronic music that isn’t yours) and using prefabricated samples for making your song.

As time goes on, I read and hear about more and more debates regarding sampling in electronic music. I refer to electronic music because in other spheres, such as trap or hip hop, the debate is non-existent. We all know it’s a matter of culture derived from how producers have approached their art.

You might ask yourself, “are there more benefits from making all my sounds by myself? Will I get more recognition that way?”

It’s hard to answer this question, but I’ll try to debunk the source of that question to help clarify a few things.

Firstly, the world of electronic music really started in the late 80’s with a DIY mentality. Back then, electronic music was not really well-known, and producers had a hard time getting support from traditional media and distributors; they had to do everything themselves. The same thing goes for their equipment. Equipment was extremely expensive and not easy to find, so many artists would work with whatever they could get their hands on. Then came a huge rise in popularity in the electronic music world, and by the 90s, it had its own culture. DIY was the established way to do things; everyone was contributing in one way or another. Making everything yourself – a form of being independent – had been rooted in the culture of electronic music. One of the big differences between that era and now is that back then, many producers were obsessed with making the most original music possible. Going out to an event was all about hearing new songs you’d never heard before that would make you dance; you were also aware you might never hear those songs again.

Secondly, with growing access to technology, it became essential to showcase your skills as a one-man-band. I’m not sure if if this was an ego thing, or more of a way of overcoming this tour-de-force, but while it can be impressive, it can also be counter-productive. There was no electronic music school out there until around 2005, where some appeared online. Prior to that, people that wanted to make electronic music had to be learning everything themselves.

Thirdly, as access to technology increased, as did the possibility to get pretty much anything you want via the internet, a certain snobbery amongst producers developed. Some people are able to do certain things a certain way, and will pass on a very clear message that if you don’t do things in their way, you’re doing it wrong. I think this approach – which I see a lot – has put many people in a defensive mode as well as made them less likely to share their work.

That said, sampling has always created polemics. You often hear a pop artist sampling others then getting into lawsuits as a result. In the underground scene, there are similar stories (such as Raresh sampling Thomas Brinkmann without understanding what consequences would ensue). There were multiple occasions where people would sample a part of a record that was released 10-15 years ago and make a song out of it. It would piss people off, mostly because it goes against two concepts:

  1. The person who sampled failed to be original and took the work of someone’s hard work to pass it off as their own.
  2. It’s a “violation” of the culture norms of music making, which have been in place for decades.

Is there a way to use sampling “correctly”?

Well, yes, there is a way. Sampling is not frowned upon in hip hop and, it’s also okay elsewhere too. However, there are rules to respect. When I launched my sub-label Climat in 2012, I wanted to use it to find artists that were talented, had beautiful content, and that once put into a groovy context, would make something new and refreshing. I was looking for music on obscure sites then tried to make music with it. Whatever samples I would keep, I would take the time to contact the artist, explain the concept and ask for their permission. Honestly, this is the least you can do and you should absolutely do it. Imagine if someone were to sample your work; I think you’d want to know. Plus, who knows, it can be the beginning of future collaborations.

How can I make use of samples from someone else’s work?

Contact the original artist, ask them if there are conditions associated with using their work, and then promote them too when you release something.

Is using samples a bad thing?

Many people feel ashamed to use samples. They think if they’re going to have an 808 kick, they need to buy a drum machine to make it. There is also a shame one feels when using presets which don’t feel original. Indeed, they aren’t, but you’re missing the point if that’s the only thing you consider.

When I make music and hit the studio, I want to be productive. I use samples to make a structure, a groove, to complement my idea, so that things come together faster. I’m not using samples as my final form. If I need a breakbeat, I don’t want to lose time trying to program the best beat possible. I’ll take a pre-made loop so I have a target of what I imagine it to be in my mind. As I work on the track, I’ll chop the loop, rearrange it, and swap the sounds out with something I’ll design myself.

Your main enemy in music making is your own mind getting distracted with things it thinks are important.

When you make a new song, you need to have a core idea. However, you can take inspiration from many things including samples. Gather them all in your project, analyze them, sample, process, and create. Don’t leave things so unchanged that could easily recognize a sample as being unoriginal. See your project as if you were a painter gathering images from magazines to use as guidelines.

Honestly, samples are the best way to get out of your routine. I’ve never understood people who were super stubborn about making everything themselves, just to end up sounding like every other song out there anyways. if you venture in genres that aren’t yours, you’ll get new ideas for sure.

Tip: I find that using layering multiple samples is a great way to make new sounds. For example, you can make your tiny clap sound fat if you combine it with a tom.

Your best companions in processing samples are just a few plugins away. With all the technology available, it’s silly not to use them:

Fabfilter Pro-Q3: Amazing GUI and pristine sound. This is a must to fix your samples into another, original way.

Mangledverb : This is a reverb for intense sound design. It can really bring alive some parts of your samples.

Discord 4 by Audio Damage: For subtle to extreme changes.

Shaperbox: The ultimate tool to recycle any sound into altered material.

Crystalizer: Great for granular synthesis and shaping sound.

SEE ALSO :  Setting up your mix bus