Tag Archive for: soundcheck

Playing Electronic Music Live (Part 6, final)

I recently played a live set at StereoBar in Montreal for the launch of my album Returning Home and it was very interesting to create a live set from scratch, following the advice of this series I’ve written over the past few months about playing electronic music live. I’d like to share with you a bit about how it went, as well as some personal notes I took for future performances.

Notes about preparation of my set

Returning Home has many tracks; I wasn’t sure how I’d approach them in a live context considering they are all pretty intricate, full of details, and pretty much impossible to execute as the recorded version(s). I decided to go through all the songs and export the stems for each group of sounds – plus making sure the kick and bass would be isolated – so I could control how they would come and go in the set.

Exporting stems took me a while. I had also exported stems from certain songs that weren’t included in the album but that I wanted to play. I had a good 17 tracks ready, with about 8 channels exported per track. I imported everything into my new live set, and added everything in the right columns and with the colors I needed. I also started chopping the stems into sections so I could trigger some parts spontaneously.

After a few days of geeking out, I started playing the tracks to see how the flow felt and to see if the transitions were going well. I played with effects; trying to spice up the main ideas to surprise people. As I kept rehearsing and trying to see how to play the songs, I found myself becoming very bored out of what I was hearing. The thing is, when you spent months making an album, you get to a point where you can’t listen to your own music anymore – and playing it as is felt too safe, too simple.

Live at MUTEK Chile 2006
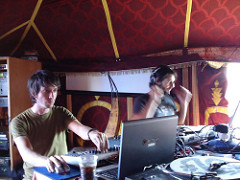
Live in Zurich 2005

I scrapped everything. I remember thinking that this whole series advising people on how to play live was crap but I realized that after going through it myself again, it still had a lot of value, but even I had done the preparations wrong. I remembered then how I used to LOVE playing live, 15 years ago and had a flashback excited me: pure improvisation. I realized that using stems wasn’t improvising enough and that my music is in itself, pure chaos.

I went back to my pool of sounds which didn’t make the cut originally and started chopping sounds, deconstructing stems, and re-exporting new parts. Then I started creating a space where I could remix the whole album on the spot, plus adding unexpected, unused sounds. Basically, it was combining the bass of track 2 with the melody of track 7, then percussion of track 4…pure remixing. I found a core idea for each moment of my set, and left a lot of space for reinterpretation. It worked and I was having a lot of fun.

My setup for this Set

I was using Ableton Push and 2 Novation Launch XLs, as mixers for all the channels (I ended up using 10). For some reason, each time I’ve tried using PUSH live, it has never really helped, but I felt this time I wanted to use it. I love the Novations so using 2 felt really amazing.

Limitations: My Macbook pro only has 2 USB ports so I needed a port to accommodate multiple items.

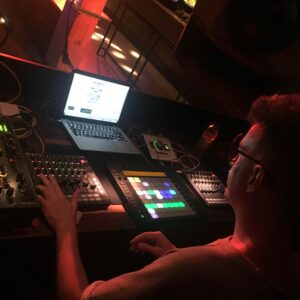
Soundcheck at Stereo

Soundcheck

Arriving at the venue, I felt really confident; perhaps too confident. The soundcheck went so smoothly that – in my experience – when that happens it gives you the feeling that something will go wrong later.

I had spent time in the studio carefully tweaking each channel with EQs to make sure the sound wasn’t to harsh or piercing. I also decided to use a Manley compression from UAD on the master which made everything really smooth. It was important to use a reference track as an EQ curve. It really paid off in Soundcheck so I didn’t have to do much; everything went so smooth.

TIP: Listen to your reference track before soundchecking, then play it to adjust an EQ on the master.

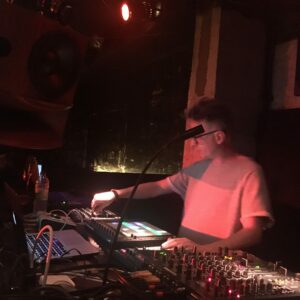
The show/performance

After a great start, shit started to hit the fan. As a track was playing, I noticed my mixer wasn’t responding and realized it had rebooted. By rebooting, it made the second mixer crash and the PUSH too. I wasn’t even 5 minutes in and the wheel of death was spinning on my Mac. I waited patiently and luckily it went back to normal. But after this glitch, I disconnected one of the Novations to plug it directly in my computer instead of the USB-Hub I had bought the same day (cheap connectors are always a big mistake!). PUSH was frozen and not doing anything, I had to activate clips with my mouse. Luckily from my experience playing live for so many years, I was able to do this in a way so that people didn’t notice. The Novations kept crashing one after the other. Each time I had to unplug them patiently to restart them, and then the wheel would go off on my computer; for some reason they would work for a good 20 minutes but then crash again.

Luckily, no one noticed anything! I could have really played a great show that night if everything had worked properly because Stereobar has the perfect setup for me…it was a bit disappointing, but I still received a lot of good feedback.
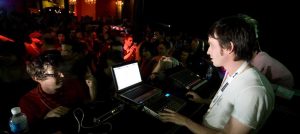
MUTEK Montreal 2006

Live in London 2005

After the show

Despite the technical issues, it was great show and fun nonetheless.

To summarize, a few tips here based on this live experience:

  • Don’t buy gear the same day without testing. Soundcheck are never 100% of what a show will be and can never be a real test.
  • Deactivate Ableton Live’s auto-update feature. It actually upgraded to a version the day before with a bug in it – a pretty big one. I had to reinstall the software and that was stressful. Thanks for the swift reply from Ableton tech support on that one.
  • Never panic when problems arise. Most of the time, people don’t notice.
  • Try to avoid shitty USB hubs! I’m still trying to find a better alternative.

I hope this series was helpful!

Playing Electronic Music Live – How to Prepare Your Live Set (Part 5)

In the previous four posts about playing electronic music live, I’ve basically covered everything you need to do before playing live. Now comes the moment of truth, where you’re basically ready and booked to play. This post will be covering the last mile of preparations including how to do a proper sound check, which is critical to play a quality set, and some bonus tips on the last things to do before hitting the play button.

Sound adjustments

Here are some main pointers about making final preparations for your sounds:

  • Clips don’t need to be perfect or mastered.
  • Leave everything with lots of headroom. We’re talking about -12dB.
  • The gain mainly comes from what you have on the master (bus). Keep it simple too.
  • The first 5-minutes of your live will be about fine tuning your sound.
Why the clips don’t need to be perfect

This is a bit hard to explain, but I’ll keep it simple. Over processing your sound might turn out horribly wrong in a venue, and if that’s the case, there will be no way back. I’d rather have something imperfect and tweak it at the sound-check to what feels best. If you’re doing multiple gigs, this also allows you to have different options for different venues. Playing on a very little sound system versus a open air festival will have totally different feel and you might have to use your compression/EQ differently.

Clips with headroom will do the job

One of the things people don’t notice is that for some sounds, channels might not be sounding like they do in the studio and thus, in a live context, you’ll need to push up the gain on certain elements that you may not have expected. Honestly, it’s more important that you sound right versus loud, and this means you need to be precise in all your sounds adjustments and find a balance. This also means that if a sound still needs to be louder than others, by leaving headroom, you’ll have space to push your fader up. If everything is maxed, you’ll only have a little space to work with which is inconvenient. Don’t hesitate to look at the meters of each channels to make sure they’re leveled. While not the perfect way to tell, it’s still useful and if you’re stressed, you’ll appreciate this quick tip regarding the gain stage, there are also two things you can do:

  • A compressor in a Send bus for all channels needing a boost. Have the compressor be aggressive with a high ratio, but a slow attack. Send to that channel as needed.
  • Routing channels to a “family bus.” Instead of having the channel sent to the Master, have it go to another channel which will act as a bus. I like to have 3 of them: low, mid, highs. Each gathering channels, having extra compression and EQ. Plus you can quickly adjust the tone of your set with these faders. All those busses will go to the master.
The Master bus will do the job

On the last bus, I like to have a limiter that will boost the incoming signal enough to see it pump with a gain reduction of about -2dB. So you might have to add +6dB to the gain for instance. This way, your channel faders might, at first, only be at 3/4 or half way but you’ll also have enough room to boost all the way to zero. Do not use Ozone or other “quick fix” mastering helpers unless you really knowing what you’re doing. I would encourage you to use a shelving EQ just before the limiter. The 3-band EQ in Ableton will do but there are also other you can use too. The idea of a shelving EQ is to quickly adjust frequency zones.

TIP: How to know what to adjust? Let’s say you feel there’s not enough low end (Kick/bass), then reduce the mids, followed by boosting the Limiter’s gain. Don’t boost the bass!!

Adjusting your sound in the first 5 minutes

I find the best way to find my levels is to take my time in the intro of my set and fade-in elements such as the kick, melody, etc. You can bring them at a level that feels like what you are familiar with. It’s important to spend time in the booth/stage before playing to be aware of the levels of the different elements in the room. I also like to go in the crowd area for five minutes to be aware of how the sound is, then go in the booth to see how the levels translate. Sometimes on the dance floor you have the highs piercing while its not the case on the stage or vice versa. This is a super important lesson for how you mix at home too and how it translates in the world.

Sound-checking

Ok, so now you’re at the venue and you’ve been given the opportunity to do a sound-check. Sometimes, you won’t have that luxury, so be grateful if you can. To make the best of this experience, focus on plugging in your sound interface so it’s ready to go and don’t worry so much about having the entire set-up ready. It’s common that sometimes there will be need for space and you might have to unplug or move some stuff. I’ve learned that leaving gear laying around might also be a bad idea, as I’ve seen people spilling drinks or even, some stuff getting stolen. Anyhow, here are main points of phase one of your sound-check:

  1. Beforehand, have your set saved so that when you press play, the most “intense moment” or peak time of your set plays. Most likely, the sound technician will ask for that to start with and I like to have than ready to fire when I arrive and be plugged. His first interest will be to see how he needs to adjust the limiter of the PA for your sound and he might also do a quick EQ curve.
  2. If you’re plugged in a DJ mixer on the stage, your first thing will be to make sure your channel is set to “Line-in”, then boost the gain of the channel to reach zero and avoid seeing any red peak indication both on the channel and the master.
  3. Make sure you can control the sound in the booth/stage and put it to a comfortable level. During your set, it’s important to mute it a few times to see what’s happening in the crowd.

If your sound reaches the PA and all is OK, then the first phase of your sound-check is completed. The gain is usually handled by the tech and you can control extra gain if needed.

Now, phase two of your sound-check: tonal adjustments.

How do I know if my sound is OK?

When at home, try to find a song that you know sounds similar to what you do, and that has its levels balanced (eg. kick vs mids vs highs) and load it up in a net channel of your set. That channel’s output should be set to “External out” and not master.

  1. Play the reference song to the venue and see how it sounds both in the booth/stage and the dancefloor. Make mental notes.
  2. Compare your master output to that reference first in the booth, then on the dancefloor.
    1. Is the volume more or less the same? Adjust limiter, compression.
    2. Are some frequencies harmful? Adjust the EQ.
  3. Go one by one, to the core of each moment/song of your set to see if there’s anything that clashes. My quick way to do this is to always start with the kick to make sure all kicks are at the same level, then bass, melody, percussion. You want all the kicks to be very close so that you don’t have nasty surprises when you jump from one song to another. Same for other parts.

You’re now basically ready to play. So if time allows you, try to quickly play between songs. See if something needs to be adjusted.

TIP: You might for instance see that all your percussion need a correction by EQ. You can add an EQ on the channel to do it or you might freeze & flatten that channel with the EQ to make it simple.

What if there’s no soundcheck?

If this happens and that means that phase one is not available. The venue might ask you to do a “line-check”, which means you send your audio to the mixer and the tech will deal with it. You might have no tech and then you have to do it in the mixer yourself. Just make sure your signal is about the same as the person before you and… good luck!

Extra tips for the minutes before you play from an experienced performer…

These are the things I always do and that took me time to figure out, so consider using them for some extra comfort:

  • Be mentally ready to play an hour before you play. Be around the booth, make sure your equipment is installed and tested that it works properly. On many occasions I had to change the mapping of my controllers – god knows why – so it’s good to have some buffer time.
  • Spend a moment without talking to anyone at least 15 minutes before you play. Keep focus.
  • Avoid drinks nearby your equipment. You know why.
  • Have a friend to filter around and help. I like to have someone to push away unnecessary people who want to talk to you while you play.
  • Bring extra cables of everything: USB, Audio cables and even a cable to play from your internal sound card.
  • If Ableton crashes, have something ready to play in iTunes in case and while you restart the program.
  • Use hearing protection if you can.

Let me know if you have questions and perhaps I’ll do a part 6 to playing live!