
Playing Electronic Music Live – How to Prepare Your Live Set (Part 4)
Following up on the previous post in this series, I’ll outline some final tweaks and advanced clip settings for your live set. There’s a lot to cover here but I’ll try to condense it down to the essentials.
Final Tweaks
As your set is likely now taking form, you should have different songs organized into scenes. You can think of this as the minimum you will need to play live but if you want the best result, there are still things to tweak. Personally, when I listen to a live set, I really want it to feel live; the artist can interact with the energy of the room and build around it. You should avoid playing each scene one after the other, without surprises. Again, this is my opinion and you might think otherwise, but what I’d like to explain is how to add a bit of “live” life in the last tweaks to your set.
1st – Rehearse and record.
This is pretty much the ultimate test to see if your live-lab is working properly. You’ll need to rehearse, play with your session, move things around, and test, again and again.
Don’t ever fall back on the idea that what you have is ready for the big show without rehearsing, because trust me, you’ll learn the hard way that if wait until being in club to test your set, it will hurt. That said, hit the record button and then start playing the clips, try to take you time as well to create a proper intro, then see how it goes when you launch scenes, fade-in some sounds, and add effects. The most important part of rehearsing your set is recording what you do.
You can then listen to see what you recorded and if you like a part of a moment, you can then drag it back into your set.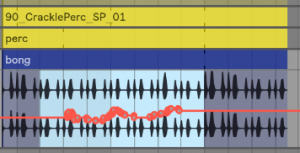

Since you only have two hands but you want each of your clips to have a feeling of “live”, you can pre-record certain subtle details you want to be played while you tweak other knobs. You’re not totally playback everything as-is, you’re interacting with other played elements you recorded. This can be particularly useful for creating unique and complex moment or breathtaking breakdowns.
You can also use ⌘+J (ctrl+J on Windows) to consolidate moments you like.
2nd – Add variations.
In my sets, I rarely have one scene repeating without having variations of it. The variations can be used for many things, such as having a more energetic variation of the same scene, one that has a little pause, or space for inserting a fill. Here are a few quick tips you can use to make creating variations easier:
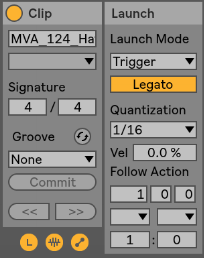 Legato: This is probably the most useful thing to activate for clips in variation. Basically, the Legato option will let the selected clip to take over the one that was previously played, based on the quantization you have set. So for instance, let’s say you play a hihat clip, then press the first clip of the variation. It will stop the activated clip and immediately switch to the other one you just started. On the image, I have set it to 1/16, meaning it will be played on the next 1/16th, keeping it on tempo. Keep in mind that the variation clips are “in sync” with the one playing so that it will continue at the same position in the clip. If legato wasn’t activated, it would start at the beginning of the clip.
Follow Action: Once played, what do you want the clip to do? You could just play that clip but it could go back to the first clip or even randomly play something else. I suggest you experiment with this and find ways to surprise yourself. Don’t forget to record yourself playing them as you can go back to the arrangement section to seize the best part and create new ideas you didn’t even know of.
 Intensity Variation: If you want to quickly go from open hihat to closed one, one of the fastest way is to play with the “Preserve” section and set it as in this image. Playing with the percentage will let you adjust how much of the end of each sound can be preserved. Having it at 100% is fully open and let’s say 25% is more closed, building tension. So one variation can be set low at first and then the other ones can be more open. If you see the need to boost the energy quickly, then you can go in one of the variation.
Reverse: this one can be fun but in a live context, if you do it at the wrong time it’s awfully awkward; perhaps introducing it in a variation instead would be a safer idea.
Transpose: This can be nice for melodies and basses. You can have them move in pitch in a variation.
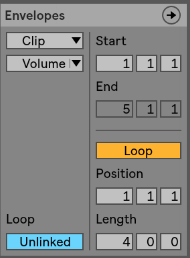 Envelopes: Super useful for variations as well because you can create automation on a very small scale or a longer one. Many artists will use this on EQ to give life to a clip and making sure it feels like it is alive. The important part is to make sure that the envelope isn’t linked and then you can decide of the length of the automation, on one attribute. Tip: make sure you select “Clip” in the first drop down to make sure the changes are made in the clip itself.
Try: Using this with a filter to create fun swooshes.
Also try: Use this technique to create melodies and textures out of a stall pad.
3rd – Transitions.
This part is the final preparation needed to play live but is also the trickiest one. Mainly because this task will imply some practice. My approach and advice here might not totally work for you because your music is different than mine. In other words, doing transitions is something personal and each musician tends to develop his or her own way to do it based on what feels like the best flow possible.
How do transitions work?
In theory, a transition from one song to another is exactly like a DJ mixing one track into another. The puzzle with live transitions is – whereas the DJ only has one fader and EQ to do the trick – you have multiple channels to blend one into the another.
Whenever I teach people how to play live (yes, I do Ableton Live training), a first exercise I give them is to create a playlist with a few DJ sets they like and tell them to study the track transitions. Some people like very fast and abrupt mixing (i.e Jeff Mills-like), while others prefer something more subtle and blurring the lines one where a song starts and the other stops.
The other thing to know beforehand is if you want your live set timeline to be fixed and fluid, or if you will chunk which tracks to play as you go. This can also be a huge factor in how you prepare your transitions. Personally, I want to have the entire flexibility to be able to play track X as an intro then switch to track Z. No order will be established until the last minute when I hit the play button to start my live set.
Once this is clear, you’ll be able to decide how to bridge songs. The first row of each song is your intro bridge and the last one most probably your outro, but you could also start mixing the next track at any moment if you want. Here a few rules of my own for transitions:
- Only one kick at a time is played. For a while I was mixing the kick of the first track and the other, but the results weren’t so great. I decided to stick to one channel for the kick and would switch when appropriate.
- One bass unless its a call/response. Same as kick, 2 basses is most usually a set up for disaster so I’d play one or the other. Some bass have only a few notes, especially in dub techno, so it could work that I have one bass of a track talking to another (eg. call/response).
- Bridge is usually atonal. I would try to stick to rhythmical elements but if I would use a melodic element, I thought it could be tricky as it can clash with the bass or other elements.
- The bridge can be a song in itself. This one is interesting but not a necessity. But if you can play with your variations well enough, you can create a new song out of two songs. This is basically the techno approach of 1+1=3 (Listener hears track A, B but also a third track which is the meeting of both). I often would record my sets and sometimes noticed that the strong moments were sometimes when I’d bridge two songs.
Because of the number of channels you have in Ableton, you might be stuck with the fact that only one instrument at a time can play. This problem led me to organize bridges differently on occasion. For example, if I want 2 layers of hi-hats, I would have to “cheat” and have a layer of hats in the clap channel. Quite often I found myself organizing this while playing, and it’s not the best because you can get lost easily in the arranging. I prefer having a few options in the intro with extra layers of claps, hats, percussion. Sometimes even some duplicates in different channels.
In the next post, we will talk about sound checking and performing, which will also conclude the series!


these are great thanks!! please keep it up it’s so so helpful 🙂