Tag Archive for: modulation

Pheek’s Guide To Making Dub Techno

I think making Dub Techno is one of the most requested blog posts I have been asked to do, and for years, I resisted it. I think there was some sort of shyness and perhaps, a lack of technical vocabulary on where to begin when teaching others how to make Dub Techno. But I think it’s time to take a chance and open up on all the ideas I compiled about my beloved Dub Techno direction.

This post won’t necessarily explain how to do the typical dub techno. While I’ll cover some of the most asked questions about it, I want to expand on the philosophy and aesthetic itself so you can take the best part of it and merge it into how you work.

Origins of Dub Techno

Before we get into how to make dub techno, it’s very important to me to honor the artists who were behind the genre and to talk about where the genre started. For this, there are some nice videos by Dub Monitor. There are these 2 videos that explain the origins of dub techno better than I could about how the genre started and how it developed.

Dub techno is a subgenre that emerged from the fusion of two influential musical styles: dub and techno. Dub music itself has its origins in Jamaica in the late 1960s, with pioneers like King Tubby and Lee “Scratch” Perry. Dub music is characterized by its heavy use of effects, echo, reverb, and the manipulation of existing tracks, often stripping away vocals to emphasize the rhythm and instrumental elements.


The Techno Connection: Techno, on the other hand, had its beginnings in Detroit in the early 1980s, with artists like Juan Atkins, Derrick May, and Kevin Saunderson. Techno is known for its repetitive beats, synthetic sounds, and a futuristic, often industrial, aesthetic.


The Emergence of Dub Techno: Dub techno began to take shape in the early 1990s when electronic musicians started experimenting with the fusion of dub’s spacious and echo-laden soundscapes with the rhythmic patterns and synthetic textures of techno, thus making dub techno. The result was a genre that retained the hypnotic beats of techno but incorporated the atmospheric and dub-infused elements.


Basic characteristics to consider while making dub techno: Dub techno is characterized by a few key elements:

  • Reverberating Soundscapes: Dub techno producers use extensive reverb and delay effects to create deep and immersive sonic environments. These effects give the music a sense of spaciousness and depth.
  • Minimalism: Similar to techno, dub techno often relies on minimalistic compositions with a focus on repetition. The use of minimal elements allows for a meditative and trance-inducing quality.
  • Subdued Rhythms: While techno can have a pounding and relentless rhythm, dub techno tends to have more subdued and laid-back beats. The rhythm is often more relaxed and groovy.
  • Incorporation of Dub Techniques: Dub techno incorporates dub’s signature techniques like echo, dropouts, and phase shifting to create a sense of movement and exploration within the music.


Notable Pioneers: Some of the early pioneers of dub techno include Basic Channel, a German duo consisting of Moritz von Oswald and Mark Ernestus, and their various aliases like Maurizio and Quadrant. These artists were instrumental in shaping the genre and creating its distinctive sound.


Global Influence: Dub techno’s influence quickly spread beyond Germany, with artists and labels from around the world embracing the genre. Labels like Chain Reaction and Echocord played a significant role in promoting the making of dub techno, and artists from countries like Sweden, Finland, and Japan contributed to its global appeal.


Obsessing on the “How-To” While Making Dub Techno

Over the last 25 years, I’ve come upon multiple and countless discussions online about how the genre is made. People would discuss what piece of equipment was used and be obsessed with recreating the original sound. While this is a state of mind that I totally get – because I also get obsessed about how certain sounds are made – I can’t help myself asking why would you want to redo the exact same results. In a way, it explains why the genre never died in the last decades. There are always people who keep making dub techno.

I think there are a few motivations to join the sound of dub techno. On one side I see it as a self-soothing experience and on the other, by passion, to join others who also make it.

But my take is that people are puzzled about how something that sounds so simple can actually be so mind-boggling to do.

The Main Aspects Of Making Dub Techno

I’d like to cover multiple techniques and strategies to infuse your music with the dub techno approach while also making sure we apply certain tweaks that can make your music have a similar aesthetic.

The first thing to explain is that there are 3 main categories to consider while making dub techno:

  1. Sound Design
  2. Modulation
  3. Colour.

Dub techno has its own touch and sound which will be explored below.

Dub Techno sound design

One of the main characteristics of dub techno comes from the pads and stabs that are fuzzy, melancholic, and enigmatic. In itself, those pads aren’t necessarily that complex to do. I found numerous tutorials on YouTube and have 3 of the ones I prefer. I find they’re well explained and show in similar ways, how to reproduce them.


How To Make Dub Techno Chords

As you see in those tutorials, the way the synth is configured, is rather simple  – it’s usually one chord that repeats, but it has specific modulation and color, as I explained earlier. Once you start experimenting with this pad, you’ll already be in business and have the basis for making dub techno.

But honestly, when I found out how to do it, I thought it would make more sense to be inspired by those techniques but to go a bit deeper into the sound design.

In my past dub albums Tones of Void, Intra, and White Raven, I basically used a bunch of synths but kept them very dark in tone (eg. lower notes around 1-3 octaves) with not too many harmonics (eg. filtered). Once you understand that any synths can do that, you won’t be limited to the classic sound of dub techno.

How to make dub techno melodies

When it comes to melody-making, there are multiple approaches. There’s the classic one note (yes, one note) from the old school dub techno (Basic Channel, Chain Reaction) and there is also a more structured approach (Pablo Bolivar, Yagya), almost pop-oriented dub techno. Both work but the harmonic nature of the melodies are often in a minor key, with the root key of D being often a popular choice.

How to make dub techno bass

While making dub techno, bass is often, also very simple, with it being than often than not a one-note thing. Simply using sine oscillators and pushing them forward in the mix will often be the aesthetic of dub.

Dub Techno synth options

As we saw in the 3 videos, dub can easily be created in any context with any soft synth. Over the years, I have tried and tested many of them. While the native plugins of Ableton can do the job, VCV has been my playground but it’s not for everyone even if it’s free and there are so many tutorials out there. Here are some of the soft synths people love.

  • Diva:  So many tracks I hear in mastering use Diva. It has a distinct sound but in a good way. It sounds warm, and lush, and is close to some hardware options. It’s pricy but you get that sound we love.
  • Pigments: Pigments is versatile, open, powerful, and extremely creative. There is a huge playground here with the option of a preset store within the synth itself.  You need to work a bit to get the dub sound but it sounds nice.
  • TAL-U-NO-LX Synth: Juno has been used over the years as a default synth for dub techno, mainly the chords. This synth option works well and is close to the real thing.
  • Go2: Cheap in price but with big results. Even the presets will give you some nice options to start with. I love this one.
  • Blue-III: Rob Papen again and this one is deep. Not for the beginner as you can easily get lost in it but the sounds you get are very impressive.
  • Prophet VS-V: Not many people know but it was said that the Prophet VS was what the early guys of Chain Reaction were using. When there was a VST version of it, we were all drooling. While it is very powerful and nice, it is not the easiest to program. But the sound is very impressive.
  • Prophet 5: This is a synth we all used for years in the early 2000s when we wanted the dub sound. It aged so well and it’s fun to use. You get tons of options for synths, pads, and stabs. Recommended and often on sale.
  • Orange Vocoder: This is not a synth per se, as it is of course, a vocoder but this was used by so many people as you can basically throw any sound in it and this plugin will turn it into a lush synth sound. Really powerful and a nice alternative to just synths.


Dub is a vibe and an aesthetic, not a bible. You take the aesthetic and apply it to any sound.

Once you pick your aesthetic, you can apply the concept to any synths you have.

What you need is to create and amplify your harmonics with saturation (tube and tape do great), then have a colored filter and sent to delay and reverb for cosmetics. This means that if you have any synth of yours, you can make it dirty with a saturation and then filter it. The reverb will then do the trick.

What will make a difference is to juggle with the most genres of saturation: distortion, amp and saturation itself. Using a combination of the 3 will bring really lovely colours but be careful not to overcook your sounds. Keep in mind that in mastering, it will be boosted so what sounds like a pleasant distortion can become overwhelming later on.

Some of my saturation go-tos are below.

Saturation plugins used in making dub techno

  • Surge XT: (FREE!) This is a collective of developers who managed to create a badass synth and free, high-quality, effects. Their Chow Tape is quite amazing but also all other distortion/saturation tools. A must-have and hey, it’s free.
  • RC-20: This one came in popular in the lofi hip-hop community as a de facto plugin to have. It adds lofi vibes but this is an element dub techno also has so the cross use is totally on point.
  • Reamp: The guys behind this are very solid and this one has a beautiful series of plugins which are all very solid. I like the colour this one has.
  • Saturn 2: Anything Fabfilter is a leader in its domain. Saturn is not an exception, as it is very good at what it does, which is to make anything too pretty, a bit uglier, dirtier.
  • PSP Saturator: PSP is one of my favorite company for their plugins. I love their EQs and compressor and this saturator does a great job on pads.
  • Satin: This is such a handy tool here. It is tape saturation/simulation, but also a tape delay which can create weird reverbs and wobbly signals. Once you start using it, you’ll be using it all the time.

Reverb plugins for dub techno

While Ableton’s reverbs option can do the job, I always rely on third-party VST for that part. It’s hard not to mention Valhalla plugins for this. The Supermassive is free and the Digital Reverb is sort of a perfect match for dub. If you have to pick, I would recommend experimenting with “plate” models and some use of a “hall” as well for sustained notes.

Whatever you do, to me, Dub Techno really starts with a heavy use of reverb, which has to be modulated, filtered, and distorted. Understanding how to use your reverb and combining it with a delay will ensure that you have a proper dub mood. If you pick the reverb properly, you almost could say that you have 50% of your job done. The rest are the sum of a lot of details but when you have your reverb done right, you’ll automatically feel you’re making dub.

Anyone who knows me has heard my affectionate passion for reverbs. I compiled some of my favorites for Dub Techno.


The saturation tools native to Ableton aren’t too bad but can be recognizable easily by an educated ear.

  • Lexicon 224: I’m a big fan of Lexicon. It has a character and tone that I love. Not sure what it is, but the grain and how it feels just does it for me.
  • Springs: Spring reverb is a type that makes sounds sent through it, sound liquid. This works well with percussive sounds and you’ll feel like some classic dub vibes.
  • Fabfilter Pro-R: This one is amazing for spaces. It is a powerful tool to shape grandiose halls and give tremendous space.
  • Adaptiverb: There’s different tools on that ones that makes it unique. It has a big array of presets that are tuned to a root key, which can create pads out of unusual sounds. Quite unique.
  • SP2016: I call this one a Cadillac of reverbs. It’s elegant, warm, very ear pleasant and very visual. I feel immersed when using it.
  • bx_rooms: Extremely versatile but the interface can be intimidating. It has lovely options for different room types.
  • Blackhole: This one is spooky, deep, powerful. It is a reverb that makes you go in space as it sounds pretty sci-fi, rich, and gigantic sometimes.


Now reverbs for dub are essential but you’ll need delays as well. You can either use long delays or short. There’s no right or wrong but the use of delays helps you take very simple sounds and create repetition, which transforms the straight-forward pattern into psychedelic equations. Delays, combined with reverb, create a thick background and will make any sound – which feel empty at first – fill with a velvety, dreamy carpet. I think for a lot of fans of the genre, it’s a quality they’re after.

Echo and Hybrid Reverb in Ableton. They can do a long run if you don’t want to break your piggy bank.

Additional plugins for making dub techno (delays, pitch modulators, etc).

  • Diffuse: These guys are dub lovers and this tool here is a go-to for reverb/delay as it’s an emulation of the famous Roland Space Echo which was in so many studios.
  • Modnetic: Same guys as above. This one is a combination of all your need in one place to turn a single, boring sound, into a dub tune.
  • Echorec: The guys at Pulsar are very competent at recreating hardware toys and they created a tape delay with self-oscilating, magnetic fields and all you wish for in a dirty delay.
  • Galaxy Tape Echo: This is UAD’s recreation of the Roland Space Echo and it is really well done.
  • Tal Dub-X: As the name implies, this is a station with all the options to turn a simple delay into a modulated one.
  • Echo Cat: Another beautiful emulation of a tape delay. But a really solid one.
  • PSP 42: Popularized by Richie Hawtin in the early 2000s, where he’d loop-delay sounds and pitch them up/down, the PSP42 was used abusively in all his sets for years. Rich was basically doing dub techniques in his own way.


Modulation in dub techno

If you just take any synth sounds and send it to your effect chains, you have done the first step but it won’t be complete until you make it move, react, and evolve into modulations. There is a lot to take in in this section because this is also one of the most discussed topics in my blog – I have covered it inside out already but you now know why, because Dub Techno is all about modulations. Once you dip your toe in those waters, you’ll become excited about it and apply it everywhere.

If you watched those tutorials on how they make the dub pads and chords, you’ll see that they use modulation on the filter. There is both use of an envelope and LFO to modulate the frequency of the filter but also its resonance. That’s just the tip of the iceberg to me. If there is a parameter on a plugin, I like to think that it shouldn’t remain static and have it move, even a little bit.

But of course, a lot of this can be handled by my favorite “Swiss army knife”, Shaperbox which is designed for modulation on all levels. A must-have.

When to use envelopes and LFOs when making dub techno

Well, if it’s a modulation that is reacting to an incoming signal such as when a sound comes in, I want the filter to react, then you’ll use an envelope. That kind of modulation is excellent for accentuating or attenuating sounds, creating a more organic feel to the processed sound.

If you want constant movement, LFOs are excellent for that. They just move to the tempo or not. They give the illusion that things are constantly on the go and help blur the lines of linear arrangements.

There’s one precious bundle that I love from Make Noiss that has so many little tools, perfect for modulation and midi signal processing. Not to forget my friends at Manifest Audio and their large array of max patches as well that are perfect for modulation but they also curated many racks for dub.

The 3 Amigos are here to turn a static idea into an animated figure.

Colours of Dub Techno

I know you might be confused by colour here as we discussed of saturation as a form of colour but this is the last touch. The colours here are from different sources else than saturation and also, very complementary. What I’m referring to are the effects of the chorus, phaser, flanger, tremolo, vibrato, auto-pan, harmonizer, wobbler, and also, one of the most important parts which is the hiss. Apart from that last one, all those effects are often heavily used in dub and it’s quite a nice touch to pick one or 2 on your sounds.

These guys are a lot of fun and sound pretty lovely.

Chorus, phaser, and vibrato

Chorus, phaser, and vibrato work really well with synths, pads, stabs, and chords. They give this engaging, trippy, stereo effect that quite often, makes a dull sound jump out of the mix. Keep an eye to make sure you don’t get phasing issues which would be an overuse of one of those effects. Phasing is quite common in dub and I often fix those issues in mastering. It’s better to control it when decorating your mix.

Flanger

Flanger gives this jet-sound feel to anything. It brings pfshhh sound to metallic or noisy sounds and can be quite psychedelic if used at a low level. I like it on hats and delays.

Tremolo

Tremolos are sort of a secret sauce that everyone underuses. It’s basically a slow or fast modulation of the amplitude of a sound. It is a superb tool for creating 3D feel where you feel sounds go away from you and come back. It turns anything linear into a lively, feeling motion. At a faster speed, it can even be used as a swing/velocity for percussion. Combine it with an auto-pan and you have head spinning spaced out moments.

The hiss part is quite important as well. The noise floor is something deep in the DNA of dub. There are multiple noise makers. You can dig the internet for noise sources, recordings or noise-making tools (RC-20). Satin has a nice hiss that you can use as well.

Conclusion

Making dub techno should be a playground of experimentation. It’s a genre that I approach with a very open mind and so do many other fans as well. While often people feel like they’re just repeating the clichés and perhaps nothing new comes out of it, then I’d say, dig deeper. There are some gems from people who push the boundaries of the genre.

LFO Shapes: A Guide to Modulating Sound with Different Waveforms

Are you getting to the point where you’ve been playing with many samples and feel like that you want to tweak them a bit so you can give them character?

As you know, I teach music production and the “level 1” of music production involves playing with samples, loops and turn them into songs. Once you get good at it, you can start to to tweak those samples. But where to start?

Well, the main issue with samples is that they’re… dead. By dead, I mean they’re static because they’ve been recorded and if played in loop, there will be no variation, no changes. Music why, this repetition can be challenging to listen to as the brain gets annoyed by an idea it understood because it expect it to change. For people with ADHD, it can even be torture and since a lot of musicians have that condition, you can expect them to want something to happen.


“I’m concerned the listener will be bored by my song”, is one challenge I hear a lot when I training people.


The answer to that is to dive in sound design. One of the main point is to teach yourself to be able to hear changes in sound, because that is movement is what makes a sound always change. There are 2 main types of movement: one that is in sync with a tempo and one that is not.


To relate to how to bring movement to your music, let’s talk about a tool I abuse of and couldn’t see myself without it: Low Frequency Oscillators.


Why using it?

A Low Frequency Oscillator (LFO) is a fundamental component in the realm of audio synthesis and sound modulation. Operating at frequencies below the range of audible sound, an LFO generates waveforms that serve as control signals rather than sound sources themselves. These waveforms—such as sine, triangle, square, sawtooth, and random—ebb and flow in a repetitive manner, influencing various parameters of sound, including pitch, amplitude, and timbre. By imparting rhythmic or cyclical changes to these parameters, LFOs breathe life into static sounds, imbuing them with movement, texture, and complexity. Widely used in electronic music production and sound design, LFOs are pivotal tools for shaping sonic landscapes, adding dynamics, and creating evolving patterns that captivate the listener’s ear.

When you write your ideas/melodies, you can draw your automation for more precision, but the idea of using LFO’s, is to delegate some movement to the machine. Fast paced movement will bring some textures, while slow movement will blur the lines between where modulation starts and stops. Mid-speed will allow ear spotting changes.

LFO

In this blog post, we’ll dive into the world of LFO shapes and how they affect sound design. We’ll explore the characteristics of different LFO waveforms and how they sound when used to modulate a filter, both in fast and slow modulation scenarios. By the end of this guide, you’ll have a better understanding of how to use specific LFO shapes to achieve desired sonic effects.

Movement Uses:


1. Sine Wave: Smooth and Subtle

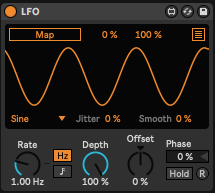
The sine wave is the simplest and most fundamental waveform, producing a smooth and gradual oscillation. When applied to modulate a filter, a sine wave can create gentle and subtle shifts in the sound. At a slow modulation rate, it imparts a calming, almost breathing-like quality to the sound. As the modulation rate increases, the sound becomes more pronounced, adding a sense of movement without being overly aggressive.


Sine movement are also the closest to nature.

  • Sine Wave: The Essence of Smoothness

The sine wave is a fundamental waveform that closely resembles the natural oscillations found in various phenomena, from the movement of pendulums to sound waves. Its smooth, rounded peaks and troughs replicate the behavior of many naturally occurring processes, giving it a sense of organic elegance.

  • Harmonic Content and Complexity:

The sine wave has the simplest harmonic content of all waveforms. It consists of a single frequency with no additional harmonics or overtones. This lack of complexity contributes to its inherently soothing and gentle quality. When the sine wave is used as an LFO shape to modulate a filter, it imparts a gradual, almost seamless movement to the sound. This characteristic is akin to the subtle changes in nature, such as the gentle ebb and flow of waves or the gradual shifts in wind patterns.

  • Emulating Natural Phenomena:

Many natural sounds, such as the chirping of birds, the rustling of leaves, and even human vocalizations, exhibit a certain level of smoothness and continuity in their vibrations. By using a sine wave LFO shape, you’re essentially mimicking these naturally occurring patterns of movement. This can make your synthesized sounds feel more in tune with the environment, adding an organic touch that’s often difficult to achieve with more complex waveforms.

  • Subtle Dynamics:

The slow, gradual modulation provided by a sine wave LFO can be likened to the subtlety of nature’s changes. Think of how the rising and setting of the sun or the changing seasons bring about transformations that are gentle yet noticeable over time. Similarly, the use of a sine wave LFO can introduce subtle dynamics to your soundscapes, creating an impression of evolving environments that are familiar and soothing to the ear.

  • Organic Aesthetic:

When crafting music or soundscapes, an organic aesthetic can be particularly appealing. It resonates with listeners on a subconscious level, invoking a sense of calm and comfort. By utilizing the natural sound qualities of a sine-shaped oscillator as an LFO shape, you’re infusing your compositions with an element of authenticity that can enhance their emotional impact.

The innate smoothness, harmonic simplicity, and resemblance to natural phenomena make the sine wave a powerful tool for creating organic and natural-sounding modulations. By incorporating sine-shaped LFOs into your sound design, you’re tapping into the essence of nature’s subtlety and fluidity, giving your compositions a more authentic and emotionally resonant quality. Since electronic music is often cold and very artificial sounding, to include something more organic can be a nice contrast.


2. Triangle Wave: Balanced and Versatile

The triangle wave combines the smoothness of the sine wave with more defined edges. This waveform is often used to achieve a balanced modulation effect. When modulating a filter with a triangle wave, the result is a sound that moves gradually between its highest and lowest points. At slow rates, it creates evolving textures, and at higher rates, it imparts a rhythmic quality without being too sharp.


3. Sawtooth Wave: Building and Dynamic

The sawtooth wave has a sharp ascending edge and a smooth descending edge. When used to modulate a filter, it produces a building and dynamic effect. At slow modulation rates, the sawtooth wave can create sweeping changes, gradually opening and closing the filter. When the modulation rate is increased, it generates an aggressive and impactful movement, ideal for creating dramatic transitions or evolving textures.


4. Square Wave: On-Off Intensity

The square wave alternates between two levels, creating an on-off pulsating effect. When applied to filter modulation, it introduces a distinct rhythmic quality to the sound. At slow rates, it produces a gating effect, with the sound fading in and out. As the modulation rate increases, the square wave generates a clear pulsating rhythm, suitable for adding rhythmic complexity to the sound.

Like any shape of an LFO, you can play with the depth of it’s output. If you keep the depth low for a square shape, you’ll have a nice variation but in two stages.


5. Random/Noise Wave: Chaotic and Experimental
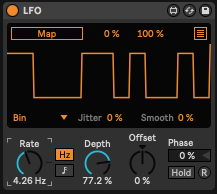
The random or noise waveform introduces an element of chaos and unpredictability to modulation. When modulating a filter, it creates a sense of randomness and texture. At slower rates, it can add a subtle layer of complexity to the sound, mimicking natural variations. At faster rates, it produces a glitchy and experimental effect, making it perfect for unique soundscapes.

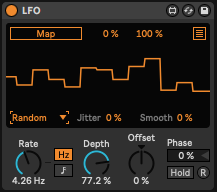
I recommend the use of random on sounds you never want to be the same twice such as the velocity of a sound, the length of a percussion, the tone of a pad. It is very useful to add variations, slow or fast.

TIP: Use the smooth option to have less abrupt changes.


6. Binary output: Computer Language

As of my last knowledge update in September 2021, Ableton Live’s “Binary” form might refer to a specific device, feature, or concept that was introduced after that time. However, if we’re discussing a feature related to binary operations or manipulation, here’s a general explanation of how binary operations might be used in a music production context:
1. Binary Operations:

Binary operations involve manipulating binary data, which consists of sequences of 1s and 0s. In music production software like Ableton Live, binary operations can be used to generate rhythmic patterns, create variations, and add complexity to your music. They can be particularly useful for creating glitchy, syncopated, or experimental rhythms.

2. Step Sequencers and Binary Rhythms:

Step sequencers are commonly used to create patterns of notes or events over time. In the context of music production, a binary step sequencer might allow you to turn steps on or off, creating a binary pattern. Each step represents a binary digit (1 or 0), which corresponds to a note or event being active or inactive.

For example, if you have a binary pattern of “101010,” it might translate to a repeating rhythm of long-short-long-short-long-short in a musical context. This can be a great way to generate interesting, irregular rhythms that deviate from traditional quantized patterns.

3. Creating Glitch Effects:

Binary manipulation can also be used to create glitch effects. By toggling certain bits on and off, you can introduce unexpected variations and unpredictability to your sounds. This is especially useful for genres like glitch, IDM, and experimental electronic music.

4. Sound Design:

Incorporating binary patterns into your sound design can lead to unique textures and timbres. You can use binary patterns to modulate various parameters of your synthesizers and effects, producing evolving and dynamic sounds.

5. Automation and Control:

If Ableton Live introduced a feature named “Binary,” it might also involve binary automation, where you can use binary patterns to automate various parameters in your project. This could add a layer of complexity and movement to your music over time.

Since my knowledge is based on information available up until September 2021, I recommend checking Ableton Live’s official documentation, user guides, or online resources for the most up-to-date and accurate information about the “Binary” feature in Ableton Live. This will provide you with step-by-step instructions on how to use it effectively in your music production workflow.


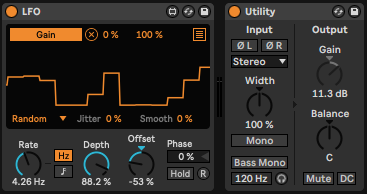
TIP: To hear better how a modulation is affecting sound, map the LFO to a Utility so you can hear amplitude (volume) modulation, which is easier to the ear since it is very obvious.


LFO Modulated LFO

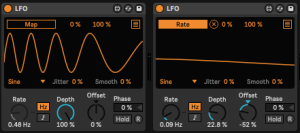
The concept of using one LFO to modulate the speed of another LFO is a fun technique that can yield intricate and non-linear modulation patterns. Let’s explore how this works and why it leads to non-linear results:


LFO Modulation Basics:

Low Frequency Oscillators (LFOs) are typically used to modulate parameters such as pitch, amplitude, filter cutoff, and more. They generate waveforms at frequencies lower than those of audible sound, resulting in modulation that occurs over time. These waveforms include sine, triangle, sawtooth, square, and random waves, each with unique characteristics.

Modulating LFO Speed:

When you use one LFO to modulate the speed of another LFO, you’re introducing a layer of complexity to the modulation process. Instead of directly affecting the sound parameter itself, you’re altering the rate at which another LFO oscillates. This means that the rate of change in modulation becomes variable and dynamic.

Ever heard the sound of a bouncing ball? This can be achieved with this technique.


Non-Linear Effects:

The key to understanding the non-linear effects lies in how the modulation rates interact. When one LFO modulates the speed of another LFO, the resulting modulation pattern becomes intricate and less predictable than simple linear modulation.

Consider this scenario: Let’s say you have an LFO (LFO1) modulating the speed of a second LFO (LFO2). As LFO1 varies its speed, it introduces fluctuations in the rate at which LFO2 modulates the target parameter. The result is a complex interplay of modulation speeds that can lead to unexpected and non-linear outcomes.

For example, if LFO1 oscillates between fast and slow speeds, the modulation from LFO2 will speed up and slow down accordingly, leading to irregular and evolving modulation patterns. These irregularities create a sense of unpredictability and complexity in the modulation, which can add a unique and experimental flavor to your sound design.

Applications:

  • Texture and Movement: Modulating an LFO’s speed with another LFO can add layers of texture and movement to your soundscapes. The constantly changing modulation rates can create intricate sonic textures that evolve over time.
  • Dynamic Rhythms: The non-linear modulation introduced by this technique can result in dynamic and evolving rhythms. It’s a great way to inject rhythmic complexity into your music, perfect for genres like IDM, ambient, and experimental music.
  • Experimental Sound Design: If you’re aiming for experimental or otherworldly sounds, using one LFO to modulate the speed of another can lead to unconventional and unpredictable outcomes that can set your sound design apart.

In summary, using one LFO to modulate the speed of another LFO introduces a layer of complexity and unpredictability to your modulation patterns. This technique can lead to non-linear results that are rich in texture, movement, and dynamic rhythms. It’s a powerful tool for sound designers looking to push the boundaries of conventional modulation and create unique sonic landscapes.

TIP: How many LFOs should be used in a project isn’t important. But you’ll have more cohesion if you use a few “master LFOs” that control multiple parameters across the song as they will move all together elements, creating an orchestral effect.


LFOs as Melodies and Compositional Tool


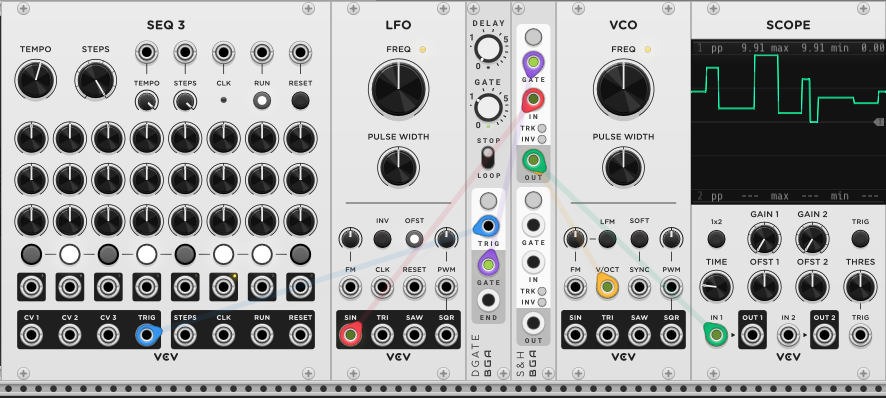
Certainly, LFOs combined with a sample and hold module in the modular synth world can produce intriguing and unique melodies. The type of LFO waveform used in conjunction with the sample and hold module directly influences the character of the generated melodies.

If you look at a melody in the piano roll, you’ll see that notes go up and down or perhaps go up then down. Those are shapes an LFO can do.

How to set it up?

Send the output of the LFO to a Sample and hold. You can ping the sample and hold at the moment you want a note to play. The sample and hold will look at the data sent by the LFO at the moment it was pinged and then output the note which can be sent to an oscillator.


Let’s see how different LFO shapes contribute to specific types of melodies:

1. Sawtooth LFO: Progressive Ascending Melodies

Using a sawtooth LFO with a sample and hold module can create melodies that ascend progressively. As the sawtooth LFO ramps up, it triggers the sample and hold to capture and hold the voltage at specific points. The resulting melody will have a rising, stair-step quality, with each note being slightly higher than the previous one. This combination is well-suited for building anticipation and tension in a composition.


2. Square LFO: Stepped and Rhythmic Patterns

A square LFO paired with a sample and hold module generates stepped and rhythmic melodies. The square wave’s on-off nature causes abrupt shifts in the sampled voltage, creating distinctive steps in the melody. When used at different rates, the square LFO imparts a rhythmic quality to the melodies, making them danceable and syncopated.


3. Triangle LFO: Smooth and Flowing Melodies

A triangle LFO combined with a sample and hold module produces melodies with a smooth and flowing character. The triangle waveform’s gradual rise and fall influence the sampled voltage, resulting in melodies that transition between notes in a less abrupt manner compared to square or sawtooth waves. This combination is ideal for creating melodies that evoke a sense of fluidity and motion.


4. Random/Noise LFO: Chaotic and Experimental Melodies

Pairing a random or noise LFO with a sample and hold module leads to chaotic and experimental melodies. The unpredictable nature of the random waveform causes the sample and hold module to capture varying voltages, resulting in melodies that seem to wander unpredictably. This combination is perfect for generating avant-garde or ambient melodies that challenge traditional musical expectations.


5. Sine LFO: Serene and Ethereal Melodies

Utilizing a sine LFO with a sample and hold module produces serene and ethereal melodies. The sine waveform’s smooth undulations translate into gentle fluctuations in the captured voltage. The resulting melodies are subtle and soothing, with a dreamlike quality that’s well-suited for ambient or meditative compositions.


Thanks for reading my tribute to a often overlooked tool in music and now you know why I’m in love with all the possibilities behind it.


Using Quad Chaos

I’m proud to announce the release of our first patch – Quad Chaos. I met Armando, the programmer, on the Max/MSP group on Facebook and his background was exactly what I was looking for and we got along very well. Quad Chaos is basically a patch version of what this blog is about: finding ways to have innovative sound design through modulation and chaos.

Speaking of chaos, the only “rule” for using Quad Chaos is to resample everything you do, because we intentionally wanted it to be something that works ephemerally; something you can’t really control and just have to go with. There are many tools out there you can use to do anything you want, but we wanted to create something experimental that can be fun and creative at the same time.

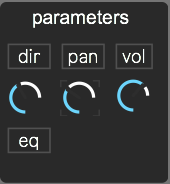
Make sure these knobs are up!

The first thing that appears when you load up Quad Chaos is a screen in which you can add up to four samples. If you hear nothing when you load in a sound, you probably need to raise the volume, direction, or panning. In the demo video, Armando has used short samples, but I find that the magic truly comes together when you load up longer files such as field recordings, things that are four bars long, or even melodic content. I don’t really find that Quad Chaos works well if you load a sample that has multiple instruments in it, but I still need to explore it more and I could be wrong about that. My advice is to start with one sample that you load into Quad Chaos, and then with your mouse, highlight a portion of it. Personally, I like to start with a small selection based on the waveform content I see. I’ll try to grab one note/sound, along with some silence. Once you make a selection, you’ll hear a loop playing that might sound like something in a techno track…but this is just the beginning.

While it’s very tempting to load in all four samples at once, if you do things this way, Quad Chaos will get out of control quickly; I like to start with one layer and then build from there.

Once you isolate a section that loops to your taste, it’s time to engage the modulation. One trick that I like to do with any synths or gear is to move one knob to its maximum and then minimum, quickly then slowly, to simulate what an LFO could do. When I find something I like, then I’ll assign an LFO or envelope to it and start my tests.

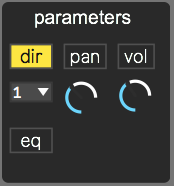
For example, in Quad Chaos you can assign the first modulator to a direction; you click on “dir” and you’ll see numbers underneath, which represent the modulation source. To access to the modulation section, use the drop down menu and pick “mod” and you’ll see the first modulation.


Depending on how you set it up, you’ll start hearing results as your sound now has modulation on and in full effect. I know the lack of sync in the plugin might seem odd, but to repeat myself, a lack of sync is needed to create “chaos” and this approach gives more of an analog feel to what you make; you can get some pretty polyrhythmic sequences because of this as well.

As I mentioned earlier, how I start my sound is usually just with an LFO set to sine curve and the I explore slow/fast oscillation to see what kind of results I get. I’ll find a sweet spot somewhere in the middle or something, then I’ll try all the different oscillations to hear other results. I’m very much into the random signal just because it will create the impression of constantly “moving” sonic results. Afterwards, I have a lot of fun scrolling through the recorded results of these experiments and then from them I pick one-bar loops/sections. I find that the random signal is always the one that gives me pretty interesting hooks and textures.

Once you’re happy with the first layer you’ve created with the first loop, you can use the other loops to create complex ideas or simply to add a bit of life to the first one. I’ve seen a few artists using Quad Chaos already and everyone seems to comes up with really different use-cases and results. One thing I often see is people dropping some important samples of a production they’re currently working on into the plugin to get some new ideas out of them. My friend Dinu Ivancu – a sound designer that makes movie trailers – tried out Quad Chaos and had some very lovely feedback of his own:

I love it JP!

[Quad Chaos] is a fantastic tool. I would love it even more if it had a few quality live options. Still though, as is, it’s an amazing tool to generate live and organic sounds out of ordinary samples. I’ll send you something I made with it and just two soft-synths. It’s fantastic. That reverb is AMAZING! Congrats – you guys did a great job. I’ll try to help [Quad Chaos] get to a wider audience as it’s very, very good for film work!

Dinu Ivancu

I think what Dinu is excited about here is the creation of small-but-detailed organic, improbable textures that are difficult or laborious to make in a very stern, organized DAW. Breaking down the strict boundaries of your DAW opens doors to creating sounds you’d hear in the real world that are completely off-sync and un-robotic. Quad Chaos also includes a built-in reverb to help create space for your sounds (and there are other effects included as well!).

Jason Corder, “Offthesky”, sent us a neat video of himself working with Quad Chaos. Jason shows us how you can record a song live, only using the plugin. It’s very spontaneous; he’s using the macros to create external automation to keep a minimum structure. This approach is something I didn’t initially think of, but seeing Jason do it makes me think that I’ll explore that avenue next time I use it!

You can get a copy of Quad Chaos here and if you make songs or videos, I’d be more than happy to see how you use it!

SEE ALSO : Creating tension in music

Tips to add movement and life to your songs

One of the most popular topics in music production is with regards to making music feel “alive” by creating movement in music. While I already covered this topic in a past article, I’ll focus today on tools you can use and some techniques you can also apply to create movement.

First, let’s classify movement into categories:

  • Modulation (slow, fast)
  • Automation (micro, macro)
  • Chaos
  • Saturation

One of the thing that makes modular synths very popular is the possibility of controlling and modulating many parameters the way you want, but the other aspect that makes it exciting is the analog aspect. You’ve probably seen and heard multiple debates about the analog vs digital thing and perhaps, what’s funny is, many feel they know what this is about but yet, can’t really figure it out.

Take, for example, something we all know well: a clock that shows time.

An analog clock is one with needles that are moved by an internal mechanism, making them move smoothly in harmony while time goes by. There’s a very, very preciseness to it where you can see the tiny moment between seconds.

The digital or numeric clock jumps from second to second, minute to minute, with the numbers increasing: there are no smooth, slowly incrementing needle that moves between numbers; they just jump.

Sound is pretty much the same in a way. Once it’s digitized, the computer analyzes the information using sample and bit rates for precision. The flow isn’t the same, but you need a really precise system and ear to spot the difference. Some people do but it’s very rare. This is why, in theory, there’s a difference between digital files and vinyl records.

One eye opener for me was that when I was shopping for modulars at the local store, I was talking with the store’s specialist who was passionate about sound. “The one thing I don’t like about samples is, the sound is frozen and dead”, he said. With modular synths, because there’s often an analog component, the sound, on a microscopic level, is never the same twice.

This is why using samples and playing with digital tools on your DAW, needs a bit of magic to bring it all to life.

Modulation

By modulation, we’re referring to tools that move parameters for you, based on how you have configured them. The two main modulators you can use are:

  • LFOs: As in Low Frequency Oscillators. These will emit a frequency in a given shape (ex. sine, triangular, square, etc.), and a certain speed. They can be synced to your song’s tempo or not. LFOs are often included in synths but you can also find once instances in the Max for live patches.
  • Envelopes: Envelopes react to incoming signal and then will be shaped in how you want. Compressors, as we discussed recently, kinda work with an envelop principle.

There are multiple aspects of a sound you can modulate. While there are numerous tools out there to help you with that, it’s good to know that there are a few things you can do within your DAW. The main things you can modulate are:

  • Amplitude (gain, volume): Leaving the level of a sound to the same position for a whole track is very static. While there’s nothing wrong with that, it’s means that the sound is lacking dynamics.
  • Stereo position (panning): Sounds can move from left to right if you automate the panning or use a autopanner.
  • Distance (far, close): This is a great thing to automate. You can make sounds go further away by high passing, filtering to higher frequencies. Combined with the volume, it really push the sound away.
  • Depth (reverb): Adding reverb is a great way to add space and if you modulate, it makes things very alive.
  • Sound’s length (ADSR, gating): If you listen to drummers, they’ll hit their percussion so that the length constantly changes. This can be done by modulating a sampler’s ADSR envelope.
  • Filtering: A filter’s frequency and resonance changing position as the song changes offers a very ear pleasing effect.

Some effects that are modulating tools you already know are chorus, flanger, autopan, phaser, and reverb. They all play with the panning and also depth. Adding more than 2-3 instances in a song can cause issues so this is why it’s good to approach each channels individually.

My suggestion: Have one LFO and one envelope on every channel and map them to something: EQ, filter, panning, gain, etc.

Some amazing modulators that offer really good all in one options that you might really enjoy (as I do for quick fix on a boring stem):

QuatroMod

LFO Tool by XFER Records

ShaperBox by Cableguys – My go to to really bring sound to life.

Movement by Output  – This one is stellar and really can make things feel messy if pushed too far but the potential is bonkers. You instantly turn anything into a living texture that is never boring.

AUtomation

Automation is what you draw in your DAW that allows you to make a quick-moving or long-evolving effect. You might already know this but you’d be surprised to know that it is too often, under used. How can you know this though?

I have my own set of rules and here are some:

  • Each channel must at least have one long, evolving movement. I’m allergic to straight lines and will sometimes slightly shift points to have them have smallest slant. My go: amplitude, EQ or filters.
  • In a drop down list of each potential parameters, I want to have at least 3 things moving.
  • Each channels, must have at least 3 quick, unique, fast change.
  • Include at least 3-5 recorded live tweaks. I like to take a midi controller and map certain parameters and then play with the knobs, faders. I record the movements and then I can edit them wherever I want in the song. This human touch really makes something special.

While working with automation, one thing I love is to use Max for live patches that create variations, record them as automation and then edit them. It’s like having an assistant. There are great options to chose from but my favorites would be:

Chaos

By “chaos” I mean using random generators. They would fit under the umbrella of modulators but I like to put them in their own world. There are multiple uses of generators. You can take any LFO and switch them to a signal that is random to make sure there’s always a variable that changes. This is particularly useful with amplitude, filtering. It really adds life. You can also use the random module in the MIDI tools to add some life. Same with the use of humanizer on a midi channel. Both will make sure the notes are changing a little, all the time.

Saturation

If we think of the earlier example of how analog gear is constantly moving, using a saturator is a good way to bend perception. We previously discussed saturators in an earlier post but we didn’t talk of a super useful tool named Channel strip which often has an analog feel included. It remains transparent but it does something to the signal that is moving it away from a sterile digital feel.

My favorite channel strips would be:

The Virtual Mix rack by Slate Digital. Raw power.

McDSP Analog channel

Slam Pro


SEE ALSO : Getting feedback on your music