Mix & Mastering Preparation Tips

As a mastering engineer one question I get asked all the time is – “how can I get the best pre-master mix out of my tracks?”. It’s an important question for sure, and this post will outline some of the actions producers can make right now to make your tracks sound way better than before. I can promise by following the mix & mastering preparation tips in this article you’ll hear a huge difference towards the final version of your projects.

My clients want big and full sounding tracks, and I love when my customers flip out after hearing the project they’ve worked hard on come back to them sounding every bit as big as the productions they are inspired by. If you ask the best engineers around the world they’ll tell you that working on music with a great quality mix is the key to turning a solid tune into a monster sounding track. But how do we get there first?

My clients come to me to correct and fix the flaws of their mixes, which isn’t always simple and straightforward. Working on properly mixed tracks with plenty of headroom (at least -6db) will make my job much easier and allow me to bring out the very best in your track.

It’s common for producers not to have the right tools or experience when tackling many of the problems that take away from a good mix, and this is where I step in to help. Let’s make clear a few things you can do in prepping your tracks to sound their best from the get go.

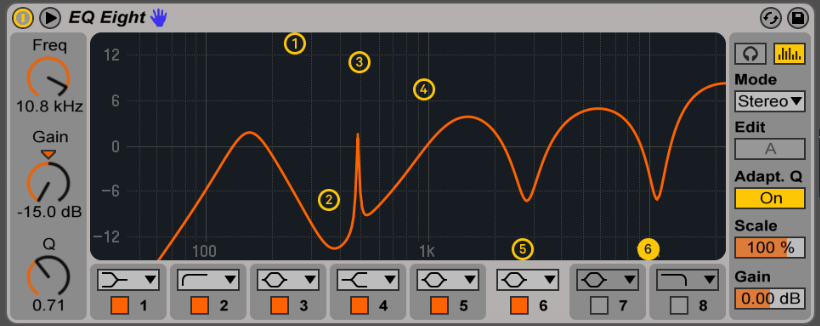
  • Avoid extreme EQ’ing. The greater adjustments you apply to a sound, the higher the likelihood of inducing unwanted resonances, and phasing issues. While in sound design, heavy processing can sometimes bring interesting results, it is often much more productive to pair an EQ with a compressor to get the same result. First, use your EQ to cut shelves from your audio source, then use compression to make what you want to hear, louder. TIP: Try using a maximum of 4 points on your EQ.
  • Remove unwanted frequencies. This is mainly about removing unnecessary frequencies from your sound, rather than cranking up the parts you want louder. If your sound isn’t a kick drum or something else in the lower range, apply a high pass filter or EQ and cut everything below 100hz. If your sound is a kick or bass, try cutting everything under 20-30Hz. As for pads, melodies, vocals, I’d suggest doing cuts in the 100-250Hz region as there will always resonances there. If you use reverb, make sure to remove or cut anything under 300Hz as it can easily get congested there, which will take out some of the precision and power of your song.
    In the end using your eq is a process of clearing away space to allow other sounds to be heard more clearly. Less is more.
  • Be careful with cheap plugins. While you can do a lot with free or cheap plugins, sometimes, this might compromise the quality of your work. Most DAW’s will have native plugins such as reverbs, compressors, eq’s etc.. however I recommend investing $30-$50 on a handful of plugins that more than often sound much better than the native plugins your DAW provides. This applies to compression, EQ, reverbs, chorus, delays, etc. I’ll often get effects on Plugin Boutique or Plugin Alliance.
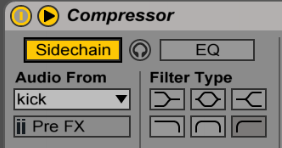
  • Side chain your kick and bass channel. These frequencies will likely overlap to some degree, which will leave your track sounding muddy, and reduce the impact, clarity, and volume of both sounds. Use sidechain compression with your bass and kick to allow both sounds to breathe and peacefully cohabit in your mix.
  • Less is more. Busy mixes, once compressed can sound horribly busy if not EQed properly. Play safe, use less. You might be surprised that on huge sound system, simple elements can sound much more powerful than a giant wall of noise.

These next 3 important points will always make a tremendous difference in the quality of your mix.

• Do not apply compression or limiting on the master (bus). Please leave the compression to me. This might sound like a good idea but your track will likely suffer for it. Mastering is my job, and I need your track to come to me as transparent as possible. If you add compression on the master channel, you’ll likely create distortions and the end result won’t be nearly as tight.
• Give me -6dBfs of headroom. This is super important. Ideally, you should aim to have each channel at -6dB, not just turn the master channel down to -6. This reduction in volume per channel creates the right amount of space for me work with and is essential in getting your track to sound full, and deep.
• 24 or 32bits / 44khZ. This is the requirement for the best results.
• Careful with hiss. Hissing is a background noise that can happen with analog gear or some fun plugins. Once compressed, it might be loud and difficult to mix in, so be careful of the level you use.

In general, the best mixes I get are the once where everything is balanced in terms of frequencies. Here’s a easy way to get that happen:

  • Lower down the volume of your monitoring. You can’t achieve good mixing at high volume. You’ll see right away what’s too loud if you use it that way.
  •  Lower the volume of each channels if they’re too close to 0dB. One bad habit I often see is people pushing all their channels to 0dB. Not only this take off the dynamic range, but it also gets hard to see what’s at the right level. The loudest channel in your mix should be at -6dB, the others below. Why? Because it gives you room (6dB exactly!) to push louder to what requires attention.
  • Find the busiest moment in your track and listen to it looping. Now, use one channel at a time to lower your channels completely and mix each sound up until you hear it properly. The mix out/mix in technique is a good way to pinpoint if something was too loud in the mix. Sometimes, a sound doesn’t need to be that loud and because we overheard the track, we feel everything should be loud.
  • Group channels or use busses. Group your four main frequencies: low, mids, hi-mids, highs. You can then play with volumes of each zones and adjust them so they’re balanced. You may use again the mix in/mix out technique and EQ for subtle details.


I want to hear your feedback on anything talked about in this post. As always let me know if you have any suggestions or tips you’ve come across in prepping your tracks for great mixes. Share this post or leave a comment below and tell me what projects you’re working on right now.


 SEE ALSO : Dynamic Sound Layering and Design 

Making and breaking genres in your music

Friends and clients of mine who listen to a wide variety of music (often very different genres) have mentioned feeling a real struggle to come up with ideas once starting a new project in their DAW. After putting together a decent beat and melody or two – many of my colleagues found no clear direction in their song, and struggled to make any progress with that project from there.

This reminded me of a something I saw online recently that very well summed this up.

If you don’t understand french, what the illustration is saying is, “this is what the music industry, as well as music genres are doing to music.”  I truly believe this statement, and I’ll explain why now.

Let’s rewind and look at jazz music. If you don’t listen to jazz you might simply think jazz is jazz, but actually there are many different forms of jazz- big band, ragtime, be-bop, free jazz, hard bop, fusion, etc.. Such labels were created by media to label and categorize music, making it easier for people to find and buy music within a certain genre. Think about the evolution of rock – hard rock, light rock, punk rock, alternative rock, the list goes on.

For electronic music, I guess we can say that some of the very first, most popular genres to emerge were originally Hip Hop (some of the early 80’s hip hop was very electronic focused), House and Techno. The reason why it keeps going under various umbrellas comes from the needs of the industry’s standards.

Our ears get excited when we hear something we know doesn’t fit the mould.

A musical term you’ve likely heard before is mashup, which refers to a song made up of other songs from completely different genres, (which is is a little like a remix). You may hear a melody being played by a distorted AC/DC guitar riff mixed with vocals from a country-western song, and a bumping disco drum beat keeping the groove. Great mashups are known to use music that would never otherwise work together, which is the reason why mashups often lead to really exciting and interesting music.

Take a minute and check out mashup artist Girl Talk creating a mashup in 2 minutes here ) and Girl Talk again, performing live mashups at Coachella here :

It’s common to think “if it worked well for x, who does x genre, I might as well do like him to imitate his/her success” syndrome has also been one of the main reasons why so much music is produced and formatted in a specific way.

This is how certain genres follow a very specific sound, using strict arrangements with very predictable techniques. There is good and bad to this, but if you listen to the top 10 of any genre, you’ll quickly understand what musical elements represent that genre.

• Genres help you reach a market, certain labels, clubs and be part of a community.
• If you are innovative, you can always input refreshing new ideas to a genre. Done right, you can get a lot of attention. People are always searching for new ideas, but you need to understand the rules of a genre, first.

So how does this apply to you, once in music mode and struggling with genres?

  • You can make multiple genres out of one melody. What is stopping you from making different versions? There’s no rules here. If you have a melody you love, you can make 10 different takes out of it and decide later which one you prefer. Slower, fast, trance version, dub version, beatless, really, there’s no reason for you not to explore.
    • You can define yourself challenges of embracing fully one genre on specific projects. A good way to approach the genre problem is to start by a genre you are 100% comfortable with and then keep your production in that genre fully. Then, as I suggested earlier why not take your melodies and write it for in a second genre? Personally, I have some ways I do it. For instance, I never make beats-oriented songs in the evening and rarely I do ambient in the morning. It’s sort of a personal rule and you can invent your own that work for you.
  • Incorporating hybrid styles can be the road to new growth. New genres are often born by someone coming from a specific scene and trying to apply ideas from another. I’ve heard really different variants for dubstep for instance or house (tech house, dub house, minimal house, break house, chill house). If you’re torn between genres, combine the elements from several genres and listen to what happens.
  • Use sample loops to get ideas. One major asset of using pre-made loops is to have a quick glance of the different directions your track could go and explore quickly from there. A tool like Splice lets you access royalty free loops from breaks to jungle, minimal, ambient, techno with a killer integration for Ableton. It’s then really easy to combine some minimal techno grooves with reggae sounds and get a feel for what’s working fast.
  • Focus on one artist or label. If you have a goal to be signed to a  specific label or get attention from an artist you like, it’s good to  have productions and reference tracks that will get his/her attention. Sometimes that means your music must follow a very specific sound, think pure techno – there isn’t much room for trombones there. That said, sometimes your roots will guide you to where you should be going. That’s wh y when I’m a bit lost, I go spend some time listening to influential music to bring me back to my flow.

You will create more original sounds by combining wider musical influences, and in doing so your music will not only sound unique within a specific genre, but it will also more closely represent your authentic voice as an artist. Win-win.


What sounds are you really excited about right now? Be sure to leave a comment below with your own ideas about mixing influences and styles, and as always I want to hear what you’ve been producing lately and music you’re sharing with the world.

JP.

SEE ALSO : Where to Get Fresh New Ideas for Tracks  

Lego Blocks as Song Structures

Have your productions become a bit predictable lately? To stand out as an artist/producer you have to create music that is unique. So much of electronic is structured around a repeating 4/4 pattern, which means it’s really important to create surprising sounds and unique arrangements that keep your track interesting. How do we do that?

I’m going to share a simple way to create a real and true sense of spontaneity into your music making that you might not have considered before. *this is a pro-tip you can use right away to bring a little magic into your tunes.

Before I get into that I want to share the backstory. Recently my son and I were building structures with legos and I noticed the colours and patterns we made together looked exactly like a track in Ableton’s arranger view. When I worked on my album Intra, I had created a few rules and challenges during the recording process and one of them was to work visually with the blocks (or clips). Initially each song would be recorded live but afterwards I would chop the blocks into smaller blocks and start sculpting the others around each one depending on the rule I had set out for that song.

The result of this meant that my Ableton arrangement soon needed to also be visually appealing and organized. This brought some results:

  • Unexpected results. If you work with a visual based reference for assembling your blocks, you might discover new ways of making your sounds evolve in a visual chaos that is also a form of organization.
  • Cleaner transition. Putting your blocks together can help making your transitions smoother as you can really put attention to a sequence of sounds, and the grid. I know you’re probably already using the grid, but perhaps you have never paid attention to how your transitions happen. If you pay more attention to your block order, you might observe patterns that are more efficient.
  • Logical progression. Using coloured blocks is really helpful to organzine big projects. People use it to identify where the verse, chorus, buildups are, and you can use that same approach.

At this point, you may be wondering if this technique will really make a big difference in your productions. I can say with confidence that creating rules to apply to your arrangements can have huge benefits. Try it on your next production.

Song structures like Lego blocks. A simple technique like this can open the door to something great and surprising when you’re tired of the mechanical feeling in your tracks.

Here’s a few tips on how you can approach your arrangements with this new perspective.

  1. Define yourself some rules. This is really for inducing fun and making your own music interesting. Think about using rules such as, “every 4 blocks, make a change” or “never leave a hole with a smaller block in the upper channel.” There’s no good or wrong way to do this but the more you give yourself a solid set of rules, the better and faster the workflow.
  2. Avoid clean blocks organization. When I work with students, I often see their final arrangements to be looking very simple, very clean and to me, this automatically make their music highly predictable, mechanical, soul-less and out-of-the-box feeling.

Ableton, arrangements, live, techno, clean

I find that electronic music is already heavily subject to a machine feel and I value doing anything that can go against that. I find breaking your blocks and messing up the arrangements is an absolute must.

TIP: Try to chop off your blocks where all the others start or end, create little offsets, and create holes in the blocks from time to time. This mutes and removes sounds so that when they are back the sound will feel welcomed and unexpected. Sometimes to appreciate a sound better you need to remove it for a while.

ableton arrangement, techno, music production tips

3. Work from bottom to top

ableton arrangements, organization

Arrange your lower sounds from the bottom up and higher one’s up in the order.  Visually it will often create a pyramid-like structure that is interesting to move around and modify.

4. Use patterns as a mosaic.

One thing I like a lot is to create a sequence of blocks and then repeat it. I will revise variations later on based on mathematical formula or ratio aspect. I try to see where this block will fall if I repeat it 4 times, in parallel to this sequence repeated 5 times. Sometimes this helps create a moment I would have never thought of, at around 2/3 of the track.

ableton arrangement, techno, music production tips

5. Give your clips room to breathe. When consolidating your clips (Use cmd+j) leave empty space before or after in the clip. The lack of sound in your clips allow space for other sounds to be heard, which you likely already do, however launching clips with silence built in will help make your arrangement more unpredictable and interesting.

lego blocks as song structures

Use cmd+j to consolidate them and make sure to leave space too as this can be useful.

ableton arrangement, techno, music production tips

The takeaway – Once you begin to apply structural shifts and apply rules to your productions your music will definitely begin to sound more interesting. Arranging your tracks by rules will force you to make adjustments you likely wouldn’t have made yourself. Another huge benefit you’ll find in working this way is speed – using pre-defined rules will take away much of the time consuming guess work in creating key differences in your productions, which makes it faster to finish your tracks, and have more people hear your music. Win-win.

As always feel free to leave a comment with me below if you like the ideas in this post. I want to hear what music you’ve been working on using any of the techniques I’ve shared with you here, and look forward to hearing those soon!

JP.

SEE ALSO :  Finishing Your Projects