Tag Archive for: balance

Sound Design and Arrangements Series Pt. 2: Balance

This post is a part of a series: Part 1 | Part 2

Balance in mixing—and in music in general—is one of the main aspects of healthy sounding music, mostly because it is a reflection of space, and perhaps, our life as well. While this post is mostly about my philosophy of work, I’ll still discuss some technical tips that can be applied to your mixing strategy and arrangement work.

Let’s define what balance means in design and see how this translate to music:

Balance is the distribution of the visual weight of objects, colors, texture, and space. If the design was a scale, these elements should be balanced to make a design feel stable. In symmetrical balance, the elements used on one side of the design are similar to those on the other side; in asymmetrical balance, the sides are different but still look balanced.

Source: Getty Edu

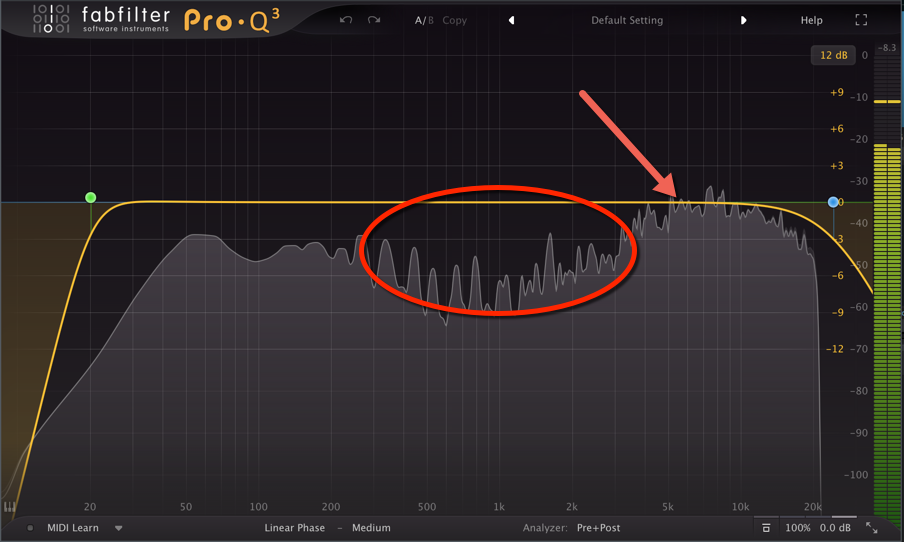
While this comes from visual design, you should already able to see how this is applicable to the world of sounds. When I first read this definition, I could understand how I was already applying it to mixing music, as I get very conscious of space and the distribution of the frequencies. One of my favorite tools at the moment is Neutron, which I use on all my groups and sometimes, all channels, so I can monitor all of them visually. I can also apply EQ flipping, where if you boost on one channel, you’ll do the exact opposite cut on another channel that is battling the first one to be heard. Using the Visual Mixer tool, you can then place each sound in space. For people who struggle with panning, this is a precious tool that will also help you see if you have distributed your sounds properly.

One of the most misunderstood aspects of mixing I see is the volume difference between elements. Thinking that everything should be loud is a not only a misconception, but it creates imbalance. The volume difference represents the space use and you need some that are further away otherwise the louder one won’t be important, they’ll be lost.

Same goes for textures. Not all your sounds can be textured simultaenously, otherwise you won’t be able to notice their differences. However they can all be textured at different times. I like to split the arrangements timeline in 3 parts and will let sounds have their moment in each; it keeps the story evolving.

Regarding the stereo spectrum, we often relate this to left and right panning, but one important part a lot of new people to mixing don’t see is the importance of the mono section. If you want your song to have a backbone, you need that part to be dead solid. One trick I like is to have a compressor in a return channel and add a mono utility there. I’ll send a lot of my groups to that mono’er channel that will beef up the mono signal of the track.

As for the frequency spreading, I find that your whole spectrum can be divided in 5 sections: low, mid-low, mids, highs-mid, highs. You can technically have them all loud, but that’s not really good balance, and your mix will probably sound harsh if you don’t control resonances and transients properly. I think having 2 out of those 5 frequency ranges slightly lower than the others will give some room for your mix to breathe. When people book me for mastering, they can select a coloured or transparent master, and if they ask for coloured, this is basically what I’ll do. Re-adjusting 2 of the bands will give a new tone to the track and most of the time, mixes I get are already unbalanced as there’s often a band that is way too loud (most of the time, the lows). If the lows are too loud, then I will lower them.

Now, when it comes to arrangements, this is where it gets fun.

I find that there’s a lot to say about the significance of arrangements. Arrangements come in many forms: short stories, edited experiences, live jams, etc.—but I find those three types are a good starting point. A pop song can be a short story, and a piece of minimalist techno music can also be one, but with a different purpose. The reason we apply a certain methodology to arrangements is to maximize the potential of the sounds, as well as the patterns. In the previous post in this series, we talked about contrast and how it can be used in a specific sound—balance, on the other hand, can be exists on multiple levels.

How Do I Know if an Arrangement is Well-Balanced?

The idea of using balance to leverage creativity is not a rule, but an idea and approach. There are countless pieces out there that have no balance and it work perfectly. I find that balance in arrangements is a method of regulation, but it’s not something I’d focus on alone as the main approach.

See balance as tomato sauce. It can be a really great base for a lot of dishes and yes, it can be used as-is, but it does a better job when it’s combined with other ingredients. This is why it works well on a pizza and pastas, etc.

So It depends what you listen to and of course, some great songs are totally unbalanced and that’s what makes them special. I like to say that rules are made to be broken, but you need to know the rules first. A balanced song has a better chance of creating a quality that we all strive for in music: timelessness. In visual arts, minimalism aged well. The logo of Mercedes has basically remained the same, compared to Google’s original disaster brand. Same for music, in general. What I see is that music which is balanced, has a number of sounds playing at a time and has an organization and internal self rules that are set to keep a clarity and easy understanding.

I find that balanced arrangements usually feel easier to understand and are not too destabilizing. But if you go in the opposite direction voluntary, it can be a good way too create contrast.

A song with a balanced mix has a full presence and usually doesn’t have one element stand out. So for percussion, I like to have a balance of numerous sounds but you can then have one that pop out, in contrast (refer to part 1).

As for having balanced arrangements, I’d recommend the following:

Set the rules of your song in the 1st minute (or first part). This can be the tempo, time signature, density, motif preview, etc. The rest of the song is a balance of contrast operating in the rules you’ve set. By balance, we can agree that it’s about not placing all your tricks into the same thing.

Distribute your ideas evenly across your song. I’m talking about the motif for instance, that could reveal one variant more per section. Balance predictability as well unpredictability by having your sounds come in and out at times the listen gets used to.

Use repetition to create patterns that support one another. The famous call and response technique is a good example.

The best way to leave annotations in your arrangements is by adding a empty MIDI channel and creating blocks that you can stretch over sections of your song and leave notes accordingly. This can be very helpful if you have a hard time seeing how sounds are distributed once a channel is flattened.

I like to have colours for each genre of sounds. This usually tells me if there’s too many percussion blocks compared to another group, for example.

Background sounds are often a good way of helping everything work together. Songs that feel full have a background, a noise floor. It can be a reverb, noise, or it can be field recordings. People often ask me where you can find sounds like that. Archive.org, Freesounds.org, Loopcloud, and Soundly are all super useful for finding these as well as odd and out of ordinary ideas.

This post is a part of a series: Part 1 | Part 2

Balancing a Mix

Balancing a mix is simple “mixing 101” theory; it’s usually fast and simple to do. I could go into a lot of detail about mix balancing, but the point here is to provide you with some quick information that you easily can put to practice to get quick results yourself. Hopefully this will also make you more curious about balancing and you will research it more on your own.

One of the very first things I do when I create a new project or mix for a client, is to drop Fabfilter Pro-Q3 on the master. Not only do I love how the FFT looks (the frequency graphic analysis), but I also love that I can make cuts, or even dynamic cuts, that react to the incoming signal. The problem with the Spectrum Analyzer from Ableton is that it’s ugly and can be a bit confusing; other than displaying information, it doesn’t do anything. The Pro-Q3 needs no adjustments; you drop it on a track and it’s ready to be used. With Pro-Q3, if you hover your mouse pointer over the graphic, you’ll be also shown the peaks with the precise frequency target. It’s hard to go wrong here.

That said, let’s say your track is about 85% done, and you’re about to switch to mixing mode to see how the track will turn out. At this stage, you know you need to have one thing in mind: balance. People who use a reference track find that there might be a tone that seems to be right to emulate, such as a very bassy or bright track. However, I find that when it comes to a rough mix, balancing the mix before referencing will give you a more objective outlook of your work so far. When I work with clients who are in this stage of their project, this is what I advise: if you’ve been working on something that’s too bright (eg. high frequencies being pushed over 0db), you’ll lose perspective of how piercing that might feel in a club. Darker mixes (eg. high frequencies below 0bd) will sound more organic, mysterious. Human ears tend to get excited by bright mixes at first, but in a loud environment, they get tired. Engineers often get “tired ear syndrome” at the end of a day because of over-exposure to bright sounds.

If you play your track and then a reference track (which should be inside your Project, in a channel that is muted unless you want to AB your mix), you might see some very different EQ curves on the graphic analyzer comparatively. In the middle of the graphic, there’s a line that points to zero dB. Ideally, you want your signal to remain under that throughout the entire frequency spectrum; by doing this you’re creating a mix that’s considered balanced. You will most likely see some “holes” in your mix or some sounds that jump over the zero line (spikes).

The circle points a hole and the arrow points to a potential overload.

One of the things that people sometimes do is boost everything to reach the zero line, but engineers go about this a different way. We will lower the louder zones with a shelving EQ and – using the gain on that plugin – we’ll raise the volume, which will automatically adjust the lower frequencies to reach the 0dB line. This simple trick alone can save you tons of time and headaches. In the case above, I’d lower everything above 3k, raise everything by 3dB and probably give a nudge at around 1k with a wide resonance.

But will this alone solve all your balance problems? The answer is no, it won’t.

The idea of using this technique is not to get into the habit of relying on EQs or tools on your master track to fix things, but more to help you understand how to balance the sounds in your mix as you go. One of the most valuable things you can do is solo each channel and look at the analysis graphic to see what’s truly going on with that sound alone. I usually take some time to fix a channel’s content with its own EQ so that it falls under 0dB on the master. If you do that with each channel, you’ll have a good base to start working from.

What about frequency spikes that go over 0dB? Well, it depends, really. I’ve heard some really good sounding songs where there’s a spike or two somewhere. Usually, spikes can work if they’re not too resonant and if they don’t go beyond 3-6dB at the most. Keep in mind that spikes will really stick out of a mix, and at loud volume they could be imposing if the quality of the system isn’t best.

One of my favorite plugins to put on a track is a channel strip, and there are many out there for you to choose from. Neutron 2 sticks out to me as one of the best out there, based on all the options provides. It also allows each instance of the plugin to “talk” to one another, so you can do useful side-chaining between numerous channels. I’d suggest trying out a few different channel strips, but make they have at least a 3-band EQ as you want to be able to do shelving to balance out your channel(s). Balancing a mix is one of the simplest things you can in the early stages of mixing, and it makes a world of difference!

Let me know what you think and happy mixing to you.

SEE ALSO : Common mindsets of musicians who have writer’s block and how to solve them

How to get the right tonal balance for a mix

One of the biggest challenge of finishing a song is to properly adjust the tonal balance. There’s no doubt this part of track-making is puzzling; many people – even experienced producers – are still going to have some issues with tonal balance some days. There are tools and methods to correct tonal balance, but it’s always a challenge; I feel that it’s important to share some tips on how you can make adjusting tonal balance easier.

What is tonal balance?

I’ll keep this as simple as possible: tonal balance, from my perspective, is dividing your song into three frequency sections and figuring out how to adjust them. For instance, in certain genres, you want the tone to be totally balanced, while for dance oriented, electronic music, you’d want the lower end louder in the mix. While this sounds extremely simple to achieve, in reality, it can be a nightmare.

The biggest issue with tonal balance is that if your tone is wrong, your work when played in a specific context (ex. in a club) will sound completely off compared to similar songs of the same genre.

Common problems with tonal balance include:

Lower end anemic: The song will feel weak, energy less and hollow.

Lower end too loud: The song will feel muddy and lacking in body.

Mids lacking: The song will feel empty, no punch or body, far off.

Mids too loud: The song becomes unnecessarily aggressive and obnoxious.

Highs lacking: The song lacks definition and precision in the sounds.

Highs too loud: The song is fatiguing and harsh.

Using the right tools for tonal balance adjustments

Monitoring is of course, crucial to adjusting the tonal balance of a song. I’d say 75% of the time I get a file for mastering and the tonal balance is completely off, mostly because of the artist’s listening environment. While we don’t all have the budget or space to have a fully treated studio, there are some things you can still do:

  1. Cross-validating. With my speakers, I’ll always check a mix periodically with headphones as I work. I like to have a different perspective and I find that the sound I have between the two often reveals a perspective I missed.
  2. Mixing at a low volume. You’d be surprised at how you’ll automatically hear what’s wrong. Reduce by half the volume level you’re working with and listen to how the kick comes through, then the melody compared to it, then the high end, etc. Cross-validate with a reference track.
  3. Using a subwoofer. Many people will tell you that you don’t need a sub to do a good mix but it certainly helps to have an idea of what’s happening down there. Many of us will have issues with the neighbors so I suggest to only use sparingly just to check your mix. A good alternative is getting a Subpac.

There are also tools you can use in your productions to help you. I use many but here are some of my favorites:

Reference

This plugin is a life-saver, no doubt. You load in your reference track, adjust the volume to match and then you can swap between your mix and the reference. There are even some dynamic graphics to show you what part of your mix is too loud or lacking in comparison to the reference track.

If the track is already mastered, you won’t be able to rely on the compression meter but the levels will be used the same way. For 60$, this is certainly an essential to have in anyone’s collection.

Shelving/Band EQ

When I first started to make music, I really didn’t like shelving EQs as I felt they weren’t useful, but once I started looking into them, I have to say that it almost became one of those obsessions one can have for a plugin. There are many of them, so I’ll name a few and then explain how to get the best out of them.

  • Tonelux (Softubes): One of the most recognized and acclaimed tools out there. It gets things done, quickly. Often on sale too.
  • Solid EQ (Native Instruments): I love this one because you have some precision on what you do and it is a good mix between being a musical EQ and a transparent one.
  • Maag Audio EQ4: This one is great for highs. It’s one of the most used in the industry in mastering to get the proper “air” sound, right.
  • Hammer DSP (Kush Audio): Crazy musical, warm and outstanding all the time. Often something to just play with on the master bus to see all the different moods one song can have.
  • Sie-Q (Sound Toys): A bit like Hammer. Musical, and slightly magical in how it handles the mids.
  • ValvEQ (Kazrog): A good alternative to the expensive Bax EQ by Dangerous. It’s handling your tone in MS mode as well.

Using the right techniques in tonal balance

If the EQ, cross validation and other tools don’t seem to work for you, I’d recommend a very simple technique to help you nail down the tone.

Basically, we’ll limit it our tone balance to three sections but you can pull it to four or five if you want, but the lower the number, the easier it gets later on. Knowing this, I’d encourage you using Ableton Live 10 for the use of the groups in groups feature. You can make alternative groups where you push all the channels using lower end in one group, then mids, finishing with highs.

If you have only three groups or busses, you really limit your options to these 3 faders to control. The less you have in front of you, the more focused you’ll be.

The way I usually do it, I’ll start with the main, loudest channel and put it as the loudest one, then mix the 2 others accordingly. Pretty often I feel like knowing the level of the low end first will greatly help settle the rest.