Balancing a Mix
Balancing a mix is simple “mixing 101” theory; it’s usually fast and simple to do. I could go into a lot of detail about mix balancing, but the point here is to provide you with some quick information that you easily can put to practice to get quick results yourself. Hopefully this will also make you more curious about balancing and you will research it more on your own.
One of the very first things I do when I create a new project or mix for a client, is to drop Fabfilter Pro-Q3 on the master. Not only do I love how the FFT looks (the frequency graphic analysis), but I also love that I can make cuts, or even dynamic cuts, that react to the incoming signal. The problem with the Spectrum Analyzer from Ableton is that it’s ugly and can be a bit confusing; other than displaying information, it doesn’t do anything. The Pro-Q3 needs no adjustments; you drop it on a track and it’s ready to be used. With Pro-Q3, if you hover your mouse pointer over the graphic, you’ll be also shown the peaks with the precise frequency target. It’s hard to go wrong here.
That said, let’s say your track is about 85% done, and you’re about to switch to mixing mode to see how the track will turn out. At this stage, you know you need to have one thing in mind: balance. People who use a reference track find that there might be a tone that seems to be right to emulate, such as a very bassy or bright track. However, I find that when it comes to a rough mix, balancing the mix before referencing will give you a more objective outlook of your work so far. When I work with clients who are in this stage of their project, this is what I advise: if you’ve been working on something that’s too bright (eg. high frequencies being pushed over 0db), you’ll lose perspective of how piercing that might feel in a club. Darker mixes (eg. high frequencies below 0bd) will sound more organic, mysterious. Human ears tend to get excited by bright mixes at first, but in a loud environment, they get tired. Engineers often get “tired ear syndrome” at the end of a day because of over-exposure to bright sounds.
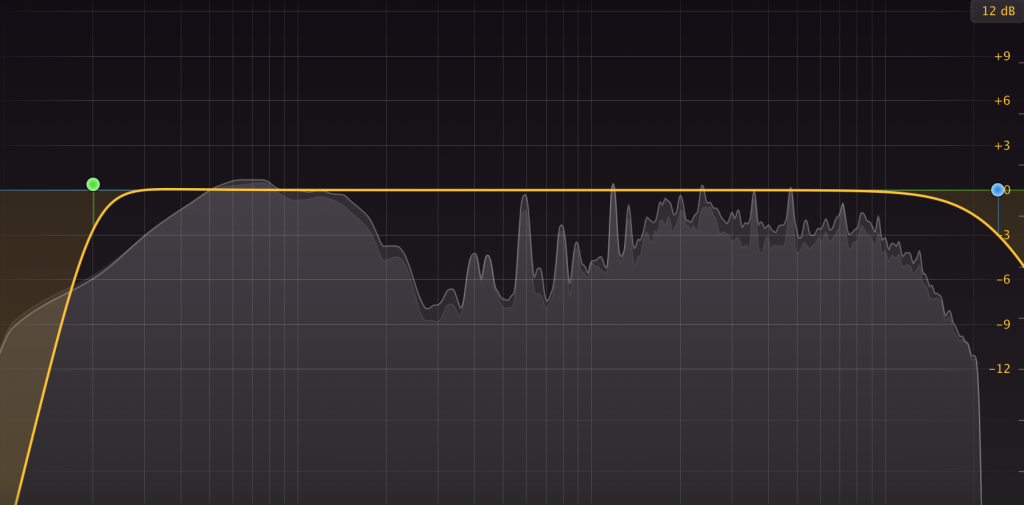
If you play your track and then a reference track (which should be inside your Project, in a channel that is muted unless you want to AB your mix), you might see some very different EQ curves on the graphic analyzer comparatively. In the middle of the graphic, there’s a line that points to zero dB. Ideally, you want your signal to remain under that throughout the entire frequency spectrum; by doing this you’re creating a mix that’s considered balanced. You will most likely see some “holes” in your mix or some sounds that jump over the zero line (spikes).
One of the things that people sometimes do is boost everything to reach the zero line, but engineers go about this a different way. We will lower the louder zones with a shelving EQ and – using the gain on that plugin – we’ll raise the volume, which will automatically adjust the lower frequencies to reach the 0dB line. This simple trick alone can save you tons of time and headaches. In the case above, I’d lower everything above 3k, raise everything by 3dB and probably give a nudge at around 1k with a wide resonance.
But will this alone solve all your balance problems? The answer is no, it won’t.
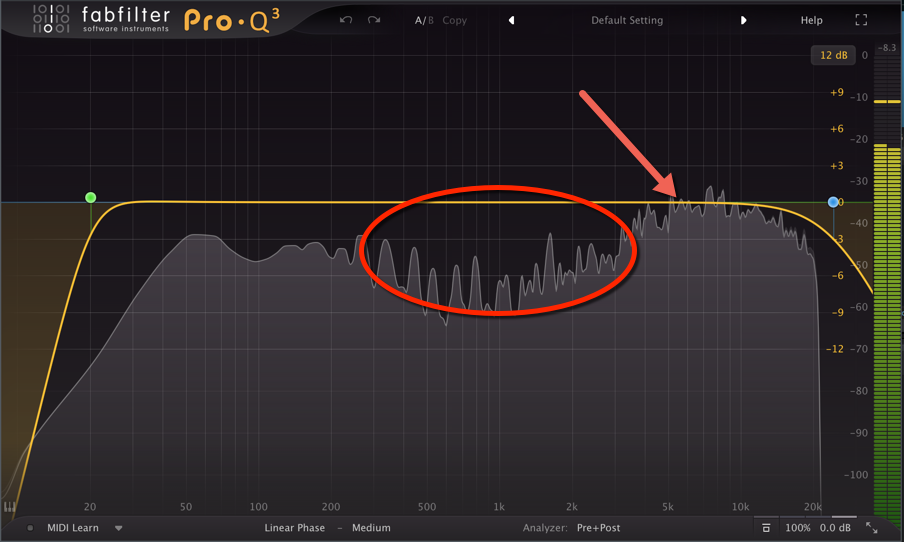
The idea of using this technique is not to get into the habit of relying on EQs or tools on your master track to fix things, but more to help you understand how to balance the sounds in your mix as you go. One of the most valuable things you can do is solo each channel and look at the analysis graphic to see what’s truly going on with that sound alone. I usually take some time to fix a channel’s content with its own EQ so that it falls under 0dB on the master. If you do that with each channel, you’ll have a good base to start working from.
What about frequency spikes that go over 0dB? Well, it depends, really. I’ve heard some really good sounding songs where there’s a spike or two somewhere. Usually, spikes can work if they’re not too resonant and if they don’t go beyond 3-6dB at the most. Keep in mind that spikes will really stick out of a mix, and at loud volume they could be imposing if the quality of the system isn’t best.
One of my favorite plugins to put on a track is a channel strip, and there are many out there for you to choose from. Neutron 2 sticks out to me as one of the best out there, based on all the options provides. It also allows each instance of the plugin to “talk” to one another, so you can do useful side-chaining between numerous channels. I’d suggest trying out a few different channel strips, but make they have at least a 3-band EQ as you want to be able to do shelving to balance out your channel(s). Balancing a mix is one of the simplest things you can in the early stages of mixing, and it makes a world of difference!
Let me know what you think and happy mixing to you.
SEE ALSO : Common mindsets of musicians who have writer’s block and how to solve them


Thank you very much, I watch the sites for dozens of hours and people talk but say nothing. There you have given us real clear and precise information. A technique and I thank you for it.
I am trying to balance piano samples, I will try your technique. Do you think I have to use velocities of 64 or 127 to use this method?
THANKS
I wouldn’t call a precise number for velocity. You’ll have to try what works best in your project. But yes, for piano or anything acoustic, I personally love to have a lot of range (30-127) but the more open it is, the more difficult it is for gain staging. Glad my article was useful!