Dealing with Past Mistakes

I was chatting with a producer friend of mine recently, and he mentioned that he was currently contacting some record labels he had released with in the past to ask them to remove his music from digital stores. I didn’t get why he would ask for such a thing, but he explained that he felt embarrassed by his past tracks and that he didn’t want them to represent him anymore.

“What was I thinking? I have no idea, but it’s embarrassing!” he explained.

He said he feels that most of the music he made back then was directionless and tailored for specific labels, and that it has nothing to do with the artist he is now. So the big question is: do I live with the past, or do I try to erase the music that I don’t want to be associated with anymore?

Well, let’s try to unpack what happened in order to avoid falling into the same trap. What were the main factors that caused my friend to react towards his past in this way?

You're never reallyalone in thisTechnical challenges. This one is pretty obvious. Let’s say you start making music, and one of your main focuses is to release on label X. All of your efforts will logically be channelled towards making music that’s an aesthetic fit for the label. But then again, you’re only just starting to produce. So you’ll find samples and presets that sound alike, try to make everything fit together, and then when you think it’s ready, send it off. You have no idea though how many demos we (as record labels) receive from people who didn’t do their homework, and who haven’t listened to our last 3-4 releases to see if their productions are up to par. For example, most problems my friend had were related to the mixdown and arrangements, which are due to simple lack of experience. As you produce, you gain experience and whatever you release will always reflect where you were technically, at that point of your life. You can remove it from stores, but not from people’s computers.

Lack of music testers. Have you played your music for people who you know are reliable sources of criticism? This might sound obvious, but a lot of producers will just finish a track and send it off to a label right away. This is a very bad habit to develop, because a second pair of ears might be the best tool out there for gaining a fresh perspective on potential issues with your tracks.

You might think you can disown the problem by relying on the label owner to take care of the technical aspects, but the truth is that a lot of label owners aren’t always technically savvy. This is how my friend and I were wondering, “How did the label owner let that get past them without sending it back to have those issues fixed?” Mainly because it’s up to the artist to ensure their track is solid enough for them to be proud of — and for it to pass muster with reliable critics too.

music direction, compassLack of direction. This one is tricky. How do you know if the music you’re making now will still hold up in 4-5 years from now? Well, you’ll never really know. But making timeless music should be more of your goal than making music that would sell, at the precise moment. Many DJs change styles and genres every year, whether because they jump from one bandwagon to the next to chase the trends, because they’re lacking gigs and choose to adjust their sets, or simply because they get bored. This can become a real issue, because if a release takes a few months to a year to get published, then by the time your music is out, you’ll have already moved on. For producers, this presents one big existential question: “What is my voice?”

If you’re spending most of your time trying to sound like others, you’ll be trailing behind all the time, trying to adjust yourself to their sound even after they’ve moved on. This is not an issue if you’re sounding like yourself.

But how do you know what your voice is?

This is a difficult question to answer. If listeners can recognize your sound from one song to another, there’s a good chance that you’ve found it. And if you tend to return instinctively to a particular musical direction when you’re having fun in the studio, this can also be a strong indication of your voice.

Try these tips to find your own voice:

  • Don’t buy samples anymore. Try to make your own.
  • Don’t use presets. Again, make your own.
  • Pick a few effects you love and use them in all your productions.
  • Spend time learning sound design.
  • Build a reference folder with tracks that inspire you no matter what.

In conclusion, I’d really encourage you not to remove music you made in the past. It is you, and old productions can be very useful for keeping track of how much you have evolved. Besides, some people might have loved what you made, and keeping the music out there is a good way to reach appropriate people.

Should I Remix for Free?

If you’ve been hanging out on SoundCloud, uploading some of your music productions, commenting on other artists’ tracks, and exchanging a few words here and there, you may have been invited to collaborate at some point. If you haven’t invested much time in networking on SoundCloud, you’re really missing out on one of the most important hubs for music producers.

There’s been a huge emphasis in recent years placed on the number of followers producers can rack up. I even get people hitting me up every now and again to offer me 10,000 new followers, if I pay them 100$ or so.

Yet this craze over followers is nothing but a mirage.

Record labels won’t bite if they see an empty profile with two songs, but 1000 followers. And it’s not only labels who’ll see right through this. Anyone who’s even slightly curious or discerning will be struck by the awkwardness of such a hollow presentation.

Genuine connections, however, can go a long way. The more you interact with people directly (through SoundCloud’s horrible messaging system…), the more you run the chance of being invited to do a podcast or a remix. It’s even a pretty frequent occurence for active users.

Remixing for free can gain you valuable exposure and connections.Yet with this being said, if you’re at the beginning of your musical journey as a producer, you honestly shouldn’t expect to get money for this, not even if they propose royalties on sales. The truth is that the current state of sales in the industry is pretty discouraging for all but the larger record labels. Exposure and connections are thus the name of the game, and networking is the way to get you there.

It comes down to these key points:

  • Gain exposure, get heard. Considering that there’s not much money to be made, and that you want to expand your visibility on SoundCloud, one thing you can hope for is that the remix or podcast you make will help you reach a new audience. The music scene is composed of countless separate micro-worlds, and you’ll never manage to reach them all. Be strategic: try to reach the ones that are looking for music like yours. It’s a common mistake to assume that casting a wide net will succeed in garnering you enough people who will love what you do. But that’s actually counter-productive. You’re better off reaching one true fan than 100 people who care more or less. That one impassioned fan will spread the word and carry your music around. But you need to be exposed.


  • Target the right people, make your network work. Following the previous point, if you connect with people who love the same music as you, your music will find its way to the appropriate people. Again, you have to think strategically. Too often I see someone agree to do a remix without first having done research into who they are about to work with. On the other end, you could end up saying no to someone who is close friends with one of your favourite artists, or who attends a club regularly and passes music he discovers off to local DJs who love the kind of music you craft. The point is that good networking involves enlisting others to spread the wheel of music for you. And the same goes for you if you ask other DJs to remix your music productions: if someone believes in the music, they’ll pass it to people who will play it.


  • The rocky road. The state of DJing is pretty interesting these days. If you think about it, a lot of DJs play digital music they get for free, and will only pay for vinyls. Digital sales, at least for underground music, are somewhat stable, but haven’t evolved much at all in the last 5 years. For some reason, people have a hard time paying for underground music. They prefer to get it for free through their DJ friends. So with this in mind, accepting to remix for a label or a fellow producer is more about hoping that you’ll connect with someone who will get you closer to your goals: to release with a specific label; to be associated with a producer that inspires you; to get more gigs; or whatever they may be. This comes with a price though, and remixing for free might be one of those little discomforts that are necessary to get you closer to your destination.

Group of Friends with Digital Tablet

So as a producer, if you’re facing the option of being invited to work for free, consider these 3 things:

  • Are you inspired by the original song?
  • Is the invitation coming from someone with an interesting reach (fans, artists, community, promo)?
  • Who else is involved? Is there anyone in their circle that inspires you?


Ask yourself these questions, and feel free to ask the people who are inviting you to collaborate. If you’re going to do it for free or for a few bucks, it’d better be a fun gig!

Now just one final tip: you too may at one point invite someone to remix your music, and they might be considering these same points. So if you really want to work with an artist you love, it could be worthwhile to invest some money into having that special artist remix your track. Paid artists are often a good source of promotion to get your music where you want it to be.

Deconstructing A Reference Track

Note: This article is partly related to the Non-Linear Music Production technique explained in my previous post. It offers a complementary method for finding inspiration in your workflow.

Now that you’ve been exposed to my non-linear approach to music production, you know that the early stages of production are focused on building ideas and content. Once that has been attacked, you can start looking into creating a temporary structure for a loop. If you’ve also checked out my One Loop Per Day challenge on YouTube, then you’ll see that the following step is to build a storyline around the idea.

One of the best and fastest ways is to devote your time to carefully analyzing the work of artists you admire. This entails actively analyzing and interpreting others’ work within your DAW so as to carve out a path that you can easily implement in your own production.

But before you dive into your sources of influence and follow the process outlined below, I’d like you to consider this famous quote:

“Art is theft” – Pablo Picasso


Step 1: Finding Your Track

  • Pick a track that you really like and whose arrangements you would like to more or less imitate.
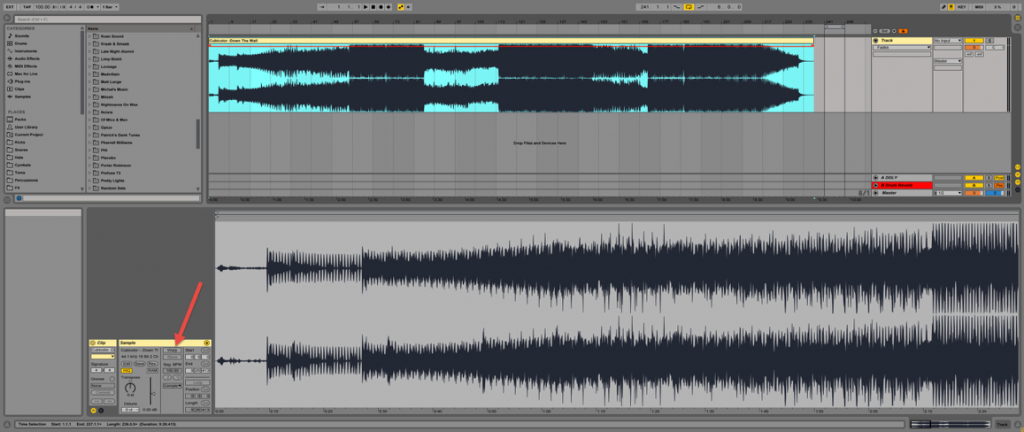
  • Make sure that the track is un-warped so that it doesn’t sync with your DAW’s BPM, and so that it’s unaffected by any transient markers you might have set.
  • If your track is in Ableton’s Session View, drag it into the Arrangement View by hovering over the 3 vertical lines at the top-right corner of your screen, or by simply pressing the tab key.


Deconstructing a reference track Step 1: Find your track


Step 2: Correcting Grid Settings

  • In order to properly match the grid with your track’s tempo so that you can use the waveform to spot what happens at what time, you need to find the BPM. You can do this in many ways, by:
    • Finding your track on Beatport. The track information should include its key and BPM.ableton, arrangements
    • Accessing the track’s metadata by right-clicking on it in Windows and then clicking on “Properties>Details” (if it’s available).
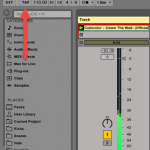
    • Finding the BPM on your own using Ableton’s Tempo Tap.
      • Make sure to tap “tempo” in the Session View or else it will fall out of sync in the Arrangement View.
    • Type in the appropriate BPM.
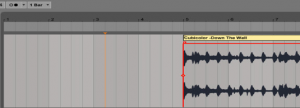
      • Manually adjust the track with Ableton’s grid so that the sections of your track begin on beat.


Deconstructing a reference track in Ableton, Step 2: Correcting Beat Grid


  • Picture4You will notice this will help you to analyze your track’s arrangements by determining at which bar a section will start.e.g.: The breakdown starts at 80 bars.
    • Feel free to cut out any elements such as silence,noise, or “pre-intros” before the actual intro, as in my example above.


Step 3: Placing Markers and Locators

  • If your sections are starting on beat and are properly aligned with Ableton’s grid, this is where you will be able to start learning how tracks are arranged.
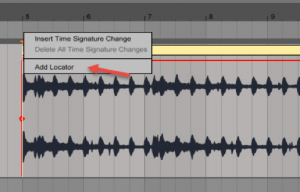
  • Listen to the track a couple of times, and marPicture5k its waveform with appropriate section locators. To do this:
    • Right-click in the Scrub Area.
    • Click on “Add Locator.”
  • Mark all relevant sections with locators throughout the whole song. It should look like this:
    • Note that you can label your sections however you wish, depending on the style of music you’re writing. You don’t need to call a section a chorus, for example, if you just want to call it A or B.


Deconstructing a reference track, Step 3: Placing Locators


Step 4: Analyzing

Now for the important part…

  • Pull out Ableton’s Loop Brace in the Scrub Area above the track’s waveform, and stretch it from the beginning of a musical section to its end (from verse to chorus).
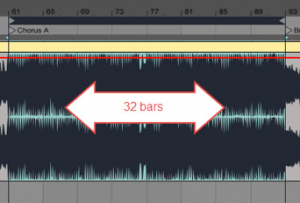
  • Count the amount of bars there are within that section by subtracting the last bar of the section from its first.
    • Example: If your section starts at 61 and ends at 93, do 93-61. That’s 32 bars.
  • Count the amount of bars for each section and you’ll start to notice when new elements emerge: sections and themes begin and end every 8 to 32 bars. That’s just how dance music works.
  • For example:In dance music, sections begin and end every 8 to 32 bars.
    • Everything works in multiples of 4.
    • You won’t hear a new section begin on bar 5 unless you’re not writing in 4/4.
  • Once you analyze how many bars are within a section,it becomes easy to understand how long your instrumental arrangements should be and where to place them in your own track.
    • Example: “My reference track has a chorus that lasts 16 bars. It also has a pad for that entire section. I can apply this to my own productions by placing a pad in my chorus for 16 bars only and making sure that it doesn’t overlap with the bridge.”


Step 5: Taking Notes

Once you map the structure of the track with locators, it’s important to take note of all the musical elements that come into play for each section. This is how you’ll get to understand what to place and when within the sections of your own track.

  • You can take notes down on a piece of paper, or even simpler, directly into Ableton’s clips. Here’s how:
    • Split the waveform into multiple clips by clicking on it and pressing [CTRL+E/CMD+E], or right-clicking on it and then selecting “Split.”
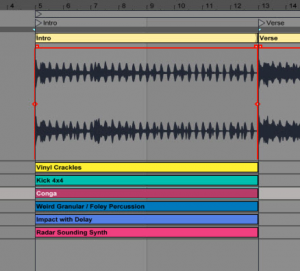
    • Once you’ve split the waveform into multiple clips, write down the most important elements for each section.
    • Then right-click on the Ableton clip and select “Edit info text.”
  • For the build-up section, you can write things like “white noise sweeps, risers, automated filter cut-off, percussion repeating faster and faster,” etc.

In Ableton, you can save notes directly in the clips


Bonus Tip: Creating Ghost MIDI Clips

The last trick I want to show you for deconstructing your Bonus Tip: Creating Ghost MIDI Clipsreference tracks element by element is to create ghost MIDI clips for every instrument. This is the best way to learn from other people’s tracks, because it will allow you to break them down layer by layer.

  • Create MIDI channels for every instrument you hear in a section, and label them.
  • Make sure there’s nothing in them.

Using this method, you can even go as far as deleting your chosen reference track and just filling in the MIDI skeleton with your own synths, pads, drums, effects and more! You’ll have the same arrangements as the artist you chose to mimic, but it will be your sound!

SEE ALSO :  Where to Get Fresh New Ideas for Tracks

Non-Linear Music Production

patienceOne of my goals is to help people be more productive and finish more tracks. I’ve learned that for many people out there, getting a project done can seem overwhelming. Many will never complete them, because the sole thought of finishing it to perfection stalls the whole process. We could even call this a form of writer’s block, even though the blockage occurs mid-project instead of at the start.

But starting new projects is and should be fun. That’s why I’ve even been encouraging people I coach to try to start one project a day.

Having multiple projects on the go is not only a great investment in your own potential, but it also forces you to practice, learn new techniques, and get outside of your comfort zone.

I swear, it will even become addictive.

So you might be wondering: how does this help you finish tracks if you just keep starting new ones?

Have a look at my Discogs page and you’ll see that I’ve released many EPs and albums. This is the technique that I’ve been using, which I call Non-linear Music Production (NLMP). And I can honestly say that I couldn’t have done it any other way.

The main mistake many producers make is to tackle a project from start to finish in a single sequence. This is how they operate:

  1. Find a hook, idea, main loop.
  2. Develop the idea into a structure.
  3. Do the arrangements.
  4. Do the mixdown.
  5. Finalize the track.

How to work faster with music production. creative process. electronic musicThe problem here is that producers also tend to move back and forth between the steps as adjustments are required. This often results in artists hearing their own track so many times that they can’t even tell what’s working or not anymore – and they start to go a little crazy! This way of organizing your production workflow might be motivated by your love for the idea you found, and by your desire to finish up the project so you can share it with your friends. But it forces it too much.

By comparison, Non-linear music production, or NLMP, works very differently. But after introducing it to people, I started seeing them improve.


The first thing that’s different is the introduction of what I call rounds. A round is an iteration of the same work process. But to define your round, first you need to decide how many tracks you need in your project. Usually, an EP will be 4 tracks and an album, 8 to 10. The number of tracks will decide the number of rounds.

Let me explain.

Once you have decided on the number of tracks, here’s how to work rounds:

  1. Find a hook, idea, main loop. Try to spend less than an hour on this at once.
  2. Save the project and close it.
  3. Create a new project, then repeat step 1.

Now, you will repeat this for each track on your EP or album, and each of them will evolve in parallel instead of one after the next. It will give you the impression that you’re not going fast enough, but you are actually farming your tracks all at once. Once you have your X number of tracks, all with an idea/hook, then you can move to the next stage of rounds.

  1. Develop the idea into a structure.
  2. Add more elements as needed.
  3. Save the project and close it.
  4. Open the next project, then repeat step 1.

Again, try to not spend too much time at once on each project. Plus you should try to space out each of your sessions by at least 24 hours. Rested ears know better. Then the final stage will follow:

  1. Arrangements.
  2. Add more elements as needed.
  3. Save the project and close it.
  4. Open the next project, repeat step 1.

As you can see, whenever you start a new round, you then repeat it for all of the other tracks. This goes as well for the mixing and such. You can develop your own workflow too, but in the end, what matters is that each track evolves in parallel.

What’s really exciting about this technique is when you get to the last week and finish all the tracks. You’ll see the end results all together, then you’ll just have some final touches to make, and boom, your project is done.

I’m currently working on a document that describes the whole process in detail. If you subscribe to my free coaching service, you’ll get the training and more news as it comes.


SEE ALSO:  Making and breaking genres in your music