LFO Shapes: A Guide to Modulating Sound with Different Waveforms
Are you getting to the point where you’ve been playing with many samples and feel like that you want to tweak them a bit so you can give them character?
As you know, I teach music production and the “level 1” of music production involves playing with samples, loops and turn them into songs. Once you get good at it, you can start to to tweak those samples. But where to start?
Well, the main issue with samples is that they’re… dead. By dead, I mean they’re static because they’ve been recorded and if played in loop, there will be no variation, no changes. Music why, this repetition can be challenging to listen to as the brain gets annoyed by an idea it understood because it expect it to change. For people with ADHD, it can even be torture and since a lot of musicians have that condition, you can expect them to want something to happen.
“I’m concerned the listener will be bored by my song”, is one challenge I hear a lot when I training people.
The answer to that is to dive in sound design. One of the main point is to teach yourself to be able to hear changes in sound, because that is movement is what makes a sound always change. There are 2 main types of movement: one that is in sync with a tempo and one that is not.
To relate to how to bring movement to your music, let’s talk about a tool I abuse of and couldn’t see myself without it: Low Frequency Oscillators.
Why using it?
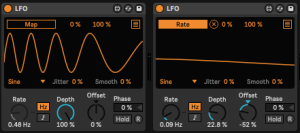
A Low Frequency Oscillator (LFO) is a fundamental component in the realm of audio synthesis and sound modulation. Operating at frequencies below the range of audible sound, an LFO generates waveforms that serve as control signals rather than sound sources themselves. These waveforms—such as sine, triangle, square, sawtooth, and random—ebb and flow in a repetitive manner, influencing various parameters of sound, including pitch, amplitude, and timbre. By imparting rhythmic or cyclical changes to these parameters, LFOs breathe life into static sounds, imbuing them with movement, texture, and complexity. Widely used in electronic music production and sound design, LFOs are pivotal tools for shaping sonic landscapes, adding dynamics, and creating evolving patterns that captivate the listener’s ear.
When you write your ideas/melodies, you can draw your automation for more precision, but the idea of using LFO’s, is to delegate some movement to the machine. Fast paced movement will bring some textures, while slow movement will blur the lines between where modulation starts and stops. Mid-speed will allow ear spotting changes.
In this blog post, we’ll dive into the world of LFO shapes and how they affect sound design. We’ll explore the characteristics of different LFO waveforms and how they sound when used to modulate a filter, both in fast and slow modulation scenarios. By the end of this guide, you’ll have a better understanding of how to use specific LFO shapes to achieve desired sonic effects.
Movement Uses:
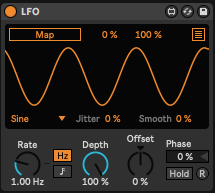
1. Sine Wave: Smooth and Subtle
The sine wave is the simplest and most fundamental waveform, producing a smooth and gradual oscillation. When applied to modulate a filter, a sine wave can create gentle and subtle shifts in the sound. At a slow modulation rate, it imparts a calming, almost breathing-like quality to the sound. As the modulation rate increases, the sound becomes more pronounced, adding a sense of movement without being overly aggressive.
Sine movement are also the closest to nature.
- Sine Wave: The Essence of Smoothness
The sine wave is a fundamental waveform that closely resembles the natural oscillations found in various phenomena, from the movement of pendulums to sound waves. Its smooth, rounded peaks and troughs replicate the behavior of many naturally occurring processes, giving it a sense of organic elegance.
- Harmonic Content and Complexity:
The sine wave has the simplest harmonic content of all waveforms. It consists of a single frequency with no additional harmonics or overtones. This lack of complexity contributes to its inherently soothing and gentle quality. When the sine wave is used as an LFO shape to modulate a filter, it imparts a gradual, almost seamless movement to the sound. This characteristic is akin to the subtle changes in nature, such as the gentle ebb and flow of waves or the gradual shifts in wind patterns.
- Emulating Natural Phenomena:
Many natural sounds, such as the chirping of birds, the rustling of leaves, and even human vocalizations, exhibit a certain level of smoothness and continuity in their vibrations. By using a sine wave LFO shape, you’re essentially mimicking these naturally occurring patterns of movement. This can make your synthesized sounds feel more in tune with the environment, adding an organic touch that’s often difficult to achieve with more complex waveforms.
- Subtle Dynamics:
The slow, gradual modulation provided by a sine wave LFO can be likened to the subtlety of nature’s changes. Think of how the rising and setting of the sun or the changing seasons bring about transformations that are gentle yet noticeable over time. Similarly, the use of a sine wave LFO can introduce subtle dynamics to your soundscapes, creating an impression of evolving environments that are familiar and soothing to the ear.
- Organic Aesthetic:
When crafting music or soundscapes, an organic aesthetic can be particularly appealing. It resonates with listeners on a subconscious level, invoking a sense of calm and comfort. By utilizing the natural sound qualities of a sine-shaped oscillator as an LFO shape, you’re infusing your compositions with an element of authenticity that can enhance their emotional impact.
The innate smoothness, harmonic simplicity, and resemblance to natural phenomena make the sine wave a powerful tool for creating organic and natural-sounding modulations. By incorporating sine-shaped LFOs into your sound design, you’re tapping into the essence of nature’s subtlety and fluidity, giving your compositions a more authentic and emotionally resonant quality. Since electronic music is often cold and very artificial sounding, to include something more organic can be a nice contrast.
2. Triangle Wave: Balanced and Versatile
The triangle wave combines the smoothness of the sine wave with more defined edges. This waveform is often used to achieve a balanced modulation effect. When modulating a filter with a triangle wave, the result is a sound that moves gradually between its highest and lowest points. At slow rates, it creates evolving textures, and at higher rates, it imparts a rhythmic quality without being too sharp.
3. Sawtooth Wave: Building and Dynamic
The sawtooth wave has a sharp ascending edge and a smooth descending edge. When used to modulate a filter, it produces a building and dynamic effect. At slow modulation rates, the sawtooth wave can create sweeping changes, gradually opening and closing the filter. When the modulation rate is increased, it generates an aggressive and impactful movement, ideal for creating dramatic transitions or evolving textures.
4. Square Wave: On-Off Intensity
The square wave alternates between two levels, creating an on-off pulsating effect. When applied to filter modulation, it introduces a distinct rhythmic quality to the sound. At slow rates, it produces a gating effect, with the sound fading in and out. As the modulation rate increases, the square wave generates a clear pulsating rhythm, suitable for adding rhythmic complexity to the sound.
Like any shape of an LFO, you can play with the depth of it’s output. If you keep the depth low for a square shape, you’ll have a nice variation but in two stages.
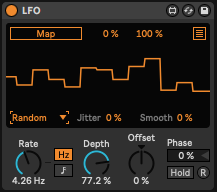 5. Random/Noise Wave: Chaotic and Experimental
The random or noise waveform introduces an element of chaos and unpredictability to modulation. When modulating a filter, it creates a sense of randomness and texture. At slower rates, it can add a subtle layer of complexity to the sound, mimicking natural variations. At faster rates, it produces a glitchy and experimental effect, making it perfect for unique soundscapes.
I recommend the use of random on sounds you never want to be the same twice such as the velocity of a sound, the length of a percussion, the tone of a pad. It is very useful to add variations, slow or fast.
TIP: Use the smooth option to have less abrupt changes.
6. Binary output: Computer Language
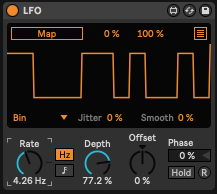 As of my last knowledge update in September 2021, Ableton Live’s “Binary” form might refer to a specific device, feature, or concept that was introduced after that time. However, if we’re discussing a feature related to binary operations or manipulation, here’s a general explanation of how binary operations might be used in a music production context:
1. Binary Operations:
Binary operations involve manipulating binary data, which consists of sequences of 1s and 0s. In music production software like Ableton Live, binary operations can be used to generate rhythmic patterns, create variations, and add complexity to your music. They can be particularly useful for creating glitchy, syncopated, or experimental rhythms.
2. Step Sequencers and Binary Rhythms:
Step sequencers are commonly used to create patterns of notes or events over time. In the context of music production, a binary step sequencer might allow you to turn steps on or off, creating a binary pattern. Each step represents a binary digit (1 or 0), which corresponds to a note or event being active or inactive.
For example, if you have a binary pattern of “101010,” it might translate to a repeating rhythm of long-short-long-short-long-short in a musical context. This can be a great way to generate interesting, irregular rhythms that deviate from traditional quantized patterns.
3. Creating Glitch Effects:
Binary manipulation can also be used to create glitch effects. By toggling certain bits on and off, you can introduce unexpected variations and unpredictability to your sounds. This is especially useful for genres like glitch, IDM, and experimental electronic music.
4. Sound Design:
Incorporating binary patterns into your sound design can lead to unique textures and timbres. You can use binary patterns to modulate various parameters of your synthesizers and effects, producing evolving and dynamic sounds.
5. Automation and Control:
If Ableton Live introduced a feature named “Binary,” it might also involve binary automation, where you can use binary patterns to automate various parameters in your project. This could add a layer of complexity and movement to your music over time.
Since my knowledge is based on information available up until September 2021, I recommend checking Ableton Live’s official documentation, user guides, or online resources for the most up-to-date and accurate information about the “Binary” feature in Ableton Live. This will provide you with step-by-step instructions on how to use it effectively in your music production workflow.
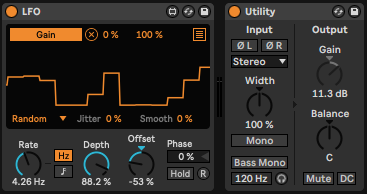
TIP: To hear better how a modulation is affecting sound, map the LFO to a Utility so you can hear amplitude (volume) modulation, which is easier to the ear since it is very obvious.
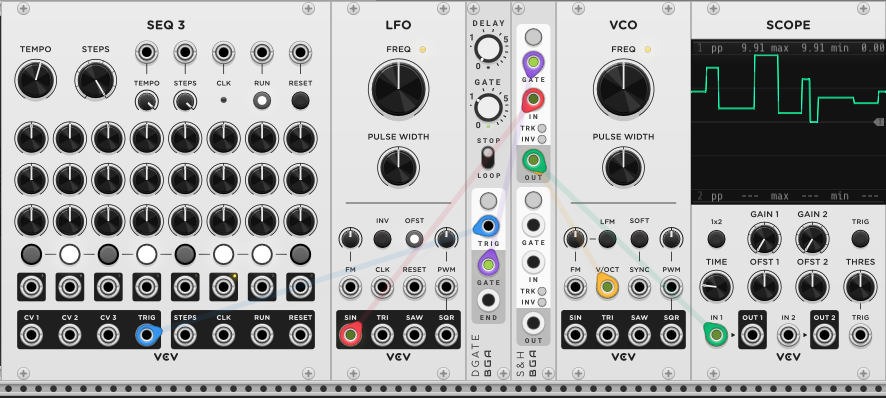
LFO Modulated LFO
The concept of using one LFO to modulate the speed of another LFO is a fun technique that can yield intricate and non-linear modulation patterns. Let’s explore how this works and why it leads to non-linear results:
LFO Modulation Basics:
Low Frequency Oscillators (LFOs) are typically used to modulate parameters such as pitch, amplitude, filter cutoff, and more. They generate waveforms at frequencies lower than those of audible sound, resulting in modulation that occurs over time. These waveforms include sine, triangle, sawtooth, square, and random waves, each with unique characteristics.
Modulating LFO Speed:
When you use one LFO to modulate the speed of another LFO, you’re introducing a layer of complexity to the modulation process. Instead of directly affecting the sound parameter itself, you’re altering the rate at which another LFO oscillates. This means that the rate of change in modulation becomes variable and dynamic.
Ever heard the sound of a bouncing ball? This can be achieved with this technique.
Non-Linear Effects:
The key to understanding the non-linear effects lies in how the modulation rates interact. When one LFO modulates the speed of another LFO, the resulting modulation pattern becomes intricate and less predictable than simple linear modulation.
Consider this scenario: Let’s say you have an LFO (LFO1) modulating the speed of a second LFO (LFO2). As LFO1 varies its speed, it introduces fluctuations in the rate at which LFO2 modulates the target parameter. The result is a complex interplay of modulation speeds that can lead to unexpected and non-linear outcomes.
For example, if LFO1 oscillates between fast and slow speeds, the modulation from LFO2 will speed up and slow down accordingly, leading to irregular and evolving modulation patterns. These irregularities create a sense of unpredictability and complexity in the modulation, which can add a unique and experimental flavor to your sound design.
Applications:
- Texture and Movement: Modulating an LFO’s speed with another LFO can add layers of texture and movement to your soundscapes. The constantly changing modulation rates can create intricate sonic textures that evolve over time.
- Dynamic Rhythms: The non-linear modulation introduced by this technique can result in dynamic and evolving rhythms. It’s a great way to inject rhythmic complexity into your music, perfect for genres like IDM, ambient, and experimental music.
- Experimental Sound Design: If you’re aiming for experimental or otherworldly sounds, using one LFO to modulate the speed of another can lead to unconventional and unpredictable outcomes that can set your sound design apart.
In summary, using one LFO to modulate the speed of another LFO introduces a layer of complexity and unpredictability to your modulation patterns. This technique can lead to non-linear results that are rich in texture, movement, and dynamic rhythms. It’s a powerful tool for sound designers looking to push the boundaries of conventional modulation and create unique sonic landscapes.
TIP: How many LFOs should be used in a project isn’t important. But you’ll have more cohesion if you use a few “master LFOs” that control multiple parameters across the song as they will move all together elements, creating an orchestral effect.
LFOs as Melodies and Compositional Tool
Certainly, LFOs combined with a sample and hold module in the modular synth world can produce intriguing and unique melodies. The type of LFO waveform used in conjunction with the sample and hold module directly influences the character of the generated melodies.
If you look at a melody in the piano roll, you’ll see that notes go up and down or perhaps go up then down. Those are shapes an LFO can do.
How to set it up?
Send the output of the LFO to a Sample and hold. You can ping the sample and hold at the moment you want a note to play. The sample and hold will look at the data sent by the LFO at the moment it was pinged and then output the note which can be sent to an oscillator.
Let’s see how different LFO shapes contribute to specific types of melodies:
1. Sawtooth LFO: Progressive Ascending Melodies
Using a sawtooth LFO with a sample and hold module can create melodies that ascend progressively. As the sawtooth LFO ramps up, it triggers the sample and hold to capture and hold the voltage at specific points. The resulting melody will have a rising, stair-step quality, with each note being slightly higher than the previous one. This combination is well-suited for building anticipation and tension in a composition.
2. Square LFO: Stepped and Rhythmic Patterns
A square LFO paired with a sample and hold module generates stepped and rhythmic melodies. The square wave’s on-off nature causes abrupt shifts in the sampled voltage, creating distinctive steps in the melody. When used at different rates, the square LFO imparts a rhythmic quality to the melodies, making them danceable and syncopated.
3. Triangle LFO: Smooth and Flowing Melodies
A triangle LFO combined with a sample and hold module produces melodies with a smooth and flowing character. The triangle waveform’s gradual rise and fall influence the sampled voltage, resulting in melodies that transition between notes in a less abrupt manner compared to square or sawtooth waves. This combination is ideal for creating melodies that evoke a sense of fluidity and motion.
4. Random/Noise LFO: Chaotic and Experimental Melodies
Pairing a random or noise LFO with a sample and hold module leads to chaotic and experimental melodies. The unpredictable nature of the random waveform causes the sample and hold module to capture varying voltages, resulting in melodies that seem to wander unpredictably. This combination is perfect for generating avant-garde or ambient melodies that challenge traditional musical expectations.
5. Sine LFO: Serene and Ethereal Melodies
Utilizing a sine LFO with a sample and hold module produces serene and ethereal melodies. The sine waveform’s smooth undulations translate into gentle fluctuations in the captured voltage. The resulting melodies are subtle and soothing, with a dreamlike quality that’s well-suited for ambient or meditative compositions.
Thanks for reading my tribute to a often overlooked tool in music and now you know why I’m in love with all the possibilities behind it.

 basslines. If that’s not enough you can also use the midi effect velocity which can not only alter the velocity of each note, but in Ableton Live it also has a randomizer which can be used to create a humanizing factor. Another way to add dynamics is to use a tremolo effect on a sound and keep it either synchronized, or not. The tremolo effect also affects the volume, and is another way of creating custom made grooves. I also personally like to create very subtle arrangement changes on the volume envelope or gain which keeps the sound always moving.
 modulate anything, and they will automatically create movement. For each LFO, I often use another LFO to modulate its speed so that you can get a true feeling of non-redundancy.
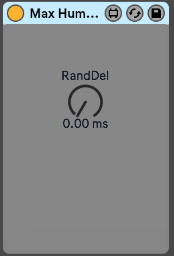 A sound’s position in a pattern can change slightly throughout a song to create feelings of movement; a point people often overlook. This effect is easier to create if you convert all of your audio clips to midi. In midi mode you can use humanizer plugins to constantly modify the timing of each note. You can also do that manually if you are a little bit more into detail editing but in the end a humanizer can do the same while also creating some unexpected ideas that could be good. Another trick is to use a stutter effect in parallel mode to throw a few curve balls into the timing of a sound every now and then.