Tag Archive for: Preparation

Rituals, Routines, and Habits in Music Production

For us musicians, where creativity meets discipline, the secret symphony lies in the art of rituals, routines, and habits. Like the intricate notes of a melody, these elements intertwine to create a harmonious process that elevates musicians from novices to virtuosos. From finding the perfect hook to crafting intricate arrangements, these rituals serve as the conductor’s baton, guiding musicians through the labyrinth of creation. In this melodic exploration, we delve into the common threads that tie these practices together and uncover their transformative impact on the journey of music production.


One thing I observe with people I know and work with, is their lack of organization or time for making the music they want to do. Taking the time to make space for self care is an important thing for enabling more satisfying sessions. That’s what we’re all interested in, no? So why not allowing ourselves healthier skills?

Most of the time, it seems like many artists have the impression, or superstition, that their unhealthy way does it better. Call it self medication or stubbornness, one can stick to it until it works no more or because they’ve entered a self destruction phase.

So let’s talk about upgrading your sessions.

Let’s define what each mean.

1. Ritual: A ritual is a set of actions, behaviours, or practices that are carried out with a sense of purpose, intention, and often a deeper meaning. Rituals are typically associated with symbolism, significance, and a heightened sense of awareness. They are performed to mark a specific event, transition, or moment and often carry cultural, spiritual, or personal significance. In the context of music production, a ritual might involve a specific pre-recording meditation, setting up a particular workspace arrangement, or even a symbolic gesture before starting the creative process. Rituals can help create a focused and intentional mindset, bringing a sense of reverence and mindfulness to the creative endeavour.

Rituals are intentional practices with symbolic meaning, often used to bring mindfulness, focus, and deeper significance to a specific activity or event.

2. Routine: A routine is a sequence of tasks or activities that are regularly followed in a specific order. Routines provide structure and predictability to daily life. Unlike rituals, routines might not carry the same level of symbolic or spiritual significance. Instead, routines serve practical purposes and can encompass a range of activities, from the mundane tasks of daily hygiene to more complex processes like a musician’s routine for setting up equipment before a recording session. Routines provide a sense of organization, help manage time efficiently, and establish a consistent pattern for accomplishing tasks.

Routines are sequences of tasks that provide structure and organization to daily life, helping manage time and accomplish various activities in a systematic manner.

3. Habit: Habits are automatic behaviours that have been repeated consistently over time until they become ingrained in our daily lives. They require minimal conscious thought and effort to perform. Habits can be positive or negative, and they often develop as a result of repetition. In the context of music production, a habit could be a regular schedule of practicing an instrument, a daily ritual of listening to music for inspiration, or even the tendency to start each recording session with a cup of coffee. Habits are powerful because they shape our behaviour over the long term, whether for creative endeavours or daily routines.

Habits are automatic behaviours that develop through repetition and become ingrained in our routines, shaping our long-term actions and behaviours.

Rituals, Routines, and Habits: A Collective Symphony


1. The Prelude: Setting the Stage

Rituals, routines, and habits all share a common purpose: setting the stage for productive creativity. Just as a well-rehearsed orchestra tunes their instruments before a performance, musicians tune their minds and environment through consistent practices. These practices create a mental framework, signalling to the brain that it’s time to enter the creative zone.

There are multiple little things that you can do to enhance your studio and make it cozier and providing inspiration.


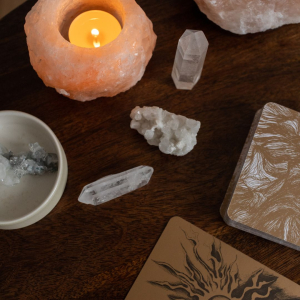
1. Thoughtful Lighting: Using LED lights that you can change the colors is a great way to change the mood on the fly. using candles is also lovely.

2. Comfortable Furniture: Invest in comfortable furniture, such as a cozy chair or a comfortable couch where you can take breaks and listen to your work. Also useful for visitors.

3. Personal Touches: Decorate the studio with items that inspire you, such as artwork, posters, or memorabilia related to your favorite musicians or bands. Personal touches can make the space feel uniquely yours and spark your creativity. Seeing people who inspire me to create helps but it has been shown that having picture of people you care for that look at you can raise your efficiency.

4. Acoustic Treatment: Incorporate acoustic panels, diffusers, and bass traps to improve the sound quality of your studio. Not only do these treatments enhance the acoustics, but they also contribute to a more professional and inviting atmosphere. In general, this is a must.

5. Natural Elements: Integrate natural elements like indoor plants, flowers, or even a small tabletop fountain. Greenery adds a refreshing touch to the studio and can create a calming ambiance.

6. Inspiring Colors: Choose colours that evoke the right emotions for your creative process. Soft, muted tones can promote a relaxed atmosphere, while vibrant colours might energize your space. Experiment with colour combinations that resonate with you.

7. Inspirational Quotes: Hang up motivational or inspirational quotes on the walls to keep you inspired and focused during challenging moments. These can serve as reminders of your creative journey.

8. Proper Organization: Keep your studio tidy and organized. Use shelves, storage containers, and cable management solutions to reduce clutter and create a clean workspace. An organized environment can lead to a clearer mind and more efficient work.

9. Personal Soundscapes: Play ambient sounds, like gentle rain or a crackling fireplace, to create a cozy atmosphere while you work. These sounds can help reduce stress and enhance focus.

10. Multi-Sensory Experience: Engage multiple senses by including scented candles, incense, or essential oil diffusers. A pleasant aroma can contribute to a relaxing and inspiring environment.

11. Comfortable Flooring: Choose a comfortable flooring option, such as a soft rug or carpet, to provide insulation and cushioning for long hours spent standing or sitting. Carpet can also help with acoustics.

12. Creative Break Spaces: Designate a cozy corner for relaxation and brainstorming. A bean bag chair, floor cushions, or even a hammock can provide a comfortable space to step away from your workstation and let your ideas flow.

13. Inspiring Instruments: Keep your instruments within arm’s reach to encourage spontaneous creativity. Display your guitars, keyboards, or other instruments prominently, so they serve as constant reminders of your musical pursuits.


2. Finding the Motif: Inspiring Creativity


Whether it’s a pre-recording meditation or a daily walk in nature, rituals stimulate inspiration by encouraging mindfulness and presence. Studies suggest that these practices activate the brain’s creative center, enhancing the ability to make connections and generate novel ideas—a valuable asset in the search for musical hooks.

1. Mindfulness Meditation: Mindfulness meditation involves focusing your attention on the present moment without judgment. You can start by focusing on your breath, gradually expanding your awareness to sensations, thoughts, and emotions. Regular practice can improve your ability to stay present and focused in various situations.

2. Guided Meditation: Guided meditation involves following the instructions of a recorded voice or a meditation app. It can lead you through visualizations, body scans, or relaxation techniques, helping you stay engaged and centered.

3. Breath Awareness: Concentrating on your breath is a simple yet effective technique. Observe each inhale and exhale, noticing the sensations as you breathe in and out. This practice can help anchor your attention and calm your mind.

4. Body Scan Meditation: In this practice, you systematically focus on different parts of your body, bringing awareness to physical sensations and releasing tension. It’s a way to cultivate bodily awareness and maintain focus.

5. Mantra Meditation: Using a repetitive word, phrase, or sound (mantra) can help direct your attention and quiet the mind. The repetition can be soothing and help prevent distractions.

6. Visualization: Visualization involves imagining a peaceful scene or a goal you want to achieve. Focusing on this mental image can help you concentrate and foster a sense of positivity.

7. Walking Meditation: Instead of sitting, you can practice meditation while walking slowly and mindfully. Pay attention to each step, the movement of your body, and your surroundings.

8. Progressive Muscle Relaxation: This technique involves tensing and then relaxing different muscle groups in your body. It can reduce physical tension and improve your ability to focus.

9. Yoga: Yoga combines physical movement, breath control, and mindfulness. The combination of these elements can help you improve focus, flexibility, and overall well-being.

10. Tai Chi: Tai Chi is a slow, flowing movement practice that promotes relaxation and mindfulness. It can enhance balance, coordination, and mental clarity.

11. Binaural Beats: Binaural beats are auditory illusions created by playing two slightly different frequencies in each ear. They’re believed to affect brainwave patterns and can aid in achieving different states of focus and relaxation.

12. Colouring or Drawing: Engaging in creative activities like colouring or drawing intricate patterns can have meditative effects, as they require sustained focus on the task at hand.

3. The Crescendo: Engaging in Routine


Routine, often synonymous with discipline, plays a crucial role in music production. Just as a musician practices scales daily to refine their technique, establishing routine can aid in refining skills such as recording, editing, and arrangement. Research indicates that regular routines enhance focus, memory, and overall cognitive abilities, all of which are integral in the intricate process of producing music.

If you’ve been following my blog, you know that I strongly encourage certain things as a routine such as:

  • Dividing your studio session in different phases (brainstorming, Concept testing, editing, loop patterns, arrangements, mixing) and approaching them one at a time.
  • Working on a song for 30 minutes and then work on another. Working on multiple tracks at once is helpful for self validation.
  • Taking breaks every 10 minutes for a few minutes.

All these will be helpful to develop as a routine as they’ll provide you the necessary to feel more satisfied with what you do.


4. Harmonizing the Elements: Rituals for Arrangement

Arranging a musical composition can be akin to composing a complex symphony. Here, rituals provide the structure necessary to weave different musical elements into a coherent whole. Studies highlight that rituals promote a sense of control and reduce anxiety—essential ingredients for tackling the intricate task of arranging various elements into a seamless composition.

Arrangements are to music, what the scenario is to a movie. Stories are made in so many different ways that to dive into how to do it, it’s important to get inspiration from storytellers you love. Personally, I love David Lynch and here are some of the points that he uses for his stories.

His style is characterized by surrealism, dreamlike sequences, and a blend of the mundane and the mysterious. Here are some key aspects of David Lynch’s approach to storytelling:

1. Embrace of the Subconscious: Lynch often delves into the subconscious and explores the depths of human psychology. His stories frequently incorporate dreamlike elements, blurring the lines between reality and the inner workings of the mind. This approach allows him to tap into universal emotions and fears that resonate on a deeply emotional level.

2. Dark and Mystical Atmosphere: Lynch’s storytelling often features dark and mysterious atmospheres that create a sense of unease and suspense. He blends the ordinary with the uncanny, infusing the mundane with an air of mystery that keeps viewers engaged and intrigued.

3. Visual Symbolism: Symbolism plays a significant role in Lynch’s work. He often uses visual symbols and metaphors to convey complex themes and emotions. These symbols may be recurring motifs or objects that hold deeper meanings within the context of his stories.

4. Unconventional Narrative Structures: Lynch is known for subverting traditional narrative structures. His stories may not follow a linear path, and he’s willing to leave certain aspects open to interpretation. This unconventional approach invites viewers to engage with the material on a more contemplative level, often sparking discussions and theories about the meanings behind his work.

5. Exploration of Dark Themes: Lynch’s stories frequently explore dark and taboo themes, such as violence, identity crisis, and the duality of human nature. He is unafraid to confront uncomfortable subjects and present them in a way that challenges the audience’s perceptions.

6. Use of Sound and Music: Lynch pays meticulous attention to sound and music in his storytelling. The auditory elements in his films contribute to the overall atmosphere and mood, enhancing the viewer’s experience and adding an additional layer of depth.

7. Character Depth and Ambiguity: Lynch’s characters often have hidden depths, and their motivations might remain ambiguous. This approach invites viewers to actively engage with the characters and their journeys, encouraging introspection and analysis.

8. Collaborative Approach: Lynch often collaborates closely with artists, musicians, and other creatives to bring his stories to life. This collaborative approach results in multi-dimensional works that integrate various artistic forms.

Perhaps these will raise some ideas.

Creating Your Own Musical Overture: Crafting Personal Rituals and Routines


1. Identify Your Goals:

Before crafting your rituals and routines, define what aspects of music production you’d like to enhance. Are you seeking greater inspiration, improved focus, or a more organized approach to arrangement?


2. Harness the Power of Consistency:

Choose rituals and routines that resonate with you and align with your creative process. Consistency is key—repetition helps solidify the connection between the practice and the desired outcome.

1. Set Clear Goals: Define specific and achievable goals for your music practice and performance. Having clear objectives gives you a sense of direction and purpose, making it easier to stay motivated and consistent.

2. Create a Schedule: Establish a regular practice schedule and stick to it. Consistency thrives on routine. Whether it’s daily, weekly, or monthly, having dedicated time for practice helps build momentum.

3. Start Small: Avoid overwhelming yourself with overly ambitious goals. Start with manageable practice sessions, gradually increasing the duration and complexity as your consistency improves.

4. Break It Down: Divide your practice sessions into smaller, focused segments. This approach helps prevent burnout and allows you to work on specific areas of improvement.

5. Practice Mindfully: Quality matters more than quantity. Focus fully on your practice without distractions. Engage in deliberate practice by identifying areas that need improvement and working on them purposefully.

6. Use a Practice Journal: Keep a practice journal to track your progress, challenges, and areas of improvement. This reflection helps you identify patterns, celebrate milestones, and stay accountable.

7. Embrace Repetition: Consistency is built through repetition. Repeatedly practicing scales, exercises, and songs helps you develop muscle memory and master techniques over time.

8. Prioritize Consistency Over Intensity: Regular, shorter practice sessions are often more effective than sporadic intense sessions. Consistency builds steady progress, while intensity can lead to burnout.

9. Find Accountability: Share your goals and practice routine with a friend, teacher, or fellow musician. Accountability can motivate you to stay consistent and track your progress.

10. Reward Yourself: Celebrate your achievements, no matter how small. Treat yourself after reaching milestones to reinforce positive behavior.

11. Embrace Imperfection: Perfectionism can hinder consistency. Accept that progress involves making mistakes and learning from them. Focus on improvement rather than flawless execution.

12. Stay Inspired: Seek inspiration from other musicians, genres, and styles. Exploring new musical territories can reignite your passion and keep your practice engaging.

13. Be Patient: Consistency takes time to yield noticeable results. Don’t get discouraged by slow progress. Keep the long-term perspective in mind.

14. Mix It Up: Vary your practice routine to prevent monotony. Experiment with different practice techniques, styles, and genres to keep your sessions fresh.

15. Rest and Recovery: Incorporate rest days into your routine. Rest is essential for preventing burnout and maintaining physical and mental well-being.

16. Adapt and Adjust: Life can be unpredictable. If you miss a practice session, don’t be too hard on yourself. Instead, adapt your schedule and get back on track as soon as possible.

3. Mindfulness and Presence:

Integrate mindfulness into your rituals. Whether it’s a pre-recording breathing exercise or a quiet moment before arrangement, cultivating mindfulness can amplify your creative presence.

My favorite book about this practice is “Wherever you go, there you are” by Jon Kabat-Zinn.

4. Document Your Journey:

Keep a journal to track the impact of your rituals and routines on your music production process. Reflect on moments of breakthrough, increased focus, or enhanced inspiration.

I personally love the Voice Memos on my iPhone to record some notes.


5. The Science Behind the Symphony: Insights from Studies

  • A study published in the “Creativity Research Journal” found that engaging in consistent creative rituals enhances creativity and provides a sense of control over the creative process.
  • Research in the “Journal of Neuroscience” reveals that mindfulness practices, often integrated into creative rituals, stimulate the brain’s default mode network, fostering divergent thinking and innovative ideas.
  • The “Journal of Experimental Psychology” suggests that routines can boost cognitive performance and improve memory, thus facilitating efficient editing and arrangement tasks.


In Conclusion: The Symphony of Productivity and Creativity

As musicians compose their sonic tapestries, the interplay of rituals, routines, and habits creates a symphony that resonates with discipline and inspiration. Just as a symphony conductor meticulously directs each note, crafting your own set of practices can transform your music production journey into a harmonious masterpiece. By understanding the common threads that unite these practices and embracing their transformative impact, you’ll not only find the hooks and arrangements that resonate but also unlock the full potential of your creative symphony.

Playing Electronic Music Live (Part 6, final)

I recently played a live set at StereoBar in Montreal for the launch of my album Returning Home and it was very interesting to create a live set from scratch, following the advice of this series I’ve written over the past few months about playing electronic music live. I’d like to share with you a bit about how it went, as well as some personal notes I took for future performances.

Notes about preparation of my set

Returning Home has many tracks; I wasn’t sure how I’d approach them in a live context considering they are all pretty intricate, full of details, and pretty much impossible to execute as the recorded version(s). I decided to go through all the songs and export the stems for each group of sounds – plus making sure the kick and bass would be isolated – so I could control how they would come and go in the set.

Exporting stems took me a while. I had also exported stems from certain songs that weren’t included in the album but that I wanted to play. I had a good 17 tracks ready, with about 8 channels exported per track. I imported everything into my new live set, and added everything in the right columns and with the colors I needed. I also started chopping the stems into sections so I could trigger some parts spontaneously.

After a few days of geeking out, I started playing the tracks to see how the flow felt and to see if the transitions were going well. I played with effects; trying to spice up the main ideas to surprise people. As I kept rehearsing and trying to see how to play the songs, I found myself becoming very bored out of what I was hearing. The thing is, when you spent months making an album, you get to a point where you can’t listen to your own music anymore – and playing it as is felt too safe, too simple.

Live at MUTEK Chile 2006

Live in Zurich 2005

I scrapped everything. I remember thinking that this whole series advising people on how to play live was crap but I realized that after going through it myself again, it still had a lot of value, but even I had done the preparations wrong. I remembered then how I used to LOVE playing live, 15 years ago and had a flashback excited me: pure improvisation. I realized that using stems wasn’t improvising enough and that my music is in itself, pure chaos.

I went back to my pool of sounds which didn’t make the cut originally and started chopping sounds, deconstructing stems, and re-exporting new parts. Then I started creating a space where I could remix the whole album on the spot, plus adding unexpected, unused sounds. Basically, it was combining the bass of track 2 with the melody of track 7, then percussion of track 4…pure remixing. I found a core idea for each moment of my set, and left a lot of space for reinterpretation. It worked and I was having a lot of fun.

My setup for this Set

I was using Ableton Push and 2 Novation Launch XLs, as mixers for all the channels (I ended up using 10). For some reason, each time I’ve tried using PUSH live, it has never really helped, but I felt this time I wanted to use it. I love the Novations so using 2 felt really amazing.

Limitations: My Macbook pro only has 2 USB ports so I needed a port to accommodate multiple items.

Soundcheck at Stereo

Soundcheck

Arriving at the venue, I felt really confident; perhaps too confident. The soundcheck went so smoothly that – in my experience – when that happens it gives you the feeling that something will go wrong later.

I had spent time in the studio carefully tweaking each channel with EQs to make sure the sound wasn’t to harsh or piercing. I also decided to use a Manley compression from UAD on the master which made everything really smooth. It was important to use a reference track as an EQ curve. It really paid off in Soundcheck so I didn’t have to do much; everything went so smooth.

TIP: Listen to your reference track before soundchecking, then play it to adjust an EQ on the master.

The show/performance

After a great start, shit started to hit the fan. As a track was playing, I noticed my mixer wasn’t responding and realized it had rebooted. By rebooting, it made the second mixer crash and the PUSH too. I wasn’t even 5 minutes in and the wheel of death was spinning on my Mac. I waited patiently and luckily it went back to normal. But after this glitch, I disconnected one of the Novations to plug it directly in my computer instead of the USB-Hub I had bought the same day (cheap connectors are always a big mistake!). PUSH was frozen and not doing anything, I had to activate clips with my mouse. Luckily from my experience playing live for so many years, I was able to do this in a way so that people didn’t notice. The Novations kept crashing one after the other. Each time I had to unplug them patiently to restart them, and then the wheel would go off on my computer; for some reason they would work for a good 20 minutes but then crash again.

Luckily, no one noticed anything! I could have really played a great show that night if everything had worked properly because Stereobar has the perfect setup for me…it was a bit disappointing, but I still received a lot of good feedback.

MUTEK Montreal 2006

Live in London 2005

After the show

Despite the technical issues, it was great show and fun nonetheless.

To summarize, a few tips here based on this live experience:

  • Don’t buy gear the same day without testing. Soundcheck are never 100% of what a show will be and can never be a real test.
  • Deactivate Ableton Live’s auto-update feature. It actually upgraded to a version the day before with a bug in it – a pretty big one. I had to reinstall the software and that was stressful. Thanks for the swift reply from Ableton tech support on that one.
  • Never panic when problems arise. Most of the time, people don’t notice.
  • Try to avoid shitty USB hubs! I’m still trying to find a better alternative.

I hope this series was helpful!

Not getting booked for shows? Try this.

If there’s one thing that haunts all artists, it’s entering a phase where you’re not getting booked for shows, or not getting any attention in general. Perhaps you were enjoying a phase of being booked frequently that’s now coming to an end, or perhaps the music ecosystem is changing and you might be out of tune with what’s currently demand.

Not getting booked can actually be a good thing.

When I come into a period where bookings start slowing down (or requests to work with me), I think of this new phase as a sort of “hibernation”; it’s a time to focus on other things that are important for the next time I start getting booked again to re-create upward momentum. Getting booked regularly is sort of like a wave you can surf for a while, but it can end, and you should take a moment to question why the ecosystem isn’t supporting you anymore. Perhaps it needs to be re-energized, or perhaps it’s time to change waves.

Even if your wave fades out, you can still rebuild your momentum.

“Momentum is when you manage to get a certain amount of people to talk about something you created enough to generate a certain level of enthusiasm that reaches other people out of your circle of contacts, organically.”

For instance, you might publish a song on Soundcloud and have a certain number of people who comment, like, repost but you didn’t ask for it. You can view this as the beginning of a wave. The number one mistake people make that hurts their momentum is release a track out of the blue and expect people to listen to and engage with it without any additional preparation or planning; doing this will make you bitter and frustrated.

To remain humble and grounded, let me offer you a few rules I’ve applied throughout my musical life:

  1. You are in no way entitled to have people listening to and liking your music.
  2. It’s not because a track is published online that it will sell, get success, or get attention.
  3. You are work in progress. Your next one will be better.

Through the experience of running my label Archipel for years, as well as other projects, I noticed that what created momentum was the usually initiated through a few diverse actions. The more imaginative you are, the better the results will be. Some of these actions include:

  • Having a really cool picture of yourself online. Artwork is also cool.
  • Uploading a video to Youtube.
  • Sharing positive news regarding something that is not related to yourself.
  • Contributing to someone else’s success.
  • Hanging out with friends and sharing it on social media. Bonus points if you did something fun that people do want to hear about.

Some basic marketing rules also apply here. Apparently, if people see three things you’ve done, it will imprint an impression on their memory. Sharing something positive will leave a better impression. Another general rule is that people enjoy useful information. Helping others or being part of something always strikes a chord in people. Being selfless in most of your online posts vs self-promotion is a critical tone you want to hit on. If you’re constantly posting things that are egotistically and promoting “your brand”, no one will pay attention.

Let’s create a plan that uses all these points in a hypothetical scenario to promote a song you’re releasing. In this hypothetical situation, we will try to create momentum online to have people come and listen to the track. Our goal for this is to get more online followers, widen up your network, and hopefully get a bit of attention from labels and some DJs who might play it out.

Scenario: Release a track on Soundcloud; we’ll take two weeks to build up momentum but the more time you take, the better.

First, try to visualize a number of plays you’d like based on a model track you like. Find a producer you like who produces music similar to you and have roughly equal or a bit more followers than you do. The main mistake people make is to try to replicate plays of far more popular musicians. Let’s say your track has 140 plays, 3 reposts and 14 likes.

A relatively successful track is identified by the number of likes vs the number of plays. I would say that 10% ratio is very good already, but if you make it up to 15 pr 20%, then I’d say the track was a success. The trick to get your ratio in the right zone is to have interested people to listen. If you’re marketing to too many random people that aren’t your target listeners, you’ll end up with many plays, but few likes; this is why reposts are important.

Do not pay for followers and plays. It will make you look really, really unprofessional.

Now that you know all these details, let’s try to create momentum for the self-release:

  • Spend an hour a day on Soundcloud building up your network. People won’t follow out of nowhere. The need a reason to and usually they’re in the same boat as you: they want to connect with people who make music and also need attention. Find music you love, follow as many artists who share the same tastes as you and leave positive comments on their music if you like it. Repost music you really like, reply to comments people address to you. The more you’re present, engaged, active and cultivate good tastes, the more people you’ll attract online. People often feel staying on top of social media like this demanding, but remember that you only reap what you sow.
  • Clean up your social media accounts. For many artists, this is a chore they hate but it’s a necessary evil if you aspire to create momentum online. You need a specific look and feel; i.e having a solid picture of yourself, no posts that make you look unprofessional, etc. Keep it simple and solid, look at the profiles of other artists to get ideas or ask for help from a friend who’s good with social media.
  • Link your Twitter with Soundcloud using IFTT. This will make sure that when you post a new track or like one, a Tweet will be sent. This is a good way to make sure people are aware you are active.
  • Connect with groups on Facebook and connect with others. Contacting someone doesn’t mean sending a none sense message out of the blue saying “bro, check my Soundcloud”, but trying to befriend them. The best promotion is when others promote your music for you but to do that, you need their collaboration and support. That comes over time with social investment.
  • As the release date arrives, be socially active and focus on helping others. The more you focus on others, the better it will be when you need their support. No one has to help you, but it’s more likely they will feel like it if you show interest in what they do, too. This is what I was saying earlier, share other people’s music, or any related news to show interest and that you truly like in them.
  • Prepare a video on Youtube. There’s are multiple free resources out there to do this. Just make one. It can be a full version of the track or not. You can contact Youtubers that share a lot of music to see if they want to premiere it.
  • Have good artwork for your release done. You can check on Fiverr for some help or maybe ask a friend who’s willing.
  • Get the track mastered or checked.
  • Share it with DJs so they can play it in podcasts. Best case scenario, a podcast goes online premiering your track the day before or day it’s released. Perhaps you can delay the date if necessary to work with a podcast creator. If you feel like you can do a podcast yourself with a good series, that can help.

As the release date approaches, have some online presence about 3-4 times a day on different channels. You can post in groups (but not shamelessly about yourself!), share things, comment. Be active. When you want to release the track, you need to get it out in a huge blast.

It’s your time to shine, make it right! Cover all your channels and talk about your release, but stay as humble as possible. When you post it, don’t have a tone that gives the impression that you expect something from someone, but instead that you’re simply happy you finished the track and want to share it.

Releasing music during the beginning of the week at a moment when people can actually listen is a good strategy.

Post-mortem comes usually a week after. Look at your stats and see what worked and didn’t work.

I hope this helps!


SEE ALSO :    Make Your Music Bucket List Happen 

Playing Electronic Music Live – How to Prepare Your Live Set (Part 3)

After the first two parts on this series of posts about playing electronic music live, we arrive at our final topic: clip arrangements, song organization and sound preparation.

Clip Preparation

I hope you did your homework from part two where I asked you to take your arrangements and turn them into an Ableton Live session. If you’ve done this, you’ll see that this task is pretty demanding and can be confusing, because you might feel your song(s) aren’t the same anymore, or perhaps they don’t make any sense. But trust me, even if you feel like you have failed in arranging your sessions, it will start to make more sense as we continue. What really matters is that you now have material loaded into the session view.

What if my track is so simple that I have only a few clips in the session view?

That’s not a problem, the idea is to have something. Part of the beauty of a live set is that once you have all your tracks in the session, you’ll shape them into a longer set. A live set isn’t like a DJ set, where you focus on transitions and track selections; it’s way more flexible and involves constant shaping to create a bigger picture.

1st To Do: Import all Your tracks into one big project

For the sake of this exercise, please start by creating a blank new live set that you’ll name “My Live Set” where you’ll have 12 channels to start with.

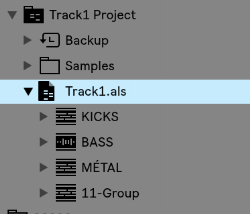
Next we will import all songs into that project. There are two ways to do this and it’s up to you to decide what is the best for you. I personally like to open a track, grab all clips in the session, copy (cmd+c), then open your “My Live Set” project and paste. You can also copy through the browser and should you be more comfortable using that method, do it that way.

One of the great new features of Ableton 10 is that groups now appear in the browser; which could be a good way to organize your work to re-import later on.

You should also consider copying audio leftovers over from each track. These unused pieces are more precious than you think, in a live context. A leftover is anything in your track that was created but didn’t make the final cut. It could be a variation, some weird FX, vocals, whatever – basically, anything will do. The idea behind leftovers is to create material for your live version to make it differ from the original song; it will add an edge.

Once you have all your tracks imported, you have a better idea of your whole session.

“How many tracks do I need for a 1h set?”

The answer here is hard to figure out until you’ve rehearse and determine your natural flow. After years of playing and recording my sets, I’ve figure that each of my tracks average a rough 6 to 8 minutes in a live context. This also includes the transitions (i.e two songs overlapping for 1-2  minutes, to make things smooth enough like a DJ would).

The total time of the tracks is not necessarily important to figure out. If you’re creative, you might even play the tracks in a random order.

2nd To Do: Name and color all clips appropriately

People often overlook this part but trust me, the better the organization, the less stress you’ll have in a live context. Never believe yourself when your mind says “oh I’ll remember what this clip is.” This is why names are important, but also, the clip color. All kicks should be the same color, basses and so on. My personal coding colors have been:

Kicks: red (grabs my attention)

Low end, bass: brown

Percussions: yellow

Claps/snare: Orange

Hihats: grey

Melodic elements: Blue, in various tons as some are different.

One thing about colors that helps is if you’re playing a track while in transition to another one, you can see the color of the other clip that you can’t see on screen.

Please note that I don’t necessarily recommend putting all of the same sounds in the same channels. You might want to mix, for instance, hihats of track A with the ones of track B. If both track’s hihats are in the same channel, you won’t be able to mix them and one will play after the other (only one clip can be played in a channel at a time).

Scene organization

Organizing your scenes is time-consuming, and it will also be what you’ll be reworking the most. It will also get your songs to have more of a live feel. For this section, I’ll use an example of one of my latest live sets to explain what I did, and why.

This song starts at the second row (scene).

Channel headers: As you can see, header colors aren’t important to me so much but there is a section all in white. This is because I use two MIDI controllers for controlling the volumes and the second section is for the second controller. This is also why they’re numbered so I know which slider they refer to on the actual controller.

3rd To Do: Map your channels to the appropriate elements of your controllers

Think of how you want to control your set on a base level, which is the channels in most cases. This is the most important part to pin down, because as you prepare your set, you’ll need to control volume sliders. Map your channels to the appropriate elements of your controllers. If your controller has buttons, I’d also map them to the mute buttons. Mutes are very important.

Buffer rows: As you can see, alternating rows before and after each busy row have scene of empty clips. You can also see that they have the “stop” square in them. I create “buffer rows” for two reasons: the buffers help know where the song starts and begins, but they also serve as a quick way to toggle a clip to stop playing if necessary.

4th To Do: Add 1-3 buffer rows between each song

The first scene/row of each track: The first row, to me, is the most important one. Over years of playing, I’ve settled on a super minimalist version of my live set where I play mostly loopy music with variations which really enforced the importance of the first row of the set.

The first row has various various roles:

  • It is the introduction of your song: It will be used in the transition from the previous track.
  • It is the core idea of your song: All sounds that are playing from beginning to end of your song should be placed here and remove everything below. In my case, the kick will be the same from beginning to end. The length of the kick will be 4 bars long and include variations. Some people like to add multiple clips underneath as variations to trigger, so that is always another option, but think that whatever remains the same throughout should be there.
  • Tension relief: If you noodle around, create an improvised breakdown or start removing sounds. You can use the right side play to then trigger all sounds at once to come back to the song’s full intensity and main idea. This point is very important if you think you’ll be exploring and improvising as you’ll need an anchor.

5th To Do: Make a solid core

Supplementary/following scenes: There are multiple ways to use the scenes that follow your initial introduction. To “play it safe” you could simply have each scene play as the track evolves. The good thing about this approach is that by having all scenes on hand, you can deconstruct the timeline of your song by playing them in different orders. My favourite way of doing this is to have variations of a scene, such as one line with hihats, one with none, one with two playing and a clap, etc, same for melodies. This way I can play variations but I can also trigger one entire line and have a “ready-to-go” new take. If you look at my live set screenshot above, you’ll also see that under one sample “Tommydrum”, I have the same clip three times using variations in timing or tweaks in the versions. I can toggle between them as I need them.

Last To Do: Plan your follow-up lines/scenes and decide what you use.

In the next post, we’ll discuss rehearsing, sound calibration and advanced clip settings!