Tag Archive for: vst

Creating a music sketch

In this post, I’d like to explain how making a music sketch can help you to stay on track when creating a song or track, much like how a painter creates an initial sketch of his/her subject. I’ve explained in previous posts that the traditional way of making music goes something like this:

  1. Record and assemble sounds to work from.
  2. Find your motif.
  3. Make and edit the arrangements.
  4. Mix.

Here we’re talking about a way of making music that was popularized in the 1960s and is still used frequently today. But what happens when you have the ability to do everything yourself, and from your computer alone? Can you successfully tackle all of these tasks simultaneously?

When I do workshops, process and workflow are generally questionable topics to address because everyone has different point of view and way of working. However, to me it always comes down to one thing—how productive and satisfied an artist is with his or her finished work. Satisfaction is pretty much the only thing that matters, but I often see people struggle with their workflow, mostly because they keep juggling between different stages of music-making and get lost in the process (sometimes even losing their original idea altogether). For example, an artist might start working with an initial idea, but then get lost in sound design, which then leads them to working on mixing, and then sooner or later the original idea doesn’t feel right anymore. For some people, perhaps its better to do things one at a time; the old before-the-personal-computer way still works. But what if breaking your workflow into distinct stages still doesn’t work? Is there another alternative approach?

In working with different artists and making music myself, I’ve come to a different approach: creating a music sketch—a take on the classic stage-based process I just mentioned. Recently, this approach has been giving me a lot of good results—I’d like to discuss it so you can try it yourself.

Sketching your songs and designs

I completed many drawing classes in college because I was studying art. If you observe a teacher or professional painter working, you’ll see that when they create a realistic painting of a subject, they’ll use a pencil first and sketch it out, doodling lines within a wire-frame to get an idea of where things are. Sketching is a good way to keep perspective in mind, and to get an idea of framing and composition. The same sketching process can be used in music-making.

When I have an idea, I like to sketch out a “ghost arrangement”. Sometimes I even sketch out some sound design. The trap a lot of people fall into when making a song—particularly in electronic music—is to strive to create a perfect loop right from the start. Some people get lost in the process easily which is, honestly, really not important. People work on a “perfect loop” endlessly in the early stages of making a song because when you are just starting a song, the loop will have no context and it will be much more difficult to create something satisfying. By quickly giving your loop a context through a sketch-type process by arranging or giving the project a bit more direction, you’ll hear what’s wrong or missing.

I’m of the belief that having something half-done as you’re working can be acceptable instead of constantly striving for perfection. I think this way because I know I’ll revisit a song many times, tweaking it a little more each time.

Sketching a song can be done by understanding at the beginning of the process that you’ll work through stages of music-making more quickly and roughly, knowing you’ll fix things later on. This is more in line with how life actually goes: we live our lives knowing some problems will get solved over time, and that there are many things we don’t know at a particular moment in time. In making music, some people become crazy control freaks, wanting to own every single detail, leading them down rabbit hole of perfectionist stagnation, in my opinion.

Creating a sketch in a project is simple. Since I work with a lot of sound design, I usually pick something that strikes a chord in me…awakens an emotion somehow. Since this will be my main idea, next I’ll try to decide how it will be use as a phrase in my song. In order to get that structured, I need to know how the main percussion will go, so I’ll drop-in a favourite kick (usually a plain 808) and a snare/clap. These two simple, percussive sounds are intentionally generic because I will swap them out during the mixing process. You want just a kick in there to have an idea of the rhythm, and the snare clarifies the swing/groove.

Why are the basic kick and snare swapped out later?

I swap out the snare and kick later because I find that I need my whole song to be really clear before I can decide on the exact tone of a kick. A kick can dramatically change the whole perspective of a song, depending on how it’s made. Same thing goes for a snare—it’s rare I’ll change the actual timing of the samples, but the sound itself pretty much always changes down the line.

For the rest of the percussion, I’ll sketch out a groove with random sounds that may or may not change later on, but I use sounds I know are not the core of my song.

With bass, I usually work the same way; I have notes that support the main idea but the design/tone of the bass itself has room to be tweaked later.

As for arrangements, when creating a music sketch I will make a general structure as to what goes where, when some sounds should start playing or end, and will have the conclusion roughly established.

Design and tweak

Tweaking is where magic happens—this is where, in fact, a lot of people usually start their music-writing process. Tweaking and designing is a phase where you clarify your main idea by creating context. I usually work around the middle part of the song; the heart of the idea, then work on the main idea’s sound design. I layer the main idea with details, add movement and velocity changes.

  • Layering can be done by duplicating the channel a few times and EQing the sub-channels differently. Group them and add a few empty channels where you can add more sounds at lower volume.
  • Movement can imply changes in the length of the sound’s duration (I recommend Gatekeeper for quick ideas), panning (PanShaper 2 is great), frequency filtering, and volume changes (Check mVibratoMB for great volume modulation). The other option is to add effects such as chorus, flanger, phaser, that modulate with a speed adjustment. Some really great modulators would be the mFlangerMB (because you can pick which frequency range to affect—I use this for high pitched sounds), chorus (mChorusMB) to open the mids, and phasers (Phasor Snapin) for short length sounds. Another precious tool is the LFO by XFER—basically you want the plugin to have a wet/dry option and keep it at a pretty low wet signal.
  • Groove/swing. This is something I usually do later—I find that adjusting it in the last stretch of sketching provides the best results. The compression might need to be tweaked a bit, but in general the groove becomes much easier to fix once everything is in place.
  • Manual automation. Engineers will tell you that the best compression is done by hand, and compressors are there for fast tweaks that you can’t do. Same for automation, I find that to be able to make your transition and movement using a MIDI controller is a really nice finishing touch that is perfect in this stage.

Basically, the rule of finalizing design is that whatever was there as a sketch has to be tweaked, one sound/channel at a time. Don’t leave anything unattended—this can manifest from a fear of “messing things up”.

When tweaking specific sounds from the original sketch, you should either swap out the original sound completely, or layer it somehow to polish it. I always recommend layering before swapping. I find that fat, thick samples are always the combination of 3 sounds, which make it sound rich. When I work on mixing or arrangements for my clients and I see the clap being a single, simple layer, I have to work on it much more using compression, sometimes doubling the sample itself, which in the end, gives it a new presence. Doubling a sound—or even tripling it—gives you a lot more options. For example, if you modulate the gain of only one of the doubles, you not only make the sound thicker but also give it movement and variation.

All this said, I would recommend making sure your arrangements are solid before spending a lot of time in design. Once you start designing, if your arrangements have a certain structure, you’ll be able to design your song and sounds specifically according to each section (eg. intro, middle, chorus, outro) which gives your song even more personality. Sound design completed after a good sketch can be very impactful when the conditions are right.

Try sketching your own song and let me know how it goes!

SEE ALSO : Creating Timeless Music

Synthesizer Basics

I’ve realized that using synths is a bit of an esoteric process for many (for me it definitely was for a while), so I’d like to share with you some synth basics. I used to read things online in-depth about synths, but didn’t feel like it was really helping me do what I wanted to exactly. Synths can create certain sounds, but the ability to shape these sounds into something you like is another task. When I dove in the modular rabbit hole, I felt like I needed to really grasp how to use them. After years of working with synths, presets have a actually provided me with many answers as to how things are made, and I’ve ended up learning more with presets than with tutorials. It’s probably useful for some to understand some basic concepts with regards to how to use synths in order to create lush or complex sounds, and in order to develop your own set of synth sounds. I’m not going to explain every synthesis concept, but I’ll cover some synth basics.

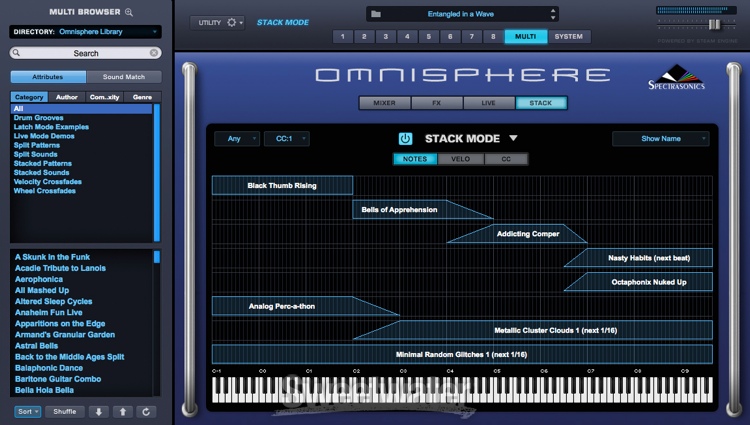
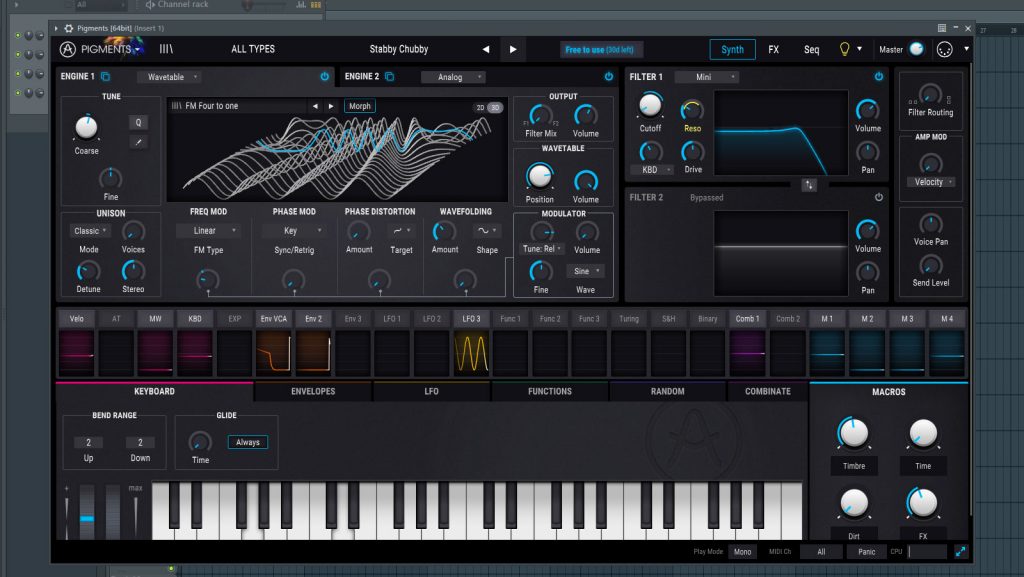
My personal go-to tools when I get to work with synths are Omnisphere, Pigments, and Ableton’s Operator. They all have different strengths and ways to work that I feel fulfill my needs. When people talk synths, they often discuss which ones are “best”, but I find that these three are pretty powerful, not only for the sounds they create, but for how they work. Speaking of workflow, if a synth doesn’t create something I like quickly, I usually get annoyed as I want to spend time making music and not just spend an hour designing a sound. In the case of these three, they all have several oscillators that can quickly be tweaked in a way you want.

Oscillators

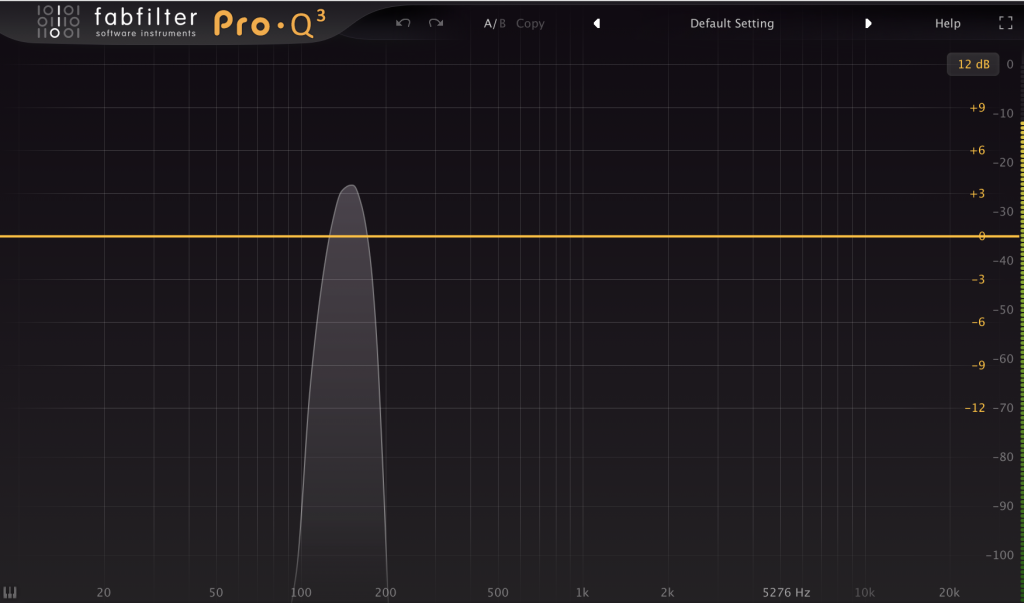
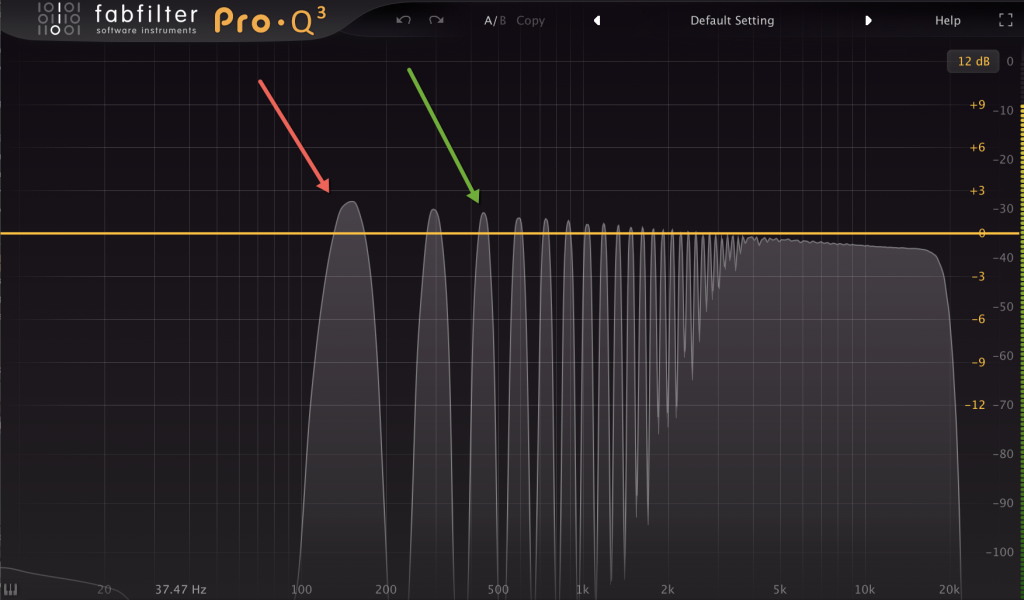
Imagine the oscillator as a voice (I’ll explain polyphony another time which is a slightly different topic). The oscillator can shape sounds in various ways by creating a waveform: sine, square, triangle, saw, etc. The waveform has certain characteristics and difference waveforms have more or fewer harmonics. If you play a note, you’ll first see that it will create a fundamental frequency (as in, the note played has its own frequency), followed by the harmonics. Sine waves, because of their simplicity, will have basically no harmonics, but a saw wave will have a lot.

The sine wave is a fundamental frequency and has no harmonics.
A saw wave is different. The red arrow shows the fundamental frequency, and the green, the harmonics.

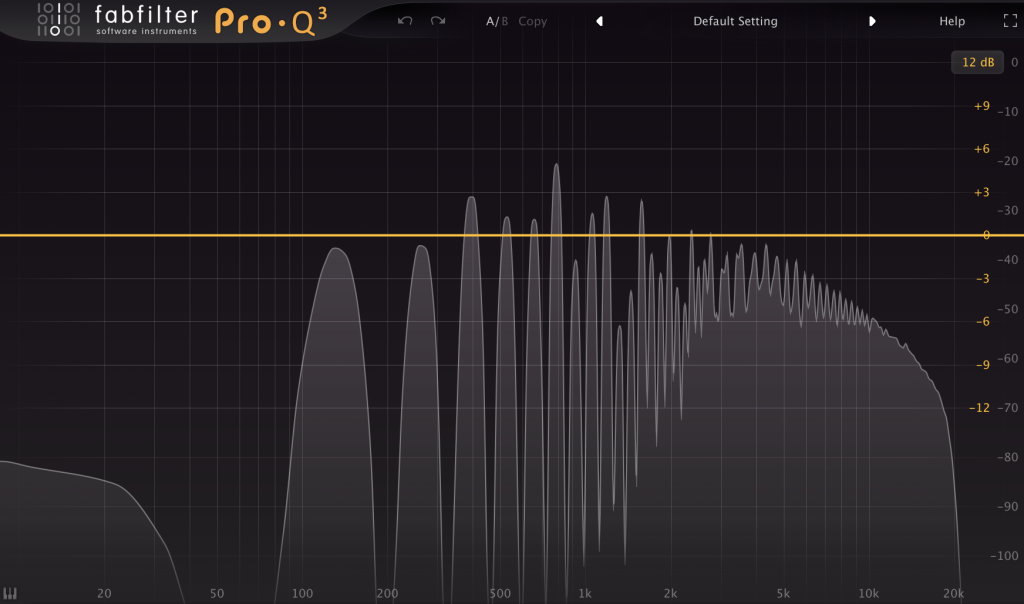
As you can see, sine and saw waves create different results, and you can combine them to create richer sounds. When there are more harmonics, the human ear tends to hear them as a sound that is richer, as it covers more frequencies (yes, this simple explanation for a more complex topic but I’ll leave for another time).

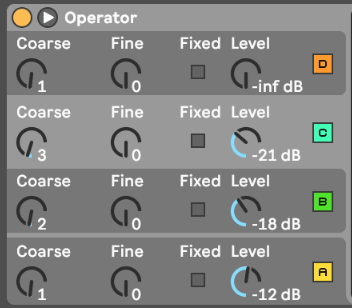
So what should you take away from this? Well, when you see a synth with multiple oscillators, realize that you can combine them in sound designing. One basic synth exercise I give to students is to start with one oscillator, like a sine wave, and then add a second one, pitched a bit higher (one octave) using a triangle wave, and use a 3rd oscillator that is a saw, pitched up again. If you play the same note, you’ll see the content is altered because the harmonics now interact to create new “sonic DNA”.

This simple starting point should pique your interest in exploring the combinations of different ways to set the oscillators in order to shape different sounds. Like I explained in past article, sounds are combinations of layers that create different outcomes; same goes for synths and oscillators. Synths are a rougher approach and it takes time at first to feel like you’re getting somewhere, but the more you practice, the better you get, and then you can event use a synth to bring richness to samples you layer. For example, I frequently use a low sub sine to give bottom to wimpy kick.

Envelopes

After deciding on the oscillator content of your synth, next comes shaping it. This is done with an envelope ADSR (Attack, Decay, Sustain, Release). The envelope tells your synth how to interact with the input MIDI notes you’re sending it. It waits for a note, and then depending on how the envelop is set, it will play the sound in a way that will shape both the amplitude (volume) and timing. For example, a fast attack means the sound will start playing as soon as the key is pressed, and a long release will let the sound continue playing for a little while after you release it. Each oscillator can have its own envelope, but you could have one general envelope as well. The use of envelopes is one of the best ways to give the impression of movement to a sound. I’m addicted to using the Max envelope patch and will assign it to a bunch of things on all my sounds, but I had to first learn how it worked by playing with it on a synth. While the envelope is modulating the amplitude, it can also be used to shape other characteristics too, such as the pitch.

Filters

You might already be familiar with filters as they’re built into DJ mixers; filters allow you to “remove” frequencies. In the case of a synth, what’s useful about filters is that most synths have filters that can be assigned by oscillator, or as a general way to “mold” all oscillators together. If you take a low pass filter, for example, and lower the frequency, you’ll see that you’ll smooth out the upper harmonics. In case of pads, it’s pretty common that multiple oscillators will be used to make a very rich sound but the filter is the key as you’ll want to dull out the result, making your pad less bright and defined.

LFOs

LFOs are modulators, and as you know, are one of my favorite tools. I use them on many things to add life and to give the impression of endless, non-repetitive changes. I’ll even sync them to a project and use them to accentuate or fix something. In most synths you can use LFOs to modulate one or multiple parameters, just like envelopes. What’s fun is to use a modulator to modulate another modulator; for example, I sometimes use LFOs to change the envelope, which helps give sounds different lengths for instance. Using LFOs on filters is also a good way to make variations in the presence of your harmonics, creating different textures.

Noise

One of the most misunderstood points in synthesis the use of noise. Noise is a good way to emulate an analog signal and to add warmth. One of the waveform types an oscillator can have is noise; white noise or other. You can add it in the high end or have it modulated by an envelope to track your keys. I like to keep noise waves very low in volume, and sometimes filter them a bit. But that said, I use a noise oscillator in every patch I design. Even a little bit of noise as a background layer can create a sense of fullness. If you record yourself with a microphone in an empty, quiet place, you’ll notice there’s always a bit of background noise. The human ear is used to noise and will be on the lookout for it. Hearing noise in a song or sound creates a certain sense of warmth.

Why do I love Omnisphere and Pigments?

Both Omnisphere and Pigments are very powerful for different reasons. Omnisphere is one of the most used software tools in the sound design industry, as well by composers who write film scores. Hans Zimmer is known to use it, among others. It has more oscillators that Operator, not just in quantity, but also in emulations of existing synths. Fore example, you could have your lower oscillator to be emulating a Juno, then add a Moog for the middle one and end up with an SH-101. I mean, even in real life, you can’t possibly do that unless you own all three of those synths, but even then it would be a bit of a mess to organize those all together. Plus, Omnisphere’s emulators sound true to the originals. If this isn’t convincing enough, Omnisphere also comes with a library of samples that you can use to layer on top of the oscillators, or import your own. Add one of the best granular synthesis modelers and you are set for endless possibilities.

Pigments by Arturia
Pigments by Arturia

Pigments is made by Arturia, and it was made with a very lovely graphical approach, where you have your modulators in the lower part of the UI and the sound frequencies in the upper part. You can then easily and quickly decide to add modulation to one parameter, then visually see it move. It’s one of those rare synths that has modulation at its core. This is why I love it; it provides me with numerous quick sounds resulting from deep or shallow exploration.

SEE ALSO : Using MIDI controllers in the studio

Tips to add movement and life to your songs

One of the most popular topics in music production is with regards to making music feel “alive” by creating movement in music. While I already covered this topic in a past article, I’ll focus today on tools you can use and some techniques you can also apply to create movement.

First, let’s classify movement into categories:

  • Modulation (slow, fast)
  • Automation (micro, macro)
  • Chaos
  • Saturation

One of the thing that makes modular synths very popular is the possibility of controlling and modulating many parameters the way you want, but the other aspect that makes it exciting is the analog aspect. You’ve probably seen and heard multiple debates about the analog vs digital thing and perhaps, what’s funny is, many feel they know what this is about but yet, can’t really figure it out.

Take, for example, something we all know well: a clock that shows time.

An analog clock is one with needles that are moved by an internal mechanism, making them move smoothly in harmony while time goes by. There’s a very, very preciseness to it where you can see the tiny moment between seconds.

The digital or numeric clock jumps from second to second, minute to minute, with the numbers increasing: there are no smooth, slowly incrementing needle that moves between numbers; they just jump.

Sound is pretty much the same in a way. Once it’s digitized, the computer analyzes the information using sample and bit rates for precision. The flow isn’t the same, but you need a really precise system and ear to spot the difference. Some people do but it’s very rare. This is why, in theory, there’s a difference between digital files and vinyl records.

One eye opener for me was that when I was shopping for modulars at the local store, I was talking with the store’s specialist who was passionate about sound. “The one thing I don’t like about samples is, the sound is frozen and dead”, he said. With modular synths, because there’s often an analog component, the sound, on a microscopic level, is never the same twice.

This is why using samples and playing with digital tools on your DAW, needs a bit of magic to bring it all to life.

Modulation

By modulation, we’re referring to tools that move parameters for you, based on how you have configured them. The two main modulators you can use are:

  • LFOs: As in Low Frequency Oscillators. These will emit a frequency in a given shape (ex. sine, triangular, square, etc.), and a certain speed. They can be synced to your song’s tempo or not. LFOs are often included in synths but you can also find once instances in the Max for live patches.
  • Envelopes: Envelopes react to incoming signal and then will be shaped in how you want. Compressors, as we discussed recently, kinda work with an envelop principle.

There are multiple aspects of a sound you can modulate. While there are numerous tools out there to help you with that, it’s good to know that there are a few things you can do within your DAW. The main things you can modulate are:

  • Amplitude (gain, volume): Leaving the level of a sound to the same position for a whole track is very static. While there’s nothing wrong with that, it’s means that the sound is lacking dynamics.
  • Stereo position (panning): Sounds can move from left to right if you automate the panning or use a autopanner.
  • Distance (far, close): This is a great thing to automate. You can make sounds go further away by high passing, filtering to higher frequencies. Combined with the volume, it really push the sound away.
  • Depth (reverb): Adding reverb is a great way to add space and if you modulate, it makes things very alive.
  • Sound’s length (ADSR, gating): If you listen to drummers, they’ll hit their percussion so that the length constantly changes. This can be done by modulating a sampler’s ADSR envelope.
  • Filtering: A filter’s frequency and resonance changing position as the song changes offers a very ear pleasing effect.

Some effects that are modulating tools you already know are chorus, flanger, autopan, phaser, and reverb. They all play with the panning and also depth. Adding more than 2-3 instances in a song can cause issues so this is why it’s good to approach each channels individually.

My suggestion: Have one LFO and one envelope on every channel and map them to something: EQ, filter, panning, gain, etc.

Some amazing modulators that offer really good all in one options that you might really enjoy (as I do for quick fix on a boring stem):

QuatroMod

LFO Tool by XFER Records

ShaperBox by Cableguys – My go to to really bring sound to life.

Movement by Output  – This one is stellar and really can make things feel messy if pushed too far but the potential is bonkers. You instantly turn anything into a living texture that is never boring.

AUtomation

Automation is what you draw in your DAW that allows you to make a quick-moving or long-evolving effect. You might already know this but you’d be surprised to know that it is too often, under used. How can you know this though?

I have my own set of rules and here are some:

  • Each channel must at least have one long, evolving movement. I’m allergic to straight lines and will sometimes slightly shift points to have them have smallest slant. My go: amplitude, EQ or filters.
  • In a drop down list of each potential parameters, I want to have at least 3 things moving.
  • Each channels, must have at least 3 quick, unique, fast change.
  • Include at least 3-5 recorded live tweaks. I like to take a midi controller and map certain parameters and then play with the knobs, faders. I record the movements and then I can edit them wherever I want in the song. This human touch really makes something special.

While working with automation, one thing I love is to use Max for live patches that create variations, record them as automation and then edit them. It’s like having an assistant. There are great options to chose from but my favorites would be:

Chaos

By “chaos” I mean using random generators. They would fit under the umbrella of modulators but I like to put them in their own world. There are multiple uses of generators. You can take any LFO and switch them to a signal that is random to make sure there’s always a variable that changes. This is particularly useful with amplitude, filtering. It really adds life. You can also use the random module in the MIDI tools to add some life. Same with the use of humanizer on a midi channel. Both will make sure the notes are changing a little, all the time.

Saturation

If we think of the earlier example of how analog gear is constantly moving, using a saturator is a good way to bend perception. We previously discussed saturators in an earlier post but we didn’t talk of a super useful tool named Channel strip which often has an analog feel included. It remains transparent but it does something to the signal that is moving it away from a sterile digital feel.

My favorite channel strips would be:

The Virtual Mix rack by Slate Digital. Raw power.

McDSP Analog channel

Slam Pro


SEE ALSO : Getting feedback on your music

Tips for compression: The Multi-band compressor (Pt. 2)

Continuing with more compression tips, I’d like to discuss of my all time favorite tool for anything and everything: the multi-band compressor. For many, this beast is a bit of a difficult tool to tame, but I’d like to break it down for you so you can include it in any of your routine and needs. In order to continue, I hope you’ve first read the first post about compression, and also the two posts about how to use EQs.

Compression guidelines

Common Use-Cases for Compression

Controlling harshness. Using a compressor, you can set the attack to be fast and the release to also be pretty fast. This makes the whole action of the compressor fast, controlling any aggressive sounds and taming them. If the attack is too fast however, it can distort, so you need to juggle with the settings to find your sweet spot.

To add punch. This is the opposite of harshness. You’ll want the attack to be slow and the release to be fast. The compressor won’t jump on the transient immediately but will instead create some snappiness. The ratio should be around 5:1 or even higher to achieve this effect in most situations.

To add thickness. Using your compressor in parallel mode, you can set it to about 50% wet/dry, then compress with a medium attack and a medium-fast release. I’d make sure the ratio is as high as possible too. If your compressor doesn’t have a parallel option, then you can use the compressor in a AUX/Send bus.

To glue together a mix. Very similar to thickness and punch, you’ll want to add this to multiple channels and busses at once. Again, parallel compression, slow attack, high ratio. That should do it. Experiment with exaggerated effects and then tone it down.

To sum it up, a fast attack makes the compressor react quickly, which means it is there to control something. A slow attack is to enhance the beginning of the sound. The ratio is how much of that effect you want in action, and the release is for how long.

Multiband action

The multi-band compressor works exactly as the use-cases explained above, but with a multi-band compressor, we can set a range of frequencies to be affected. Therefore, you can set thickness in the mids, control the high-mids for harshness, and enhance the high’s transients with a single compressor, but with different settings for each section.

The multi-band compressor has an additional feature: the use of crossovers that set points for where each section starts and ends. A crossover is simply a frequency you set. For instance, Ableton’s 3-band multi band will have 2 of crossover frequencies. You set the lower crossover which will set where the low end ends in the mids (ex. 200hz) and the other crossover will be where the mids end and the highs start (ex. 6khz).

My perspective on multi-band compressors is that I use them like a shelving EQ where I control each section’s aesthetics in a different way. You can then shape the tone of a sound or mix, or extract minute details. Ideal for finishing touches, multi-band compression can also be used to bring forward parts of your sounds in the most effective way.

Now, here are some situations where the effects of multi-band compression can be useful:

  • Wimpy percussion: If your percussion needs presence, thickness and power, set your crossovers so you can control what’s happening between 200hz and 800, then up to 3khz. Beef up the first section with slow attack and high ratio and aim to add punch up there (refer to the notes above regarding how to do this).
  • Pale pad: Again, say a weak pad needs presence, beefiness between 250 and 600 hz. I’d also compress between 4 and 8khz to add some shimmering, which is like adding thickness. You could even lower your section to hit all the way down to 90hz to get some analog feel.
  • Crazy swirl: Sometimes transitional effects are great but can be not appropriate for your song. I like to control the highs over 7khz in a way were they don’t hit aggressively but will have the mids over 1khz enter smoothly. This is a way to control the harshness and presence; often very useful to create wobble, rubbery movement.
  • Dull mix: A dull mix usually needs brightness which can be created by stimulating the highs and mid highs. This can be a combination of adding thickness or stimulating the transients. I’d say try sharp sections around 4khz to 8, then another one until 11khz and even compress above that with a 3rd section to create what we call pixie dust.
  • Stellar reverb: A multi band with a reverb is pack of fun for me! I like to beef up the mids above 300hz and also create thickness between 2khz to 6. You can then control the levels to decide on the tone of the space you’re creating for your song.
  • Deep kick design: Compress a section under 50hz and then another until 120, plus a last one that goes all the way to 500hz. I can guarantee you that if you have the lower sub purring, then you can also add a bit of punch around the mids to have a super deep, but punchy kick.

When it comes to my favorite multi-band compressors, here are some of them:

Neutron 2 (Izotope)

General tool for mixing that makes pretty much the best all around assistant to deal with numerous problems. Transient shaper, exciters, gate, compressors and all of them are in multi-band mode. You can’t get better than that.

Drawmer 1973 (Softubes)

The Drawmer compressor is amazing for creating ambient so imagine if you can set it in multi band mode, then you get awe dropping moments.

Fabfilter Pro-MB (Fabfilter)

Elegant, precise and transparent would be the best way to describe this one. Really useful for the finishing touch of your mixdown.


SEE ALSO : The EQ and compression combo (Pt. 3)

Tips and recommendations for compression (Pt. 1)

After two important posts on EQs, it’s time to start discussing how to use compression, as these two work so well hand-in-hand, and I’ll offer my own recommendations on some of the best compression VST plugins. Your own selection of VSTs should always start with a few of these two categories:

For EQs:

  1. One Parametric EQ for surgical needs.
  2. One Shelving EQ for toning.
  3. One analog based EQ for coloring.

For compression, there are also several choices and it’s easy to get lost, so one of the things I find important to start with is to explain the different families of compressors (more suitable to relate them to as models).

FET

This type of compressor is one of the most popular out there. It’s known for its aggression and for its use of adding tons of punch to sounds, mixes, with a lot of attitude. The FET compressor, which means Field Effect Transistor, appeared later in the history of compressors, when they switched the tubes for to a model that helped make sounds warmer and richer; it became an instant favorite in studios. The 1176 is one compressor that became one of the most popular models in studios.

Use: Amazing punch on percussion and add life on textures, pads.

Recommended plugins:

FET Compressor (Softube)

FETpressor (PSP)

Black Limiting 76 (IkMultimedia)

Opto

This type is pretty much the opposite of the FET (although there are people who will argue about this). The Opto model is smooth and super warm. Not idea for percussion but I do use it in parallel (see techniques below), which can give beef to a kick, for instance. The way this model works is very interesting. It’s basically a lamp that reacts to the incoming sound and will light up depending of the incoming signal. I’m not the best at explaining this, but that pretty much sums it up,  and this makes the Opto compressor not the most aggressive, as it offers smoothness.

Use: Ideal for pads, synths, textures and I would recommend you experiment it with percussion, but in parallel mode.

Notable suggestions for VST:

Bx_Opto (Brainworx)

Opto compressor (IKMultimedia)

Renaissance Compressor by Waves also offers an Opto mode.

VariMu

VariMu is like the prince of compressors because it has finesse and elegance. Manley popularized the VariMu with their famous version of it. It is a cousin of the Opto in the way it works, and is also very smooth. Often used in mastering, it works like a charm to handle punch problems or to keep coherence in a mix that needs general glue to it. It’s not the best to create punch and this is why, but when used in pair with another compressor, it can really create beautiful results.

Use: On your mix or on a group. It will glue it all together in the most luscious way.

Suggestions of plugins:

The Manley Compressor from UAD

MJUC by Klanghelm

DynaMU by IKMultimedia

VCA

This type of compressor is also very popular just like the FET. I’d say that most generic compressors are often based on that model. Since it’s based on voltage control, this compressor is a surgical type of tool. It is really effective to produce snappiness to percussion but it can also be used to control harsh transients.

Use: Smack those kicks with it and control the transients of hats with another setting.

My favorites:

TDR Kotelnikov

U-He Presswerk

API 2500 (There are a few imitations from UAD and Waves, so check it out)

Techniques

You may have the best plugins but if you don’t know how to use them, you’ll miss the full potential of these amazing tools. I’d say that if you don’t, please know that a large number of producers out there, even experienced ones, struggle to fully understand them. So while you will find so many tutorials out there, I’d like to explain you my simple vision.

But first, let me explain what compression does. It takes the incoming sound and monitors the loudest peak and checks if it is louder than a certain point: the threshold. If that’s the case, it will push down the signal above the threshold, down. I like to picture it as when you sit in a bath, where the water rise as you sit in it. The way a compressor “pushes down” the audio will be controlled by the attack (how fast it reacts), release (for how long) and ratio (how much).

I’d like to compare a compressor to an oven and the incoming music as the dough. The compressor doesn’t work like, let’s say a reverb where if you put it on a sound, you’ll automatically hear what’s being altered. How compressor VSTs work are really, to me, like a oven. You need to bring in the sound, cook it, then push it out.

So, use these parameters when dealing with compression:

  1. Incoming signal. You’ll need to raise the volume of the incoming signal to make sure it meets or is above the threshold. If the signal is too low, it won’t be processed.
  2. Threshold. Lower it down if needed. You’ll see that most compressors have a “GR” for gain reduction meter. This will start to pump as the signal meets the threshold. If nothing happens, lower down the threshold and or boost the incoming signal.
  3. Attack/release. A fast attack will make the pumping start react quickly while a slow one will be less aggressive. You can then adjust the release to control for how long the pumping will last.
  4. Ratio. This is how much will be pushed down. For instance, a 2:1 ratio means that for 2dB over the threshold, it will be turned down by 1dB over the threshold. Eg. 8:1 is a more aggressive result.
  5. Make-up gain/Output. Your output signal will be turned down in the process so you can use the make-up gain to adjust the processed signal to match or be louder than the incoming signal.

So yeah, it sounds weird on paper, but compression is about lowering the volume to make things louder.

Regarding my analogy with the bread, you need to make sure it bakes (gets compressed) before pushing it out.

Now, the techniques you can use compression for:

  1. Limiting. This is the most known use of a compressor. It is a way of making sure the sound never goes above a certain level. Ideal on a master bus to avoid clipping. You can use it to a certain extent on busses to maximize the volume. But make sure it’s not too much as it can then distort in mastering.
  2. Side-chain, ducking. Popular in electronic music, this makes the compression work based on an incoming signal. I’ll get back to this in a future post.
  3. Parallel compression. To do this, you need to put the compression in an AUX/Send bus and then send whatever needs compression to it. This ensure the original signal is mixed with the compressed one, adding power, loudness, precision.
  4. Serial compression. To be used with care, but has very powerful results. This is about putting two (or more) compressors back to back. One can be in parallel (thanks to a wet/dry) and the second one, not. This makes sounds really powerful, punchy, fat. Ideal on sounds that are wimpy and pale.

That’s it for the basics of compression! I’ll discuss the art of sound design using compression and EQs next.


SEE ALSO : Tips for compression: The Multi-band compressor (Pt. 2)

Tips on how to pick your EQs and use them (Pt. I)

People often ask me about my opinions on what the best audio plugins are, and there are no doubts that investing in quality EQs and compressors is one of the most important things you can do for both sound design or mixing. You can do pretty amazing things just with EQ and compression, but of course you need to understand your tools to make the best of them. In this post I propose some exercises and tips, as well as covering the main tools I have gathered through the last years and my thoughts on the best EQ plugins.

Types of Equalizers

There are many types of EQs and I believe some are more important than others. It took me a while to understand how to fully use them all and how to select the right one for specific situations. This subject is actually so vast and complex, I could make a series of multiple posts and I wouldn’t get through it. I’ll try to avoid being too technical and will explain them in simple terms so anyone can understand.

The way I approach EQs are based on different actions:

  • Corrective. Sometimes a sound will have part of it that will feel aggressive and annoying. I will do corrective by spotting where where it looks like it’s an issue and then cut. Corrective cuts are usually not too narrow (Ex. Q of 3)
  • Surgical. A resonance in a sound makes your ears hurt and that will need a very narrow cut. (Q of 6-8+).
  • Tonal adjustments. An EQ can be used to make tonal changes such as deciding if you want your track more beefy or more light by either boosting lows or highs.
  • Coloring. Some EQs aren’t transparent and will have a musical touch to the changes it makes. This will add some personality.
  • Valley cuts. The opposite of surgical, where the Q will be make the curve really wide. It makes very subtle changes, somewhat tonal, a bit colored and sometimes a bit corrective. Try it at different points on a sound and see it change without being able to really know what’s happening.

TIP: The human ear will hear a noticeable difference if you cut 3-4dB minimum. If you cut 6dB, it will be quite obvious.

The main types of EQ plugin categories are:

  • Graphic/Fixed Frequencies. Influenced by older models and the first EQ, the frequencies you’d have access to are fixed and won’t be changed. In many of those models, the frequencies are based per octaves but certain companies will have their own way of deciding which ones are used.
  • Parametric. One EQ that is very popular is the Q2 by Fabfilter which allows you to drop a point anywhere and then be able to shape how narrow you want to cut or boost.
  • Shelving/Band. This is a part of the spectrum that will be affected. For example, on DJ mixers, the 3-4 EQ buttons are basically shelves of frequencies that are altered.
  • Dynamic. This one is advanced. You can “order” a point of your EQ to react depending of certain conditions. For example, if you have a recording of a drum, you can order the highs to lower down by 3-4dB if the cymbals hit too loud. Very practical!

TIP: If you love the sound of analog, you might want to dig in Universal Audio’s suite that does emulation of classic pieces of gear. The fidelity of replication is absolutely mind boggling!

Now let’s make some associations regarding which EQ does what:

  • Surgical and valley cuts are mostly done with parametric EQs. This type of EQ will allow you to precisely identify the rogue frequencies and then cut or boost, in the way you want.
  • Corrective EQ can also be done with parametric but with graphical ones too. Sometimes a correction needs precision but sometimes, it can just be a way to realign the curve of the sound which a graphical EQ can do easily.
  • Tonal adjustments. This is done with shelving and band EQ.
  • Coloring. This is basically fixed frequencies, but if you look for analog emulation or EQs that provide a type of saturation, then you’ll also get some coloring and personality.

My favorite EQ plugins

Here are my thoughts on the best EQ plugins  that are precious tools to have in your arsenal. I’ve also included low budget EQs alternatives that are similar.

1. Fabfilter ProQ2 (Surgical, Valley cuts, Corrective, Tonal)

This plugin seems to have found it’s way in many producer’s tool kit mostly because it can pretty much do it all. From complex curves, mastering touch-ups to shelving tones and copying the frequency of a sound to apply it to another… the ways you can use this beast are so numerous that you’ll have to watch a bunch of tutorials to get all the hidden things it can do.

Budget Alternative: TDR Nova GE by Tokyo Dawn

2. Electra by Kush Audio (Shelving EQ, analog replica)

Not so known by the masses but this EQ is an absolute wonder to have on hand. I use it in every single mixes I do and the results are always amazing. A bit of a learning curve to understand as the GUI is a bit weird but even if you’re not sure of what you’re doing, it shapes the sound in a way that makes it pop out and warms it too.

Budget Alternative: RetroQ by PSP

3. BX_Hybrid V2 by Brainworx (Corrective, shelving)

I don’t think there’s any plugin that can do what this can do in terms of results. Not as versatile as the ProQ2 but where this one stands out is for how buttery it cuts in the sound, smoothing things out. When I have people studying mixing with me, I would always require them to buy this one as the very first EQ to have and use.

Budget Alternative: Voxengo Prime EQ

4. Passive EQ by Native Instruments (Shelving, correction, color)

This emulation of the famous Manley Massive-Passive EQ is a bomb EQ. I love to place it on a bus of all my melodic content and then smoothly shape it into something that magically turns organic and warm. It requires a bit of exploration but when you get your hands around it, you’ll always want to use it. I find it quite powerful for sound design as a way to warm up the lows.

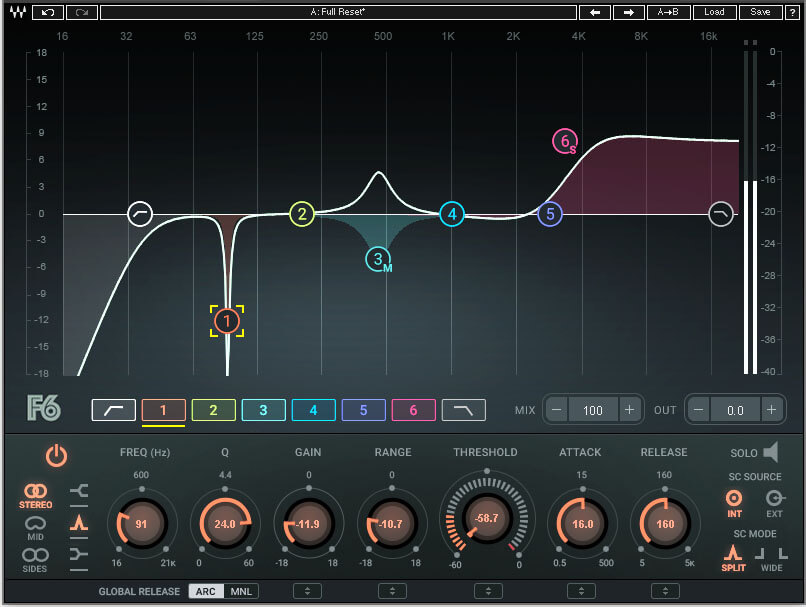
5. F6 Floating band dynamic EQ by Waves.

I’m not a big fan of Waves as well as their aggressive tactics for selling but this plugin is a really useful one to have. As described above, with a dynamic EQ, you can tame some frequencies that are randomly happening. The problem with a static EQ is, you’ll be cutting permanently a frequency so if what you’re trying to cut isn’t always there, you might cut something that doesn’t need adjustment. This is why you can have more control with a dynamic EQ. This one is also really easy to use if you’re familiar with the concept and the fact that you can use it in MS makes it really versatile. Not as easy and fancy looking as Fabfilter’s but it does more, in other ways. Wait for the price to fall but you might get it fro either 29$ to 49$ if you’re patient enough.

In the next post, I will go more in detail with my favorite plugins and will also explain certain ways, in details, for how to get the most of them.


SEE ALSO :

The best EQ plugins and various EQ’ing tips (Pt. II) 

My Music Production Methodology Pt. III: Depth and spatial shaping tips

This post about music production methods is an important one. In the group I work with on Facebook, I give feedback to people and I’d say that while for many, the part they strugg le with the most is to nail down a proper mixdown, and for the majority there are issues with the stereo field. I have a bunch of tricks that can help turn a 2D pattern into a 3D realm to get lost in. Let’s start by discussing a few things regarding making music 2D, and then how you can slowly shape it.

One thing that is essential for music to sound clear, loud, and powerful in a club is to have the majority of your sounds “in mono”, or in engineering terms, to have your mids solid. This is why many people will tell that doing a mono test on your mix to see if everything is heard is a good way to know. Why? Because if the sounds are moved randomly around, they might phase with others, which will end up cancelling out once in mono.

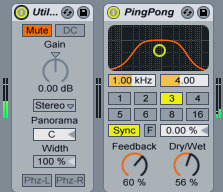
While this might sound like voodoo magic if you make music as a hobby, you can drop a tool into your DAW to make the signal mono so you can check. (hint: in Ableton Live, it is the Utility effect that will let you do that)

Ableton’s Utility tool

This is why you want your low end (under 100hz) to be in mono; to make sure there are no conflicts and that it will be sounding fat and strong. Again, in Ableton Live 10, you can activate the “Mono bass” option on the Utility tool.

Why I’m saying this is clear and simple: depth is a fun thing to have on your music but if you go too crazy with it, it might end up being a problem. So, first and foremost, when you program your patterns and music, try starting in mono. Make sure everything is heard and clear.

Once you have created the arrangements and are pretty much done but before you get to mixing, start spreading your sounds around to occupy the space in front of you. You don’t want to have everything in the middle, it will feel narrow and lifeless. There are multiple ways to get this done and it goes a bit beyond than simple panning which might be a bit boring. (Note: many mixes I get have everything in mono!)

Tips to give your mix more space

Mid/Side is a great way to use space in a mix, but is often misunderstood.

Here are a few tips to give you mix space and life, and if you google this topic, you’ll find multiple others too:

  • If the sound/sample is in mono: Try doubling it by duplicating the channel a few times, then pan and experiment. In pop, soul, R&B, the producers often do that and have up to 4 duplicates, spread around and or pitched to different tones to give sounds textures. You can use a VST Doubler to do the same but there’s something exciting about doing it manually. Keep in mind, a clap is actually 4 layers and so on for your percussion. Try to create something wild.
  • Panning around your sounds can do but it will feel bland if you don’t couple it with a quality reverb. Even at very low levels, a reverb will create space around the panned sound. This is why I group percussion into families (ex. all organic, all metals, all wood, etc) then have a reverb per family, not per sound.
  • Use stereo effects: These will be super useful to help things around and for instance an auto-pan will help give life and movement. These include: chorus, delay, phase, flanger and wideners (of course). These should be applied to a sound, not a family. Only one of these effects per song to avoid issues.
  • Quality reverbs: as described above, a quality reverb is a game changer. Stock plugins are never as good as a whole team that work on making something special. For instance, all the plugins from Valhalla are now recognized as some of the best in the industry and for a reason, they sound just as good as some hardware units. Tip Top who make modular synths has licensed their reverb for their z-Dsp 2. If you can, always go for convolution reverb for your music and use only one, in a AUX/Send. So if you really a 3D sounding song, keep in mind that a reverb will do 80% of the job. The rest is about lowering the volume of certain sounds to give the impression they’re further away. Also, filtering out the low can give that impression. Mixed with a quality reverb, you will have a lovely space.
  • MID/Side: This is one of the most misunderstood aspects of mixing because it’s hard to really understand it. Keep it simple, this term refers to how your space is shaped as what you have in front of you is the mid and the sides are located where are the speakers/monitors are. If you misuse the sides too much, it will make your music phase (you’ll hear it in the mono-check). But it’s really interesting to play with the Mid/Side (Aka MS) of your groups to open them, a bit.

Last tip: Low end should always be in mono and I usually make sure that some part of the melody is also, while it can partly be spread around. The main hihat and percussion should also be strong in the mid but then you can have support sound of the same family be spread around to give room.

 SEE ALSO :   The “sous-chef” experience