The best EQ plugins and various EQ’ing tips (Pt. II)
In my previous post regarding the best EQ plugins, I covered some of my favorite EQs and some of their uses. After receiving many compliments about that post, I’ve decided to continue with a part two. In the following post, I’ll share a few tricks with you that you can easily do yourself when facing certain mixing situations, and I’ll also briefly outline compression.
Filters
In case you didn’t already know, EQs are filters; really complex mathematics which each developer has coded in more or less slightly different formulas. This explains why some EQs are really expensive: because of the time invested in perfecting the curves. Many people don’t realize it, but EQs do sound different from one another and you can tell once you have a high quality sound system.
“Most people don’t have a high quality system, so what’s the point…”, you say.
Well, if you use high quality tools, in the end, your regular sounds will be “upgraded” in quality too, which will eventually make a difference where ever you play them.
The number one tip for a better mix is to use filters; this alone can make dramatic improvements.
For instance, your kicks might sound muddy if you don’t remove the garbage frequencies that are below the fundamental note of it. If this sounds complicated, let me explain it in the most simple terms:
- Use your EQ and the first point on the left should be switched to filter, then low cut.
- The slope should be put to 24db/octave.
- Then roll it to 20hz to start with and then go up frequencies until you hear your kick losing power. If that happens, you’re now filtering too high and you have to roll back a bit.
- My general rule is to cut kicks at 20hz by default.
Now that tip was for kicks alone, but you should apply this idea to basically everything in your mix. However, besides the kick, I wouldn’t use a slope of 24db/octave on anything else unless there are big issues. It’s up to you to experiment but if you want to test something interesting, try 18 or 12 for cutting other sounds and you’ll see that this leaves less of a digital feel, giving your sounds clarity and warmth.
I’d also cut the highs where they’re not needed, but not too much either.
Percussion, melodies, and high pitched sounds such as hi-hats would benefit from a 6db/octave, high cut filter; this smooths things in a lovely way.
Some of my favorite filters for this kind of use are:
PSP MasterQ2: Smooth!
Sharp cuts
Surgical, sharp and static cuts are very useful for a ringing resonance. Many people ask how to spot it these and how to know if it’s really something to cut or if the it’s something to do with the acoustic of the room. There’s no real way to know but to often cross validate with reference tracks.
So often, I get clients sending me a project in Ableton and I see really odd cuts. Is that bad?
Yes and no.
First off, if you use Ableton’s native EQ, switch it immediately to oversampling mode for better quality.
Second, cutting might change something in your environment but you’ll also permanently cut frequencies that might not be needed to change, which could also potentially induce phasing issues (i.e. during the entire length of the song).
*Note – do not use too many EQs in one chain because that will definitely cause phasing!
So, how do you spot one rogue frequency?
Sometimes I just use a spectrum meter to get hints if I can’t pinpoint where it is. Try to always use a spectrum meter on your master to have an overall indication of your mix. If you see some sounds that start to poke above 0dB, this *might* be a problem; not always, but it could. What you want to look for is one thin spike coming up out loud about +3-6dB. This might really be an issue.
My instinct would be to try to lower the volume of the sound itself if that’s possible. Sometimes it’s not and that’s when you use an EQ.
- Isolate the sound in the appropriate channel.
- Drop your EQ of choice (see below for suggestions).
- Pick an EQ point, set it to the frequency you spotted, then adjust the Q to 3-4. Cut 4dB to start with, but more if needed.
- On the EQ, there should be a output gain. If you have cut that frequency away, it might be great to just increase the gain by about the half of what you have cut away. Ideally I like to compress but we’ll get into that later.
TIP: Avoid sharp cuts in the low end. That can cause issues such as phasing, muddiness. If you really have to, make sure to use a mono-utility after.
I revealed some of my favorite EQ plugins in the first post in this series, but I’ll add some more:
Cambridge EQ by Universal Audio: Works amazing on synths and melodies.
Voxengo CurveEQ: Solid on percussive content.
Valley cuts, boosts, and shelving
Many readings on the subject of EQ’ing only will recommend that if you need to boost, go moderate and try to have a very low Q to have an open curve. However, there are really no rules on what you should or shouldn’t do. Explore, fail, and be audacious, because sometimes great things come out of it.
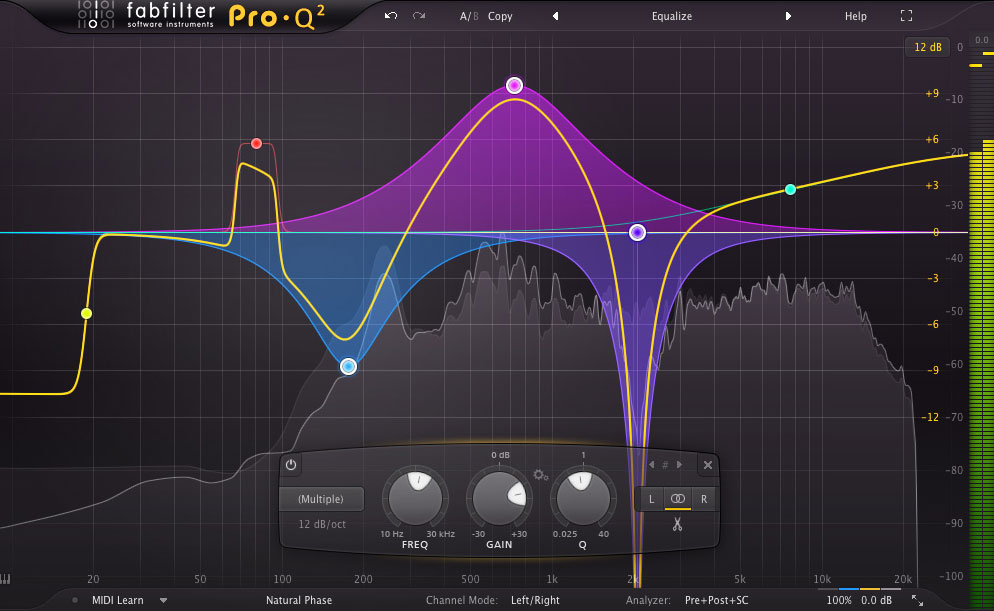
My only red flag would be on those really complicated, several points EQ curves you can do in Fabfilter ProQ2. This sometimes induce weird resonances when you’ll bounce, which is no good for mastering unless you are OK with annoying people’s ears.
Also, think differently. If you’re going to use 3-5 points that are all boosting, then why not start by turning up the gain on your EQ’s output and cut down whatever you don’t want.
But if you boost, I like to have a Q below 1. It gives really interesting results!
- For instance, try to boost 2-3db at 500hz to instantly give presence and body to a song.
- Try it at 8khz to add a lush, bright presence to metallic percussion.
- Boost at 1khz on your snare to make them pop out of your mix.
Experiment like this. At first it will appear subtle but with practice, great results will come.
My favorites of the moment:
Sie-Q by SoundToys for really doing beautiful shelving.
MEqualizer by MeldaProduction.
SEE ALSO :


Leave a Reply
Want to join the discussion?Feel free to contribute!