Deleting all yours tracks and selling your gear.

Since the very beginning, I can remember many times I’ve questioned my abilities as a music producer. Feeling stuck on a project or coping with negative feedback from a track I was proud of left me wondering if I was starring down the path of a musical dead end. Sometimes it doesn’t take much to consider unplugging, and putting it all away for good. Several colleagues of mine have similar stories, and more than once I’ve seen someone debate deleting all their tracks and selling all their gear.

High highs and low lows. There is a wealth of research which supports the fact that making music can produce a massive dose of satisfaction, a high similar to the effect of drugs or the rush of an intense workout. The thrill after completing a track is huge, yet on the flip side when things aren’t working out the low can often be depressing. At times it can feel like you’re living in a constant state of low-grade misery. Our perspective often governs our moods, and with just a twist our outlook can turn from sour to super very quickly.

I’ve spent a lot of time reading comments within Facebook groups from people flirting with the idea of selling their gear and calling it quits. On the digital side, I hear people talk about deleting entire hard drives filled with a rough version of tracks, and I think about the hard work and time they’ve invested in projects that will never be completed. They feel the work is simply not worth the effort. So often the feeling of excitement and energy from listening back to our next best track can be replaced by frustration and self-doubt when seeing it stored away in the unfinished bin. Another great idea that stays just that, and idea – incomplete, unheard. Back to the drawing board. Again.

A personal rule of mine is never to delete any project or sample. I just won’t do it. 0% chance.

I believe the main enemies that alter our judgment are overexposure and adverse reaction. If I am working on a project that just isn’t happening, I remind myself to simply store it away and come back to it after a time has passed. Once re-opened and listened to with a new perspective, you’ll likely find something that inspires you, or at the very least – something you can work off of right away. As artists, we are always changing. The artist you’ll be a year from now might like or dislike what you’re producing right now. By keeping your unfinished projects somewhere safe, you are investing in your time and talent for tomorrow rather than throw away what you’re frustrated with today.

Tip: This might feel silly but if you don’t feel good about music, try simply saying:”For the moment, I don’t feel like making music.” Insist on “for the moment“, because it takes away the idea that your mindset is permanent.

In past posts I’ve talked at length about the benefit of planting seeds, creating a master project where all your ideas can be grabbed from and used as a springboard to something great with minimal effort. The benefits of having a library of sounds and tools custom-made, ready at a moments notice, is huge because momentum is critical to completing your tracks.

One thing that’s common is the search for old gear to achieve a particular sound. At some point, it’s natural to feel like you’ve outgrown your equipment and you’re sure that buying new (old) gear will solve the problem. We are constantly being tempted with new products and tools that promise to solve our problems and make everything that much easier. Even after buying new gear we sometimes don’t take time to truly audition them. How often do we ask ourselves what it is we truly need to fix? Can gear solve this? The hype and marketing work for sure, yet without fail the next time we turn around there is yet another must-have tool we’re after, because this one…. man this one, is going to make the difference.

Tip: Some gear can be rented. If you can test drive what you want, that can be really useful.

Take a minute to reflect what your goals are before making another investment.

To truly move on as a producer the best personal investment I can think of is to simply finish something, anything. I believe deleting your tracks reinforces your inability to finish what you started, and doesn’t bring anything good. You certainly aren’t farther ahead as a producer, and you’ll never have anything to show without completing your projects.

Take a moment to look at your progress or lack thereof. Where do you get stuck? Where does it come to and end? Is your sound design weak, do you break apart while arranging it? Find your weakness and draw a circle around it with a big, red, pen. That is your problem area. This is the tough part for you. This is where you give up and call it quits. Nothing you can buy is going to fix this for you. The good part is that now you know where you break down you can learn ways to improve on it.

Youtube. Thank the Lord. Whatever you are looking for I promise there will be a video to help you overcome your sticking point. Just don’t get stuck endlessly watching videos that hours later morph into a totally different topic (it’s easy to do). Also, to wrap things up, here’s a production tip I love doing: At the end of a session, bounce whatever you have, then store this in the folder of the production. Always do “collect all and save” It can be a 30-second loop ,the arrangements you have ongoing, or even export all your session stems.  Doing this is extremely useful when going through older projects but also, you can open a blank project and then import several bounces and play with them straight away. This tip has been so useful for my past albums!


SEE ALSO :  Finishing Your Projects

Use a main project for organizing yourself


Over the years I’ve talked with dozens and dozens of people from various backgrounds that would love to begin producing music but simply don’t know how or where to start. On the other hand, if you’ve already been creating music but lately have become overwhelmed with too many sounds, too many vsts, and are less productive in the studio, this post is for you. We’ll focus on using a main Ableton project to organize your sessions, which will make for a productive and efficient time in the studio.

For your studio time to be productive and enjoyable, it’s essential that you are organized, and have a solid grasp on your sounds and tools.

DJ’s who’ve listened to hundreds of top quality, finely mastered tracks, will often complain that the quality and sound of their first efforts in the studio will clash with the loudness and polish of the music they’re used to hearing. This frustration is predictable, but also preventable, and it’s one reason I strongly encourage beginners to start by using pre-made loops or simply remixing the tracks they already have. To keep things organized and productive, select just two tracks with the sound and style you’d like your own productions to have, and work on just one project at a time.

Speaking of bought loops – I want to debunk the myth or opinion that using pre-made loops is cheating. This is 100% wrong, and counter productive to making music.

I believe the perfect mindset to approach music production is very much like that of a moderator, you must work with that which is in front of you.

This idea requires a lot of openness and humbleness, but using this approach will make you much stronger at being resourceful in the face of adversity.

The internet is an endless source of tools and options, and it’s critical at one point to stop consuming ideas and make the best out of the material you have. My rule: never buy a new VST until I have gotten a true and complete hold of the ones I already have. That being said, if you need a tip to help organize yourself, I highly recommend to create one main Ableton project that will be your mothership, your sound compendium, your personal lab for growing ideas.

  • Buying new effects for our synth: to truly get a hand of what your new effects can do, just drop your new effects in one channel and experiment. I highly recommend you record the entire session of exploration as wav file but also as a session where automation and knob movement will be recorded.
  • Gathering leftovers: Whenever you finish a song, there will be sounds you haven’t used. You can copy and paste theses into your main project. Using your audio leftovers is an excellent way to create fast and great sounding starting point ideas for your next song.
  • Building macros: Building macros can be time-consuming. Some macros I like to build are usually ones that involve a good use of the macro knobs because when I’m recording a session, I can just drop them on a channel and quickly controller parameters using PUSH which has the excellent automap feature.
  • Gathering new sounds: Because I don’t have the time and energy to record all the sounds I want I’ll just buy the few that I need. I’ll also purchase sounds that I don’t have resources to make such as sounds from a plane. Some sounds that you’ll use often will be a great investment, but there’s also many that are available for free.
  • Building drumkits: This one area where I often spend a lot of time. When I start an idea, I want to be able to throw in a good combination of percussion. With the huge selection available to me choosing the right sound can take forever. Check out this nice video here that shows how to create a tool to test many sounds at once. This is great but you still need to make your kits.
  • Creating layers: This is a bit of the following logic from the previous tip. Once you have multiple kits, you can work on assembling them in a drum rack in order to create layers. As you probably know, in sound design, one sound is very often made of up many sounds that have been layered correctly. It’s a good idea to make multiple kits in advance, organized well, and ready to perform when the session gets rolling.
  • Making categories with your channels: Each channel should have sounds of the same family. So perhaps, you can make one channel that has pads and another channel with kicks. This is useful because when you go in Ableton’s browser and open your main project, you have access to all the sounds from each channel, which makes it much faster to find a specific sound. Another big benefit in doing this is exporting your channels as stems will make for efficient mixing later on. (Read more about that article here – Bouncing Stems)  

When I look at how I work, I often see that I spend way more time preparing my music session than producing a track itself. The better your organization, the easier it gets in your workflow.

JP

SEE ALSO : Music Production Tips: How To Start A Track 


Background vs forefront to create dimension

Nearly every week I have a similar conversation with my clients. In good faith, and to save both my clients and myself time I’m writing this post to help answer the questions many producers keep wondering. The question of background vs. forefront to create dimension.

My clients often send me projects with a lot of sounds going on, which if you know me and my label well enough is something I’m a big fan of. That being said, there is a way to work with a song made up of lot’s of sounds without things becoming a bit too much.

During the production of your song, how many times have you listened to it all the way through? Twenty, thirty times? More? As songwriters, we need to consider the listening perspective of our audience, who will likely never hear all the nuances and details that we do. Perhaps if they’re big fans, they’ll listen to our track ten times. With that number of listens, the impression you get from a very busy song is very similar to looking at a very busy picture – You’ll discover different ideas on each view, but the whole image will be taken for what it is. What will sound like a mistake to you will likely be perceived otherwise by the casual listener.

When we use many different sounds together in an arrangement, it can be impossible to hear them all equally. As producers, we care for the work we’ve put into our sound design and often make the mistake (myself included) of trying to give every sound (big and small) the same amount of emphasis in hopes that nothing will be missed.

Even during active listening, both simple and complex music will often have subtle details we may not hear at first.

The important thing to understand is this – many sounds working together shape and create an experience. Some sounds only work when combined with others to form a unique layer, much stronger than the sum of it’s parts.

Sound design is a complex science that often takes years to understand fully. For many producers that ‘a-ha’ moment comes with the understanding that many sounds aren’t massive all by themselves, but rather a combination of several sounds carefully layered together.

For example, a punchy kick may have three layers (low, mids, hi-mids for transient shaping). A warm and full sounding pad may have harmonics created from a layer of richer oscillation in the hi-mids (using a square oscillator). This is the technical part of it but for someone not interested in sound design and is purely a listener, he/she will experience these sounds in an entirely different language, but he will get it though.

TRY: When listening to music, force yourself to identify layers in sounds.

With the concern that some sounds will not be heard equally at rest, we can start looking into how to create details with dimension and subtlety.
These details are as important as each of the featured sounds as they are needed to support the main element(s) of the song itself. Let’s see how to approach this:

  1. Decide what the core or backbone of your song is. If someone has to sing your song to someone else or attempt to explain what the song is about, what would that person say? In other words, the most memorable part of your song is the main idea. If you remove that, the song is not really there since most of the sounds are there to support that main idea.
  2. In the percussion sounds, identify what are the main elements that support the groove and the main idea. Usually, there’s the kick, a snare/clap, and a hat. Some tracks have multiple claps or additional  percussions here and there, but it’s important to decide what the main percussion sounds are.
  3. The other sounds will be EQed to create dimension. Only the use of EQ combined with volume changes will be enough here.

TRY: Next time you listen to a song, try to give attention to anything that is mixed low in the mix.


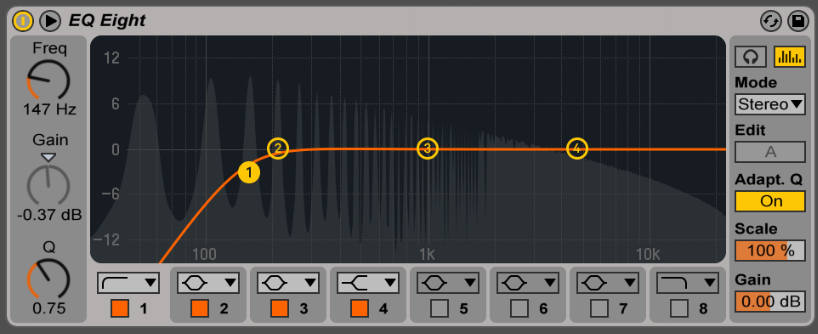
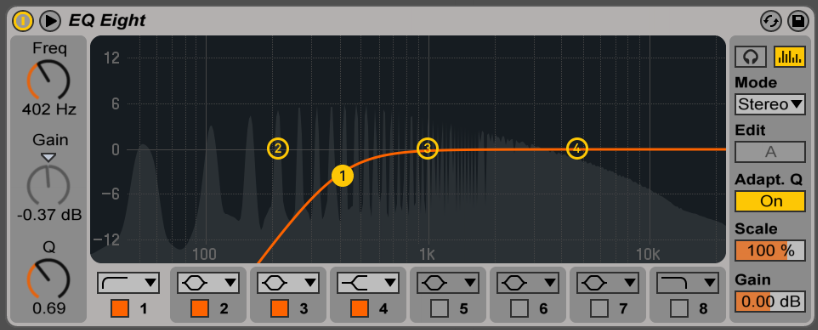
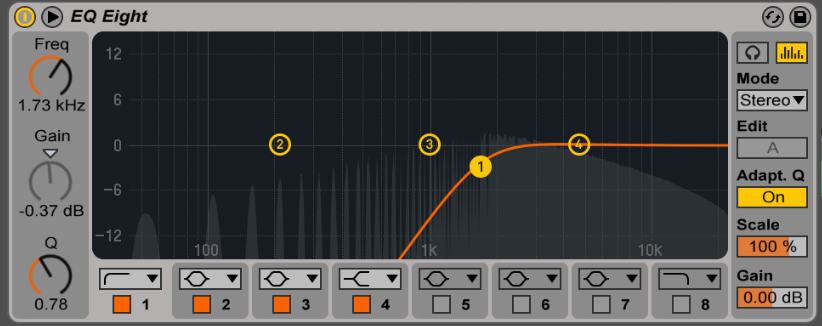
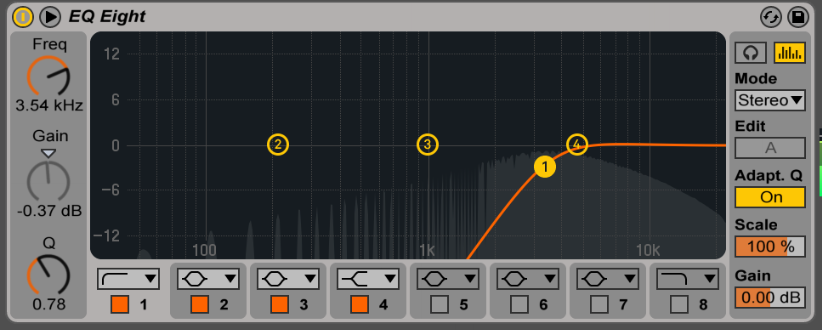
How to apply the distancing technique, on a very simple level, is to apply a low-pass filter/EQ on the sound. The more your filter up, the thinner the sound will feel and also the more pushed away it will sound. There’s no right or wrong here, but you’ll need to adjust the volume to your own taste and feel. I would suggest compressing your sounds to bring them together somewhat.

This is a regular cut that usually removes a lot of muddiness.


This cut would move sounds to a bit behind any of the featured sounds.


This place sounds far off


For subtle positioning.


The other trick would be to use reverb but that one is something to use with great care. Depending on your reverb unit, this technique can introduce muddiness which the previous trick won’t do. Like always experiment and find what you like in the process. You can also combine the EQ trick with the reverb use for better feel.

Let me know how it goes!


 SEE ALSO :  Dynamic Sound Layering and Design