Tag Archive for: playing live

It’s Time for Musicians to be Inclusive

Anyone making music regularly goes through numerous phases of wisdom. Sometimes, it can seem like the music industry is a video game, where—with some luck and networking—you can “level up” until you attain glory. Making music with this frame of mind, which many artists seem to do, produces certain unattractive behaviours:

  • An unwillingness to share knowledge and contacts
  • Taking a competitive approach to music
  • Snobbery and arrogance towards other people and artists

New producers are often thrown-off by the attitude of established artists. Established artists do filter people for other reasons, as being completely open to everyone and everything can become draining, especially if many are trying to “use” them (i.e. for attention, feedback on music, etc). Some artists are also really bad at communicating or just shy, which makes them adopt a closed persona as a way to hide. That said, there exists a very thin line that can be crossed from filtering to snobbery.

Where Does Arrogance Among Artists Come From?

If people work hard on learning something, giving what they spent time and money to understand to someone else for “free” might seem unfair, right? People might also feel that if they’ve reached a certain status, maybe others coming up behind them might bump them out of their position.

Sharing knowledge doesn’t make you lose it.

Sometimes people also feel that opening up to someone to share valuable information and getting anything in return can be very frustrating, as it feels like a waste of energy. Or worse, sometimes there are concerns that there will be some sort of betrayal if the recipient gets “further” with the shared piece of information than the original artist did themselves. It’s not really a surprise that many artists are extremely protective, as they constantly feel like they’re at risk of being “surpassed”.

Seeing someone succeed doesn’t mean you failed.

Reality check—a music career is just a series of ups and downs, with some peaks and plateaus. You can’t escape it, it’s part of the game. It’s never related to other people’s success, it’s just organic. A music career is absolutely bipolar and extremely volatile. These conditions are conducive to feelings of hyper-vigilance, anxiety, and depression. Some people manage to reach a flow where things work longer than others—this is related to a good combo of solid networking, natural talent and a good dose of charisma. Sometimes helping other artists can actually help an artist’s career for the better.

What are the Benefits of Being Inclusive and Helping Other Artists?

While for many this might seem obvious, you’d be surprised how for many others, the idea to work with other people sounds like a bad or compromising idea. I’m not one to judge anyone’s opinion because there is indeed a big risk we need to first address: theft and knowledge abuse. Many artists are taken advantage of by labels, club promoters, Spotify or other giant takeovers in the music business, and even other artists copying or “stealing” content/ideas. Does being inclusive pose risk for these types of situations to increase?

Being inclusive is not being naive. It is—first and foremost—trying to help others, as you wished you were helped when in need.

While writing this post, most of us are in quarantine and have no idea what things will be like in the near future. Interestingly enough for me, for the last 20 years, I’ve become used to being in my studio, secluded and working remotely. I’ve done countless collaborations online and ran labels as well. But now this lifestyle is imposed on many people who aren’t used to it. Not everyone can feel comfortable in this position, even musicians. In the last two weeks, I managed some online groups through Zoom to support my community. Sessions of three hours with more than 30 participants made it clear to me that we all want to reach out to one another, and that our life is far from a dystopian movie depicting revolts and violence. I see way more creative collaboration, online performances, tons of entertainment, classes and people spending their time helping strangers. I want this to happen with music-makers as well.

During a prolonged time of inactivity such as the situation we’re in right now, many institutions, clubs, festivals, and artists will suffer losses. I see people organizing crowd-sourcing campaigns, but they don’t seem to be gaining much traction. Money is only one aspect of the problem—it’s not the real solution to this situation. Where we’ll really need help will in reaching out to one another, supporting local musicians and businesses, and cutting out this business of acting like a “music diva”—we should rethink how we work.

I would like to outline some ways of acting towards others that have been my way of life. I don’t see myself as perfect, but I try to live by these maxims. Being inclusive is something essential to my daily life.

  1. One thing I often do, since of course I don’t always have the time to help is that I teach people to troubleshoot their problems, find answers through efficient researching. For instance, YouTube has solution to many issues and many people ignore that.
  2. I give everyone a chance until they prove me otherwise. Just like in life, if someone comes to me, seems friendly and wants to chat, I’ll usually take the time to chat back. I’m always interested in getting to know others with the time I have. For the most part, people are really friendly. The great thing about an online presence is, you can take distance yourself easily if things don’t go well. But I like to give people a chance and would never snob someone unless I feel there’s a strong clashing of life values (ex. aggressive behaviour, inability to listen, excessive drug use, or anything that can put my health at risk).
  3. I like to be a “yes-man”. For the most part, whatever people ask me, I will do my best to say yes and answer. I’ve been told I’m too nice and that people take advantage of me, but there are a lot of people who are like that and it’s often more energy-boosting than draining. I find that having strong boundaries are essential, though.
  4. I invest in those who invest in me. I’ve often chased after people who I thought were cool, but from whom I wasn’t getting any attention back. I kept trying and usually ended up feeling resentful. That behaviour is in the past now for me, and I only invest myself in people who give attention back. If I send an email and there’s no follow-up, I might poke a second time, but I usually set no expectations. This has cleared up a lot of frustration towards labels who don’t reply or other artists I’ve been wanting to work with that would never reply. I now focus on people who come to me in the first place. There’s a lot more energy there.
  5. Listening to what people have to say teaches me one thing a day. When I do online coaching, I spend time listening to what people have to say. There’s space for learning just as much as for teaching. I believe that everyone gets to teach me something because the world of music making is too vast to claim to know it all.
  6. Develop trust that even when confronted with what seems like a failure, there’s something ahead that will benefit me. Sometimes I felt like some misfortunes were really bad for me personally or for my music career. It’s really impossible to foresee what’s ahead but strangely enough, when it comes to the future no one is in control; magic that can happen down the road, in ways that were impossible to imagine. Stories of missed flights, cancelled events, pirated albums and so on, have been things I went through and I could go on about, but there was always something positive that came out of those experiences. I’m not someone that believes “positive thinking” can in negative situations fixes everything, so I prefer to stay grounded and have a sense of trust that there’s something to come that will be better for me or others.
  7. Always put people in touch—sharing connections creates power. I’ve never ever kept contacts for myself but this is something I often see people do. I don’t see the point to keep people apart. If you can put people in contact and something happens from that, you’ve just created a channel that many people will benefit from.
  8. Never take anything personally—’Nuff said.
  9. You never know who will help you in the future. So many times, I’ve talked with some random people and years later, these people came back to me with something. Recently someone booked my services for a mix and said I gave him a CD in 2004!
  10. Being nice often pays more in the long run. I don’t believe that being difficult pays off in any way, and in the long term, people will avoid you if you’re unpleasant.
  11. Explaining is learning. This is my motto. If you can teach someone a trick, you need to know it well enough to explain it. Therefore, you’re teaching yourself how to do it again. Often, if someone doesn’t get it, you need to find other ways to explain it, which tends to help discover new opportunities in your workflow.

Creating tension in music

Electronic music—oriented for dance-floors—mainly relies on the use of tension to create excitement. I was recently asked how I personally approach tension-building in my work. In this post I’d like to share my point of view on the subject, but before writing this I also spent some time reading articles about tension in music to see how it’s approached by others. To my surprise, I didn’t find anything I could really relate to. Many approaches to creating tension use common, established techniques, and it seems like most of the advice about this topic was for rock-type music. While the techniques I read about are interesting, I firmly believe that you need to understand the reasons behind creating tension in music first, and once you understand them, you might find that things I discuss in this post are still relevant 10 years from now. Personally, I’ve been approaching tension-building in my music the same way for the last 20 years, from a philosophical point of view.

There’s a moment that stands out to me most with regards to my first true understanding of tension in electronic music. I spent the first few years of my DJ career as the opening act. I’d be the minimal dude that plays mellow, heady, trippy stuff, which—at the time in Montreal’s scene—meant opening slots. No complaints here though; this part of my career is when I learned the most about playing live. Opening a show is one of the most misunderstood roles in live music; it’s far more important than most people think.

When people start arriving at a show, the club is empty and there’s already a bit of awkwardness and natural tension mixed in with the audience’s excitement and anticipation. People arrive with expectations, and the opening artist is usually there to set the mood and to build a foundation for what the night will become (which includes not playing too uptempo if the floor is empty). Creating sonic comfort as the opening act is essential.

It’s difficult to create tension if you haven’t yet created a trusting relationship with the people at the event while performing. You’ve probably read many times that the best DJs are the ones that know how to read a crowd—and there’s a reason for this; you have to be aware of the audience’s needs and how to fulfill them, but also of how to create anticipation before addressing those needs: this is tension-building.

Now, it’s important to understand that there are three main tension-building scenarios in music:

  1. Circumstantial. In a given context, some natural tension/excitement might already exist, such as playing your last song before the headliner plays. Those 5 minutes will be naturally more tense as people’s eyes and ears are getting ready for the main act, and the music is supporting this anticipation.
  2. DJ-related. When a DJ knows how to play a track at the right moment and combine it with something else to create an experience, then the music becomes part of a puzzle.
  3. Music-made. This type of tension is created within a song itself, sonically via producing.

When you understand that your music might be heard in these three different contexts, it can give you a better idea of what sort of tension might be best for you personally to create. For instance, perhaps you only want to create music that will rely on the skilled hands of a DJ to really be effective—this doesn’t mean your song is made to be less interesting; skilled DJs search for these kinds of tracks as “tools” for their sets! When someone thinks a song is boring or too “simple”, I’d reply that usually it’s because it’s being listened to out of context, and someone like Villalobos or Hawtin could easily turn a simple track into a bomb by dropping it at the right time. I made an album on my label Climat that was quite experimental, and it was reported that Ricardo played some of the weirdest cuts in the middle of his sets and people would cheer…I doubt many acts can do that with a purely experimental track. That said, music that’s made for DJs to use as a tool has to be very clean from a technical point of view, which means that you need to have your sections very spaced out and have elements that come in repetitively at regular intervals. For example, your 4-bar sections could always end with a snare roll to indicate you’re finishing a section. This organization in your arrangement becomes a track that can be easily layered without confusion, for both the crowd and the artist.

If you think that most of your tracks are for DJs and are meant to be played in clubs, it’s important to test your tracks yourself in a DJ set to see how they go. You’ll want to determine if the tracks are easy to layer or not and to see what you can do with them.

When it comes to creating elements in a track through producing that can create tension, it’s essential to understand that tension rises as an expectation of something to happen (or not). If you write a song so that there’s a specific sound at a specific point every bar, if you have have a bar or two where you leave it out, this can create anticipation and tension. So from a technical point of view, there are some specific tension-producing techniques that can work well when implemented properly:

  • Breakdowns. I’d say that techno between end the of 90s until about 2009 usually had at least one breakdown with “stuff” happening. Breakdowns can include things like cutting the kick out or removing lower frequencies—applied for about 4 bars or so—then a drop would follow. A few years after, people started to get really fed up with this approach, and many producers realized that it was actually more effective not to include a breakdown, and to let the DJs create their own breakdowns by cutting the lows at a moment better suited to their own personal set(s). That said, cutting the lows often still works well.
  • Volume changes. When you introduce a new element into a song, you can either fade it in or simply drop in the sound at 100% volume. A fade will create tension as it the sound becomes louder and louder, while a drop-in is useful to create surprises, which is also a good way to resolve tension. One of the most misused techniques when it comes to volume changes is to have a variation in the volume of an entire section, then having the following section louder. When this is done properly, the contrast is a good way to create an explosion.
  • Decay. Sounds that have their decay increase over time seem bigger and more powerful, especially if you approach changes progressively. Reverb use is also a way of adding decay, and if you add a very large one to short sounds, they’ll become longer, creating tension.
  • From maximal to minimal. Having a lot of sounds happening at the same time and then trimming them down to the essentials will create an “emptiness” that people become familiar; they will anticipate resolution to a “fuller” mix. The density change is something that can be physically felt in a club setting. This is why everyone was using the white noise technique to create excitement for a while; it was a good way to resolve a moment of emptiness.
  • Pitch. Playing with the pitch of a melody or sound is a good head trip, and if you play with it subtly, it can really create uneasiness and tension. Some genres use pitch manipulation in an extreme way by slowly modulating pitch to its highest point, but to me, this technique becomes irritating and predictable after a while.
  • Pattern changes. If you’ve established your groove with a certain pattern and then introduce a hole or change, it will create tension.

Now, is there a particular duration for a tension-building section that might make it work better?

Yes and no. I’m lucky and have had the chance to hear and see many of my songs in a club setting. I’ve had many attempts at tension-building fail, and some succeed. Shorter tension-builders work better than longer ones. Also, keep in mind that some songs will play better if you don’t try to add tension to them at all. I think that 2-bar moments are great for tension-building because it also gives the DJs some time to play within them. If you make your tension-builder too long, you’re making the DJ work hard and potentially fail. Think about tension-building like a sauce—if it’s all premade, you have less room to add your own stuff. Don’t overdo it in your own productions; developing a sense of trust with the DJs who will be playing your work is essential. When people listen to minimal music and say it’s boring, it’s something I take with a grain of salt—perhaps at home in your living room it might be, but in the right context (such as a club), it might be more than enough.

SEE ALSO : Building a great groove

Playing Electronic Music Live (Part 6, final)

I recently played a live set at StereoBar in Montreal for the launch of my album Returning Home and it was very interesting to create a live set from scratch, following the advice of this series I’ve written over the past few months about playing electronic music live. I’d like to share with you a bit about how it went, as well as some personal notes I took for future performances.

Notes about preparation of my set

Returning Home has many tracks; I wasn’t sure how I’d approach them in a live context considering they are all pretty intricate, full of details, and pretty much impossible to execute as the recorded version(s). I decided to go through all the songs and export the stems for each group of sounds – plus making sure the kick and bass would be isolated – so I could control how they would come and go in the set.

Exporting stems took me a while. I had also exported stems from certain songs that weren’t included in the album but that I wanted to play. I had a good 17 tracks ready, with about 8 channels exported per track. I imported everything into my new live set, and added everything in the right columns and with the colors I needed. I also started chopping the stems into sections so I could trigger some parts spontaneously.

After a few days of geeking out, I started playing the tracks to see how the flow felt and to see if the transitions were going well. I played with effects; trying to spice up the main ideas to surprise people. As I kept rehearsing and trying to see how to play the songs, I found myself becoming very bored out of what I was hearing. The thing is, when you spent months making an album, you get to a point where you can’t listen to your own music anymore – and playing it as is felt too safe, too simple.

Live at MUTEK Chile 2006

Live in Zurich 2005

I scrapped everything. I remember thinking that this whole series advising people on how to play live was crap but I realized that after going through it myself again, it still had a lot of value, but even I had done the preparations wrong. I remembered then how I used to LOVE playing live, 15 years ago and had a flashback excited me: pure improvisation. I realized that using stems wasn’t improvising enough and that my music is in itself, pure chaos.

I went back to my pool of sounds which didn’t make the cut originally and started chopping sounds, deconstructing stems, and re-exporting new parts. Then I started creating a space where I could remix the whole album on the spot, plus adding unexpected, unused sounds. Basically, it was combining the bass of track 2 with the melody of track 7, then percussion of track 4…pure remixing. I found a core idea for each moment of my set, and left a lot of space for reinterpretation. It worked and I was having a lot of fun.

My setup for this Set

I was using Ableton Push and 2 Novation Launch XLs, as mixers for all the channels (I ended up using 10). For some reason, each time I’ve tried using PUSH live, it has never really helped, but I felt this time I wanted to use it. I love the Novations so using 2 felt really amazing.

Limitations: My Macbook pro only has 2 USB ports so I needed a port to accommodate multiple items.

Soundcheck at Stereo

Soundcheck

Arriving at the venue, I felt really confident; perhaps too confident. The soundcheck went so smoothly that – in my experience – when that happens it gives you the feeling that something will go wrong later.

I had spent time in the studio carefully tweaking each channel with EQs to make sure the sound wasn’t to harsh or piercing. I also decided to use a Manley compression from UAD on the master which made everything really smooth. It was important to use a reference track as an EQ curve. It really paid off in Soundcheck so I didn’t have to do much; everything went so smooth.

TIP: Listen to your reference track before soundchecking, then play it to adjust an EQ on the master.

The show/performance

After a great start, shit started to hit the fan. As a track was playing, I noticed my mixer wasn’t responding and realized it had rebooted. By rebooting, it made the second mixer crash and the PUSH too. I wasn’t even 5 minutes in and the wheel of death was spinning on my Mac. I waited patiently and luckily it went back to normal. But after this glitch, I disconnected one of the Novations to plug it directly in my computer instead of the USB-Hub I had bought the same day (cheap connectors are always a big mistake!). PUSH was frozen and not doing anything, I had to activate clips with my mouse. Luckily from my experience playing live for so many years, I was able to do this in a way so that people didn’t notice. The Novations kept crashing one after the other. Each time I had to unplug them patiently to restart them, and then the wheel would go off on my computer; for some reason they would work for a good 20 minutes but then crash again.

Luckily, no one noticed anything! I could have really played a great show that night if everything had worked properly because Stereobar has the perfect setup for me…it was a bit disappointing, but I still received a lot of good feedback.

MUTEK Montreal 2006

Live in London 2005

After the show

Despite the technical issues, it was great show and fun nonetheless.

To summarize, a few tips here based on this live experience:

  • Don’t buy gear the same day without testing. Soundcheck are never 100% of what a show will be and can never be a real test.
  • Deactivate Ableton Live’s auto-update feature. It actually upgraded to a version the day before with a bug in it – a pretty big one. I had to reinstall the software and that was stressful. Thanks for the swift reply from Ableton tech support on that one.
  • Never panic when problems arise. Most of the time, people don’t notice.
  • Try to avoid shitty USB hubs! I’m still trying to find a better alternative.

I hope this series was helpful!

Playing Electronic Music Live – How to Prepare Your Live Set (Part 5)

In the previous four posts about playing electronic music live, I’ve basically covered everything you need to do before playing live. Now comes the moment of truth, where you’re basically ready and booked to play. This post will be covering the last mile of preparations including how to do a proper sound check, which is critical to play a quality set, and some bonus tips on the last things to do before hitting the play button.

Sound adjustments

Here are some main pointers about making final preparations for your sounds:

  • Clips don’t need to be perfect or mastered.
  • Leave everything with lots of headroom. We’re talking about -12dB.
  • The gain mainly comes from what you have on the master (bus). Keep it simple too.
  • The first 5-minutes of your live will be about fine tuning your sound.
Why the clips don’t need to be perfect

This is a bit hard to explain, but I’ll keep it simple. Over processing your sound might turn out horribly wrong in a venue, and if that’s the case, there will be no way back. I’d rather have something imperfect and tweak it at the sound-check to what feels best. If you’re doing multiple gigs, this also allows you to have different options for different venues. Playing on a very little sound system versus a open air festival will have totally different feel and you might have to use your compression/EQ differently.

Clips with headroom will do the job

One of the things people don’t notice is that for some sounds, channels might not be sounding like they do in the studio and thus, in a live context, you’ll need to push up the gain on certain elements that you may not have expected. Honestly, it’s more important that you sound right versus loud, and this means you need to be precise in all your sounds adjustments and find a balance. This also means that if a sound still needs to be louder than others, by leaving headroom, you’ll have space to push your fader up. If everything is maxed, you’ll only have a little space to work with which is inconvenient. Don’t hesitate to look at the meters of each channels to make sure they’re leveled. While not the perfect way to tell, it’s still useful and if you’re stressed, you’ll appreciate this quick tip regarding the gain stage, there are also two things you can do:

  • A compressor in a Send bus for all channels needing a boost. Have the compressor be aggressive with a high ratio, but a slow attack. Send to that channel as needed.
  • Routing channels to a “family bus.” Instead of having the channel sent to the Master, have it go to another channel which will act as a bus. I like to have 3 of them: low, mid, highs. Each gathering channels, having extra compression and EQ. Plus you can quickly adjust the tone of your set with these faders. All those busses will go to the master.
The Master bus will do the job

On the last bus, I like to have a limiter that will boost the incoming signal enough to see it pump with a gain reduction of about -2dB. So you might have to add +6dB to the gain for instance. This way, your channel faders might, at first, only be at 3/4 or half way but you’ll also have enough room to boost all the way to zero. Do not use Ozone or other “quick fix” mastering helpers unless you really knowing what you’re doing. I would encourage you to use a shelving EQ just before the limiter. The 3-band EQ in Ableton will do but there are also other you can use too. The idea of a shelving EQ is to quickly adjust frequency zones.

TIP: How to know what to adjust? Let’s say you feel there’s not enough low end (Kick/bass), then reduce the mids, followed by boosting the Limiter’s gain. Don’t boost the bass!!

Adjusting your sound in the first 5 minutes

I find the best way to find my levels is to take my time in the intro of my set and fade-in elements such as the kick, melody, etc. You can bring them at a level that feels like what you are familiar with. It’s important to spend time in the booth/stage before playing to be aware of the levels of the different elements in the room. I also like to go in the crowd area for five minutes to be aware of how the sound is, then go in the booth to see how the levels translate. Sometimes on the dance floor you have the highs piercing while its not the case on the stage or vice versa. This is a super important lesson for how you mix at home too and how it translates in the world.

Sound-checking

Ok, so now you’re at the venue and you’ve been given the opportunity to do a sound-check. Sometimes, you won’t have that luxury, so be grateful if you can. To make the best of this experience, focus on plugging in your sound interface so it’s ready to go and don’t worry so much about having the entire set-up ready. It’s common that sometimes there will be need for space and you might have to unplug or move some stuff. I’ve learned that leaving gear laying around might also be a bad idea, as I’ve seen people spilling drinks or even, some stuff getting stolen. Anyhow, here are main points of phase one of your sound-check:

  1. Beforehand, have your set saved so that when you press play, the most “intense moment” or peak time of your set plays. Most likely, the sound technician will ask for that to start with and I like to have than ready to fire when I arrive and be plugged. His first interest will be to see how he needs to adjust the limiter of the PA for your sound and he might also do a quick EQ curve.
  2. If you’re plugged in a DJ mixer on the stage, your first thing will be to make sure your channel is set to “Line-in”, then boost the gain of the channel to reach zero and avoid seeing any red peak indication both on the channel and the master.
  3. Make sure you can control the sound in the booth/stage and put it to a comfortable level. During your set, it’s important to mute it a few times to see what’s happening in the crowd.

If your sound reaches the PA and all is OK, then the first phase of your sound-check is completed. The gain is usually handled by the tech and you can control extra gain if needed.

Now, phase two of your sound-check: tonal adjustments.

How do I know if my sound is OK?

When at home, try to find a song that you know sounds similar to what you do, and that has its levels balanced (eg. kick vs mids vs highs) and load it up in a net channel of your set. That channel’s output should be set to “External out” and not master.

  1. Play the reference song to the venue and see how it sounds both in the booth/stage and the dancefloor. Make mental notes.
  2. Compare your master output to that reference first in the booth, then on the dancefloor.
    1. Is the volume more or less the same? Adjust limiter, compression.
    2. Are some frequencies harmful? Adjust the EQ.
  3. Go one by one, to the core of each moment/song of your set to see if there’s anything that clashes. My quick way to do this is to always start with the kick to make sure all kicks are at the same level, then bass, melody, percussion. You want all the kicks to be very close so that you don’t have nasty surprises when you jump from one song to another. Same for other parts.

You’re now basically ready to play. So if time allows you, try to quickly play between songs. See if something needs to be adjusted.

TIP: You might for instance see that all your percussion need a correction by EQ. You can add an EQ on the channel to do it or you might freeze & flatten that channel with the EQ to make it simple.

What if there’s no soundcheck?

If this happens and that means that phase one is not available. The venue might ask you to do a “line-check”, which means you send your audio to the mixer and the tech will deal with it. You might have no tech and then you have to do it in the mixer yourself. Just make sure your signal is about the same as the person before you and… good luck!

Extra tips for the minutes before you play from an experienced performer…

These are the things I always do and that took me time to figure out, so consider using them for some extra comfort:

  • Be mentally ready to play an hour before you play. Be around the booth, make sure your equipment is installed and tested that it works properly. On many occasions I had to change the mapping of my controllers – god knows why – so it’s good to have some buffer time.
  • Spend a moment without talking to anyone at least 15 minutes before you play. Keep focus.
  • Avoid drinks nearby your equipment. You know why.
  • Have a friend to filter around and help. I like to have someone to push away unnecessary people who want to talk to you while you play.
  • Bring extra cables of everything: USB, Audio cables and even a cable to play from your internal sound card.
  • If Ableton crashes, have something ready to play in iTunes in case and while you restart the program.
  • Use hearing protection if you can.

Let me know if you have questions and perhaps I’ll do a part 6 to playing live!

Playing Electronic Music Live – How to Prepare Your Live Set (Part 4)

Following up on the previous post in this series, I’ll outline some final tweaks and advanced clip settings for your live set. There’s a lot to cover here but I’ll try to condense it down to the essentials.

Final Tweaks

As your set is likely now taking form, you should have different songs organized into scenes. You can think of this as the minimum you will need to play live but if you want the best result, there are still things to tweak. Personally, when I listen to a live set, I really want it to feel live; the artist can interact with the energy of the room and build around it. You should avoid playing each scene one after the other, without surprises. Again, this is my opinion and you might think otherwise, but what I’d like to explain is how to add a bit of “live” life in the last tweaks to your set.

1st – Rehearse and record.

This is pretty much the ultimate test to see if your live-lab is working properly. You’ll need to rehearse, play with your session, move things around, and test, again and again.

Don’t ever fall back on the idea that what you have is ready for the big show without rehearsing, because trust me, you’ll learn the hard way that if wait until being in club to test your set, it will hurt. That said, hit the record button and then start playing the clips, try to take you time as well to create a proper intro, then see how it goes when you launch scenes, fade-in some sounds, and add effects. The most important part of rehearsing your set is recording what you do.

You can then listen to see what you recorded and if you like a part of a moment, you can then drag it back into your set.


Since you only have two hands but you want each of your clips to have a feeling of “live”, you can pre-record certain subtle details you want to be played while you tweak other knobs. You’re not totally playback everything as-is, you’re interacting with other played elements you recorded. This can be particularly useful for creating unique and complex moment or breathtaking breakdowns.

You can also use +J (ctrl+J on Windows) to consolidate moments you like.

2nd – Add variations.

In my sets, I rarely have one scene repeating without having variations of it. The variations can be used for many things, such as having a more energetic variation of the same scene, one that has a little pause, or space for inserting a fill. Here are a few quick tips you can use to make creating variations easier:

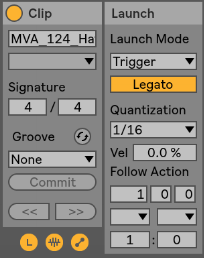
Legato: This is probably the most useful thing to activate for clips in variation. Basically, the Legato option will let the selected clip to take over the one that was previously played, based on the quantization you have set. So for instance, let’s say you play a hihat clip, then press the first clip of the variation. It will stop the activated clip and immediately switch to the other one you just started. On the image, I have set it to 1/16, meaning it will be played on the next 1/16th, keeping it on tempo. Keep in mind that the variation clips are “in sync” with the one playing so that it will continue at the same position in the clip. If legato wasn’t activated, it would start at the beginning of the clip.

Follow Action: Once played, what do you want the clip to do? You could just play that clip but it could go back to the first clip or even randomly play something else. I suggest you experiment with this and find ways to surprise yourself. Don’t forget to record yourself playing them as you can go back to the arrangement section to seize the best part and create new ideas you didn’t even know of.

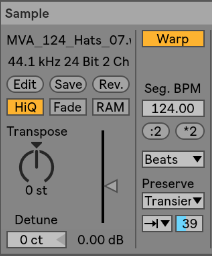
Intensity Variation: If you want to quickly go from open hihat to closed one, one of the fastest way is to play with the “Preserve” section and set it as in this image. Playing with the percentage will let you adjust how much of the end of each sound can be preserved. Having it at 100% is fully open and let’s say 25% is more closed, building tension. So one variation can be set low at first and then the other ones can be more open. If you see the need to boost the energy quickly, then you can go in one of the variation.

Reverse: this one can be fun but in a live context, if you do it at the wrong time it’s awfully awkward; perhaps introducing it in a variation instead would be a safer idea.

Transpose: This can be nice for melodies and basses. You can have them move in pitch in a variation.

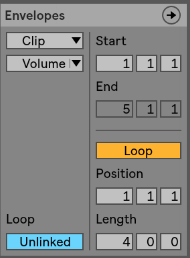
Envelopes: Super useful for variations as well because you can create automation on a very small scale or a longer one. Many artists will use this on EQ to give life to a clip and making sure it feels like it is alive. The important part is to make sure that the envelope isn’t linked and then you can decide of the length of the automation, on one attribute. Tip: make sure you select “Clip” in the first drop down to make sure the changes are made in the clip itself.

Try: Using this with a filter to create fun swooshes.

Also try: Use this technique to create melodies and textures out of a stall pad.


3rd – Transitions.

This part is the final preparation needed to play live but is also the trickiest one. Mainly because this task will imply some practice. My approach and advice here might not totally work for you because your music is different than mine. In other words, doing transitions is something personal and each musician tends to develop his or her own way to do it based on what feels like the best flow possible.

How do transitions work?

In theory, a transition from one song to another is exactly like a DJ mixing one track into another. The puzzle with live transitions is – whereas the DJ only has one fader and EQ to do the trick – you have multiple channels to blend one into the another.

Whenever I teach people how to play live (yes, I do Ableton Live training), a first exercise I give them is to create a playlist with a few DJ sets they like and tell them to study the track transitions. Some people like very fast and abrupt mixing (i.e Jeff Mills-like), while others prefer something more subtle and blurring the lines one where a song starts and the other stops.

The other thing to know beforehand is if you want your live set timeline to be fixed and fluid, or if you will chunk which tracks to play as you go. This can also be a huge factor in how you prepare your transitions. Personally, I want to have the entire flexibility to be able to play track X as an intro then switch to track Z. No order will be established until the last minute when I hit the play button to start my live set.

Once this is clear, you’ll be able to decide how to bridge songs. The first row of each song is your intro bridge and the last one most probably your outro, but you could also start mixing the next track at any moment if you want. Here a few rules of my own for transitions:

  • Only one kick at a time is played. For a while I was mixing the kick of the first track and the other, but the results weren’t so great. I decided to stick to one channel for the kick and would switch when appropriate.
  • One bass unless its a call/response. Same as kick, 2 basses is most usually a set up for disaster so I’d play one or the other. Some bass have only a few notes, especially in dub techno, so it could work that I have one bass of a track talking to another (eg. call/response).
  • Bridge is usually atonal. I would try to stick to rhythmical elements but if I would use a melodic element, I thought it could be tricky as it can clash with the bass or other elements.
  • The bridge can be a song in itself. This one is interesting but not a necessity. But if you can play with your variations well enough, you can create a new song out of two songs. This is basically the techno approach of 1+1=3 (Listener hears track A, B but also a third track which is the meeting of both). I often would record my sets and sometimes noticed that the strong moments were sometimes when I’d bridge two songs.

Because of the number of channels you have in Ableton, you might be stuck with the fact that only one instrument at a time can play. This problem led me to organize bridges differently on occasion. For example, if I want 2 layers of hi-hats, I would have to “cheat” and have a layer of hats in the clap channel.  Quite often I found myself organizing this while playing, and it’s not the best because you can get lost easily in the arranging. I prefer having a few options in the intro with extra layers of claps, hats, percussion. Sometimes even some duplicates in different channels.

In the next post, we will talk about sound checking and performing, which will also conclude the series!

Playing Electronic Music Live – How to Prepare Your Live Set (Part 3)

After the first two parts on this series of posts about playing electronic music live, we arrive at our final topic: clip arrangements, song organization and sound preparation.

Clip Preparation

I hope you did your homework from part two where I asked you to take your arrangements and turn them into an Ableton Live session. If you’ve done this, you’ll see that this task is pretty demanding and can be confusing, because you might feel your song(s) aren’t the same anymore, or perhaps they don’t make any sense. But trust me, even if you feel like you have failed in arranging your sessions, it will start to make more sense as we continue. What really matters is that you now have material loaded into the session view.

What if my track is so simple that I have only a few clips in the session view?

That’s not a problem, the idea is to have something. Part of the beauty of a live set is that once you have all your tracks in the session, you’ll shape them into a longer set. A live set isn’t like a DJ set, where you focus on transitions and track selections; it’s way more flexible and involves constant shaping to create a bigger picture.

1st To Do: Import all Your tracks into one big project

For the sake of this exercise, please start by creating a blank new live set that you’ll name “My Live Set” where you’ll have 12 channels to start with.

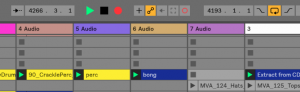
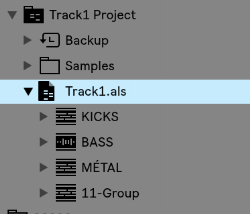
Next we will import all songs into that project. There are two ways to do this and it’s up to you to decide what is the best for you. I personally like to open a track, grab all clips in the session, copy (cmd+c), then open your “My Live Set” project and paste. You can also copy through the browser and should you be more comfortable using that method, do it that way.

One of the great new features of Ableton 10 is that groups now appear in the browser; which could be a good way to organize your work to re-import later on.

You should also consider copying audio leftovers over from each track. These unused pieces are more precious than you think, in a live context. A leftover is anything in your track that was created but didn’t make the final cut. It could be a variation, some weird FX, vocals, whatever – basically, anything will do. The idea behind leftovers is to create material for your live version to make it differ from the original song; it will add an edge.

Once you have all your tracks imported, you have a better idea of your whole session.

“How many tracks do I need for a 1h set?”

The answer here is hard to figure out until you’ve rehearse and determine your natural flow. After years of playing and recording my sets, I’ve figure that each of my tracks average a rough 6 to 8 minutes in a live context. This also includes the transitions (i.e two songs overlapping for 1-2  minutes, to make things smooth enough like a DJ would).

The total time of the tracks is not necessarily important to figure out. If you’re creative, you might even play the tracks in a random order.

2nd To Do: Name and color all clips appropriately

People often overlook this part but trust me, the better the organization, the less stress you’ll have in a live context. Never believe yourself when your mind says “oh I’ll remember what this clip is.” This is why names are important, but also, the clip color. All kicks should be the same color, basses and so on. My personal coding colors have been:

Kicks: red (grabs my attention)

Low end, bass: brown

Percussions: yellow

Claps/snare: Orange

Hihats: grey

Melodic elements: Blue, in various tons as some are different.

One thing about colors that helps is if you’re playing a track while in transition to another one, you can see the color of the other clip that you can’t see on screen.

Please note that I don’t necessarily recommend putting all of the same sounds in the same channels. You might want to mix, for instance, hihats of track A with the ones of track B. If both track’s hihats are in the same channel, you won’t be able to mix them and one will play after the other (only one clip can be played in a channel at a time).

Scene organization

Organizing your scenes is time-consuming, and it will also be what you’ll be reworking the most. It will also get your songs to have more of a live feel. For this section, I’ll use an example of one of my latest live sets to explain what I did, and why.

This song starts at the second row (scene).

Channel headers: As you can see, header colors aren’t important to me so much but there is a section all in white. This is because I use two MIDI controllers for controlling the volumes and the second section is for the second controller. This is also why they’re numbered so I know which slider they refer to on the actual controller.

3rd To Do: Map your channels to the appropriate elements of your controllers

Think of how you want to control your set on a base level, which is the channels in most cases. This is the most important part to pin down, because as you prepare your set, you’ll need to control volume sliders. Map your channels to the appropriate elements of your controllers. If your controller has buttons, I’d also map them to the mute buttons. Mutes are very important.

Buffer rows: As you can see, alternating rows before and after each busy row have scene of empty clips. You can also see that they have the “stop” square in them. I create “buffer rows” for two reasons: the buffers help know where the song starts and begins, but they also serve as a quick way to toggle a clip to stop playing if necessary.

4th To Do: Add 1-3 buffer rows between each song

The first scene/row of each track: The first row, to me, is the most important one. Over years of playing, I’ve settled on a super minimalist version of my live set where I play mostly loopy music with variations which really enforced the importance of the first row of the set.

The first row has various various roles:

  • It is the introduction of your song: It will be used in the transition from the previous track.
  • It is the core idea of your song: All sounds that are playing from beginning to end of your song should be placed here and remove everything below. In my case, the kick will be the same from beginning to end. The length of the kick will be 4 bars long and include variations. Some people like to add multiple clips underneath as variations to trigger, so that is always another option, but think that whatever remains the same throughout should be there.
  • Tension relief: If you noodle around, create an improvised breakdown or start removing sounds. You can use the right side play to then trigger all sounds at once to come back to the song’s full intensity and main idea. This point is very important if you think you’ll be exploring and improvising as you’ll need an anchor.

5th To Do: Make a solid core

Supplementary/following scenes: There are multiple ways to use the scenes that follow your initial introduction. To “play it safe” you could simply have each scene play as the track evolves. The good thing about this approach is that by having all scenes on hand, you can deconstruct the timeline of your song by playing them in different orders. My favourite way of doing this is to have variations of a scene, such as one line with hihats, one with none, one with two playing and a clap, etc, same for melodies. This way I can play variations but I can also trigger one entire line and have a “ready-to-go” new take. If you look at my live set screenshot above, you’ll also see that under one sample “Tommydrum”, I have the same clip three times using variations in timing or tweaks in the versions. I can toggle between them as I need them.

Last To Do: Plan your follow-up lines/scenes and decide what you use.

In the next post, we’ll discuss rehearsing, sound calibration and advanced clip settings!

Playing Electronic Music Live – How to Prepare Your Live Set (Part 2)

After deciding the direction your live set will take, we will now discuss how to prepare a live electronic set in terms of how we approach each individual song, or moments as I call them. This article is the follow up to Playing Electronic Music Live – How to Prepare Your Live Set (Part 1)

Before continuing, make sure you have read the article linked above; after which you should have a better idea the style you’d like to play live. Since most electronic musicians are software users, we’ll start with that approach which is easier and allows for playing both at home for fun or in a club. A common mistake I often see from new artists who want to perform live is to make things too ambitious and overly complicated; the preparations become too demanding and actually playing the set loses its fun.

First idea in preparing your set: turn your tracks, finished or not, into moments to be played live.

In a previous post, I said that making many loops is something that eventually pays off. When you want to play live, it’s always best to have a lot of options on hand that you can trim, to see what works together and then turn these perhaps unfinished loops into new songs.

For years, I always had a main project file for playing live in which I would test drive any new ideas I would worked on done over a given period of time. This live set was like a laboratory for experimentation; it was where new ideas would sprout, where loops became completed tracks, and where some sounds were replaced or remixed into another track. In other words, I recommend turning your unused arrangement loops into a scene in Live, play them, and record the output. Rinse, repeat.

But where and how do I start? 

For example, let’s take this simple arrangement and see what we can make out of it. Let’s say you have a track in the works or done, partially set up in an arrangement view (Note: Any DAW, in arrangement, not just Ableton); firstly, you’ll need to know how the track is structured.

Figure 1 – Arrangement view with markers


Do you want to play the track like your arranged it or do you want to have the parts so you can improvised with the different section?

As you can see in the above screenshot, I have inserted markers in my arrangement which represent the main changes between sections; everything is mostly organized in blocks. You’ll need to slice out these blocks to trigger them, and also what will become important is how you decide to play them. If some parts are heavily chopped, I would recommend that you either turn that section into an entire block, or if you want to jam those sounds you could add them to a Drum Rack. It depends if you want to do some jamming in your set or not. The point here is to have a better view of how your blocks exist so that when you are in the session view, the parts are easy to see.

1st TO DO:

  • Stretch the little blocks that repeat to create bigger blocks that cover the area where they should be repeating (note: make sure the clip is in loop mode) .
  • Use cmd+j to consolidate chopped blocks into bigger block. If some blocks have changes in them, consolidate them as is.
  • Use colors to clarify where the blocks have changes. Say a block is repeating until a given time but then changes pitch; you could change the color of the one where the pitch is changed to symbolize this change.

Figure 2 – Consolidated vs. Unconsolidated blocks

In Figure 2, the left section has been consolidated, and the right side hasn’t. You can the Duplicate left section to the right after consolidating this way.

This may appear time consuming, but it’s not that much extra work and it will pay off once you move everything to session view.

When you’re finished here, you need to bring the new blocks into the session view.

If you have groups, I’d suggest to ungroup them. The reason is that it is not only inconvenient to use groups in session view, but there are chances that your groups differ from one song to another, and in the end it might be more confusing than helpful. If you have grouped FX, I’d suggest you export the entire channel as a stem and decide later how to use it in a live context. You could perhaps decide to use FX during the live and so, not to bounce the channel. It’s hard for me to tell you what to do here.

2nd TO DO:

  • Grab all clips using cmd+a, click to grab, press Tab and then drop them in the session view.

    cmd+a, click to grab, press Tab and then drop them in the session view

  • You might have a really large amount of clips. After moving things to session view you’ll see that some “scenes” are made up of the same clips. You’ll need to delete all scenes that are the same; you don’t need them. In the end, you might go from 60 possible scenes, to about 5 (!). In live situation, you want everything in front of you, and the simpler things are, the faster you’ll be able to get in the zone. You can also go from Scene A to B, to C to D in any order, which gives you the option to remix your music on the fly.
  • Some people might have a huge number of channels grouped in 5-8 groups. Groups make things difficult to play live as they add a lot of complexity. I’d suggest you perhaps export the track’s stems for the groups and then chop them in sections as I explained above. This might also eventually invite you to reconsider how you use channels – I often feel like people use too many. I never use a single channel for a one hit that happens once in a song. I’ll have a reserved channel where I drop all the one-hit sounds. This can be a game changer for you if you use many as smaller projects are easier to understand and you’ll feel more focused (and use less CPU!)


Regarding the number of channels to use, you’ll need to do tests on your own set up before deciding how to do this. In the previous post on this topic, I was advised to be careful with the number of channels/tracks you use. Ideally you want to deal with a max of 12. To trim down the number of channels you are using in the event that you are already using more, you’ll need to mix down a few that are similar or combine channels that don’t have much going on. For example, I’d have a channel that would be a longer loop that would combine all FX and random hits. Playing it as a longer loop as opposed to a shorter one creates more of a live feel that isn’t as “loopy”.

Rehearse your session by hitting certain clips or triggering a scene to see what happens. Once you have removed the redundant scenes and trimmed down the number of channels, you’ll start having a first real glance of what your song looks like in terms of playing it live.

Of course, you’ll deal with the existential question of if you want to play the track “as is” or have a special version just for a live context.

Personally, I think it’s a bit boring to not offer something different in a live set, Two ways you can change things up are through pacing and jamming. jamming will be touched on more in part 3 as it is a very important part of preparation and can also be something that can also forever change your approach regarding how you make music.

Pacing will be the last part of the preparation of your live set. I will cover most of the preparation phase of pacing below, and the following blog post will be more concerned with how to play your live set.

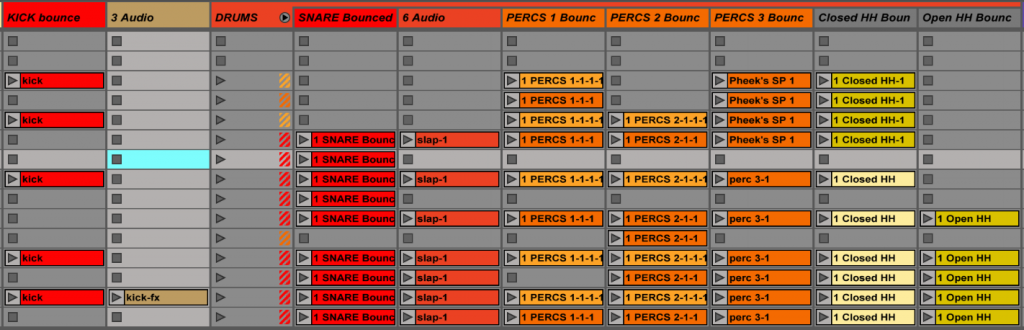
I think my best live sets were good mostly because they had a core to work around that had some preparation, but also had a lot of room to improvise, dependent on how the actual event turned out. These sets were versatile; I could open an evening with them or play peak time, mostly because of how flexible they were. These sets were more or less made up of the same songs but the variations would be so easy to perform on the fly that I could really just follow what felt good to me in that moment in time. I’ve never really understood the point of having an overly prepared set. I’ve tried the prepared approach before and it just made the whole experience boring, because there would be no risk-taking; it also felt out of sync with whoever was listening. For example, imagine that your track has been built to have a drop, breakdown at one precise point and a moment of tension after, but if the dance floor is just starting to warm up when you drop, you might lose people’s attention or it might feel out of place.

A well prepared set has moments for building tension, others to release, variations, and material to raise the intensity if needed, without it being a fixed bunch of parts that aren’t easily movable. Each songs need an intro and outro so that you can move from one song to another in a very flowing way, just like a DJ would do.

Last TO DO (3):

  • Try to decide on the first scene of your songs. They shouldn’t be too busy but usually, you want a solid groove plus some teasers of the melody to come. Establishing the groove is always important to get people’s–what I call–dancefloor trust. That trust usually comes from kick-low end that is clear and precise, which people can relate to, no matter what happens in other parts of the frequency spectrum.
  • Your intro should have openness and space. If you have a melody, try muting a part of it. This will allow the possibility of mixing a part of the melody of another song with the current song; they will be “talking to each other” by echoing. This happens when the first few notes of a melody are answering the last few notes of another melody. DJs love that in a song and by playing live, you’ll see why; you’ll discover “dialogs” between your tracks which could even teach you the good and bad of your track’s arrangements.
  • Define the hook. The main hook of your song will follow the intro. It doesn’t mean you’ll drop the hook right away, as you can build towards there.
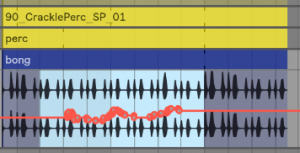
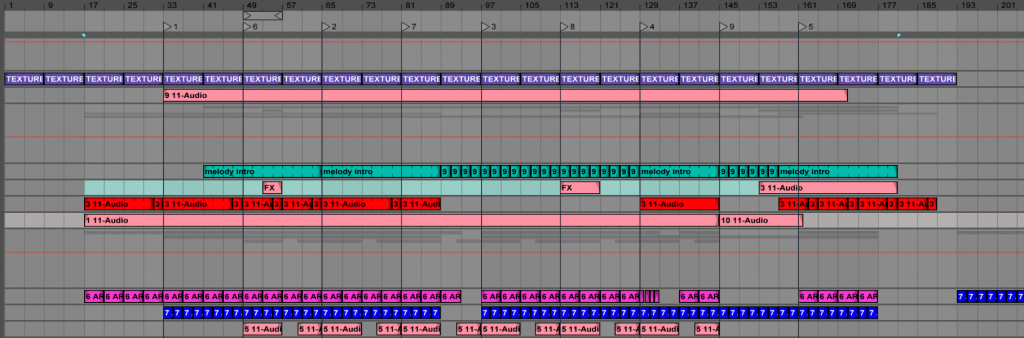
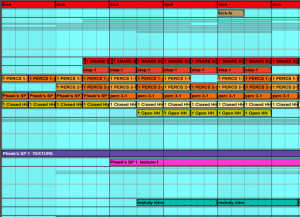
  • Set two variations of the hook with some complementary percussion. If you listen to a DJ set, especially techno or loop based music, you’ll see that it’s mainly a loop with variations. Try to have variations in your percussion, melody or bass. That way you can toggle between the hook and this part. I really really encourage you to listen to DJ sets to get ideas.
  • Create one tension-making moment. This can be a breakdown or a moment where something happens. I always loved to define this moment to be a scene where effects and atmosphere to create something exciting.
  • Release the tension. This scene is basically what would be played after the breakdown or tension-making moment and it’s usually the hook with some more intensity and or variations. This scene should be the most important one.
  • Outro. This is similar to the intro but it should be slightly different.

In the next post, we’ll go into more detail about the actual clips and how to create the perfect little “laboratory” for you to jam with. I’ll propose some ways to jam that will open doors to finally playing live and having all the fun that comes with it.

SEE ALSO : Playing Electronic Music Live – How to Prepare Your Live Set (Part 3)  

Playing Electronic Music Live – How to Prepare Your Live Set (Part 1)

Playing electronic music live is a huge topic and I could dedicate an entire blog to it; this is the first in a series of posts outlining some advice to help electronic and computer-based musicians perform a live set. My goal here is to cover everything you need to know to perform live.

Prior to writing this post, I talked with MUTEK Festival’s director Alain Mongeau about how the festival has been sticking to prioritize live acts. I asked him if live acts were still popular compared to when the festival’s debut in 2000. He said that while it is an important thing for them to promote live expression of music, there’s still confusion on what it really implies.

Firstly, we need to answer the essential question which has been debated for years:

What is a “live set” and why would you do it?

I’m not going to explain this in a ton of detail, but let’s clarify one thing, no one person has the right to say what a “correct” live set is. You should have your personal opinion about what a “live set” means in electronic music, which will then in turn be the foundation of your own approach to creating a live set.

Before I offer any answers to this question, let me share my personal interpretation of the phrase “live set” which has defined my own sets since the very first one I performed in 1999.

To me, a live set of electronic or computer-based music:

  • implies playing your own music.
  • is not playing songs as is. Nothing pre-recorded unless live tweaking is involved.
  • involves some improvisation; experiments and an element of risk taking.
  • means that there are some possible interactions with the audience; therefore the timeline of songs played shouldn’t be planned in advance (like they often are in a DJ set).
  • should be unique every time you play it. But I understand this is difficult and/or not important to everyone.

While I’ve always felt that these should be the basic “rules” of live sets, I’ve come across so many well-established artists who don’t follow any of these points and would argue that “live sets” are something different. Like I said previously, it’s not up to me to decide how “live sets” should be. Picture your own interpretation of a good “live set” so you can build your session accordingly.

This series of posts will address certain ways to prepare a live set in Ableton Live, mainly from my own perspective but I will also cover other points.

Why do you want to play live? This is an equally important factor to consider. I feel that live sets in electronic music are very important and meaningful to both the artist and the audience. It’s a rare moment for an artist to share, connect, explore and be creative with a lot of other people. I don’t believe it approaching live sets lightly unless, well, you’re music is light-hearted perhaps! But even then, I still think devoting time and love to your set can do great things.

Live set preparations

I’d like to cover three main types of live sets to start to help you decide on a direction you want to take for your own sets.

Live Set Type #1 – Playing close reproductions of your own tracks

This type of set is what I’ve been doing most when I play live, but I really make sure that no matter how I’ve prepared my set, it has room for improvisation. I remember a tour where I had one person see/hear my set three nights in a row and told me years later that each night was pretty different, and each felt like a different trip – that really made me happy!

  • The logic of this set type: You have songs that are done or halfway done and divide them into scenes and groups in Ableton (note: the new version of Ableton gives this approach crazy potential). I do not like the idea of an artist simply playing one scene at a time, one after the other until he/she gets to the end. I find there are no risks taken here but understand some genres are limited to this approach.
  • How much of a base should I use? I would say that an average song should have about 3 to 10 scenes and groups, and audio channels are more effective if you limit yourself to 6 to 12. Think of CPU too as you don’t want it to stutter in the middle of your set. A MIDI controller is often limited to 8 faders so if you have more channels, it gets a bit complicated, but more complex arrangements are still doable.

mutek 2008

Live Set Type #2 – Playing mainly improvisations with little-to-no preparation

In the early years of my live sets, this was how I approached live sets, but I came back to the first method as I find that for me type #1 is the most fulfilling. This method however, will definitely result in completely new versions of your music each time you play.

  • The logic of this set type: In my early live sets (circa 1998-2002), I would prepare the core of each important moment of the set at home; I would treat these moments like songs. I would know what the melody would be, a bit of the drum sequence, effects, etc. In those days I’d have analog gear alone, and I would save the melody in the piece of hardware I was using. The narrative of the set would be that I’d go from one song to another, in no precise order, sort of similarly to how you can now do this in Ableton Live. You can keep it simple and go from one scene to another in no particular order, which also opens doors to improvise or add new ideas on the fly. I call this approach the elastic live set.
  • How much of a base should I use?  In Ableton, contrasting to the approach I outlined in type #1, using this type (#2) I have only one scene but have 12-15 channels. In a live set of this type, I jam around one scene using the clips I already have saved, going from one scene to another in no particular order. In the past I would need to make sure all my hardware would be on the appropriate settings.

Live Set Type #3 – Playing with analog gear or hybrid with A laptop

This type of live set is fun and looks good on stage but is also very tricky, mostly because of the sync problems you might have between gear and the laptop. But if you make it work, it can be pretty damn epic.

  • The logic of this set type: There’s no formula here, as uses either of the type #1 or type #2 approaches, simply complemented by a piece of gear such as a synth, drum machine or modular stuff. You can use the computer for sequences or as a potential helper to handle things you can’t do alone. Bitwig is actually really really powerful if you are using modular because of the way it’s built. I’d consider running Ableton Live and Bitwig, sync with Link. I find Bitwig to be a bit more tight on the sync and Ableton to be more easy on playing sequences.
  • How much of a base should I use? The mistake you might run into with this type of live set is wanting to do too much, to cover too many aspects of your music and potentially to never be able to do it all in live set. I find that the less you have to do in terms of sync’ing and parameter tinkering, the more focused you’ll be, which means you follow the flow of your improvisations and music more easily.


mutek_2017_YoureMeBand_TRUNG-16

Other Live Set questions you might want to address

  • Are you going for one representation of your music or do you plan to play it multiple times?
  • Does it matter to you if you can repeat the same set exactly or do you want it to be evolving?

These two questions can also influence what type of live set you decide to build and play.

Concluding thoughts on live set types

Think ahead; think about which direction your live set might go. For instance, if you want to play your own tracks, think of which ones you’d want to use, and try to have them all in a folder (use the “collect all and save” from Ableton to make sure you have everything on hand ready to go). As for the improvisation and hybrid sets, think about what kind of setup you might want and feel comfortable with. And lastly, the audience you are performing in front of is important. You should never play the same set in a club as you would at an outdoor festival.

Stay tuned for part two of this series of posts on playing electronic music live.


SEE ALSO : Playing Electronic Music Live – How to Prepare Your Live Set (Part 2)