An Interview with Techno Producer Stan Soul
This post is a Q&A with Dj, Producer, and label owner Stan Soul. Stan is based out of Tel Aviv, Israel, and has just put out an impressive 7th vinyl release as of late.
In this Q&A we find out where the energy to record 4-5 songs a week comes from, why vinyl is still important, how one contact he made opened the door to starting his own label, and what’s his favourite club to play at right now.
Hello Stan ~ I’m really excited to be speaking with you here, and I know many people will be looking forward to reading and learning more about you.
 You’ve had a lot of success getting records signed, congrats!
Q. As an artist, where does your drive to produce music come from? Where is your choice of sounds and textures coming from?
A. I think that all music is going through people from the universe. So, in fact, we are just instruments in the hands of our world, and we are not in control during this process. Just a small part of it. All that I can say that I feel the music, since my childhood I hear new ideas in my head. Once I realized that all my life I can hear music in my head and I have to share it with people. To make music, you have to accumulate energy so nowadays my life is firmly oriented to save mental energy during the day and express it in a music session.
Q. Is there something within your tracks that is very personal, or unique within music right now?
A. Every track consists of things very personal because it’s totally based on my feelings in that current moment. I’m producing around 3-5 tracks per week and it’s always different because the universe is changing every minute with me.
Q. When you were a less experienced producer, (still dreaming of having releases signed), did you experience an ‘a-ha’ moment in your music making? If so can you describe that breakthrough?
A. Sure. It was very hard to understand what people were thinking about my stuff. I was very excited when I signed my first release and understood that some people did like it. I still enjoy the process more than the results. After some releases, I would like to play live sessions on my gigs.
I understand you’ve been really busy with Tevol, your vinyl label. I’d like to talk about that –
Q. Can you tell me what motivated you to get started with Tevol?
A. I’m always trying to make something that I want to play. So after experience with my digital label TEOL I realized that I want to create a vinyl label with dubby music oriented more towards dancefloors. After some research, my friend put me in touch with a contact from Memoria distribution. Since that time I’m very happy to be a part of Memoria’s family :).
Q. As a label what are you looking for in a track to sign/release, and what do you get excited about hearing?
A. I can’t explain what am I looking for because I never know. I just feel the music.
Q. How do you find artists & music you’d like to sign?
A. I just look around. Some music has come from my friend, some from my label mailbox. One track set for release I found within a forum related to techno music in a topic where people are releasing unfinished tracks. I just found a snippet, contacted guy and told him that I would like to release it on my label once he finishes it. It’s just fate, be in the right place at the right moment.
Q. How would you describe the feeling and vibe of a typical Tevol release?
A. I’m always trying to make release different. From the very deep hypnotic dub techno vibes to the full of energy minimalistic techno tracks. You can find something that you’d play on warm up and something that will exasperate people in the prime time of the party.
Q. Is the development and production for a record going to vinyl different than for digital? (aside from the actual pressing)
A. In fact there no differences. But sometimes I’m trying to make a track for vinyl a little bit longer because in that format I like “slow mixing” (when two tracks you are mixing are playing for 2-3 minutes). It means that the introduction part of the song should be longer because you can’t make a loop like in case with digital decks. I’m not releasing my music in digital anymore, so every track I’m producing is for vinyl 🙂
Q. Why is vinyl still important?
A. Vinyl is important because you can feel it. I can go deep into the process of mixing only with vinyl, and it sounds awesome as well 🙂
 Moving along to the final set of questions, I believe that as an individual I am very influenced by my surroundings. Given this idea,
Q. How has being based in Israel shaped your musical tastes?
A. This is complicated. I repatriated to Israel from Ukraine two years ago and I’m still not feeling that I’m a perceptible part of the local scene. But it takes time, and now I’m fully concentrated on my label, production and always opened for any booking requests
Q. Is there anything great or unique about the Israel scene many might not know about?
A. The most valuable thing that has an effect on my production is the fantastic weather during the whole year and beautiful sea which I can see every day from my window.
Q. What is your favourite club to play out in?
A. In Israel, my favorite club is The Block. And Closer (Kyiv) If we are talking about worldwide it would be Closer.
Q. In general, do you experience music differently at home than playing out?
A. It alway different. Every gig for me is something new.
Q. Where do you see your music making in 5 years?
A. I can’t predict anything but I hope to continue producing music to be heard all over the world.
Q. Any final thoughts?
A. I just want to add that Pheek is a fantastic mixing and mastering engineer, and he’s been providing amazing service to make my music way more enjoyable and productive.
Thank you x10 for taking the time today Stan ~
Feel free to keep up to date with Stan by jumping over to the Tevol Facebook & Soundcloud page for more info and music.
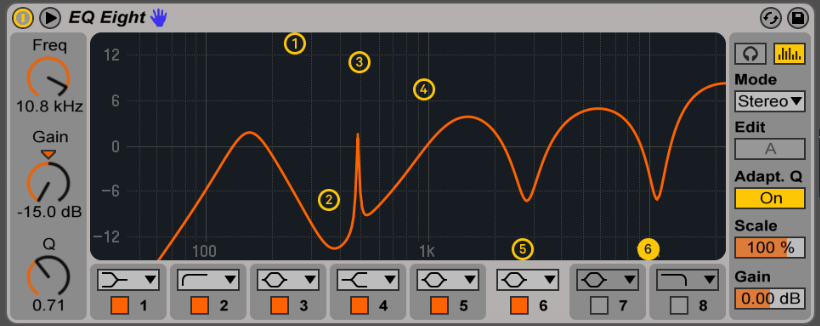
 That last point is crucial here. You can take the same compressor concept (ex. FET compression), but it will sound different from one company to another. There are no real universal standards on how to approach compression or EQing. An EQ can show you a curve but the filter in the back might slightly be different to give a color, for instance.