Tag Archive for: learning from experienced producers

The Inspiration Cycle

Most people enjoy discussing music technically in terms of production as we all wonder where to start and how to handle ideas in order to make a song. I also follow many magazines and articles which cover how the brain perceives creativity, where it starts, and how to invoke it and keep it alive. However, even if you know the techniques to make music, remaining inspired to make music can become a challenge.  I struggle with musical inspiration as well, but also have a few tips if you’ve been struck with writer’s block that I find always work.

How is your inspiration cycle working?

This video about using flow is tightly linked to the experience of inspiration. Let’s dive deeper.

Through reading and my own personal experience, I’ve noticed that inspiration comes and goes through a number of phases, in a cycle:

  1. The stimulation and satisfaction of the mind.
  2. Conceptualization.
  3. Struggle.
  4. Release and creativity.
  5. Project completion.
  6. Transmission, validation.
  7. Celebration.

In the above video, the discussion is around flow, which is an important state of mind for a high level of creativity that can be reached by athletes and musicians during a performance. You can also access this level of creativity by making music, in your studio. But before a studio session, you need an idea and concept to make music around. Let’s examine the phases of the musical inspiration cycle I outlined above:

The stimulation and satisfaction of the mind

To sum up this phase, think about falling in love with something. For the writer, it’s a book or a scene description. The photographer gets excited about a landscape; the gardener, about the perfect trees; and the musician, sounds or a song. This can stimulation can occur anywhere at any time; in your car for example, or in many cases, during a “celebration” of some kind. The cycle becomes evident here, because the last phase is the celebration of completing your work, but this phase can also restart the cycle and restart the first phase of stimulation.

For example, many people feel that they want to become a DJ after a special night in a club. This is an example of musical stimulation kicking off the cycle of inspiration. People also like to celebrate art, in search of some sort of new stimulation for the mind; to be inspired to create.

Describing his creative process, Mozart observed, “Those ideas that please me I retain in memory, and am accustomed, as I have been told, to hum them to myself. If I continue in this way,” he writes, “it soon occurs to me how I may turn this or that morsel to account so as to make a good dish of it… All this fires my soul” (Harding, ).

The mind will feel satisfied by certain things that will inspire it to bring different elements all together, into a collection that will lead to the creation of a concept.

Tip: Before investing and diving into production, try to make a personal collection of music that moves you. It could be a secret playlist on Youtube, Spotify or Soundcloud, for instance. The richer your collection, the more you are investing into potential sources of inspiration.

Conceptualization

Understanding your concept is key here; it’s about putting to words what you have in mind. The main writer’s block-inducing trap in electronic music is facing the limitless options of where you could go in a creative sense. Ideas and concepts help to box you in, and to create your sounds into a palette that matches your idea. For instance, knowing you want to make “banging techno” already provides you with a direction as to what you’ll be doing. The challenge in this particular case would be educating yourself and understanding how complex sounds are recorded as well as other technical details. Conceptualization leads to the next phase which is the struggle; an unavoidable part of the creative process necessary when trying to apply your concept.

I’ve always found there to be two main things that will help with conceptualization:

  • Finding real life equivalent to what your vision is, such as finding songs that contain your idea or a part of it.
  • Finding resources to help you understand what your idea actually is.

The more clear your initial idea or concept, the best you can explain it. From there you can find someone who has the experience or tools to help you get your there if necessary.

Tip: Using voice memos to record something you hear or to leave yourself notes is a very useful practice. If you can invest in a microphone to try to reproduce sounds with your mouth or found objects; this technique can lead to very interesting results.

Struggle

The struggle is the phase in which many people feel like they want to stop making music altogether and even sell all the gear they have in extreme cases. Perhaps you’ve been through this struggle before – it can manifest in many ways – but the best approach to handle a struggle effectively is to moderate what you like doing, by reducing the length of time or efforts you’re inputting into developing your concept.

For example, instead of being in the studio for four hours, how about going for just one? How about you go for a walk when you have negative ideas coming to you? There’s no rush in making music.

I’ve seen so many artists struggle through this phase by falling victim to substance abuse which is by far the most risky way to deal with writer’s block. If you need an external substance to make you creative, you’ll quickly become dependent on it.

Tip: My drug is jogging.

Release and creativity

This phase can be when the “aha!” moment hits you full effect; all the technical details fall into place and you can express yourself entirely. I’ve had this moment with two albums I made, Tones Of Void and White Raven. However in previous albums, I’ve worked and worked to eventually find a pace that just made me feel unstoppable. I would finish songs in a day, which would normally take me months. Find a recipe, a patch, a series of effects that give you wings to turn anything in the sound you’re looking for.

For me, the “aha” moment is easy to hear on Tones Of Void. I had found the right series of effects that I loved and I was digging in my library, then could easily turn 1-2 sounds into a full song. I would record it live, do minor edits and felt entirely satisfied with whatever I had. I’ve also seen people using modular synths to make self-generative patches where songs are just written on their own and it’s really beautiful to see.

Tip: This phase isn’t linear and comes in moments. Find ways to save your tools and understand what uplifts your work.

Project completion

Finishing projects is something many people struggle with. The real question is when is it really done? Recently, I made a list of items to check to give yourself an answer but you can also give yourself certain criteria. I like the idea that something is never actually totally done, and that is part of the charm of it. Knowing the next project will be better is a way to let go of anything that has been revisited too often.

Once you can save your file and are happy with it, do a backup and call it done, this phase is simply done; it’s something you don’t want to drag on.

Transmission, validation & Celebration

You know when you love your song so much you want to share it with the entire world? That’s what the celebration phase I mentioned earlier is about. We want validation for our work, but there’s a part of ourselves that also wants to pass on our ideas to others. This creates the desire to have “the celebration” and to provide musical inspiration to others.

There are some people, however, who fear sharing their music. It’s no secret that most musicians seek validation from their community and music is a way to do it. What stops some people from sharing their work with others is the fear of being criticized. However, transmission and validation are necessary to move on to “the celebration”, which is the end of a cycle, but also the beginning of another.

I’d love to hear your stories about your inspiration. Please share!


SEE ALSO :   Where to Get Fresh New Ideas for Tracks 

Playing Electronic Music Live – How to Prepare Your Live Set (Part 4)

Following up on the previous post in this series, I’ll outline some final tweaks and advanced clip settings for your live set. There’s a lot to cover here but I’ll try to condense it down to the essentials.

Final Tweaks

As your set is likely now taking form, you should have different songs organized into scenes. You can think of this as the minimum you will need to play live but if you want the best result, there are still things to tweak. Personally, when I listen to a live set, I really want it to feel live; the artist can interact with the energy of the room and build around it. You should avoid playing each scene one after the other, without surprises. Again, this is my opinion and you might think otherwise, but what I’d like to explain is how to add a bit of “live” life in the last tweaks to your set.

1st – Rehearse and record.

This is pretty much the ultimate test to see if your live-lab is working properly. You’ll need to rehearse, play with your session, move things around, and test, again and again.

Don’t ever fall back on the idea that what you have is ready for the big show without rehearsing, because trust me, you’ll learn the hard way that if wait until being in club to test your set, it will hurt. That said, hit the record button and then start playing the clips, try to take you time as well to create a proper intro, then see how it goes when you launch scenes, fade-in some sounds, and add effects. The most important part of rehearsing your set is recording what you do.

You can then listen to see what you recorded and if you like a part of a moment, you can then drag it back into your set.


Since you only have two hands but you want each of your clips to have a feeling of “live”, you can pre-record certain subtle details you want to be played while you tweak other knobs. You’re not totally playback everything as-is, you’re interacting with other played elements you recorded. This can be particularly useful for creating unique and complex moment or breathtaking breakdowns.

You can also use +J (ctrl+J on Windows) to consolidate moments you like.

2nd – Add variations.

In my sets, I rarely have one scene repeating without having variations of it. The variations can be used for many things, such as having a more energetic variation of the same scene, one that has a little pause, or space for inserting a fill. Here are a few quick tips you can use to make creating variations easier:

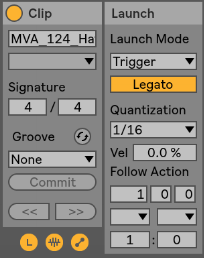
Legato: This is probably the most useful thing to activate for clips in variation. Basically, the Legato option will let the selected clip to take over the one that was previously played, based on the quantization you have set. So for instance, let’s say you play a hihat clip, then press the first clip of the variation. It will stop the activated clip and immediately switch to the other one you just started. On the image, I have set it to 1/16, meaning it will be played on the next 1/16th, keeping it on tempo. Keep in mind that the variation clips are “in sync” with the one playing so that it will continue at the same position in the clip. If legato wasn’t activated, it would start at the beginning of the clip.

Follow Action: Once played, what do you want the clip to do? You could just play that clip but it could go back to the first clip or even randomly play something else. I suggest you experiment with this and find ways to surprise yourself. Don’t forget to record yourself playing them as you can go back to the arrangement section to seize the best part and create new ideas you didn’t even know of.

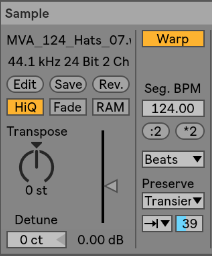
Intensity Variation: If you want to quickly go from open hihat to closed one, one of the fastest way is to play with the “Preserve” section and set it as in this image. Playing with the percentage will let you adjust how much of the end of each sound can be preserved. Having it at 100% is fully open and let’s say 25% is more closed, building tension. So one variation can be set low at first and then the other ones can be more open. If you see the need to boost the energy quickly, then you can go in one of the variation.

Reverse: this one can be fun but in a live context, if you do it at the wrong time it’s awfully awkward; perhaps introducing it in a variation instead would be a safer idea.

Transpose: This can be nice for melodies and basses. You can have them move in pitch in a variation.

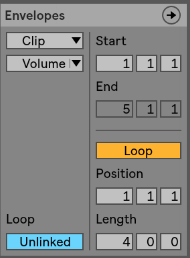
Envelopes: Super useful for variations as well because you can create automation on a very small scale or a longer one. Many artists will use this on EQ to give life to a clip and making sure it feels like it is alive. The important part is to make sure that the envelope isn’t linked and then you can decide of the length of the automation, on one attribute. Tip: make sure you select “Clip” in the first drop down to make sure the changes are made in the clip itself.

Try: Using this with a filter to create fun swooshes.

Also try: Use this technique to create melodies and textures out of a stall pad.


3rd – Transitions.

This part is the final preparation needed to play live but is also the trickiest one. Mainly because this task will imply some practice. My approach and advice here might not totally work for you because your music is different than mine. In other words, doing transitions is something personal and each musician tends to develop his or her own way to do it based on what feels like the best flow possible.

How do transitions work?

In theory, a transition from one song to another is exactly like a DJ mixing one track into another. The puzzle with live transitions is – whereas the DJ only has one fader and EQ to do the trick – you have multiple channels to blend one into the another.

Whenever I teach people how to play live (yes, I do Ableton Live training), a first exercise I give them is to create a playlist with a few DJ sets they like and tell them to study the track transitions. Some people like very fast and abrupt mixing (i.e Jeff Mills-like), while others prefer something more subtle and blurring the lines one where a song starts and the other stops.

The other thing to know beforehand is if you want your live set timeline to be fixed and fluid, or if you will chunk which tracks to play as you go. This can also be a huge factor in how you prepare your transitions. Personally, I want to have the entire flexibility to be able to play track X as an intro then switch to track Z. No order will be established until the last minute when I hit the play button to start my live set.

Once this is clear, you’ll be able to decide how to bridge songs. The first row of each song is your intro bridge and the last one most probably your outro, but you could also start mixing the next track at any moment if you want. Here a few rules of my own for transitions:

  • Only one kick at a time is played. For a while I was mixing the kick of the first track and the other, but the results weren’t so great. I decided to stick to one channel for the kick and would switch when appropriate.
  • One bass unless its a call/response. Same as kick, 2 basses is most usually a set up for disaster so I’d play one or the other. Some bass have only a few notes, especially in dub techno, so it could work that I have one bass of a track talking to another (eg. call/response).
  • Bridge is usually atonal. I would try to stick to rhythmical elements but if I would use a melodic element, I thought it could be tricky as it can clash with the bass or other elements.
  • The bridge can be a song in itself. This one is interesting but not a necessity. But if you can play with your variations well enough, you can create a new song out of two songs. This is basically the techno approach of 1+1=3 (Listener hears track A, B but also a third track which is the meeting of both). I often would record my sets and sometimes noticed that the strong moments were sometimes when I’d bridge two songs.

Because of the number of channels you have in Ableton, you might be stuck with the fact that only one instrument at a time can play. This problem led me to organize bridges differently on occasion. For example, if I want 2 layers of hi-hats, I would have to “cheat” and have a layer of hats in the clap channel.  Quite often I found myself organizing this while playing, and it’s not the best because you can get lost easily in the arranging. I prefer having a few options in the intro with extra layers of claps, hats, percussion. Sometimes even some duplicates in different channels.

In the next post, we will talk about sound checking and performing, which will also conclude the series!

The creative burnout no one is talking about

Around 2008, as I was coming back from the doctor’s office, I felt completely lost. He told me that I had to change what I was doing because I was heading straight for creative burnout. At that time, in my career, I felt like it was in its peak: I was touring, releasing music, making remixes, was invited to great festivals, and had an occasional part time job as a teacher. I had nothing to complain about; I felt I was pretty much living my dream.

So what was going on exactly?

Before I explain, I want say that this post is about sharing what I’ve learned the hard way. I’m talking about an important thing no one will tell you:

It’s not because you do what you love that you’re shielded from your limitations. It’s mostly because by doing what you love, you may overlook that it remains a form of work.

When you do what you love, you feel invincible. This might be related to the feeling of flow, explained by Mihály Csíkszentmihályi, which is a state you get into when you create or become really focused. The thing about music is, it’s about inspiration, and inspiration doesn’t come about “when you need it”, it just happens.

How do you recognize the signs that could announce you’re on the verge of crashing?

  • Negative output in discussions. Do you observe yourself talking negatively to your friends or on social medias? It’s interesting to look at a week of posting on Facebook and see if you’ve been more positive or negative.
  • Lost of interest for music or anything you used to love.
  • Desire to announce you’re “retiring” (from DJing or anything), selling all your gear, deleting projects, quitting.
  • Cynicism towards the music world, what you do, others who make music.
  • Jealousy, envy, feeling discouraged when being around other artists who are doing OK.

Keep track if any of these are persistent.

These obstacles may lead to burnout:

Overworking

Going from a “normal” full time job to transforming a hobby you love into a job involves a pretty steep learning curve. There are multiple things to take in consideration . Money in the artist’s life is the source of a huge amount of stress. Not only can you not predict when things will work, but when they do, you don’t know how long the ride will last Since there’s no obvious relationship between the creative work you do and what you harvest, it becomes very easy to overwork. Pair that with the pleasure of making music, and at first you’ll feel you have too much time on your hands to know what to do with. As I described in a previous post about how spending a long time in the studio is counter-productive; you can easily ruin a lot of your own music. During the early years when I was making music full time, I felt I didn’t create music that was as meaningful as when I was working and doing music on the side; this realization has changed my way of making music for the better.

In my case, with my label (Archipel), mastering, touring, and everything else, I really was working up to 60 hours per week. I forgot to take care of my health. No wonder I couldn’t keep up the pace after a few years went by. When you do what you love, it never feels like work, but it is.

Expectations

Managing your expectations is extremely tricky in the arts domain. The ultimate goal is to get recognition, because many things unfold after that. Or do do they?

It’s very difficult to tell, and it messes up your zen. For instance, if you believe that this release on a specific label will give you certain opportunities, or you think that playing in a gig will lead you to get better gigs, or working with an agent will give you more visibility, etc, all these things – in theory – could be true. You admire specific role models who’ve made it to a level you want to reach, but you might never seem to get there even by doing the same things.

Why isn’t there a recipe that you can follow that will guarantee results?

The arts are a big gamble; a lottery where the turn out is not determined by anything rational other than – most probably – timing and networking. And even if you have those right, it might not lead to anything at all.

The only thing you can control is your patience and resilience. That’s about it.

Some people will tell you that hustling hard might make a difference, but you might get to the opposite of what you want; people don’t like artist who are constantly “pushing their brand”. Knowing when and when not to have expectations is certainly incredibly healthy, especially if you can reduce them to be realistic.

In conclusion, what I’d recommend based on my experiences with creative burnout:

  • If you can live a healthy life of work/music making, try to keep doing it as long as possible. It’s not only good for you, but you will have money to invest in your craft. Balance is everything.
  • If you are brave enough to try to live off music making, treat it as a job. Give yourself time to not work – that’s equally valuable.
  • Find a new hobby. Since music used to be yours and now it fills your whole time, try doing other things.
  • Sleep long nights and nap. Avoid partying on a regular basis.
  • Collaborate, delegate, ask for help. Connecting with other humans is always amazing for recovery!


SEE ALSO : Mindfulness for Creatives

Playing Electronic Music Live – How to Prepare Your Live Set (Part 1)

Playing electronic music live is a huge topic and I could dedicate an entire blog to it; this is the first in a series of posts outlining some advice to help electronic and computer-based musicians perform a live set. My goal here is to cover everything you need to know to perform live.

Prior to writing this post, I talked with MUTEK Festival’s director Alain Mongeau about how the festival has been sticking to prioritize live acts. I asked him if live acts were still popular compared to when the festival’s debut in 2000. He said that while it is an important thing for them to promote live expression of music, there’s still confusion on what it really implies.

Firstly, we need to answer the essential question which has been debated for years:

What is a “live set” and why would you do it?

I’m not going to explain this in a ton of detail, but let’s clarify one thing, no one person has the right to say what a “correct” live set is. You should have your personal opinion about what a “live set” means in electronic music, which will then in turn be the foundation of your own approach to creating a live set.

Before I offer any answers to this question, let me share my personal interpretation of the phrase “live set” which has defined my own sets since the very first one I performed in 1999.

To me, a live set of electronic or computer-based music:

  • implies playing your own music.
  • is not playing songs as is. Nothing pre-recorded unless live tweaking is involved.
  • involves some improvisation; experiments and an element of risk taking.
  • means that there are some possible interactions with the audience; therefore the timeline of songs played shouldn’t be planned in advance (like they often are in a DJ set).
  • should be unique every time you play it. But I understand this is difficult and/or not important to everyone.

While I’ve always felt that these should be the basic “rules” of live sets, I’ve come across so many well-established artists who don’t follow any of these points and would argue that “live sets” are something different. Like I said previously, it’s not up to me to decide how “live sets” should be. Picture your own interpretation of a good “live set” so you can build your session accordingly.

This series of posts will address certain ways to prepare a live set in Ableton Live, mainly from my own perspective but I will also cover other points.

Why do you want to play live? This is an equally important factor to consider. I feel that live sets in electronic music are very important and meaningful to both the artist and the audience. It’s a rare moment for an artist to share, connect, explore and be creative with a lot of other people. I don’t believe it approaching live sets lightly unless, well, you’re music is light-hearted perhaps! But even then, I still think devoting time and love to your set can do great things.

Live set preparations

I’d like to cover three main types of live sets to start to help you decide on a direction you want to take for your own sets.

Live Set Type #1 – Playing close reproductions of your own tracks

This type of set is what I’ve been doing most when I play live, but I really make sure that no matter how I’ve prepared my set, it has room for improvisation. I remember a tour where I had one person see/hear my set three nights in a row and told me years later that each night was pretty different, and each felt like a different trip – that really made me happy!

  • The logic of this set type: You have songs that are done or halfway done and divide them into scenes and groups in Ableton (note: the new version of Ableton gives this approach crazy potential). I do not like the idea of an artist simply playing one scene at a time, one after the other until he/she gets to the end. I find there are no risks taken here but understand some genres are limited to this approach.
  • How much of a base should I use? I would say that an average song should have about 3 to 10 scenes and groups, and audio channels are more effective if you limit yourself to 6 to 12. Think of CPU too as you don’t want it to stutter in the middle of your set. A MIDI controller is often limited to 8 faders so if you have more channels, it gets a bit complicated, but more complex arrangements are still doable.

mutek 2008

Live Set Type #2 – Playing mainly improvisations with little-to-no preparation

In the early years of my live sets, this was how I approached live sets, but I came back to the first method as I find that for me type #1 is the most fulfilling. This method however, will definitely result in completely new versions of your music each time you play.

  • The logic of this set type: In my early live sets (circa 1998-2002), I would prepare the core of each important moment of the set at home; I would treat these moments like songs. I would know what the melody would be, a bit of the drum sequence, effects, etc. In those days I’d have analog gear alone, and I would save the melody in the piece of hardware I was using. The narrative of the set would be that I’d go from one song to another, in no precise order, sort of similarly to how you can now do this in Ableton Live. You can keep it simple and go from one scene to another in no particular order, which also opens doors to improvise or add new ideas on the fly. I call this approach the elastic live set.
  • How much of a base should I use?  In Ableton, contrasting to the approach I outlined in type #1, using this type (#2) I have only one scene but have 12-15 channels. In a live set of this type, I jam around one scene using the clips I already have saved, going from one scene to another in no particular order. In the past I would need to make sure all my hardware would be on the appropriate settings.

Live Set Type #3 – Playing with analog gear or hybrid with A laptop

This type of live set is fun and looks good on stage but is also very tricky, mostly because of the sync problems you might have between gear and the laptop. But if you make it work, it can be pretty damn epic.

  • The logic of this set type: There’s no formula here, as uses either of the type #1 or type #2 approaches, simply complemented by a piece of gear such as a synth, drum machine or modular stuff. You can use the computer for sequences or as a potential helper to handle things you can’t do alone. Bitwig is actually really really powerful if you are using modular because of the way it’s built. I’d consider running Ableton Live and Bitwig, sync with Link. I find Bitwig to be a bit more tight on the sync and Ableton to be more easy on playing sequences.
  • How much of a base should I use? The mistake you might run into with this type of live set is wanting to do too much, to cover too many aspects of your music and potentially to never be able to do it all in live set. I find that the less you have to do in terms of sync’ing and parameter tinkering, the more focused you’ll be, which means you follow the flow of your improvisations and music more easily.


mutek_2017_YoureMeBand_TRUNG-16

Other Live Set questions you might want to address

  • Are you going for one representation of your music or do you plan to play it multiple times?
  • Does it matter to you if you can repeat the same set exactly or do you want it to be evolving?

These two questions can also influence what type of live set you decide to build and play.

Concluding thoughts on live set types

Think ahead; think about which direction your live set might go. For instance, if you want to play your own tracks, think of which ones you’d want to use, and try to have them all in a folder (use the “collect all and save” from Ableton to make sure you have everything on hand ready to go). As for the improvisation and hybrid sets, think about what kind of setup you might want and feel comfortable with. And lastly, the audience you are performing in front of is important. You should never play the same set in a club as you would at an outdoor festival.

Stay tuned for part two of this series of posts on playing electronic music live.


SEE ALSO : Playing Electronic Music Live – How to Prepare Your Live Set (Part 2) 

Equipment Needed to Make Music – Gear vs. Experience vs. Monitoring

This post follows a previous one I made regarding the minimum equipment needed to make music; due to the popularity of that post and the number of questions I had afterwards, I wanted to dive deeper into my thoughts on this.

I’m often asked what matters the most between equipment, experience, and monitoring, and I  give someone the following advice on those three topics:

The Role of Experience

There is absolutely no doubt at all that someone’s experience, more importantly than anything, will have the biggest impact on the quality of the music he or she makes. A producer with years of experience knows what works and what doesn’t. Even without the proper equipment, he or she will find ways to maximize the tools they are limited to in order to get the make the most of their gear, and sometimes can even turn something very insignificant into a piece of art. What’s also something to understand is that experience can also guide you to make strategic decisions based on past experiences. For example, someone who has made high quality products knows that reaching out to others who can help is a valuable, essential part of the process. Also, if you’re faced with limitations, the internet is filled with information about how to make the best of your situation. Lacking sounds you love? Find a sample pack and buy it. Lacking ideas or technique? Look stuff up on YouTube. There’s an abundance of information that is either free or cheap. Investing in little things like personal connections is not only a great way to build support among people who can help you later, but it’s also a way to stay on top of new and better tools that come out from people who and work with develop them.

Studio Monitors Matter

The biggest mistake I see in people who are just starting out, is to invest in cheap studio monitors because of their budget limitations. I know this one is tricky because many people have small budgets. Monitors are something you want to have for the next 10 years minimum, and you want them to be the best pair you can afford. Though experience is the most important thing to consider, but you can’t start with it if you have none, monitoring is to me, what’s you need to focus on as a close second. Studio monitors are your “eyes” in music making: if you can’t “see” what you do, your music will not be precise and the end result might be difficult to appreciate after it leaves your studio. Having proper speakers is like having access to glasses when you can’t see: all of a sudden, everything is clear and you’ll know exactly what’s not working.

  • Tight budget? I find that if you can’t invest in good monitors, it’s worth waiting. There are many ways to raise money, from getting a loan or asking relatives, or whatever. But investing in cheap speakers will only benefit you in the short run and will be a major problem in the long term. In the meantime, try getting good headphones that feel good for you when listening to your favorite songs. Go in a store and spend some time comparing models. Comfort is also important.
  • What if music production isn’t for you? If you want to produce, it’s probably because you’re a music lover. If you give up on production after buying monitors (note: contact me before doing that!), you’ll still have great speakers to DJ on or to just to listen to.
  • Having a subwoofer is a game changer. To me this is an indisputable fact; you’ll see what I mean if you get one or if you get to hear a setup that makes use of one. Thin walls? Angry neighbors will love you if you get a Subpac instead.

The takeaway here: music equipment is a useful but luxurious tool.

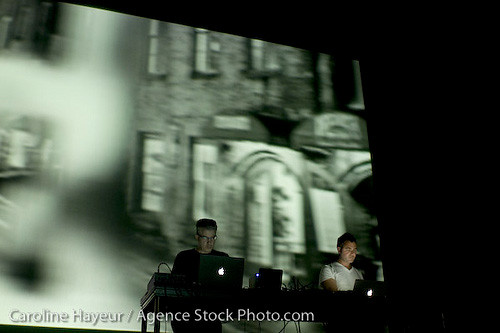
One of my friends came to my home one day and showed me a stunning album he made which totally blew me away. We quickly started talking production and he explained me that he was using Cool Edit (a very simple sound editor which in the early 2000s wasn’t even considered a DAW!) and no equipment whatsoever. None. Everything was made from scratch and with a lot of patience. Honestly, he changed my perspective on gear forever. Every time someone tells me they “need this” or “need that” to start working on their music, I have to yell “bullshit!” because I know and have heard otherwise.

The Role of Additional Gear

“Yeah but I love the feeling of touching knobs to produce!”

So, where should you start if you want to explore the tactile dimension of producing? If you still feel the need to buy equipment beyond a good pair of monitors, I would recommend the following:

  • Explore to know what you love doing and invest based on what you decide you like. Don’t fall for the classic “If I just have the [insert trendy piece of gear name here], then I will be okay.” Try to understand music on your computer first: play with synths, make beats, see what you like, and after a few songs, maybe you’ll notice you love synths that sound like a Moog. Learn to understand what kind of sounds you like, just like how you find out what labels an artist releases with. The more you know, the more you’ll be able to invest properly.
  • Buy used, rent if possible. Or go hang out with someone who has gear you can try. Make a song with their gear to see if it feels good for you.
  • MIDI controllers are always a good investment no matter what but aren’t essential.

Truthfully, there is no such thing as minimum equipment needed to make music, but the things I’ve outline here are things that will help you get started. I hope this helps!

SEE ALSO :  What is the Electronic Music Equipment Needed to Start Producing?   

Intuition for decisions in music production

In a sense, musical intuition is what defines someone who can bring a bit of creative magic into something, in comparison to someone who sticks to truly technical application of software. I’ve often had the chance to watch experienced producers make music, either while I was visiting one’s studio or on the spur of the moment of a jam. For instance, we once had the infamous Narod Niki experience at Montreal’s MUTEK in the early 2000’s where Zip, Villalobos, Dan Bell, Akufen, Cabanne, Dandy Jack, Monolake (even Cassy sang for some minutes) all synced their laptop and gear to improvise a show for us. Our local festival gave us many opportunities to watch, what I would call, masters in what they do, play in front of a crowd to present how to create and perform. The live act itself, when done properly, should sort of represent what the artist is doing in his or her studio, but in a way that can bring the crowd on a journey.

When I state a live set done properly, I refer to something that is partly prepared, partly improvised: a set that relies partly on musical intuition. Musical intuition is the happy combo that allows for “happy accidents” and creates a sense of risk-taking. There are a lot of pre-recorded performances that I don’t get the point of. What interests me here, is the topic of musical intuition. Ever since I started teaching, this one question is often brought up:

How does one teach musical intuition, or intuition at all?

There are 3 points about intuition that we need to discuss first. Intuition can be:

  1. immediate apprehension or cognition without reasoning or inferring.
  2.  knowledge or conviction gained only by intuition.
  3. the power or faculty of gaining direct knowledge or cognition without evident rational thought and inference.

What I refer to by using the word intuition is a bit different from those three points. For me, intuition in music is how someone does something that seems to be random, but is actually done in a very effective way. Partly unpredictable, partly guided by experience, but entirely guided by a personal vision to arrive at a specific result. This is musical intuition.

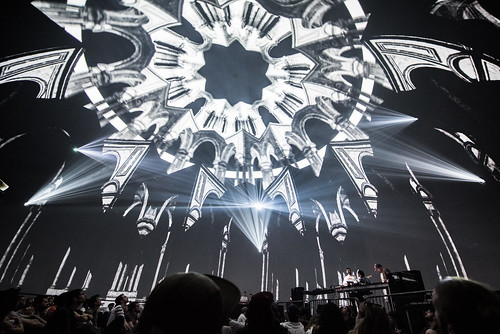
A notable example would be an artist, during a live show, dropping some sounds or a musical idea that was unexpected but works with what’s happening at the current moment completely. Another example could be a musician proposing a random idea and having that incomprehensible idea make total sense after 2-3 minutes or development.

Can musical intuition be learned or developed in music making?

I firmly believe it can be. Some ways to get there would imply:

  • Listening to a lot of music genres, be diverse in the selection. The best way to get new ideas for one song and bring a wind of freshness into something is to translate an idea from somewhere else. The number of ideas I get from free jazz or Indian music are too large to count, but I find a lot of depth into these genres; they have been around for so long that they have developed so much maturity. Try to dig into realms that seem obscure or spend time listening to folkloric music as a starting point.
  • Knowing your tools. This one is overwhelming as there’s always something to learn. I often say to people, what you need to know about your DAW should be just enough to make blocks and build tracks. The rest of it, you learn as you go. But the main part is that you should be at ease with the DAW, and using it should be second nature to you. Moving blocks around, copying & pasting, and arranging basics must be something you can do fast so you never lose your flow. It’s when you start looking for how to do something very simple when you struggle too much and lose your initial idea. Imagine you couldn’t explain to a friend how to get to the nearest grocery store because there are too many details to explain; it would be confusing for him and you.
  • Be attentive to your routines and things you don’t like. We get caught up in what has previously worked, and will tend to repeat it ad nauseum. While part of what attracts people to our music sometimes one specific sound, if we become a slave to ourselves and to people’s expectations, we will fail to grow as artists. Musical intuition progresses with your personal dedication to grow and stepping outside your comfort zone. The easier it gets for you to explore, the more easily you can express yourself. The sense of becoming fluent in music-making will allow you to become more spontaneous and able to come up with new ideas.
  • Nurture technical curiosity. Spend tons of time reading about music, but also, non-music related topics. I have had so many ideas come to me by reading sci-fi novels, watching dancers, reading about architecture, drawing with my son, running in the woods, etc. Your brain needs to do other things other than spending time in the studio. You can only learn to a certain extent in there, you open yourself up to new ideas by doing other things.
  • Rehearse alone and with others. If you can jam on your own to get comfortable in your art, that is one important thing. But when you can then play with a friend, it becomes very interesting as the dialog forces you to interact/propose/listen/adjust. This will improve your communicative music skills by a few notches.
  • Play for friends. I used to do intimate, living room concerts where I would play for 3-4 friends, sitting on the floor, sipping tea, drawing, dancing, chatting but mostly, listening carefully. Those moments are where I’ve learned the most and this is often overlooked as people think playing in front of a lot of people is where the fun is at; it can be, but it’s not the only option. The advantage of playing for a handful of guests is about getting intimate and instant feedback, which can be a very rich experience.

Experiment with these ideas and you should slowly develop your musical intuition. Let me know if you have questions or join my mentoring service to explore your music more deeply.


SEE ALSO : What Is A Mature Sounding Track? 

When The DIY Becomes An Obstacle

I want to talk about DIY – that is, the do-it-yourself approach to making music. Some people have the desire to begin massive projects where they create everything themselves, from scratch. They hunt for samples, they record bits of this and that, they spend days writing and re-writing melodies, they do everything themselves and more, and it takes forever if they don’t become overwhelmed by it all first and end up scraping the project altogether. This is when the DIY becomes an obstacle.

It reminds me of the video that went around the internet about this guy who decides to make a sandwich from scratch and create all the elements needed all on his own. He’s collecting salt from the sea, milking the cow himself, learning to bake bread. etc. Spoiler alert – when the guy finally eats the sandwich (which cost him nearly $1500 in expenses) the result was somewhat mediocre, and disappointing.

People who specialize do ‘their thing’ better, faster, with better ingredients, tools, finesse, and experience that more than often makes a world of difference. In the studio, it’s the same thing. I’m sure there are areas of music writing and production you don’t look forward to and others you could do all day. If we let every obstacle along the way frustrate us and chip away at our mental energy, the effect can be quite damaging.

The path doesn’t need to be cleared from obstacles. Obstacles are the path. (Buddhist Proverb)

You might have a feeling where I’m going with this as I’m a big fan of collaboration in music and productivity in the studio. It’s a great feeling to push ahead quickly in your productions when one person can lead with his/her strengths in an area and vice versa, so the question is – how do you make the most of your skills while taking advantage of help?

Find what you love doing. Identifying your strengths will make a big difference in the confidence, and understanding of yourself as an artist. It’s a task many people I coach and speak with overlook. Is your thing sound design, mixing, searching for the perfect set of samples? The production-oriented tasks where you’re the most happily active and engaged is where you’ll find your strength. On the flip side, it’s important to understand the areas you’re less happy and skilled at doing, and make a mental note of this when collaborating with others. If you can specialize at what you do best, you’ll be a great asset to anyone who is struggling in that department.

Invest in yourself. In whichever area you are strongest in, consider acquiring the best equipment and knowledge in that specialty. For example, if mixing is your strength, you should definitely follow Pensado on Youtube to learn as much as possible about mixing, and learn about kick-ass plugins used by the pros. Find your role model in that department and study what he/she does, what gear they use, how they use it and also go above them, and find out who are their mentors. If you get to know who influences your role model, you’re gaining critical influences.

Check your ego. Have you ever observed yourself snubbing a technique or tool just because you think it’s not for you? How many times have you counted out something great without even giving it a chance? If you can, think if you’ve been avoiding some plugin such as channel strips or a specific compressor, perhaps even a DAW without any evidence for doing so. Also, if something is considered ‘bad’ it’s important to understand the difference from that which is regarded as good and make your own judgment after accessing the facts. Things I’ve read people shouldn’t use have drawn my attention to tools such as multiband compression, which is one of my favorite tools for sound design now. For some reason, rock producers seem to dislike multiband compression, yet I can’t understand why if you imagine what’s possible in the right hands.

As always I want to hear your opinion and look forward to keeping the discussion open ~

JP