Tag Archive for: groove

Building a great groove

Have you ever been on a dance-floor and heard a track that connects with you in a very physical way? Physical connection creates a sort of energy that is infectious and makes you want to dance until your feet give up. This feeling is all about the groove in a track; creating a groove makes the combination of elements and arrangement feel just right to keep you dancing. What follows in this post is my personal take on groove, and the steps I’ve learned that I think work best to create a great groove.

Taking into account that everyone has a particular taste, a groove that can give me this irrevocable urge to dance may not do the same for you, and on the other hand, you may relate to other tracks in the same way which don’t do anything for me. To better understand groove, I recommend that you take a step back and subject yourself to some critical listening.

Critical listening includes listening to some reference tracks with your eyes closed and making mental notes of what seems to work best. How do the elements in the track relate to one another? What kinds of sounds are used? Is the groove driving or swing-y? Listening this way will give you great ideas with regards to what works and what feels forced for you personally. I cannot stress this point enough. Have you ever made a track which you felt was “good” but didn’t create a sense of physical movement or urge to dance? Review the groove and change it, and you’ll hear an improvement.

Based on my own personal taste, I feel that when it comes to groove, less is more in terms of what works best. Subtlety coupled with taking extra care in the sound design/sample-selection stage will help your ideas flow smoothly. Understand which sounds you want to be the “protagonists” from the get-go, and you will be able to fill the space much more naturally. 

Workflow for creating a groove

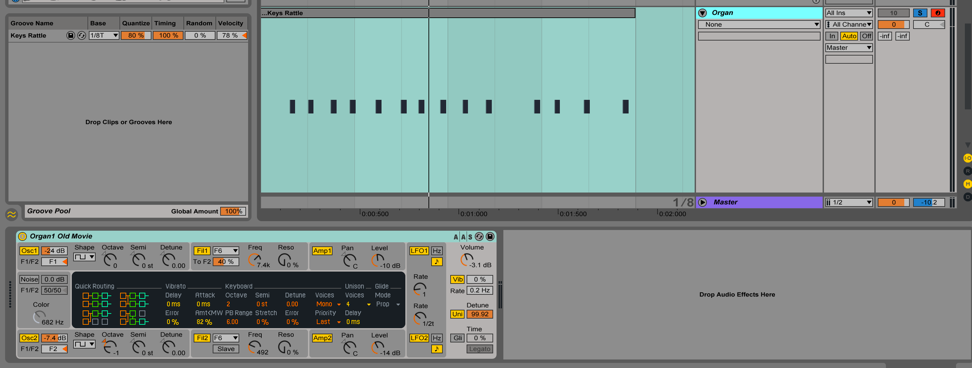
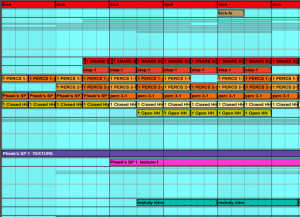
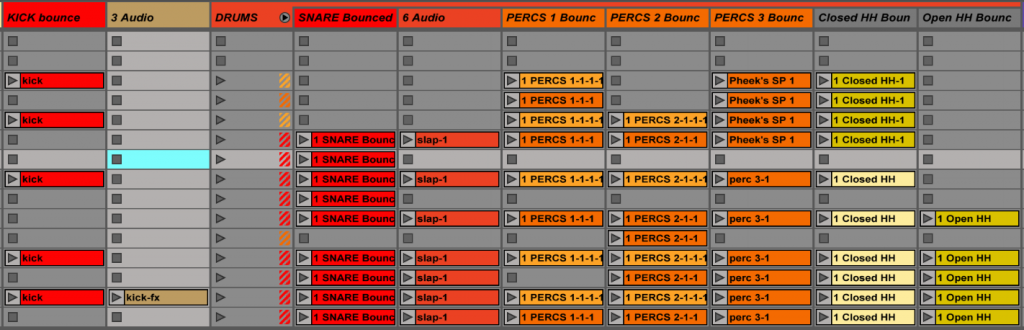
  1. Build a simple pattern. After designing some sounds you feel are nice, take them and start constructing the foundation of your groove. While most of the time drums and percussion are associated with the groove, they are not the only parts which have to work in order to have a nice flow. Pheek’s Guide to Percussion has some great tips on call and response—a concept you must focus on quite a bit to build a solid groove.
  2. Once you have your pattern, add some variations to it. A variation could be muting the kick every eighth bar, or having a hat come in and out sporadically, or even changing the note of a synth stab you are using for the groove. You’ll notice that your groove already feels more complete once you add some variations. Micro-variations help to keep the listener interested as the pattern evolves a bit within itself.
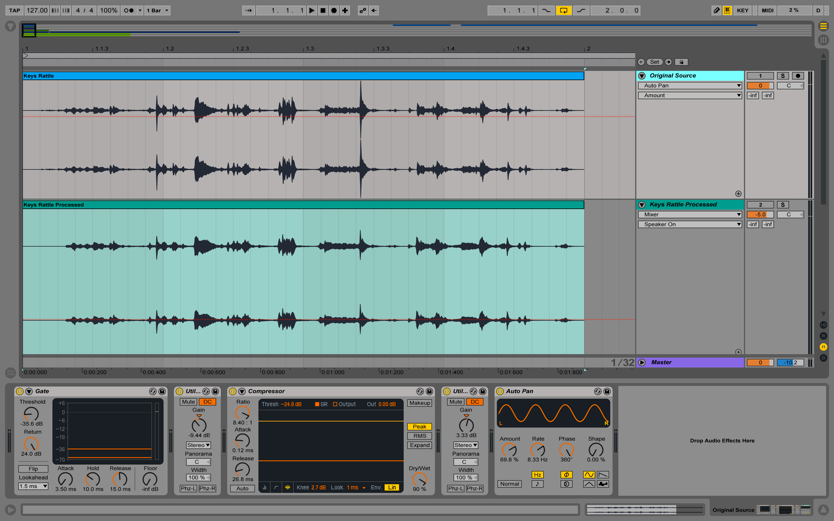
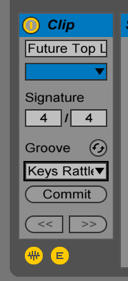
  3. Swing is your best friend! It doesn’t matter if you’re working inside the box or with hardware—take your pattern and apply some swing to it, whether it be via Ableton groove pool or just micro-timing changes (moving things just a tad off grid), this will make this pattern feel less robotic which is what we are going for. This last point is very important for a nice groove, but some kinds of music don’t apply this technique as aggressively because they are just hard hitting and energy driven, but many others rely on these small details and time changes to give a human touch to the pattern. 
  4. Add some effects to your sounds. Instead of programming each MIDI note or step, add some delays—both triplets and eighth notes work well—with some very short feedback and dry/wet. Here’s where you can go crazy experimenting—you will notice that when you use these delays and reverbs your sound begins to morph and ghost notes appear in the background, which make things feel fuller and glued together.
  5. To continue morphing it, apply some modulations and LFOs to control different aspects of a sound; from panning to volume, modulation allows a pattern to evolve on a macro-scale and creates movement, which is crucial in creating a great groove. 

Don’t forget that it’s important that all your elements work well together. If you feel something is out of place, take a couple of minutes to review it—experiment and you’ll create “happy mistakes” which end up being great. I like to use the word coherence to describe how things work together in a track. If a track has a coherent groove in which the drums, bass-line, synths, and other parts work well together, then it will be infectious. Many people use the coherence approach, and you can go crazy with it. Again, listen to some references and use them as a starting point while asking yourself the important questions:

How much swing does the pattern have?

How does the bass-line relate to the percussion and main drums?

Are synths being used rhythmically or as background sounds?

Don’t be afraid to revise a groove, but also learn when to compromise—after a session take a break and come back to it with fresh ears. If your groove is solid, you will feel it. If not, you’ll have an easier time fixing it when your perspective is fresh.

SEE ALSO : Honing your production skills before releasing music

Adding life to sounds: movement in electronic music

Creating movement in electronic music

One of the most misunderstood concepts in electronic music is movement. By movement, I am referring to the way that each sound constantly evolves throughout a song. I was once talking with someone who is very into modular synthesizers and he was saying that he cannot stand recorded sounds such as samples because according to him, those sounds are “dead”. With modular synths a sound can be repeated for minutes and it will never be exactly the same because the hardware components constantly give the sound slight variations. A recorded sound is frozen just like a picture. Since we don’t all have the luxury to own a modular synth, let me explain how we can use software tools to make sounds feel “alive” and develop some movement in our own electronic music.

First, let us agree that movement in electronic music is about having some elements that are in “motion”. There are a variety of different ways to create that feeling:

1. Changes in volume (amplitude)

Volume change in percussion are often associated with groove and swing. Both can alter the volume of the sounds. That said, you can apply a groove template not only to percussion, but also to melodies and basslines. If that’s not enough you can also use the midi effect velocity which can not only alter the velocity of each note, but in Ableton Live it also has a randomizer which can be used to create a humanizing factor. Another way to add dynamics is to use a tremolo effect on a sound and keep it either synchronized, or not. The tremolo effect also affects the volume, and is another way of creating custom made grooves. I also personally like to create very subtle arrangement changes on the volume envelope or gain which keeps the sound always moving.

In general, using LFOs – such as what is offered in Max patches – can be used to modulate anything, and they will automatically create movement. For each LFO, I often use another LFO to modulate its speed so that you can get a true feeling of non-redundancy.

Tip: Combine the use of LFOs and manual edits and then copy sequences until the end of the song. I suggest you try stepping out of 4/4 and regular blocks structure to step out of a “template feel.”

2. Filter

Another great way to create movement is to have the sound always changing its tone. Using a filter in parallel mode is a very efficient way to create colours. The important part is to make sure that both the frequency and resonance are constantly in motion by using either LFOs or envelopes. By being in parallel the sound always appears to be the same but will have some added body to it because of the filter. What many people don’t know is there are different types of filters, so you can try different types of filters into different send channels and then your song will feel like its moving. While filters are great for subtle changes, you can also do the same trick with an equalizer but still in parallel. Adding an envelop on the filter so it detects incoming signal and change the the frequency is also a very nice way to keep things organic sounding.

Tip: Try comparing how a Moog filter can differ from any regular ones.

3. Textures

Background textures or noise is another great way to emulate analog gear. There are many ways to do that, but the one that I recommend is to get a microphone for your iPhone and then record a part of say, your next visit at the coffee shop or restaurant, or even in your house where we don’t realize that there is still a very low level of noise. Adding that recording at low volume to your song automatically adds a layer of every evolving sound. if you want, you can also convert certain noise into a groove pattern which creates a form of randomization on your sounds. Some high quality effects such as saturation used on certain sounds will add a form of texture that prevents your samples from sounding stale.

Tip: FM modulation on a filter or oscillation can create gritty textures.

4. Stereo and Panning

For this point there are different effects that play with the stereo image and – while you should be cautious – it’s good to have at least one or two sounds that have these kinds of effects. Some of these types of effects include of phaser, chorus, flanger, delay, reverb and auto-pan. They can all give the sounds movement if the modulation is unsynchronized and if the wet/dry is constantly being slightly modified.

Tip: Just be careful of what effects you use as overusing can create phasing issues.

5. Timing

A sound’s position in a pattern can change slightly throughout a song to create feelings of movement; a point people often overlook. This effect is easier to create if you convert all of your audio clips to midi. In midi mode you can use humanizer plugins to constantly modify the timing of each note. You can also do that manually if you are a little bit more into detail editing but in the end a humanizer can do the same while also creating some unexpected ideas that could be good. Another trick is to use a stutter effect in parallel mode to throw a few curve balls into the timing of a sound every now and then.

Tip: turn off the the grid locking in the arrangement section to intentionally be imprecise.


SEE ALSO :   Dynamic Sound Layering and Design 

Playing Electronic Music Live – How to Prepare Your Live Set (Part 2)

After deciding the direction your live set will take, we will now discuss how to prepare a live electronic set in terms of how we approach each individual song, or moments as I call them. This article is the follow up to Playing Electronic Music Live – How to Prepare Your Live Set (Part 1)

Before continuing, make sure you have read the article linked above; after which you should have a better idea the style you’d like to play live. Since most electronic musicians are software users, we’ll start with that approach which is easier and allows for playing both at home for fun or in a club. A common mistake I often see from new artists who want to perform live is to make things too ambitious and overly complicated; the preparations become too demanding and actually playing the set loses its fun.

First idea in preparing your set: turn your tracks, finished or not, into moments to be played live.

In a previous post, I said that making many loops is something that eventually pays off. When you want to play live, it’s always best to have a lot of options on hand that you can trim, to see what works together and then turn these perhaps unfinished loops into new songs.

For years, I always had a main project file for playing live in which I would test drive any new ideas I would worked on done over a given period of time. This live set was like a laboratory for experimentation; it was where new ideas would sprout, where loops became completed tracks, and where some sounds were replaced or remixed into another track. In other words, I recommend turning your unused arrangement loops into a scene in Live, play them, and record the output. Rinse, repeat.

But where and how do I start? 

For example, let’s take this simple arrangement and see what we can make out of it. Let’s say you have a track in the works or done, partially set up in an arrangement view (Note: Any DAW, in arrangement, not just Ableton); firstly, you’ll need to know how the track is structured.

Figure 1 – Arrangement view with markers


Do you want to play the track like your arranged it or do you want to have the parts so you can improvised with the different section?

As you can see in the above screenshot, I have inserted markers in my arrangement which represent the main changes between sections; everything is mostly organized in blocks. You’ll need to slice out these blocks to trigger them, and also what will become important is how you decide to play them. If some parts are heavily chopped, I would recommend that you either turn that section into an entire block, or if you want to jam those sounds you could add them to a Drum Rack. It depends if you want to do some jamming in your set or not. The point here is to have a better view of how your blocks exist so that when you are in the session view, the parts are easy to see.

1st TO DO:

  • Stretch the little blocks that repeat to create bigger blocks that cover the area where they should be repeating (note: make sure the clip is in loop mode) .
  • Use cmd+j to consolidate chopped blocks into bigger block. If some blocks have changes in them, consolidate them as is.
  • Use colors to clarify where the blocks have changes. Say a block is repeating until a given time but then changes pitch; you could change the color of the one where the pitch is changed to symbolize this change.

Figure 2 – Consolidated vs. Unconsolidated blocks

In Figure 2, the left section has been consolidated, and the right side hasn’t. You can the Duplicate left section to the right after consolidating this way.

This may appear time consuming, but it’s not that much extra work and it will pay off once you move everything to session view.

When you’re finished here, you need to bring the new blocks into the session view.

If you have groups, I’d suggest to ungroup them. The reason is that it is not only inconvenient to use groups in session view, but there are chances that your groups differ from one song to another, and in the end it might be more confusing than helpful. If you have grouped FX, I’d suggest you export the entire channel as a stem and decide later how to use it in a live context. You could perhaps decide to use FX during the live and so, not to bounce the channel. It’s hard for me to tell you what to do here.

2nd TO DO:

  • Grab all clips using cmd+a, click to grab, press Tab and then drop them in the session view.

    cmd+a, click to grab, press Tab and then drop them in the session view

  • You might have a really large amount of clips. After moving things to session view you’ll see that some “scenes” are made up of the same clips. You’ll need to delete all scenes that are the same; you don’t need them. In the end, you might go from 60 possible scenes, to about 5 (!). In live situation, you want everything in front of you, and the simpler things are, the faster you’ll be able to get in the zone. You can also go from Scene A to B, to C to D in any order, which gives you the option to remix your music on the fly.
  • Some people might have a huge number of channels grouped in 5-8 groups. Groups make things difficult to play live as they add a lot of complexity. I’d suggest you perhaps export the track’s stems for the groups and then chop them in sections as I explained above. This might also eventually invite you to reconsider how you use channels – I often feel like people use too many. I never use a single channel for a one hit that happens once in a song. I’ll have a reserved channel where I drop all the one-hit sounds. This can be a game changer for you if you use many as smaller projects are easier to understand and you’ll feel more focused (and use less CPU!)


Regarding the number of channels to use, you’ll need to do tests on your own set up before deciding how to do this. In the previous post on this topic, I was advised to be careful with the number of channels/tracks you use. Ideally you want to deal with a max of 12. To trim down the number of channels you are using in the event that you are already using more, you’ll need to mix down a few that are similar or combine channels that don’t have much going on. For example, I’d have a channel that would be a longer loop that would combine all FX and random hits. Playing it as a longer loop as opposed to a shorter one creates more of a live feel that isn’t as “loopy”.

Rehearse your session by hitting certain clips or triggering a scene to see what happens. Once you have removed the redundant scenes and trimmed down the number of channels, you’ll start having a first real glance of what your song looks like in terms of playing it live.

Of course, you’ll deal with the existential question of if you want to play the track “as is” or have a special version just for a live context.

Personally, I think it’s a bit boring to not offer something different in a live set, Two ways you can change things up are through pacing and jamming. jamming will be touched on more in part 3 as it is a very important part of preparation and can also be something that can also forever change your approach regarding how you make music.

Pacing will be the last part of the preparation of your live set. I will cover most of the preparation phase of pacing below, and the following blog post will be more concerned with how to play your live set.

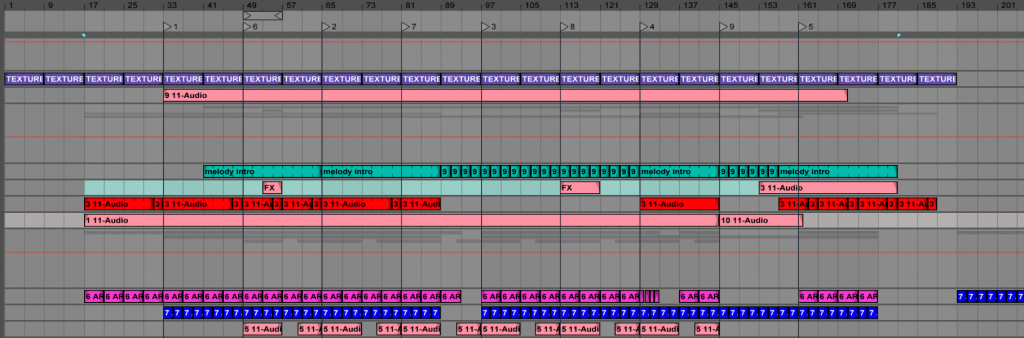
I think my best live sets were good mostly because they had a core to work around that had some preparation, but also had a lot of room to improvise, dependent on how the actual event turned out. These sets were versatile; I could open an evening with them or play peak time, mostly because of how flexible they were. These sets were more or less made up of the same songs but the variations would be so easy to perform on the fly that I could really just follow what felt good to me in that moment in time. I’ve never really understood the point of having an overly prepared set. I’ve tried the prepared approach before and it just made the whole experience boring, because there would be no risk-taking; it also felt out of sync with whoever was listening. For example, imagine that your track has been built to have a drop, breakdown at one precise point and a moment of tension after, but if the dance floor is just starting to warm up when you drop, you might lose people’s attention or it might feel out of place.

A well prepared set has moments for building tension, others to release, variations, and material to raise the intensity if needed, without it being a fixed bunch of parts that aren’t easily movable. Each songs need an intro and outro so that you can move from one song to another in a very flowing way, just like a DJ would do.

Last TO DO (3):

  • Try to decide on the first scene of your songs. They shouldn’t be too busy but usually, you want a solid groove plus some teasers of the melody to come. Establishing the groove is always important to get people’s–what I call–dancefloor trust. That trust usually comes from kick-low end that is clear and precise, which people can relate to, no matter what happens in other parts of the frequency spectrum.
  • Your intro should have openness and space. If you have a melody, try muting a part of it. This will allow the possibility of mixing a part of the melody of another song with the current song; they will be “talking to each other” by echoing. This happens when the first few notes of a melody are answering the last few notes of another melody. DJs love that in a song and by playing live, you’ll see why; you’ll discover “dialogs” between your tracks which could even teach you the good and bad of your track’s arrangements.
  • Define the hook. The main hook of your song will follow the intro. It doesn’t mean you’ll drop the hook right away, as you can build towards there.
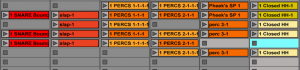
  • Set two variations of the hook with some complementary percussion. If you listen to a DJ set, especially techno or loop based music, you’ll see that it’s mainly a loop with variations. Try to have variations in your percussion, melody or bass. That way you can toggle between the hook and this part. I really really encourage you to listen to DJ sets to get ideas.
  • Create one tension-making moment. This can be a breakdown or a moment where something happens. I always loved to define this moment to be a scene where effects and atmosphere to create something exciting.
  • Release the tension. This scene is basically what would be played after the breakdown or tension-making moment and it’s usually the hook with some more intensity and or variations. This scene should be the most important one.
  • Outro. This is similar to the intro but it should be slightly different.

In the next post, we’ll go into more detail about the actual clips and how to create the perfect little “laboratory” for you to jam with. I’ll propose some ways to jam that will open doors to finally playing live and having all the fun that comes with it.

SEE ALSO : Playing Electronic Music Live – How to Prepare Your Live Set (Part 3)  

Self-Imposed Rules For Arrangements

When you’re up against the wall, pushing forward to break through and get things down can be taxing. It’s a mental game of will and strength against creative effort. What you need to know is this – waiting around for that very brief moment of inspiration and creativity will always lose out to dedicated, and consistent hard work. Does it have to be this hard all the time? Is there a way I can out-smart more difficult and time-consuming tasks? I’ll be the voice you can hear saying yes you can. And it’s easier than you think.

Over the years as a working producer, I’ve never stopped learning from others and finding ways to improve my skills and technique across all areas of music production. One thing I’ll share with you that I wish I’d picked up early is this – creating self-imposed rules for arrangements. Rules? What? I’ll explain.

For many producers, the stage where you arrange your tracks seems to be something you don’t look forward to. I get that, I’ve been there. I’m always hearing that the vibe and soul of your track seem to change in a less exciting way once you sit down and begin laying it out. You’ve told me often that when you get to that block in the road, the party’s over. Listen, don’t stop the music just yet.

I’m successful and prolific as an artist because I get the hard jobs in my day done. I don’t hide from the tasks that I used to avoid doing. I get right to it and start with some of the toughest work first. I beat through them in a way that isn’t painful or tedious anymore. Using rules isn’t like flying on auto-pilot, but a lot of the tough decisions are pre-decided for me.


This might sound too easy, or pure brilliance, yet people all over the world use this process to offload the hard mental work of making decisions to get to the finish line faster. If you want to achieve more consistent and impressive results, read on.

(you know this is a key focus throughout my blog, finding ways to maximize your creativity and efficiency, by organising our workflow to spend less time on the mundane and challenging, and more time on the rewarding and exciting parts of our work)

Let’s talk about imposing internal rules on yourself. My definition of rules would go as: Using certain techniques to create an engaging song structure. And remember – rules can be broken later, but you’ll find it so  much more helpful to get started quickly and make fast progress as opposed to starting slowly from zero.)

It’s given that there are many reasons why a listener might be engaged with your song – the quality of the mix, a great loop, the catchiness of the hook, etc.. Most people will admit to being drawn to a song (or having a song stuck in their heads) by the storytelling structure of the arrangement. Creating a tight and well-sequenced arrangement is one area where many people struggle to achieve properly. Their songs lack correlation, which is to say, the combination of repetition vs change. This is one area of songwriting where rules can help tremendously by pre-defining how each sound can be used.

Here are some examples of rules that I would use:

  1. Direction: is this project for the club, for headphones, for a cinema project? Knowing this will dictate every choice that follows.
  2. Sections definition: this is a critical one, which I’ll define as -a part of the track where one idea is used in a certain way, and you’ll go from one section to another, hearing a clear and noticeable difference.) Depending on the genre some arrangements are tight, verse, chorus, verse, chorus, bridge, verse, etc… Many arrangements stick to a repeating formula, which in this case is a good thing because we listen along and quickly know what to expect. It’s here where you can add and create variations to the sounds which can elevate the intensity in a mighty way for the listener.
  3. The sequence of percussion. Is this sequence the same over 8 or 16 bars? As before you want to create a stable pattern that repeats itself and can sustain the other elements of your track. The benefit to using repeating structures is that only a small change is needed to introduce a big change, which will grab the listener’s ears right away, and create anticipation for the next part. Hats or claps are often used to create this variation.
  4. Block sequence and colour: If there’s variation in the same channel for one sound, I highly recommend changing the block colours to indicate that difference. It’s fun and efficient to place your blocks in a visual pattern,”blue-red-blue-red-blue-orange.
  5. Superimposed blocks: This is the natural follow up to the previous rule. Imagine you have 2 channels, each their own colour sequences, your visual pattern can be created from combining both channels. This is quite useful when you want two different sounds to call/answer one another. You’ll see them one on top of another, as a pair.
  6. Blocks size: I like to make a sequence for my kicks and then grab them to consolidate (+j). That will create a larger block that I’ll duplicate until the end. Now, I can demand that those kick drum blocks won’t change at all, allowing me to focus my energy on creating variations for my shorter percussion blocks. Imposing block sizes is one of the most liberating ways to speed up the arrangement process!
  7. Live Blocks vs static: You’ll find that every track I have will include individual elements that are an audio recording of some live manipulation. For me, those blocks are ‘Live’ while the ones that have no manipulation to be ‘sleepy’. You can decide to have a certain ratio of live ones vs sleepy.
  8. Perspective ratio: Perhaps my favourite. While a ratio in third is the usual (ex. intro, middle, end), you can also have more but each ratio should be the same length more or less. How many sections fit in a moment is really up to you.
  9. Surprises %: Simple right? How many surprises will you give the listener? Too many will lessen impact while too few might not engage the listener enough and they’ll find your track boring.
  10. Silences: Super important element. Silences in music can give great power to the notes played. You’ll need at least a tiny moment where you’ll give air to your mix by adding silences to a part. Think creatively about how to want to create space in your sequence.


As you can see, the rules you can create and apply to your track can be anything you wish. The best part about using rules in your workflow is that you’ll greatly speed things up by off-loading much of the mental guess work to a process that’s already been pre-decided. This all means more fun in the studio, more music finished, which is a win-win from every angle.

SEE ALSO :    The Science Behind Tracky Music 

Creating Timeless Music

Recently my Facebook page was flooded in a fantastic way. This thread became overwhelmed with comments I was happy to read because it reminded me of how much music can drive and affect our emotions. We’re talking about timeless music.

I asked my FB followers to name some music that hadn’t left their DJ bag for years. These were the records that passed the test of time, and truly stood out as ‘timeless’ music. Which brings up the question, what is it about some music that makes it sound timeless? In many cases, music that has content touching on deeper themes can be easier to connect with since right away it feels more personal. Music can have a way of suggesting and expressing emotions which words sometimes cannot, which is why music is often such a powerful medium of expression.

A friend of mine mentioned that music with a particular sound or mood would seem to have a personality of its own, which is a similar comment my friend Vera told me about the records she always carries with her – that certain records were like friends or companions to her. Some records work better with others and some work really well in a very specific context. Some people talked about keeping certain records to close out their sets, and others perfect for a sunrise.

In a past article, I covered how to develop many ideas quickly, but also explained the lottery of finding a good one. This can be quite a complicated topic and in some ways impossible to pin down as a science. Despite the fact that so many popular songs can, and have been written very quickly, there is still no exact science to writing great music. That being said, it’s worth spending a minute to look at a few common denominator between these examples.

Let’s explore some theories you can put in place so that hopefully, you may one day create timeless music of your own.

First, some will say achieving a state of grace, which in psychology, is often labeled as being in a state of flow. Many artists have, and can touch that feeling yet sadly will often rely on substances to reach it again, which is in many cases counter-productive. What exactly is flow?


In positive psychology, flow, also known as the zone, is the mental state of operation in which a person performing an activity is fully immersed in a feeling of energized focus, full involvement, and enjoyment in the process of the activity. In essence, flow can be characterized by a complete absorption in what one does and loses a sense of space and time.

You could also see this state of ‘flow’ as an activity where time flies by so quickly, and you are so absorbed by what you do that you can feel it is being made by nearly itself, in the most natural way. I would say that this is not something essential, but usually, as you make music and have experienced this state you’ll agree that some of your best music will be written during this time.

Another way you can approach writing music that sounds more timeless is to be aware of current trends in music, and understand what really defines what’s popular. There is no shortage of studies that have looked look at chord progressions common throughout different eras, and identified a winning formula. The use of the right chord progression mixed with innovative techniques of an era will make a musical and well-written song truly stand out. David Bowie is one artist who always had the flair to find and collaborate with upcoming, creative people to push the edge creatively.

 Get it done, and get a lot of it done.
Being productive helps if you avoid censoring yourself, and not to overthink the process. In other words, if you made 50 tracks over a span of time and 5 of those were truly excellent, will always be more prolific than spending years having only made five great tracks.

Below you’ll find some tracks that made it to the suggestions people did and what made the tracks timeless would be categorized to a few main points.

Melodies: More than often, a haunting melody or something very catchy will make you remember a track.

Innovation: Using some new technology or personalizing a technique. Sometimes what you can do is take a way used in another genre and apply it to what you do.

Arrangements: There’s no secret here to say humans love surprises and arrangements are the art of playing with expectations, unexpected moments, gratifying cues and misleading ideas. The balance of these elements, the ratio of events in your track, spread in the right perspective, will make your timeline, timeless.

Mood and emotions: When you hear an accordion playing in a restaurant in Paris, even though the song is probably 100 years old, you’ll automatically connect to the mood, the emotion and understand why that musicality belongs to the streets of Paris. You know that will still be played in 100 years too. It fits. Using triggers as these in some ways can really help your music to connect with a context.

To finish my point of view, I’ll share some of the tracks people suggested that got attention and I’ll try to explain why the track can be seen as timeless.

This track by Maurizio (Moritz Von Oswald) was when I felt I really clicked to the more minimal movement back around 1996. It was one of the first low key track that was completely hypnotizing and that could be played at pretty much any moment, mixed with anything (almost) and up until now, it has been copied, influenced the whole dub techno movement. It’s for sure, a well-known classic by any DJ that’s been digging for a while. Excellent to drop in any set, it’s one of those tracks that you can’t go wrong with. Would this record have the same appeal if it was released today? It’s still strong!

Timeless for: Innovation, use of pads, groove and endless feel.

Isolé got really big through the release of his track “Beau Mot Plage” which, when released, automatically went in most of DJs bag, listening to techno, house, etc… It’s just a beautiful, well-produced record that brings a smile when played. There’s no doubt it will be a classic for the next 20 years as well.

Timeless factor: Melodies and arrangements.

We were lucky enough to first see Ric play this during his live set at MUTEK in 2002. He had it sketched out and played it at the festival. It’s one of those records that, when played, often get people to ask what song is this. Mainly because there’s a super catchy bass at first then the guitar drops and it automatically creates an atmosphere where things feel suspended. The nostalgic, yet profound feel, and tone of it makes you want to listen to it on repeat. There’s no doubt the guitar use is what makes this track memorable.

I’m flattered this track came as a suggestion to have in the bag. When Hubble and I made this track, we weren’t expecting it to get the attention it got (it was on sale on Discogs for 150 euros at one point before the repress). Soon we saw videos of DJs playing it and gave us goosebumps. It seems that this track is one that you can drop in any set, mixed with other songs or by itself and it locks you in. I’m biased because I was involved in its creation but I get the attraction by DJs to play it.

Laurent Garnier is the man behind this track, and even though it’s from 1993 is still playable right now. It’s romantic to think back then, we were making music of the future yet this one really made it there. This acid bass and melody are making things work so well in many situations, and there’s no doubt it’s a classic now, raising hands when dropped. I believe it has made a good job at grabbing a snapshot of what was rave music of the early 90’s.

Very beautifully made, catchy melody and overall, this is the kind of song that can seduce pretty much anyone. You’ll feel Paris and you’ll feel love. It’s certainly not something you can play anytime you’d like in your set but I can imagine someone playing this to end an event and would have exactly the right effect.

SEE ALSO : The Art of Keeping People on Their Toes 

Riding the Grooves in Ableton

Have you ever felt that your music’s rhythmic structure lacked a certain human touch? This seems to be the general consensus among producers, yet there is a simple solution to this hitch in the road. It’s caused by what I believe is the biggest drawback to producing music within a DAW: the musician tends to pigeonhole himself or herself by needing everything to sound perfectly aligned to the grid.

From experience, however, I think I can affirm – with a reasonable degree of certainty – that this method does not reflect how humans operate. We are not precise, monotonous machines, and we are most definitely prone to error when jamming live with acoustic instruments. There is even a certain beauty in this rawness, as music perfused with slight imperfections tends to appeal to the ear as more natural and groovy.

In order to achieve this particular “effect,” Ableton Live allows the producer to import a collection of rhythms, called grooves, into any MIDI or audio track, so as to either alter the current rhythm already written or to add an element of surprise or randomness to the audio.

The Ableton Core Library has a myriad of classic grooves that you can choose from, from MPCs to Latin percussion to hip-hop. However, in this tutorial, we’ll get really advanced and show you how to get creative by making your very own grooves.

Step 1: Record any percussive sound

I’ve recorded myself rattling my keys using nothing but a Macbook (you don’t need to get fancy).


Your recording will most likely sound like crap, so feel free to cut out excess noise with gates or tame peak transients with compressors.

Step 2: Modulation (Optional)

Add a creative effect that will automate the gain (volume) of your signal. You can draw automation curves or pump (sidechain) it with Ableton’s Autopan. The point is to create as many dynamics as possible by playing with the volume so that it translates into the clip’s velocity once we extract the groove. You shouldn’t have to do this if your signal is already very dynamic.

Step 3: Bounce

Consolidate the clip and its effects by either resampling it onto another track or simply freezing and flattening the track (by right-clicking the track).

Consolidate the clip and its effects by either resampling it onto another track or simply freezing and flattening the track (by right-clicking the track)

Step 4: Extract groove

Right click on your consolidated audio sample and select Extract groove.

Step 5: Groove pool

Open Ableton’s groove pool by selecting the wave in the lower left side. Your groove should appear in this box.

Step 6: Add groove

soundpicture2You can consult the Live manual or other tutorials to better understand what things like “base” and “quantize” mean, but make sure the timing is set really high (i.e., how much the groove pattern will affect the clip). Drag the groove name onto any audio/MIDI sample or loop track, preferably something percussive like a drum loop. Notice how the rhythm of your track has changed, and how certain transients sound louder or quieter, or appear later or earlier. If you increase the velocity of your groove, your signal will respond heavily to the volume changes in your original signal (which is why I used the Autopan to create dynamics).

Press “Commit” in the clip view, to destructively write the current groove settings to your sample. This means the sample’s pseudo-markers will move in accordance with the quantization setting, and your transients will translate the rest of the settings you selected in the groove pool.


Original:

Processed:

Step 7: Layering

Hopefully, you’ve saved your original percussion loop so that you can play it with your newly made rhythm. Notice how there’s percussion a bit everywhere now, and that it’s a little bit off. Yet I’ve still opened doors to new possibilities that I couldn’t have predicted by simply drawing in MIDI notes. I even got a wonderful slap-back delay on the snare, which I can edit to my liking.

I’ll go so far as layering the two sounds with a reversed sample of my new groove, which gives me this:


I’ve then added back the original keys rattle sample, and simply applied sidechain compression to get this beat:


Although it sounds a little all over the place, I can always go back and edit it how I want, or even apply some effects! Note how it sounds more human now and not perfectly cut to grid.

soundpicture3

Bonus: Step 8

Go back to Step 6, and drag your groove to an empty MIDI channel instead of an audio or instrument track. An empty MIDI clip will appear with notes matching the groove you created. Drag an instrument onto it to hear how it sounds. Although it will probably sound awful, you can always edit the MIDI notes to your liking!

soundpicture4

Bonus: Step 9

You can even get away with layering organic textures such as strings, or pad with grooves. Make sure to apply different groove settings to each layer by duplicating the groove (CTRL+D/CMD+D) and dragging it onto the track that you want. You can control all the different grooves together with the Global Amount value at the bottom right of your groove pool.

Examples:

SEE ALSO : Background vs forefront to create dimension