Creating Depth in Music

I don’t know many people who took theatre in school, or aspired to become an actor or comedian. For me, having a background in theatre has shaped my vision of music, performance, and storytelling. In Québec, we have a “theatre sport” called Improvisation, where teams meet in a rink to create stories and characters, out of the blue. After practicing this for 20 years or so, it’s shaped how I perceive songs and sets. There are so many parallels to music in theatre: how a story develops, the use of a main character, supporting roles, etc., all of which can be applied to the use of sounds in a track.

A story is never great without quality supporting roles. Support adds depth to any story, and richness to the main character. Think of all the evil nemeses James Bond has faced—the more colorful they were, the more memorable the story, and the same goes for songs.

You might have a strong idea for your song, but if it has a good supporting idea or two, then you’ll end up with a song that keeps you engaged until the end.

I’ve been really into minimalist music lately; I like music that has a solid core idea that evolves. I was reading a really nice post on Reddit about Dub Techno where one of the main criterion discussed was the importance of simplicity. Simplicity doesn’t make something dull or dumb—in music it can be a reduction of all unnecessary elements, in dub techno resulting in a conversation between the deep bass and the pads and other layers.

If you’re immersed in electronic music, you’re generally used hearing multiple layers and often multiple conversations between sounds. Percussion layers will be often related to themselves, but the main idea is usually supported by a second layer. I often hear this in some indie rock songs too, especially ones that have some electronic elements in them. The way the human ear works, is that we will always hear the main component of a song as the centre of attention, but attention will shift back-and-forth between different layers. The advantage of having depth in music is that it encourages repeat listening. For a listener to replay a song and hear something new is exciting; some songs will grow on them even though they may have felt overwhelming during the first listen.

How can you create secondary ideas and “supporting roles”?

There are multiple ways to do to add depth to your songs.

Negative Space

The most important part when you program or write a melody, is to leave some empty space in it, which I call “negative spacing.” This space is where your secondary ideas can appear, supporting or replying to the main idea. I usually start by writing a complex melody, and then will remove some notes that I will use elsewhere, either in a second synth, bass, or percussive elements. Here are some suggestions as to what you can do with the MIDI notes you remove from the first draft of your melody:

  • Use the same MIDI notes from your melody, but apply them to multiple synths or other sounds to create variations and multiple layers that all work together.
  • Use the MIDI tool chords and arpeggios to build evolving ideas that come from the same root.
  • Look into some MIDI-generating Max for Live patches that can give you alternative ideas. I’ve had some fun with patches like Magenta, but also with the VST Riffer or Random Riff Generator which are really interesting.

The “Fruit of the Tree” Exercise

This is an exercise that is a bit time-consuming that I have a love/hate relationship with. You spend time playing the main idea through intense sound altering plugins. So, if your main idea is a melody, imagine you send it through granular synthesis, pitch-shifting, a harmonizer, random amplitude modulation, etc.—you’ll end up with a bunch of messed up material that can be shaped into a secondary idea while still being related to your original idea. The idea is to transform what you have into something slightly different. There are multiple plugins you can look into for achieving this:

  • Vocoders, mTransform, mHarmonizer, mMorph: These all work by merging an incoming signal and with a second signal. So, let’s say you have your main idea or melody—you can feed it into something completely different, such as a voice, some forest sounds, textures, or percussion, and you’ll obtain pretty original results.
  • Shaperbox 2 is the ultimate toolbox to completely transform your sound by slicing, gating, and filtering it, with the help of LFOs. This is pretty much my go-to to create alternative tools quickly. One thing I like to do a lot, is to run two side-by-side on different channels, and then use them to create movement that answers one another. For instance, one will duck while the other plays. You can also use side-chaining in the newest version, which can create lovely reactivity, if you use it along with the filter to shape the tone by an incoming sound. This allows you to do low-pass gating, for instance, which isn’t really in Ableton’s basic tools.

Background Sounds

The lack of background sounds, or noise-floor, always leaves people with the impression that there’s something missing in a track. This can be resolved with a reverb at low volume that leaves a nice overall roundness if you keep it pretty dark in its tone. Low reverb creates an impression that a song is also doubled, or wide. Another good way to make background sounds is to load up a bunch of sounds that can be played multiple times in different sections of your song, at very low volume. I was checking out this producer who does EDM/festival music, and he would use sounds of people cheering at a very low volume in moments where the chorus of the song would hit, to create more density and excitement. However, at a high volume, this approach can conversely create a “wall of noise”, so it should be crafted carefully.

If you simply drop a background sound into a project, such as forest sounds, you’re missing out on one of the most enjoyable activities in making music, which is to create your own live sounds. A forest has a bunch of—what seems like—random sounds. You can alter this, and say have a basic 5-second background of noise-floor and then decide when the bird chirping comes in via automation and perhaps have them sync to the tempo. This creates a bit of a groove too. A good exercise is to try to create sounds that emulate nature as you’ll have a bit more control over the sounds (and you’ll learn more about sound design in the process).

Ghost Notes

Ghost notes are mostly discussed as they relate to percussion, but they can be used, as a technique, with anything. A common example of ghost notes is their use in hi-hats, as a bunch of in-between hats at a very low volume to fill up space, which stretches the groove and but avoids too much negative space. Aside from using this technique on the low end—where sounds need a lot of space and room to breathe—make sure everything doesn’t sound mushy. The use of a delay in 16th or 32th notes can be a good way to create ghost notes.

A tap delay, where you can program where the delays fall, is also super fun in terms of creating ghost notes, as you can use one to make complex poly-rhythms. However, I suggest cutting some part of the high-end from the delays to avoid clashing with the main transients, and make sure the volume is very low. Using a AUX/Send bus for delays can be quite useful.

SEE ALSO : Improving intensity in music

Are all Electronic Tracks Starting to Sound the Same?

Recently, I noticed someone on Facebook post something like “why are you guys all making the same track over and over? All the tracks are sounding the same and you’re killing the genre I love.”

I think he’s partly right. As a label owner and mastering engineer, I hear a lot of tracks, and many do sound the same. I remember that in the mid-90s, there was a moment when I was playing some hard techno at a record shop—listening to a pile of records I wanted to buy—and half-way through, I noticed they all started the same: they all had a break at the exact same spot, used the same rides, etc. I left the entire pile without buying anything. I was really into minimal, but back then it was much harder to find music of that genre, let alone anything interesting enough to buy. In that moment, I lost total interest in hard techno and got into other genres. At that time, everyone wanted to sound like Adam Beyer—10 years later, everyone wanted to sound like Minus/Richie Hawtin—and now, 10 years after that, everyone wants to sound like artists who could play Sunwaves in Romania.

We love genres for certain reasons, but as time passes, we might start disliking them for the same reasons. Somehow, we hope that a genre can be constantly reinvented in a linear way, so we never get bored. If a genre gets popular enough—and people see that learning how to make it can give them some sort of recognition or return on their work—you get a whole bunch of people repeating the same ideas that got the genre popular, over and over. The genre is then flooded with a crazy amount of songs that are all made up of the same basic ideas, just arranged differently.

So, how can you make sure you’re not falling into this trap? To start, you might want to read my post about how to reinvent your sound.

That said, what makes a genre stagnate? What makes a genre feel like it’s lost its soul? I could go on and on about this but I’ll try to keep it short.

Formula-Based Techniques

Before writing this part of the post, I went on Beatport and had a look at the “minimal” section. I’ve been very familiar with this section since 2006, when I joined that platform. I find that if you want to hear the common denominator of a specific genre, just listen to the top 10 sellers of it on Beatport. Recently, it seems like things have changed—I was happy to see that the top 10 minimal tracks didn’t all sound the same (but the same can’t be said about some other genres I checked out). However, even in the minimal category, I can tell that shuffling and swinging of hi-hats, and breaks all seemed to follow the same kind of formula. The top 10 best-selling tracks on Beatport are, in my opinion, never the most creative songs. The majority of DJs who buy tracks for their sets want transitions to feel smooth, so their sets feels seamless. Approaching music production this way results in a couple of issues:

  • What gets popular, and heard the most, becomes a standardized form of expression. The genre gets characterized by standards of production based on what people play, and this causes new and old artists to conform their music to fit the mold.
  • Seeing formulaic music sell positively reinforces artists to repeat similar ideas.
  • Production-wise, formulaic music does not age well. Down the road, it will have no personality, and it might just sound gimmicky or bland.

As you can see, this becomes a pretty nasty pattern for creativity, as things that are slightly outside “the norm” might get rejected unless they’ve been charted by bigger names (which is why DJs get bombarded with promos).

For example, here are some formulas that a genre might have:

  • Use of a specific sample. It can be a type of kick (i.e. 909 for techno, 303 bass-lines for acid).
  • An effect (i.e. lush reverbs for dub techno).
  • A swing type (i.e. the 65% MPC swing in house).
  • Programmed sequence (i.e. trap has a very recognizable way of using hats and snare, minimal techno has a particular way of using backgrounds).
  • Structure (i.e. the use of long breakdowns and bass drops in some genre that have become the norm).

Potential Solutions

To be aware that formulas exists is already a huge step forward, as you are mindful of the potential trap you might have fallen into. Some people often say to me that they just want to make the music they like, and not worry so much. That’s great, but there are also other options, such as:

  • Take the common denominator of a genre and add something new. This is a good way not to throw people off too much. For instance, in the “deep minimal” section, I noticed that the hi-hats are all quite similar—these types of hi-hats could be your anchor to build from while adding something new. If you really care about your sound, I’d encourage you to spend some time listening to the top 10 of whatever genres you’re interested in to see how people are working. This way you won’t repeat the same thing (this is the opposite approach some people will outline if your goal is to make a “hit”).
  • Do you have a personal signature sound? Some artists like to record themselves making a specific sound, or will design something that they use for each track they make. This is usually a good idea to make yourself a bit more personable.
  • I often discuss the use of reference tracks while producing, especially in the arrangement section. You can see and hear how a track is built, and make decision to counter certain recurrent use of a structure. For instance, if you notice that multiple tracks are often taking a kick-pause around 1 minute before bringing a bass, perhaps you might want to do the opposite by bringing the bass before 1 minute and do a kick-pause at 1:15, for example—mess with expectations.
  • One of the pitfalls people tend to fall into is thinking that adding elements will create a new style, but I find that removing is often the key. Stripping down what you have and really working existing sounds might create better results and can point you in new directions. For instance, when I work on a clap, I like to have 4 different variations total; that’s all.

The Availability of Samples

Online stores offer quality samples based on what’s in demand from producers. Sometimes, they’ll even approach successful artists to propose using a sample pack of a certain type. While you can use samples as they are, if you create a few loops of your own this way, you’ll automatically sound like a trend. It should be no surprise that I encourage you to tweak all your samples at least a little.

The best way to tweak samples quickly generally follows the same few types of tweaks:

  • Pitch-related: You can alter the pitch by loading the sound in a sampler or using a pitch-shifter. I really like using an envelope that will modify the sound which makes it a bit less static, compared to simply altering it.
  • Effect-altering: Reverb, chorus, and phasers are always helpful. A multi-fx plugin like Movement (by Output) is a really easy shortcut to new ideas. You can also use presets from different effects in your DAW and quickly swap presets to find a starting point, then play with the knobs to see what comes out.
  • Transient/Decay: If you can play with an envelope that alters the length of the clip in a sampler, it’s always interesting, as you can discover “hidden” parts of the sound. Sometimes, I like to start the sample later, when it’s less loud, and then add gain, then shorten it. You can get some really off-sounding results, especially with kicks and percussion, where you create a nice surprise.
  • Multi-band is to me the solution to approaching sound design in new ways. Whenever you have a sound, you can split it into 3 bands, and treat each of them independently. This can be done by quickly by using a multi-band effect or by duplicating a sound 3 times so that each channel has a band in solo, and the sum of 3 channels is the sound itself (tip: use the Fabfilter EQ3). One of my favorite tools in Max for Live is the Shaper. You can create an LFO, and then apply it to any knob of an effect, like the Utility Tool from Ableton. Modulate the gain or panning for example or bring saturation only on the highs or add EQ changes in the mids.

Structured Predictability

When you listen to a specific genre and can predict when certain elements will happen, you know that the artists making it have fallen into the trap of predictability, which is one of the most common issues in music production. To keep the listener interested, you need to create a balance of new ideas alongside a world of known territory. This usually keeps engagement with the track going, because it’s not entirely predictable. Again, a reference track is helpful to spot moments where there are elements of predictability. In your references folder, perhaps you have a sub-category of case studies where you can have a few “generic track structures” so you can use those do the last polishing of your arrangements.

Also, I love to save my project (eg. Ableton’s .als file) on the desktop without any samples. When you open a lost file like this, Live will be display an error messages that some samples are missing and you’ll only see ghost clips in the arranger. From there, you can import new clips of your own and distribute them into the structure that’s already in place. However, with using pre-made arrangements this way, you should pay attention to avoiding repeating yourself, in the ways I’ve described in this post.

SEE ALSO : How to maintain consistency in the quality of your productions

Improving intensity in music

Intensity in music can be a tricky balancing act. In our Facebook group, one member recently asked about how he could improve the intensity and excitement of his tracks. He makes electronic music, and feels that compared to some producers he likes, his music doesn’t match in terms of excitement. After asking him a few questions, I realized that the tracks he shared as examples he wanted to emulate were mostly songs with high levels of density, and perhaps not the levels of intensity I thought he was referring to. The term “intensity” is very different from one genre to another; in this post, I’ll try to cover some of the different ways we relate to intensity, and also some tricks and tips as to how to make your tracks more intense-feeling.

Loudness

One of the main aspects of intensity is the loudness or volume of a song. Humans are often tricked into thinking that loudness directly correlates to the intensity of a song. Concerts at high volumes give music a physical sonic experience that people like. Artists often try to replicate the live experience through volume levels or even compression.

However, when making music, there are a lot of other things one needs to pay attention to in the process—loudness should be the very last thing to worry about. Volume/loudness levels can only be adjusted once your mix is proper and flawless. Some people play with mastering tools such as Izotope Ozone 9 as a mastering assistant to help push songs up to a higher level, but if you think loudness is the key to intensity, you might run into issues. Heavily boosting the loudness of a song ruins all the finer details that were worked on so much, via too much compression.

If you want to play with the perceived loudness experience, one thing you can do is make sure that your mid-range frequencies are mixed at sufficient levels, or even perhaps a bit louder than what you’d usually do. Humans will always hear something with a good mid presence as “louder”, even if the overall loudness is lower. A plugin like Intensity by Zynaptiq can really help bring intensity to a song, but can also do subtle wonders at lower levels.

Another thing you can do is play with saturation. This gives a gritty feel to your track’s sounds, adding textures, depth, and relative power as well. Harmonics by Softubes is often my go-to plugin when it comes to applying saturation to mids. It really brings out an organic brightness in sounds that almost always sounds good. Saturation also creates the impression that something is louder, but not in a compressed way.

Density

Similar to loudness, is density: how many sounds you have in your mix at a given time that have very little difference in volume. You could have multiple percussive sounds, for example, and all of them equally loud. Doing this occupies a lot of room in your mix and makes sounds feel more like they’re at the forefront. The denser a mix, the less room there is for depth, but a dense mix can have a lot of immediate power.

For certain techno songs, density is often in the form of a wall of machine-gun type hi-hats which are always going. This creates excitement in the highs. In tribal music, density comes from percussive sounds, but in the mids, and in dubstep, it’s pretty much all about the low end (although dubstep tends to overcharge the full frequency spectrum).

An interesting genre that people often simply refer to as ambient, is drone music. Drone, in a loud venue, becomes a pure noise show so intense, it can give you very powerful body sensation. At MUTEK, I almost puked after a drone show.

If you want an alternative way to create density, other than simply using a lot of tracks, you can also play with the decay of your sounds. Longer hats, kicks, claps, and other percussive sounds will add intensity via density. If you have certain sonic limitations, decay can also be “created” with a gated reverb which will add a tail, but I’d encourage you to use a darker tone.

Background and noise floor

If you go to the most quiet place you can think of and record with a field recorder, you’ll still hear noise in your recordings at a very low level. In general, there’s always some sort of noise surrounding us. It can be the fan of your computer, a car passing by your apartment, people talking in the background in a quiet coffee shop. When you put your headphones on and make music, you might have the impression that your music feels empty and that usually comes from a lack of noise floor. In Dub Techno, songs are often washed in a sea of reverb, which creates a space that feels comforting. Using a long reverb can create a low level of noise that is naturally pleasant to the ear, but there are also other ways to create a noise floor:

  • In many minimal tracks, people will mix in field recordings. You can find a lot of field recordings for free online. They can be from anywhere, but you can event record noise from where you live and use that (some producers love to have a microphone in their studio to pick up noises of themselves as they work). You can also spend time creating your own invented field recordings using day to day sounds that you mix with a white noise and reverb, then lower the volume to -24db or lower.
  • Use hardware equipment and use a compressor to bring up the noise.
  • Take a synth and use a noise oscillator to create a floor. You can then add volume automation to it to give it life, like side-chain compression.

In the tracks the member of our group shared which I mentioned at the beginning of this post, the noise floor was just as loud as the main sounds, which then created an impression that the song was really, really dense, loud, and busy.

Powerful low end

One thing people often do for intensity is create really powerful kicks or basses. They’ll have them mixed way louder than the rest of the track, but this often results in a muddy mix, as the details will then feel covered or too low. But in many genres, the importance of a solid kick is often directly related to the intensity of the song. A tip—the clap or snare, should also be equally intense, with a presence in the mids; this relationship will make the track feel very assertive and punchy.

Creating a powerful kick is not an easy task, but you can achieve better results with a combination of Neutron‘s transient shaper and multiband compressor. This will allow you to shape your kick so it’s fat and round. But even if you end up with the most powerful kick you can create, a mix can still feel like it’s lacking intensity unless the kick is properly mixed. Proper mixing of a kick’s low end can often be done by high-pass filtering or EQ’ing some parts of the bass so it doesn’t mask the kick. You can also use a tool like the Volume Shaper or Track Spacer to give clarity to the kick.

Exciting effects

Transitional effects, fills, and rises/falls are always a popular way to create excitement in your track. These are often effects you can use straight from presets and simply apply them on random sounds that are already in your project. I usually like to have two channels per percussive sound I use. Not only for layering, but sometimes the second channel of a percussion will have an effect that I’ll use once or twice. You can have dedicated channels that are effects only, and then drop sounds from your song into that channel. This can be done with a send/aux channel too, but I like to have a FX-channel on its own, as it’s more visually clear.

Popular effects that can help create intensity and excitement include delays, panning, reversing sounds, and reverb, but if you’re looking into something out of the ordinary, I suggest you look into unusual multi-effect plugins such as SphereQuad, Tantra, Fracture XT, Movement, and mRhythmizerMB.

Dynamics

A lot of people don’t seem to understand dynamics, and what they mean in music. Dynamics are often simply interpreted as compression, but if you really use dynamics in an exciting way, you need to think about it as the contrast or range between two levels. Imagine someone whispers something in your ear, and then, all of a sudden, starts talking really loudly; it will create a shock or surprise. Differences in sound are a good way to create surprise and intensity—the greater the difference between the two sounds, the louder or more intense the second sound will feel, or vice-versa. You could have section or certain sounds in your song that are quieter for a moment and then get louder. Dynamics don’t necessarily always refer to volume, however. For example, you can create a moment in a song in mono, and then go to full stereo mode—this difference is also surprising for the listener.

Finally, one thing to keep in mind about intensity in music: if you immediately give away everything your song is about in the first few seconds of a track, you’re mostly likely going to screw up the ability to create intensity, tension, and excitement in the entire work—it will be really hard to keep a listener interested for the entire duration of a song if he or she has already heard your “climax”.

SEE ALSO : Textures Sample Pack

Integrating a modular setup with your DAW

Using modular in Ableton or another DAW of your choice opens up a range of possibilities—from simple multi-tracking where a modular is just one part of the musical whole, to MIDI style sequencing, and to the exchange of complex control voltages between the DAW and modular system.

I’m going to run through the three basic methods of integrating a modular system with your DAW:

  1. Basic synchronization with a clock signal
  2. Sending MIDI from the DAW to a MIDI to CV converter
  3. A purpose-built CV tool to output CV directly 

Clock synchronization

The simplest method of integration is simply sending a clock signal from your DAW to a clock module in your eurorack. That can be as straightforward as sending a regular 1/16th rimshot (or any short sound with a fast attack and sufficient volume) pattern to a clock module. With the volume as high as possible (Euro levels are higher than line) it should work. However, not all clock modules are the same—some might not respond at all to a line-level signal, in which case you’ll need a signal processor to boost your clock signal.

Syncing a clock is computer-modular integration at its most basic. With a clock signal you can record into your DAW and keep things in time with your plugins or other hardware. You don’t have transport controls or any sequencing options.

If the appeal of modular is escaping the computer and your DAW is a necessary evil just for recording purposes, this is the way to go.

MIDI to CV converter

Most synths and all DAWs use MIDI as their main control method. MIDI information includes pitch, note on and note off, and velocity. With the right MIDI to CV module you can utilize all of this information and convert it into CV and gate signals. For flexibility and price, I highly recommend the Mutant Brain module from Hexinverter Electronique, or the CV.OCD from sixty four Pixels (essentially the same thing but in a standalone box).

Unlike CV, which is a continuous signal, MIDI is made of discrete digital signals. These signals have a fairly low resolution, which means they  cannot express a smooth curve. Smooth LFOs and pitch slides—portamento—are beyond MIDI’s capabilities, except through cunning workarounds. So, portamento messages in MIDI simply tell the instrument when to turn on portamento and how long the oscillator should take to slide to the next pitch, but if the MIDI device controlled the oscillator directly and tried to implement portamento, you would hear distinct stepping of pitch. Similarly, you can send MIDI LFOs to some MIDI to CV converters (including the Mutant Brain) as CC messages, but they will be stepped audibly, depending how you are using the LFO.

Still, the ability to tap the vast world of MIDI sequencing—from your everyday piano roll in the DAW of your choice, to ingenious little Max for Live devices, to dazzling iOS apps like Patterning—will be enough for many people.

Custom software and hardware, or a DC-coupled interface

For a long time this section would have included only one company: Expert Sleepers. Their suite of plugins, Silent Way, in conjunction with their ES-series of modules, have offered high resolution integration between DAWs and analog equipment for around ten years. They support both the output and input of control voltages using either one or more of their own ES modules, a DC-coupled audio interface, or a non-dc-coupled interface and some pretty basic DIY circuitry.

What is DC-coupled?

All audio equipment deals with two types of electrical signals—AC and DC. All audio signals are AC (Alternating Current)—they alternate between a positive and a negative polarity. A DC (Direct Current) signal alternates between 0 and a positive voltage, never going into the negative. A DC current should never go into a speaker. Speakers work by pushing the speaker cone in and out/ When the cone is pulled backwards, into the speaker, the voltage is negative; when the cone is pushed outwards, towards the listener, the voltage is positive. A DC current would only push the speaker cone outwards, without letting it spring back equally far—you can probably imagine how this could damage a speaker.

So…in order to send CV signals from your computer you need a device that can output DC voltage. Expert Sleeper’s hardware fills this role. Or you can use a module to provide a DC-offset, such as Doepfer’s A-183-2 or A-138. You might already be using an audio interface with DC-coupled inputs; most notably, all of MOTU’s audio interfaces feature DC-coupled interfaces.

Once you have a means of outputting DC signals, Silent Way offers perfectly smooth LFOs, envelopes, pitch perfect sequencing, smooth portamento directly out of your computer, and lots more.

As I mentioned, for a long time Expert Sleepers was the only company offering this type of product. However, in the past few years a couple of other offerings have appeared. First, in Bitwig Studio, then Ableton came out with a suite of CV Tools in Max for Live. These all offer similar features to Silent Way and which one you prefer might come down to which DAW you’re using.

I’d like to finish by outlining one feature that’s found in all of these products—Silent Way, Bitwig and Abelton’s CV Tools—and which might just be their “killer feature”: automated frequency calibration. With the high resolution control voltage they can output, coupled with your DAW’s ability to analyse audio, you can calibrate your CV signals so that your oscillators track perfectly in tune, over the full audible frequency range–even if they don’t intrinsically track well at all. All those weird, characterful oscillators that are never in tune, the analog drum circuits, the self-resonating filter that sounds amazing but doesn’t respond to anything like 1v/octave – all of these can now be played in tune! This feature makes these products very tempting….

SEE ALSO : Live recording with the Ableton session view

The benefits and risks of using a reference track when mixing

In the group I run on Facebook when we discuss using a reference track when mixing, I often ask people what sort of tracks they have been using as a reference—I ask so regularly that people find my predictability funny. There are so many reasons why I encourage people to use a reference track when mixing, but for me personally to give someone feedback, I find it critical that I provide commentary based on the artist’s views. In the early days of the Facebook group, someone posted a song and everyone was criticizing its kick, but after a bunch of people commented on it, we all realized that the song creator was trying to mimic the low end of a very lofi song where the kick was intentionally “ugly”. From the perspective of people who love highly-produced techno, this particular kick was “wrong”, but only from this point of view. There’s no one-size-fits-all kick.

I encourage people to be super careful with feedback they give to artists in the event one may not totally understand what that artist is trying to do. I’ve developed this habit as a mastering engineer—if you’re too technical and detached from what the person is actually trying to do, it will be hard to really achieve mastering results that will please them, while respecting the artistic direction he or she is trying to achieve.

Think about using a reference track in the same way as how a painter might draw someone—it would be easier for the painter if he/she had an image of the person to use as a reference. Of course, the painter could try to “freehand” the drawing from memory, but it would probably end up less accurate.

The main concerns people seem to have with respect to using a reference track is that it might be too much of an “influence” on what they’re working on, and that they’re trying to find their own original sound. Many people think using a reference track would sort of corrupt their vision.

The problem is, if you’re trying to “sound like no one”, you’ll get a lot of confusing feedback about your work because most people won’t understand it. People always have something already in mind when they listen to something new. They’ll compare and try to make sense of it, but if it’s totally unsettling, they might feel a bit lost. If you refer to something they know, then there’s link that can be made by the listener.

A reference track can only be used for certain portions of a song and not all of it, which to me is the reason why it can’t totally corrupt your vision. Plus, if you use the same reference a few times, you’ll introduce new habits into your workflow, and this will ensure that your tracks are on the right path.

How can a reference track benefit your mix?

  • Tone: This is mostly what I use references for, myself. The longer I work on a track, the more fatigued my ears get, and I lose sense of the lows and highs. If I can quickly A/B another track, I’ll know if I’m on the right path.
  • Arrangements: If you know a track is really successful at, let’s say, creating a tension, or really nailing it with the timing of the drums in a timeline, you might want to study its structure to understand it.
  • Mix levels: Very useful if you want to know if one element of your sounds is loud enough in a mix, then you can see what kind of relation the reference has. People are often confused with the mids which is the part I always fix in clients’ works; I can fix it because I can check my references that have very clear, present mids. Mids are critical to have right on a big sound system.
  • Loudness: You can also check if you’re matching the power of your reference—but keep in mind that your reference has probably already been mastered by someone with experience!

How can a reference track harm your mix?

Despite having many benefits, using a reference can have pitfalls as well. The most common error in using a reference track is using a song that’s actually poorly mixed or mastering and trying to emulate it. If your reference isn’t great from a production point of view, you risk messing up your whole perspective on music production and mixing up what’s “good” with what’s “bad”.

How should you find a good quality reference track?

If you’re in doubt, to me there are two main ways to find a reliable reference track:

  1. Ask a reliable source to validate something you’ve chosen, or to provide you with one that’s similar to your selection. The source can be someone in the industry, a record store owner, a DJ, a fellow producer, etc. Make sure your source is someone you trust.
  2. If you go out in a club and hear something that sounds really great, ask what it is. There are a lot of people who want to know what’s playing so if the DJ is unable to tell you, perhaps someone else can.

Once you have your reference track chosen, you can compare anything to it to see if it’s in the same “ballpark”. Try to get a 24-bit WAV or AIF version of the reference track. Once you have a high-quality version of the reference track, I recommend “audio jogging” everyday—listen to the reference on your sound system, not too loud but at a comfortable level, and then don’t change the volume for the whole duration of the session. Now your reference track has been set up as a guide for you to work from; cross-check your own project with the reference as you work!

SEE ALSO : How to balance a mix

Live recording with the Ableton session view

Many people who sit in from of a computer to make music find this style of music work counter-productive or “too nerdy”, and will always prefer using gear, instruments, and live sounds to create music. If you’re finding your workflow too rigid when working in the arrangements view of a DAW and feel like your usual song structures are “too square”, it’s good to remind yourself that there are other ways to make music.

If you feel limited in your current production style, finding a better way might come from exploring alternatives.

This is partly why modular synth music feels free—tweaking a machine you can’t entirely control with often unexpected results. Similarly, in DJ’ing, the DJ is the master of when a song starts, stops, and how to control certain outputs. One of the best ways to see where you yourself stands is to understand what brings you excitement when you make music. I often hear stories of people struggling with an inner voice telling them how music should be made The Right WayTM and they’ll sit in front of their DAW hoping something happens, but what comes out feels weak, boring and not worthy of any energy. These individuals have been misled in what is believed to be The Right WayTM (though for some the DAW approach works).

The last thing you want to do if you’re bored of DAW-based production is to jump straight in the modular world, especially if you don’t know much about it. Even though you may have read a lot about modular, you might get started with it and not really enjoy it either, which is a waste of time and money.

Explore low-cost alternatives

My view and approach to finding a new way to produce your music is through low-cost gear or instruments, and a drive to explore less predictable music-making methods. When it comes to knowing how to make music, I always insist that what you should master first is the knowledge of your personal tools and how to get the best of them. It takes time and patience, but this approach starts you on a road to success with controllable results instead of facing a long list of failures resulting from never truly being an expert at any tool you use.

Using live audio recordings in Ableton Live (and other DAWs)

It’s easy to forget that you can totally turn your production methods with Ableton Live (or any DAW, for that matter) upside-down without spending a dime. One of the most powerful aspects of DAWs—though sometimes under-utilized in electronic music—are their ability to process live recordings. “Real”, original audio recordings feel more organic than pre-made samples or boring MIDI blocks. So, how can you go about working with live recordings in an effective way?

Gather your loops for source material to jam with

Pre-made loops

There’s a lot of bad-mouthing out there regarding the use of pre-made loops. If you use them “as-is”, you risk having the same loops as other people’s songs, and perhaps be accused of not being original. However, don’t write-off pre-made loops completely—there are many advantages to using them.

  • Search for quality loops. If you hunt for loops, chances are you’ll find some that sound great, and perhaps some will also have at least one sound that you might be interested in. It’s important that you train your ear to what good quality sounds are, and that you are able to see how they are sequenced and processed.
  • Slice the loops into smaller pieces. Once you have a loop, right click to use the option of Slice to MIDI. Once sliced, you can trigger the sounds you want to keep and reprogram them.
  • Drop the slices in a sampler. Using the sampler, you can also isolate one part of the loop, and by playing a note, you can control its pitch—another way to recycle sounds from pre-made loops.
  • Use envelopes. In the clip itself, you can draw automation for gain/volume, and have part of the loop playing while silencing other parts. You can also automate pitch if you want. The fun part in using envelopes is to create automation that isn’t linked to the length to the clip itself—a good way to create strange results or polyrhythms.
  • Adjust the length. You can make tiny loops out of long ones, and you can create strange rhythms by having the loop points a bit “off”.

Recording your own loops

If you are one of those people who doesn’t like tweaking things on a screen, of course you can always record organic sounds yourself, and create source material from those recordings instead of using pre-made loops created by someone else. Once you have recordings saved, you can always tweak them in a similar fashion to the methods we just discussed.

How many sounds or samples should you create for your song?

Collecting and creating quality sounds from pre-made loops takes a fair bit of time and research. You need to do part of the sound design yourself in order have decent material to make your song. As an example, below I’ve created a list of what I believe to be “the bare minimum” to create in terms of loops and slices before to have a productive jam. Keep in mind that this is for mostly electronic music, but it could also apply to other genres:

  • A 2-bar loop minimum of kick or low end sounds that mark the tempo.
  • A 2-4 bar loop of low end material. This can be bass, filtered low synths, toms, etc.
  • 3-5 loops of rhythmic elements to be used as percussive material. For percussive sounds, I strongly encourage you to have at least A/B structure, as in 1 bar of sequence and then a variation in the second. The AAAB pattern is also a great way to keep ears interested.
  • 1 main idea—as long as you like—which will be your hook. Often this can be a short phrase, a melody, or something one can sing. Main ideas work well if they can evolve and develop.
  • 2 sub-ideas to support the main idea. This can be through call-and-response with the main idea, or something in the background. These ideas are secondary to provide support, not to stand out.

I know this seems like a grocery list, and it feels perhaps still very far from the main topic of this post, but keep in mind that if you’re not so found of doing all this, you can also get pre-made loops to practice programming sequences with PUSH.

The power of the session view and recording yourself jamming

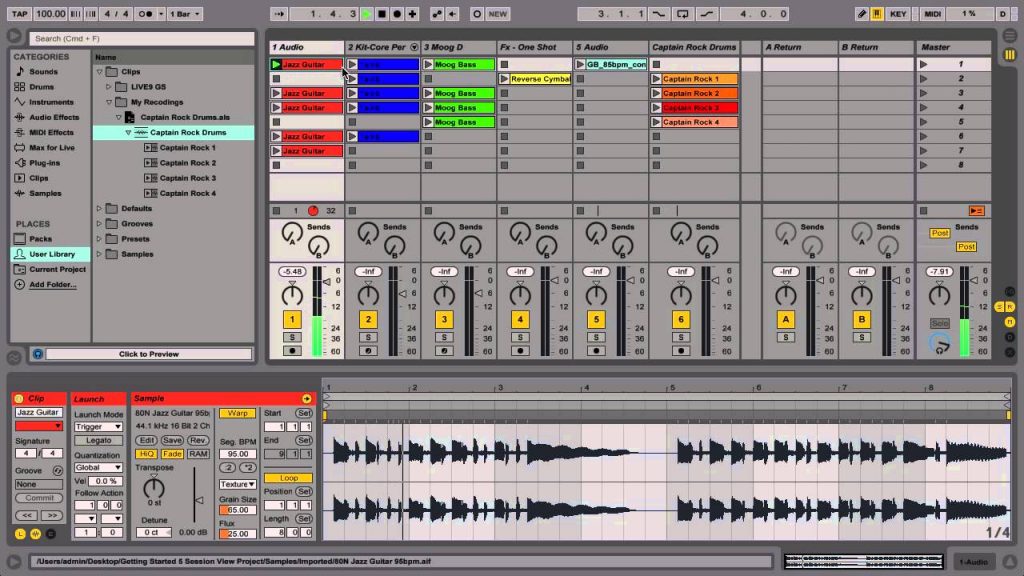
Ableton’s session view

Often misunderstood and misused, Ableton’s session view is a very powerful panel that allows you to jam, play, improvise and explore.

Start by building scenes, starting with the main idea from your song. Imagine your song and how it might sound right in the middle of it, when everything is playing together. I know it can be a bit confusing to imagine, but this helps you generate ideas. The second row of the session view could, for example, be the same clips as the first arranged differently. Following that, perhaps you add more new ideas, and so on. Just make sure that row X with, lets say kicks, only has kicks—one sound per column. Basically, you want 10 lines of material to jam with; then once you have this, you jam.

Now that you’re ready, hit the record button and record yourself jamming. Don’t aim for perfection, don’t aim to make a song at all, just jam and eventually you’ll end up with great moments you can use.

TIP: Change the global quantization to 1 bar or less and experiment with how it goes.

When you press the record button while in the session view, everything will be tracked and recorded on the arrangement view. Afterwards, you can slice out the best parts of your jam, and then arrange them in a way that makes the song interesting, while avoiding feeling too “on the grid”. You might even end up with material for multiple songs. I strongly encourage you to read about the creative process I use to start and finish tracks, but working out of jams is very pleasing. I often use jams myself when I have a lot of loops and aren’t sure how to use them in a song.

SEE ALSO : Integrating a modular setup with your DAW

The art of making long, linear songs

I’ve always said that long songs are in a way, a genre in themselves. If you think of an artist like Brian Eno with his long meditative songs, or Villalobos with his spaced-out explorations, they all have a way in to people’s hearts who understand the sort of exercise involved in long songs. Since I’m a big fan of long-lasting songs and can’t never get enough of them, I thought I’d write about how I view creating them, and then share a few tips about how to make efficient but meaningful longer tracks.

Why make long songs?

There are as many reasons for making longer tracks as there are people who make them, but I think the main two reasons are:

Immersion: Longer tracks immerse you in a mood and moment, and will sink you into a world that overcomes you.

DJ tools: Some artists who DJ love long tracks because they can layer them to create new ideas. Having a long track lets you focus on carving the two (or more) tracks playing, in order to have content to play with.

Long, linear music in-itself isn’t meant to be listened to with your full attention, but more as something you let take your body over.

Eno’s Reflection is a masterpiece of ambient music.

Brian Eno explained long songs quite well, saying “[they] shouldn’t be enough to have your full attention nor be boring enough to be forgotten.” In generative music, this means you can include musical ideas, but they shouldn’t be overpowering either.

For North Americans, long songs and extended sets are often misunderstood as bars and clubs close early, and immediate satisfaction is what DJs tend to go for. Sets should be exciting and deliver a response within 5-6 minutes, and therefore music that lets things go on for a while isn’t always fitting the needs of these types of DJs. In Europe for instance, clubs are often open until 6:00am or later, which means the crowd is very patient and understands that tension building is part of the pleasure of listening to a DJ play. Long sets are favoured by many Romanian DJs, who prefer using long, linear music as a way to focus on a mood, rather than an immediate reaction or excitement. The thrill is to see where things will lead to, more so than enjoying “a drop”.

The reason I mention a drop is because resisting the temptation to make one in longer tracks is important, but also because you have to trust the DJ who will use your longer track. Plus, if you intend to make something long, it’s nearly impossible to have exciting things happening for 20-minutes. This is also why long tracks are often hard to swallow for the average listener, as they often seem too “noodly” and pointless, since it can sometimes feel like there’s a lack of direction or a goal in the song.

The main goal of long tracks in sets is to play a supportive role. In a movie, a good secondary character is essential in making the main character seem stronger. Overdoing it or taking up too much space isn’t helpful, and likewise an overly pale or weak supporter is equally useless. Some actors become very solid in secondary roles and are just as in demand as the main characters (yet, that is often overlooked by the general public).

This is why long tracks don’t necessarily need to be interesting, but perhaps, more technical while carrying a strong motif—but the theme should be clear, useful, catchy, and timeless. I’ve played live many times in my life—I’ve always approached gigs with improvisation as my focus. I don’t believe in totally planned sets, as I may have to deal with certain sounds not coming out as planned. In the past, at many shows I’ve ended up carving a groove that fit exactly what the crowd needed, and stretched it over 10 minutes. People wouldn’t get bored because it was what was needed at that time.

One philosophy of long tracks is to provide the DJ with material strong enough to fit into his or her set. You create, then you trust it will be used properly.

Approaching long tracks this way is different than making a track for let’s say, vinyl, which is usually between 5-to-10-minutes long. Using shorter tracks as a model, we can revise the architecture of those tracks and translate them to longer works. Below are some approaches I find to be useful in creating long songs.

One main idea, supported by two secondary ideas.

This approach is the key to having something solid while keeping it simple. What usually ages well is music that is simple, compared to more complicated works. If you know my music, this might seem like a contradiction to my own work as mine is complex, but that’s another topic. I’m talking about music I personally still love, 20 years later.

For example: One main idea could be a melody, supported by a vocal and a trippy and catchy percussion sequence.

Divide the song into 3 sections.

Intro, core, and outro are usually enough to make a song structure. The intro and outro should be easy for a DJ to mix, for bonus points.

Have one new element per section to motivate the listener to keep listening.

This can be an effect, a sound that evolves, a change of tone, a raise of tension, etc. If the listener feels there’s no reason to continue listening, he/she might stop altogether.

Insert an Easter egg.

The idea that you can have one element in a song that happens just once is a bit surprising—it might not be heard on the first listen but makes the listener want to start the song all over to hear it again. The Easter egg is not part of sub-ideas and is not part of the element per section I described above; it’s something on its own.

The first minute dictates the language and pattern of the track that will then repeat.

If you use a pause every four bars, keep that logic until the end (unless you want to be a trickster and play with anticipation).

Structural organization based on part of 32 beats is welcome.

When it comes to long tracks, the logic is slightly similar on certain points as it is to shorter tracks. There’s no written laws but certain tricks make a difference.

Sections are ideally over 4-5 minutes.

Keep in mind that this is a bit of a long shot, but if you structure your music by periods of 4-5 minutes, you’ll create the impression that your song evolves and moves, and that it actually has something worth paying attention to.

The first five minutes dictate the logic of how your song will progress.

In a shorter track, your initial outline of the track might be based on a 1-minute idea, but in a longer track it could be a 5-minute idea. Long tracks benefit from solid structural organization as they are made to be layered.

Try to keep in mind that long sections are pretty much like a 32-beat section.

You can create an A/B pattern where two sections alternate.

Don’t have more than two main ideas and a maximum of four sub-ideas.

Over-crowding your song will be counter-productive if your goal is to make a track that’s meant to have a supportive role.

Experiment. Break rules. Throw an oddball in there.

Long tracks are meant to create space for experimenting, something an artist might not do in a shorter track. For instance, I like progressions over 3 minutes long; sounds that creep in so slowly that you have no idea where they came from or for how long they’ve been playing. One trick I learned from Villalobos is to have a very oddball breakdown, or complete change-over right in the middle of the song. He can do a complete break at 11 minutes for a good 2 minutes where you have no idea what’s happening. He does this mainly because that very moment will be layered over something else he’s playing, and he’ll always find a way to make it work.

Don’t worry about repeating an idea over and over.

Long tracks can be repetitive; they’re not made to be listened to as-is anyway, for the most part.

Years ago I created three songs that were over 20 minutes long—it was an experiment from which I learned a lot. To my great surprise, it was used by many DJs in Berlin back then. Some people would drop the long tracks to be able to go pee in the middle of a marathon set, while others used them to layer and create something special. Now that you’ve read about my own approach to creating long songs, you can listen to how I used the ideas I’ve just described in the track below:

SEE ALSO : Creating a music sketch

Mixing projects with many tracks or sounds

If you are familiar with my music, you know I love things complex and busy. Many people in our online community share songs they are currently working on that have a lot of content in them, so I thought it would be practical for me to share what I’ve learned about mixing too many tracks at once.

The pros and cons of using a large number of different sounds in a song

Pros

  • The song becomes exciting to listen to.
  • For listeners, there’s always something new to discover on each listen—this is good for replay value.
  • A song can develop complex call-and-response story-lines. After multiple listens, a listener might notice that certain sounds are “talking” to one another.
  • A song becomes very colorful—covering many frequencies of the spectrum in a single track can feel like a rainbow to the ears.
  • Movement—using multiple sounds can be a cool way to create the impression that many things are moving at once.
  • Stereo effects—if you like action and panning, playing with the panning of many sounds can be fun.

Cons

  • The song can feel overwhelming. Work by someone who is not familiar with producing with many sounds can feel irritating and hard to connect with if the brain of the listener doesn’t know what to focus on.
  • Complex tracks are harder to DJ. If there’s a lot going on in a track, it can be hard for a DJ to find other appropriate songs to mix it with.
  • Complex songs can feel confusing. If a sound isn’t well mixed, it can be confusing on certain sound systems.
  • Phasing issues—if you’re not careful, some sounds can technically disappear in mono, and on some sound systems, this effect can be weird.
  • The timelessness of the piece suffers—if you’re overdoing it, it might be difficult for people to get emotionally attached to the track and it will not age well.
  • Losing the hook in the mix—it’s super important to have your hook be very clearly discernible in a jungle of sounds.

Despite these cons, it can be quite fun to use a lot of sounds in your work; most of the risks come from technical challenges in mixing too many tracks or sounds at once.

Sometimes people crowd a track with tons of different sounds because they’ve spent too much time on it and they’re afraid people will get bored.

Mixing multiple sounds requires the producer to approach the mixing process in a few different phases. Let’s say you’re happy with the arrangements in the track—you can then move on to the next step(s).

Should you mix while working on your arrangements simultaneously?

Yes and no. When I’m arranging, I make sure the levels are OK but I won’t deploy an armada of plugins to polish the mix yet because it drains CPU and also because some unfinished arrangement details might completely change the mix itself; I would have to re-polish afterwards.

One of the first things I do when I get to mixing is to question if all of the sounds I’ve included in the project are essential to the narrative of the song or not. You can start by listening to the song and perhaps cross-checking with a reference.

How does one know if a sound is essential? Try removing it. Sometimes, having fewer sounds in a mix can be beneficial to other sounds so they can be heard properly. If you are in love with certain sounds, you can save them for the next track you’re working on if you don’t think they work in your current mix.

Establishing a hook

What’s your hook? Is it the bass? Or is it a 2-bar melodic sequence? Are the rest of your sounds either decorative, percussive, or supporting your hook? What’s the purpose of those additional sounds? People will remember the hook when listening to your song—the other sounds can be described as “decorative”. While some producers are really against using too many decorative sounds in a song, there are no rules to making the music you like and I encourage you to say to anyone telling you “you’re doing it wrong” to just mind their own business. If you like lots of sounds like I do, that’s all that matters, really.

In the late 90s, there was a huge interest in minimalist techno. One of the approaches that artists like Hawtin were obsessed with back then was trying to use as few sounds as possible in a track and still getting their message across. [Hawtin] would come up with an idea and surround it with only the bare-minimum; his idea was that a track was a part of a bigger picture that included assembling it with other tracks.

Mixing with groups

Mixing with groups can be done in many different ways, but to use groups effectively it’s essential that you have a good understanding of the nature of each sound in your project. For instance, I usually have a big group named “Percussion” which will have its own sub-groups. The sub-groups can be different themes on that main group:

  • Same “family”. All “metal” samples could be grouped together, wooded ones, synth, tonal, atonal, etc. Having a group for each family of sounds is excellent for EQing similar resonances these sounds might all have.
  • Same length. All short samples could be grouped together, all long ones, etc. This is useful if you want to use compression and control the groove.
  • By stereo position. All sounds in mono could be grouped together, sides on another. All high, forefront, or far-back sounds could be assigned to different groups. Grouping by position is useful for controlling a portion of the stereo field’s positioning and volume all at once.
  • Other sub-group types. You can come up with your own sub-groups based on what seems the best for your particular track. The idea of a group and sub-group is to control something common to all its members.

Leveling many sounds

Attaining proper volumes for each sound is critical for a mix with a lot going on. If you’re using Ableton, I suggest you switch to the session view to be able to see the meter of each channel. Just by eye, try to start by making sure that they’re all roughly even. After they’re even, lower some 20% lower, others 50%, and some very, very low. Which sounds you lower will depend on what sounds you want to be “decorative” and what sounds you think are a part of your main hook. One of the most common mistakes I hear in complex mixes with many tracks is that the producer is concerned that all of the sounds won’t be heard, so they’re all turned up too loud. The thing is, if you use a lot of sounds, it’s better to have some that are way lower in the mix, and just like in percussion—we call them ghost notes.

Creating unity in a busy mix

How can you make sure all your sounds feel like they’re a part of the same song? Sometimes when you use a lot of tracks and sounds, some might sound lost or it might feel as if two different songs are playing at once.

Grouping

Unity is something that groups can really help with. If your mix doesn’t feel like one song, the first fix you can try is to apply reverb to each of your groups. You can either use a AUX/Send bus, or apply different reverb per-group. I usually keep it at a low 10% wet only, but you can exaggerate too. Similarly, if you EQ a group, you modify the signal of each sound, and this usually helps blend all the sounds from the group together. I put an EQ on a group by default and then will do at least one cut where there’s a general resonance. Compression works magic on groups too—especially a vari-mu type of compression with a pretty aggressive setting; this will feel like adding butter to the whole thing.

Gating

There are multiple ways to use gating, but I like the simple gate from Ableton that has an envelope and an incoming side-chain. If you gate an entire group to one of the main percussion elements of your song—such as the regular clap for instance—it can provide a lot of room to other sounds and have them not be in conflict.

Side-chaining

Like I said, compression is great to bring all the sounds together and a bit of subtle side-chain is also really practical. I like to side-chain some decorative percussion to the main hats, so I make sure they peak through. The best option here is to use Trackspacer as side-chain because it will only use frequency of the incoming signal instead of the amplitude. So for instance, if you use it to side-chain hi-hats from a clap, only the conflicting frequencies of the clap will be removed from the hats.

Modulation

One of the riskiest things a producer can do when mixing many tracks or sounds is the use of stereo modulation such as auto-pan, chorus, phasing, or flanger. These effects make sounds move, and if multiple sounds are moving at once, then you’re going to face phasing issues. I always use these modulation effects on specific sounds in each song, but the sounds that are modulated are treated as “main” sounds. This means you have to give them a lot of room in the mix otherwise they’ll get lost.

Finalizing the mix

Finishing a busy mix is where most people get confused and many fail. The main percussion and other main elements of your song should be mixed first as-is. Then, all elements that are decorative should be mixed in, as a second layer like a “cloud” that completes it all—you’re bringing the main sounds and decorative sounds together. Usually, in the end—thanks to Live 10’s multiple groups feature—I end up having only two faders to mix with. You’ll need to compress them both with a gain reduction of about -3dB to create the impression they merge well together.

But before you get to your final mix, it’s important to get all your sounds right, group them, and control them all first. The final blending of these two major layers at the e nd will be pretty easy if you can get your levels together.

SEE ALSO : Creating organic sounding music with mixing

How to maintain consistency in the quality of your productions

The most consistent musicians have reached a comfortable flow and they finish tracks that they’re satisfied with fairly quickly. But how do they ensure that each of their tracks are maintaining the same level of quality as their first well-received works, as they complete more and more of them?

Making a lot of songs/tracks and actually finishing them is, to me, one of the most essential purposes of making music. Stalling on a particular idea or song builds up doubts, and eventually you’ll grow to hate it. If you finish up a track quickly—as opposed to more slowly—you capture an idea you liked at a precise moment in time and make the most out of it, then move on to the next idea.

FACT: you will always learn something new when you finish a song that you can apply to the next one.

The faster you become at completing tracks, the more you become articulate in your self-expression; if you dig a really good idea, you’ll know what to do pretty quickly to make the best out of it.

Many well-known and consistent artists make multiple songs (yes, songs!) in one day. Marc Houle, Ricardo Villalobos, and Prince to name a few, have expressed that they like to sit, jam, record, edit a bit, and then move on. Ricardo’s long songs are actually long sessions that haven’t been edited. “It’s more important to simply record something each time you hit the studio rather than make a perfect song“, I’ve heard him say.

How do you maintain consistency in your work when you’re creating a ton of tracks?

My personal mentality that I like to have is to not get too attached to the music I make, nor about its potential or future. With this mentality in mind, you can embrace imperfection, have more relaxed sessions, and have more fun. But yes, there are also some technical points you can keep in mind to avoid letting your work slowly degrade in terms of quality while trying to maintain a regular quantity of completing tracks:

  • Stay away from trends or gimmicks. Trends can be hard to spot when they’re first evolving, but usually there are signs. When many people use the same samples over and over, which can often define a style, you know that’s a road probably too often taken—in going there yourself, you might get lost in the sea of similar sounding songs. To me, production trends are about some samples, effects, and arrangements that become a norm. I’ll always remember a long time ago when I was into hard techno, I was at the record store listening to a pile of 30 records and every record had the exact same structure to the point where you could predict when the kick muted, the hats came in, and so on. Sounding like existing trends is not a good way to stand out as a memorable, original musician; timeless music is often “odd” when it’s first released, but something catchy about it makes it work.
  • Use scales. You don’t always have to be using an established scale when writing, but it will help your music age a bit better. Off-scale or highly dissonant music not only sounds a bit weird or off-putting to the average listener, but by working with established tonal scales people can reference your music decades later. When I think of high-quality music, the musicality in terms of scales is always top notch. If it’s purely experimental and still high-quality, it’s usually based on a concept that makes it relevant.
  • Cross validate with references. I can never stress this enough—your references, loaded in a playlist alongside your music, should feel right.
  • Have a friend as quality filter. A reliable friend is one that will tell you when things aren’t working. I personally like to have 5 people to send my music to in order to get reliable feedback. Sometimes I feel more excited sending them my music than submitting it to a label. You should have 5 responsive people that want to listen to your stuff; proper feedback is a great feeling when done right.
  • Keep your renderings/bounces at -6dB, 24bits. This is in case you want to release them in the future, but also because music with headroom is universally more well-received. Back when the trend was to have very loud mixes, your music was irrecoverable later on if you lost the original mix. Loudness has also aged terribly since this trend went out-of-style.
  • Use quality samples and quality tools. What makes a great mix is the use of great samples. Working with a harsh sample means you have to use more effort to make it sound better, but the end results could still bad, or even worse.
  • Simplicity ages best. Humans tend to remember simpler ideas. Complex intentions and complicated, draining music isn’t always the best in the long-run. I’m not saying “don’t do it” if you’re into it, but maybe to tone things down a bit if you’re interested in the longevity of your work. I’m in love with this quote by Da Vinci: “simplicity is the ultimate sophistication.”
  • Make sure your mixing is high-quality, and use quality effects. If you can make sure your song is properly mixed, it will certainly age much more gracefully. Otherwise, you might regret some decisions you made in your mix as it ages. Cheap effects and presets don’t age very well because others might also use them heavily. Further down the road, your originality might feel lacking as a result, and plus nothing ages worse than a gimmicky sounding effect (ex. think of cheesy effects used on audio in the 80s.)

The effects of your work habits on maintaining consistent quality in your work

There are things you can do to make sure all your tracks end up with a level of quality you are happy with and will continue to be happy with as they age. I believe that working on multiple tracks at once is a great way to maintain perspective on your quality levels. Personally, I also like to export half-completed tracks and listen to them later, or import them into the next track I’m working on to give myself better perspective(s). Sometimes, I encourage clients to bring in all the tracks they’ve made in the last few months so we can toggle between them easily and make comparisons—this task might reveal a lot to you regarding the patterns and trends you use the most.

Using Modular Can Change the Way You View Music Production

Are “sound design” and “sequencing” mutually exclusive concepts? Do you always do one before you do the other? What about composition—how does that fit in? Are all of these concepts fixed, or do they bend and flex and bleed into one another?

The answers to these questions might depend on the specific workflows, techniques, and equipment you use.

Take, for example, an arpeggiator in a synth patch. There are two layers of sequencing to produce an arpeggio: the first layer is a sustained chord, the second layer is the arpeggiator. Make the arpeggiator run extremely fast, in terms of audio rate, and we no longer have an audible sequence made up of a number of discrete notes, but a complex waveform with a single fundamental. Just like that, sequencing has become sound design.

These two practices—sequencing and sound design—are more ambiguous than they seem.

Perhaps we only see them as distinct from each other because of the workflows that we’re funneled towards by the technologies we use. Most of the machines and software we use to make electronic music reflect the designer’s expectations about how we work: sound design is what we are doing when we fill up the banks of patch slots on our synths; sequencing is what we do when we fill up the banks of pattern slots on our sequencers.

The ubiquity of MIDI also promotes the view of sequencing as an activity that has no connection to sound design. Because MIDI cannot be heard directly, and only deals with pitch, note length, and velocity, we tend to think that that’s all sequencing is. But in a CV and Gate environment, sequencers can do more than sequence notes—they can sequence any number of events, from filter cutoff adjustments to clock speed or the parameters of other sequencers.

Modular can change the way you see organized sound

Spend some time exploring a modular synthesizer and these sharply distinct concepts quickly start to break down and blur together.

Most people don’t appreciate how fundamentally, conceptually different CV and gate is to MIDI. MIDI is a language, which has been designed to according to certain preconceptions (the tempered scale being the most obvious one). CV and gate, on the other hand, are the same stuff that audio is made of…voltage, acting directly upon circuits with no layer of interpretation in between. Thus, a square wave is not only an LFO when slowed down, or a tone when sped up, but it is also a gate.

What that square wave is depends entirely on how you are using it.

You can say the same thing about most modules. They are what you use them for.

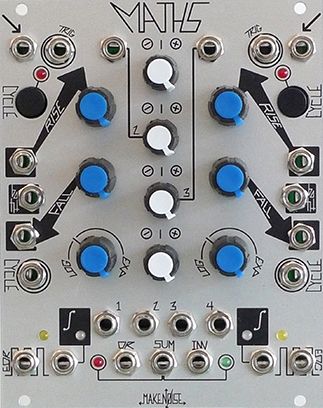
Maths from MakeNoise. It’s a modulator. No, it’s a sound source. No, it’s a modulator.

To go back to our original example: a sequencer can be clocked at a rate that produces a distinct note, and that clock’s speed can itself be modulated by an LFO, so the voice that the sequencer is triggering goes from a discrete note sequence, to a complex waveform tone, and back again. The sound itself goes from sequence to sound effect and back to sequence…

Do you find this way of looking at music-making productive and enjoyable, or do you prefer to stick to your well-trodden workflows? Does abandoning the sound design – sequencing – composition paradigm sound like a refreshing, freeing change to you? Or does it sound like a recipe for never finishing another track ever?

SEE ALSO : “How do I get started with modular?”

Building a great groove

Have you ever been on a dance-floor and heard a track that connects with you in a very physical way? Physical connection creates a sort of energy that is infectious and makes you want to dance until your feet give up. This feeling is all about the groove in a track; creating a groove makes the combination of elements and arrangement feel just right to keep you dancing. What follows in this post is my personal take on groove, and the steps I’ve learned that I think work best to create a great groove.

Taking into account that everyone has a particular taste, a groove that can give me this irrevocable urge to dance may not do the same for you, and on the other hand, you may relate to other tracks in the same way which don’t do anything for me. To better understand groove, I recommend that you take a step back and subject yourself to some critical listening.

Critical listening includes listening to some reference tracks with your eyes closed and making mental notes of what seems to work best. How do the elements in the track relate to one another? What kinds of sounds are used? Is the groove driving or swing-y? Listening this way will give you great ideas with regards to what works and what feels forced for you personally. I cannot stress this point enough. Have you ever made a track which you felt was “good” but didn’t create a sense of physical movement or urge to dance? Review the groove and change it, and you’ll hear an improvement.

Based on my own personal taste, I feel that when it comes to groove, less is more in terms of what works best. Subtlety coupled with taking extra care in the sound design/sample-selection stage will help your ideas flow smoothly. Understand which sounds you want to be the “protagonists” from the get-go, and you will be able to fill the space much more naturally. 

Workflow for creating a groove

  1. Build a simple pattern. After designing some sounds you feel are nice, take them and start constructing the foundation of your groove. While most of the time drums and percussion are associated with the groove, they are not the only parts which have to work in order to have a nice flow. Pheek’s Guide to Percussion has some great tips on call and response—a concept you must focus on quite a bit to build a solid groove.
  2. Once you have your pattern, add some variations to it. A variation could be muting the kick every eighth bar, or having a hat come in and out sporadically, or even changing the note of a synth stab you are using for the groove. You’ll notice that your groove already feels more complete once you add some variations. Micro-variations help to keep the listener interested as the pattern evolves a bit within itself.
  3. Swing is your best friend! It doesn’t matter if you’re working inside the box or with hardware—take your pattern and apply some swing to it, whether it be via Ableton groove pool or just micro-timing changes (moving things just a tad off grid), this will make this pattern feel less robotic which is what we are going for. This last point is very important for a nice groove, but some kinds of music don’t apply this technique as aggressively because they are just hard hitting and energy driven, but many others rely on these small details and time changes to give a human touch to the pattern. 
  4. Add some effects to your sounds. Instead of programming each MIDI note or step, add some delays—both triplets and eighth notes work well—with some very short feedback and dry/wet. Here’s where you can go crazy experimenting—you will notice that when you use these delays and reverbs your sound begins to morph and ghost notes appear in the background, which make things feel fuller and glued together.
  5. To continue morphing it, apply some modulations and LFOs to control different aspects of a sound; from panning to volume, modulation allows a pattern to evolve on a macro-scale and creates movement, which is crucial in creating a great groove. 

Don’t forget that it’s important that all your elements work well together. If you feel something is out of place, take a couple of minutes to review it—experiment and you’ll create “happy mistakes” which end up being great. I like to use the word coherence to describe how things work together in a track. If a track has a coherent groove in which the drums, bass-line, synths, and other parts work well together, then it will be infectious. Many people use the coherence approach, and you can go crazy with it. Again, listen to some references and use them as a starting point while asking yourself the important questions:

How much swing does the pattern have?

How does the bass-line relate to the percussion and main drums?

Are synths being used rhythmically or as background sounds?

Don’t be afraid to revise a groove, but also learn when to compromise—after a session take a break and come back to it with fresh ears. If your groove is solid, you will feel it. If not, you’ll have an easier time fixing it when your perspective is fresh.

SEE ALSO : Honing your production skills before releasing music

“How do I get started with modular?”

Modular synths are fascinating, complex, and alluring machines, but to the uninitiated they can also be enigmatic and confusing. The vast range of available modules, the high price of entry, the obscure interfaces, and the images of gigantic, room-filling systems can make modular synthesis seem like a hobby mainly reserved for the independently wealthy PhD candidate. But the truth is that modular is more accessible now than it has ever been—in this post I’ll offer some of pieces of advice for those of you who are just getting started with modular synths.

Of course, there are unavoidable costs—it will probably never meet most people’s definition of cheap (although Behringer might be about to try and change that.) The lowest priced case and power supply combinations are still hundreds of dollars (the TipTop happy ending kit with power is around $175). Still, once this hurdle is passed, it’s in fact easy and beneficial to start small. Buying a couple of modules at a time, and getting to know them well before buying more, is a great strategy to take when starting out.

Let’s look at some relatively easy entries into modular in a variety of price ranges, looking to answer the Eurorack novice’s question, “How do I get started with modular?”

The semi-modular

Semi-modular is a great way of getting some experience with patching. Standalone, semi-modular synths like the Moog Mother32, Moog Grandmother, MakeNoise 0-Coast, or the Behringer Neutron, give you a taste of the modular experience and are all highly capable synths. They are all fully compatible with Eurorack; essentially they are Eurorack format but with their own power supply and case. Which leads us to a possible disadvantage of this route: if/when you want to go deeper down the “rabbit hole” you still need to buy yourself a case and power supply for your modules. If you are committed to getting into Euro it will be more cost effective to get a case and power right away.

The micro-system

Full voice modules, like the Atlantis from Intellijel or Mutable Instruments’ Elements, function something like a desktop synth module, but in Eurorack. In other words, they combine all the oscillators, VCAs, envelopes and filters of a full mono-synth behind a Eurorack panel. Pair one of these with a Eurorack sequencer, or a MIDI sequencer and a MIDI to CV module like the Hexinverter Mutant Brain, and you have a full synth voice in Eurorack. Without any other modules to patch up it’s not the full modular experience yet – you have a synth voice that you can trigger with gates and CV from your sequencer or MIDI-CV module, but you do not have any modulators. Modulation is the heart of modular, so, tempting though it may be to stick one of these all-in-one modules in a tiny case and use it standalone, it is probably wise to leave some space for growth.

Another approach to build up a micro system is to go for a range of relatively cheap, bread and butter modules. Doepfer, the company that created the Eurorack format back in the 90s, are still a great choice for reliable, straight-forward modules at reasonable prices. Their active product line is vast and you can build a huge system with their products alone. Then there are the very small, low-priced modules from various companies such as Erica Synths, TipTop Audio, and 2HP (whose name refers to the size of all their modules—about as tiny as it’s possible to get). These are great value and can be highly useful but beware, they have tiny pots so too many of them too close together can get extremely awkward. While it might seem like a great cheap solution, a whole system made up of these tiny modules would be pretty annoying to use.

The ready-made, full system

On the other end of the spectrum in starting tiny with a micro system is splashing out on a full-size system. Why not bypass all that decision making, scrimping and saving for one module at a time, and just hit your bank account/credit card one devastating blow? The easiest way of doing this is to go for a single manufacturer’s system – a curated collection of modules by one company, which are sure to work well together. A the ultimate single manufacturer system is probably the stunning MakeNoise Black and Gold Shared System. This is a great option if you have the money and are totally sure of your commitment. But a makeNoise shared system is around $5.5k USD…so there’s that.

The modular drum machine

If you are a producer heavily focused heavily on electronic drums—which you probably are if you are reading this blog—you may want to build up a modular drum machine. Modular drums are capable of more extreme tonal changes and generally have a wider pitch and timbral range than a typical drum machine voice. They can also be triggered in a variety of unconventional ways, allowing for strange, unexpected rhythms. The good thing about drum modules when you are starting out is that they are, by definition, whole voices—they contain a sound source or two, an envelope and VCA, and perhaps a filter. You just feed them a trigger and they do their thing. There are now a huge number of drum modules available from many different manufacturers, analog and digital, covering a vast sonic territory, so you can mix and match to create something truly unique.

When getting started with modular synths, it’s useful to know that you can easily combine modular drums with external drum machines by using the same sequencer (e.g. sequencing your modular drums with an external drum machine) via a MIDI to CV module. This makes starting small simple—just add one drum module at a time. Of course, just as with any other approach in modular, modulation is key, so at least one step-modulation source, such as the Malekko Voltage Block (an 8 track, 16-stage CV sequencer), should be an early addition to your modular drum machine.

The other aspect of a modular drum machine, and one that really shines in Eurorack, is sequencing. Conventional, 16-step x0x style sequencing is of course easy in or out of the case, but you can quickly move far from a typical drum machine sound by using more idiosyncratic sequencing options. Methods of sequencing in modular is a whole other topic but take a look at digital modules that use binary logic gates for a taste of what can be done. For example, Noise Engineering’s range of digital trigger sequencing modules can create unique, ever-changing rhythms.

The DAW-integrated system

For many people, modular synths are totally separate from the DAW; indeed it is almost a point of principle for some modular users to “only” use their DAW, if at all, as a sort of tape recorder. But this is by no means the only way to approach things. If you are already fully committed to a DAW workflow—perhaps you already sequence standalone synths via MIDI from Ableton, for example—there are many options for fully integrating your modular synth with your PC. Sending gates, triggers and pitch CV is easy: the aforementioned MIDI to CV converter can achieve this via a MIDI interface connected to your computer. Expert Sleepers make a range of modules that can give you even closer integration, with smooth control voltages that a MIDI to CV module cannot send, due to the limitations of MIDI. Finally, if you use Ableton and have a soundcard with DC-coupled outputs (most MOTU soundcards have this feature) then you will very soon be able to use Abelton’s new suite of CV Tools in Max for Live to control your modular through your soundcard’s output jacks.

The obvious appeal of using the DAW to control your synths is that you immediately gain the equivalent of several modules-worth of functionality in terms of sequencing and modulation. The drawback is that you perhaps risk sacrificing some of the exploratory potential of modular in favour of greater control.

DIY

Going DIY would seem to be a great option, especially if you are short on cash. But beware, unless you actually enjoy soldering and are keen to learn a little bit about electronics, it might well end up being a lot more expensive than buying your modules ready-made. Remember, if you mess up your build the company is not liable to fix it for you. Basic synth DIY is totally doable and can be great fun….if it’s the kind of thing you like doing. But if you’re doing it only to save money you might find that:

a. It doesn’t save you all that much and,

b. Lots of your modules only kind of work and some don’t work at all!

SEE ALSO : Using Modular Can Change the Way You View Music Production

Honing your production skills before releasing music

For music producers, specifically those interested in releasing music, gratification is one of the most complex topics to address. From the moment you complete your first track, it becomes all about showing it to people to see how they react and to get feedback. As you progress with producing, more of your tracks will start to feel like they are release- worthy. But the real question we have to ask is not if they are release-worthy, but are they timeless?

When you start making music and don’t have the concepts or skills honed enough to do it in a streamlined manner, it’s inevitable that you’ll find yourself “hating” the tracks you make; spending so much time on them means you will dislike them by the time they are “done”. I’m of the opinion that most tracks are never 100% complete—every time you work on a project you’ll notice more details that you feel you can fix and this can turn into a never-ending spiral.

For me personally, my road has been an interesting one—the first tracks I ever made were sent to labels and eventually released, but every time I visit Beatport (or other platforms) are and listen to those tracks, I ask myself if they are what I want people to think about when they hear my artistic name. Each release comes with a technical improvement, and the process is noticeable, but…what if those tracks were never released? 

On the upside, I guarantee 100% that if it were not for those tracks and releases, I wouldn’t have been able to connect with so many people around the genre and network into making contacts—this proved very useful and worthy in the long-run. On the downside, every musician wishes to have his/her very best out there, as it’s our business card, it’s what people will remember the most when they talk about you.

I read the other day about an artist who practiced and honed his skills for seven years straight without even considering releasing a track before that, as he felt his music was not up to the standards that he wanted to put out in the world. So, what then, is the correct road? If I could do it all over again, I would most definitely not have released the first and most technically lacking tracks I ever made. It’s all very personal, but if you can, I would follow that artist’s advice—it removes the stress of wanting to sound in a specific manner for a specific label, and you’ll find your own sound in a more creative way. Make music for the sake of it, not because you have a deadline. Deadlines will come in the future, I can guarantee it.

My honest conclusion is that with production—same as any skill—you have to put in the hours of work and have the patience to accept that it will be slow. As one of my teachers once told me, there is no shortcut to training your ears. Having some perspective now and a short career of 5 years in music production, I believe our best tools are groups like the coaching corner we all know and love; in groups like these you can show your music to the world, get focused feedback, and continue to improve and grow as an artist around like-minded people without it being too permanent.

The key is knowing and accepting that you will always be able to do better. There’s no rush and you will eventually be thankful for having waited to have your very best out there. On the other hand if you don’t want to wait, make sure you have some feedback from artists you know have a deep technical background as they will give you the best tips to improve your tracks.

SEE ALSO : Taking breaks from music-making

Is sampling wrong?

Sampling in electronic music involves two main types: using another person’s idea (e.g. using a harpist’s melody for your deep techno song, or sampling electronic music that isn’t yours) and using prefabricated samples for making your song.

As time goes on, I read and hear about more and more debates regarding sampling in electronic music. I refer to electronic music because in other spheres, such as trap or hip hop, the debate is non-existent. We all know it’s a matter of culture derived from how producers have approached their art.

You might ask yourself, “are there more benefits from making all my sounds by myself? Will I get more recognition that way?”

It’s hard to answer this question, but I’ll try to debunk the source of that question to help clarify a few things.

Firstly, the world of electronic music really started in the late 80’s with a DIY mentality. Back then, electronic music was not really well-known, and producers had a hard time getting support from traditional media and distributors; they had to do everything themselves. The same thing goes for their equipment. Equipment was extremely expensive and not easy to find, so many artists would work with whatever they could get their hands on. Then came a huge rise in popularity in the electronic music world, and by the 90s, it had its own culture. DIY was the established way to do things; everyone was contributing in one way or another. Making everything yourself – a form of being independent – had been rooted in the culture of electronic music. One of the big differences between that era and now is that back then, many producers were obsessed with making the most original music possible. Going out to an event was all about hearing new songs you’d never heard before that would make you dance; you were also aware you might never hear those songs again.

Secondly, with growing access to technology, it became essential to showcase your skills as a one-man-band. I’m not sure if if this was an ego thing, or more of a way of overcoming this tour-de-force, but while it can be impressive, it can also be counter-productive. There was no electronic music school out there until around 2005, where some appeared online. Prior to that, people that wanted to make electronic music had to be learning everything themselves.

Thirdly, as access to technology increased, as did the possibility to get pretty much anything you want via the internet, a certain snobbery amongst producers developed. Some people are able to do certain things a certain way, and will pass on a very clear message that if you don’t do things in their way, you’re doing it wrong. I think this approach – which I see a lot – has put many people in a defensive mode as well as made them less likely to share their work.

That said, sampling has always created polemics. You often hear a pop artist sampling others then getting into lawsuits as a result. In the underground scene, there are similar stories (such as Raresh sampling Thomas Brinkmann without understanding what consequences would ensue). There were multiple occasions where people would sample a part of a record that was released 10-15 years ago and make a song out of it. It would piss people off, mostly because it goes against two concepts:

  1. The person who sampled failed to be original and took the work of someone’s hard work to pass it off as their own.
  2. It’s a “violation” of the culture norms of music making, which have been in place for decades.

Is there a way to use sampling “correctly”?

Well, yes, there is a way. Sampling is not frowned upon in hip hop and, it’s also okay elsewhere too. However, there are rules to respect. When I launched my sub-label Climat in 2012, I wanted to use it to find artists that were talented, had beautiful content, and that once put into a groovy context, would make something new and refreshing. I was looking for music on obscure sites then tried to make music with it. Whatever samples I would keep, I would take the time to contact the artist, explain the concept and ask for their permission. Honestly, this is the least you can do and you should absolutely do it. Imagine if someone were to sample your work; I think you’d want to know. Plus, who knows, it can be the beginning of future collaborations.

How can I make use of samples from someone else’s work?

Contact the original artist, ask them if there are conditions associated with using their work, and then promote them too when you release something.

Is using samples a bad thing?

Many people feel ashamed to use samples. They think if they’re going to have an 808 kick, they need to buy a drum machine to make it. There is also a shame one feels when using presets which don’t feel original. Indeed, they aren’t, but you’re missing the point if that’s the only thing you consider.

When I make music and hit the studio, I want to be productive. I use samples to make a structure, a groove, to complement my idea, so that things come together faster. I’m not using samples as my final form. If I need a breakbeat, I don’t want to lose time trying to program the best beat possible. I’ll take a pre-made loop so I have a target of what I imagine it to be in my mind. As I work on the track, I’ll chop the loop, rearrange it, and swap the sounds out with something I’ll design myself.

Your main enemy in music making is your own mind getting distracted with things it thinks are important.

When you make a new song, you need to have a core idea. However, you can take inspiration from many things including samples. Gather them all in your project, analyze them, sample, process, and create. Don’t leave things so unchanged that could easily recognize a sample as being unoriginal. See your project as if you were a painter gathering images from magazines to use as guidelines.

Honestly, samples are the best way to get out of your routine. I’ve never understood people who were super stubborn about making everything themselves, just to end up sounding like every other song out there anyways. if you venture in genres that aren’t yours, you’ll get new ideas for sure.

Tip: I find that using layering multiple samples is a great way to make new sounds. For example, you can make your tiny clap sound fat if you combine it with a tom.

Your best companions in processing samples are just a few plugins away. With all the technology available, it’s silly not to use them:

Fabfilter Pro-Q3: Amazing GUI and pristine sound. This is a must to fix your samples into another, original way.

Mangledverb : This is a reverb for intense sound design. It can really bring alive some parts of your samples.

Discord 4 by Audio Damage: For subtle to extreme changes.

Shaperbox: The ultimate tool to recycle any sound into altered material.

Crystalizer: Great for granular synthesis and shaping sound.

SEE ALSO :  Setting up your mix bus  

Tips to add movement and life to your songs

One of the most popular topics in music production is with regards to making music feel “alive” by creating movement in music. While I already covered this topic in a past article, I’ll focus today on tools you can use and some techniques you can also apply to create movement.

First, let’s classify movement into categories:

  • Modulation (slow, fast)
  • Automation (micro, macro)
  • Chaos
  • Saturation

One of the thing that makes modular synths very popular is the possibility of controlling and modulating many parameters the way you want, but the other aspect that makes it exciting is the analog aspect. You’ve probably seen and heard multiple debates about the analog vs digital thing and perhaps, what’s funny is, many feel they know what this is about but yet, can’t really figure it out.

Take, for example, something we all know well: a clock that shows time.

An analog clock is one with needles that are moved by an internal mechanism, making them move smoothly in harmony while time goes by. There’s a very, very preciseness to it where you can see the tiny moment between seconds.

The digital or numeric clock jumps from second to second, minute to minute, with the numbers increasing: there are no smooth, slowly incrementing needle that moves between numbers; they just jump.

Sound is pretty much the same in a way. Once it’s digitized, the computer analyzes the information using sample and bit rates for precision. The flow isn’t the same, but you need a really precise system and ear to spot the difference. Some people do but it’s very rare. This is why, in theory, there’s a difference between digital files and vinyl records.

One eye opener for me was that when I was shopping for modulars at the local store, I was talking with the store’s specialist who was passionate about sound. “The one thing I don’t like about samples is, the sound is frozen and dead”, he said. With modular synths, because there’s often an analog component, the sound, on a microscopic level, is never the same twice.

This is why using samples and playing with digital tools on your DAW, needs a bit of magic to bring it all to life.

Modulation

By modulation, we’re referring to tools that move parameters for you, based on how you have configured them. The two main modulators you can use are:

  • LFOs: As in Low Frequency Oscillators. These will emit a frequency in a given shape (ex. sine, triangular, square, etc.), and a certain speed. They can be synced to your song’s tempo or not. LFOs are often included in synths but you can also find once instances in the Max for live patches.
  • Envelopes: Envelopes react to incoming signal and then will be shaped in how you want. Compressors, as we discussed recently, kinda work with an envelop principle.

There are multiple aspects of a sound you can modulate. While there are numerous tools out there to help you with that, it’s good to know that there are a few things you can do within your DAW. The main things you can modulate are:

  • Amplitude (gain, volume): Leaving the level of a sound to the same position for a whole track is very static. While there’s nothing wrong with that, it’s means that the sound is lacking dynamics.
  • Stereo position (panning): Sounds can move from left to right if you automate the panning or use a autopanner.
  • Distance (far, close): This is a great thing to automate. You can make sounds go further away by high passing, filtering to higher frequencies. Combined with the volume, it really push the sound away.
  • Depth (reverb): Adding reverb is a great way to add space and if you modulate, it makes things very alive.
  • Sound’s length (ADSR, gating): If you listen to drummers, they’ll hit their percussion so that the length constantly changes. This can be done by modulating a sampler’s ADSR envelope.
  • Filtering: A filter’s frequency and resonance changing position as the song changes offers a very ear pleasing effect.

Some effects that are modulating tools you already know are chorus, flanger, autopan, phaser, and reverb. They all play with the panning and also depth. Adding more than 2-3 instances in a song can cause issues so this is why it’s good to approach each channels individually.

My suggestion: Have one LFO and one envelope on every channel and map them to something: EQ, filter, panning, gain, etc.

Some amazing modulators that offer really good all in one options that you might really enjoy (as I do for quick fix on a boring stem):

QuatroMod

LFO Tool by XFER Records

ShaperBox by Cableguys – My go to to really bring sound to life.

Movement by Output  – This one is stellar and really can make things feel messy if pushed too far but the potential is bonkers. You instantly turn anything into a living texture that is never boring.

AUtomation

Automation is what you draw in your DAW that allows you to make a quick-moving or long-evolving effect. You might already know this but you’d be surprised to know that it is too often, under used. How can you know this though?

I have my own set of rules and here are some:

  • Each channel must at least have one long, evolving movement. I’m allergic to straight lines and will sometimes slightly shift points to have them have smallest slant. My go: amplitude, EQ or filters.
  • In a drop down list of each potential parameters, I want to have at least 3 things moving.
  • Each channels, must have at least 3 quick, unique, fast change.
  • Include at least 3-5 recorded live tweaks. I like to take a midi controller and map certain parameters and then play with the knobs, faders. I record the movements and then I can edit them wherever I want in the song. This human touch really makes something special.

While working with automation, one thing I love is to use Max for live patches that create variations, record them as automation and then edit them. It’s like having an assistant. There are great options to chose from but my favorites would be:

Chaos

By “chaos” I mean using random generators. They would fit under the umbrella of modulators but I like to put them in their own world. There are multiple uses of generators. You can take any LFO and switch them to a signal that is random to make sure there’s always a variable that changes. This is particularly useful with amplitude, filtering. It really adds life. You can also use the random module in the MIDI tools to add some life. Same with the use of humanizer on a midi channel. Both will make sure the notes are changing a little, all the time.

Saturation

If we think of the earlier example of how analog gear is constantly moving, using a saturator is a good way to bend perception. We previously discussed saturators in an earlier post but we didn’t talk of a super useful tool named Channel strip which often has an analog feel included. It remains transparent but it does something to the signal that is moving it away from a sterile digital feel.

My favorite channel strips would be:

The Virtual Mix rack by Slate Digital. Raw power.

McDSP Analog channel

Slam Pro


SEE ALSO : Getting feedback on your music

Saturation Tips and Hacks

After presenting some of my favorite EQs and compressors, it would be silly not to also talk about audio saturation which is complementary tool. There’s not a single project I’ve done in the last 10 years where I haven’t used saturation in one way or another; same with mastering. I often compare it to putting some words in bold in a text, where that effect will do the same thing in a mix: making parts stand out in a way the brain can’t totally understand at first.

What is saturation exactly?

Saturation is essentially a form of soft distortion that gives certain texture to sounds. The simplest way to explain it is to think of how analog processing changes sound; it brings a certain noise it, sometimes very subtly or not. You may use it give warmth or character to the signal being processed, which gives a more aggressive crunch if you exaggerate it. Types of saturation that are most common:

  • Tape emulation: Similar to what was popular in the disco days when they’re send their mixes to a reel to reel, to provide a certain thickness.
  • Tubes: Common in compressors and certain EQs using lamps, they are the absolute reference to warm up synths.
  • Transistor and retro: To emulate an old school feel.
  • Preamp: Often related to guitars and the world of microphones, preamps can be used on anything. They’ve been a tool of excellence for decades to give personality to sound by engineers.
  • Distortion: Pure distortion isn’t always pleasing and appropriate but if you control it properly, it will give beautiful textures and beefiness.

There are multiple situations where you could benefit from saturation in your mixing or sound design in order to alter the character of your sounds.

Pads & synths.

There’s nothing more exciting than rich tones, melodies, and very warm pads. More than often, I see people recording soft synths with no processing whatsoever; they’re really missing out on giving depth to the backbone of their songs. You can for instance simply pass them through a preamp, but my tool of choice for these is absolutely tape emulation (a personal favorite of mine in case you didn’t already know).

How: Start by pushing the saturation to a very high point and make sure it’s more than noticeable. Then adjust the wet/dry to a very low level where you can hear the incoming signal feeling almost clean but have the saturation be mixed in there. I usually find the sweet spot by going “oh, here I can totally notice the saturation” and then lower it by a few notches.

Tool: I’d suggest the Tape from Softubes or RC-20 Retro Color. Both are fantastic to shape your sound with shimmering textures.

One thing I really love is to use multiband saturation to get the most out of your melodies. This way, you can address the lower mids in a way while you bring out harmonics in the higher part of the sound. This can be done with tools such as Ozone 8, Neutron 2, and Melda’s PolySaturator.

Bass

Who doesn’t like a dirty, funky bassline? Low end with grit will always bring some excitement to a mix – especially in a club – this is something we’ve heard so many times in hip hop for instance. A very clean sine bass typically from an 808 has a certain warmth, but if you pass it through tape or tubes, it will give a lot of oomph. If you want to try it, I suggest you even try two instances of saturation to see where that goes. It depends of how much you want it distorted. The wet/dry will have to be applied to taste here. The producers of dubstep brought the game here to a new level.

How: Just experiment. Try to go overboard. Really.

Tool: SoundToys’ Little Radiator does marvel on basses as well as its cousin the Decapitator. For something more subtle but still robust, try the Steven Slate Virtual Preamp Collection.

Percussion

Saturation on percussion will automatically bring an old school feel from breaks that were really popular in the 90’s. The take on that, with Hip Hop (again), was to export the audio to VHS tapes or even tape cassette. The result is pretty badass. Experimenting outside of software is really fun, and I would encourage you to give it a try. One thing I like from doing this is to saturate only the tail and not the transients so that you beef up the overall signal.

How: Duplicate the channel you want to saturate and put saturation on the second one. Using MAX’s envelope follower, map it to the wet/dry of the saturator/exciter. Set the envelope to be flipped so that when a transient is detected, it will duck the knob making sure transient isn’t affected. Melda’s Polysaturator provides that option internally.

Tip: Add reverb and put the saturation after to get really fluffy crispiness.

Tools: Reels by AudioThing, Satin by U-He and Polysaturator once more.

Vocals

There’s nothing more beautiful than vocals that are lush and full. Treating vocals alone is an art in which I could get lost. I don’t want to get into that too much, but I’d like to invite you a bit of everything to see which one suits you best. Some prefer the tubes but other swear by the tapes. This is where Ozone can be a game changer, especially that you can do multi band processing as well as M/S.

Tip: Apply anything and everything from what’s explained above but start by doubling your vocals which will already do great things.

SEE ALSO : Tips to add movement and life to your songs


The EQ and compression combo (Pt. 3)

After going into details with regards to EQ and compression, in this post I’ll cover some practical tips on how they work well together. I’ll try to also clarify why many engineers will tell you that all you need is these two tools to accomplish most of the work in mixing and mastering.

Here are a couple terms and ideas that have to do with this topic:

  1. There are no rules for how to use EQs or compressors. You’ll read many different views online, and some people will affirm loud and clear that their point of view is right, but after 20 years of trial and error, I still feel that I’ve accomplished a lot of great things when I knew less than now. Relying on your ears is really important. Some of the most innovative trends involve people who have no idea what they’re doing else than following their gut feeling.
  2. Substractive correction. It involves only cutting the junk out.
  3. Coloring correctives. This usually means that you’ll boost frequencies. Sometimes, cutting might necessary.

To start with, I’d point out that in mastering or mixing, one of the most common chain would look like this:

[Corrective EQ]  –  [Compression]  –  [Color EQ]

There’s precise logic behind this. Basically, you want to take the rogue frequencies out first, compress and readjust the good ones with the compression, and finally adjust the tone or highlight details with a coloring EQ. My personal preference for better results would be that whenever I cut, I do it with a pretty narrow Q (resonance) on the EQ. A great starting point is to start with 2 or 3 and then adjust. Don’t hesitate to use visual reference of the FFT that is often included in the EQ’s display, especially if this technique is new to you. Then, I’d cut about 3dB at first, up to 5. You see how this changes your sound by bypassing the EQ and comparing.

When it then comes to compression, there are a few different things you could do here. For instance, if you go with an aggressive setup, then you’ll beef up what you have “open” by cutting away the bad frequencies. I’d suggest starting with a more exaggerated approach to see what will pop as annoying. It might not be possible to hear what’s wrong if you don’t push the sound to its limit.

Once you see and hear issues more clearly, you can cut again, then you roll the compression into parallel mode to have some of the incoming dry signal mixed with the compression.

If you haven’t explored the side-chain frequencies, this is an option where you can decide that your compressor won’t apply anything starting at the target (ex, anything under 100hz). With this, you might want to filter only a part of your song with the EQ and then compress to accentuate the part you want to put to front.

The last process in the chain is the color EQ. You can take any EQ you like but ideally, I’d go for either an analog emulation or a shelving EQ. Those will provide a nice enhancement to complement what the compressor has been doing. For coloring, you can explore. One way to approach it is to completely exaggerate one band to see how it sounds, and then roll down. This is not only very interesting for sound design, but also for mixing more subtly annoying details. It can help build body for a sound that feels week too.

Examples of where to start – EQ and Compression

A pad that that lacks body and roundness. In this case, it’s most likely that a resonance is poking through too loudly and that good frequencies are hidden behind it. You could start by checking if there is one peak on the spectrum and with your corrective EQ, with a not so wide Q (ex. 1.5 to 3), try to bring that peak down pretty severely with a cut of 5-6dB. Get the threshold of your compressor to meet the highest peak and then adjust the output to be the same as the input. With the shelving EQ, bring the mids up but 2-3dB.

A kick that lacks bottom. This might be related to the mids of the kick that are too loud. You could lower them by 4-5dB, then compress with a ratio of 8:1. The shelving EQ should then bring the lows under 100hz up by 4db. If that doesn’t do, cheat by using the corrective EQ to notch up a bell curve at 50hz.

Percussion that are harsh. This is usually because one frequency is resonating around 4 to 8khz. It’s hard to say but try to cut by 8dB and scan around to see if there’s at any point, something more comfortable. Bypass to double check and then adjust your cut so that you can make the resonance almost there. Compress with a fast attack to control the transient and glue them. The shelving EQ could be used to lift the highs.

EQ suggestion: The TDR SlickEQ GE will do a great job for correcting.

Compression: The new SphereComp is super lovely and affordable. I tested it in sound design and it does really nice gluing.

Shelving EQ: I tried the demo of EVE-AT1 and I think you’d like it just like I did. The price is incredibly good for what it offers!

SEE ALSO : Saturation Tips and Hacks