Live recording with the Ableton session view
Many people who sit in from of a computer to make music find this style of music work counter-productive or “too nerdy”, and will always prefer using gear, instruments, and live sounds to create music. If you’re finding your workflow too rigid when working in the arrangements view of a DAW and feel like your usual song structures are “too square”, it’s good to remind yourself that there are other ways to make music.
If you feel limited in your current production style, finding a better way might come from exploring alternatives.
This is partly why modular synth music feels free—tweaking a machine you can’t entirely control with often unexpected results. Similarly, in DJ’ing, the DJ is the master of when a song starts, stops, and how to control certain outputs. One of the best ways to see where you yourself stands is to understand what brings you excitement when you make music. I often hear stories of people struggling with an inner voice telling them how music should be made The Right WayTM and they’ll sit in front of their DAW hoping something happens, but what comes out feels weak, boring and not worthy of any energy. These individuals have been misled in what is believed to be The Right WayTM (though for some the DAW approach works).
The last thing you want to do if you’re bored of DAW-based production is to jump straight in the modular world, especially if you don’t know much about it. Even though you may have read a lot about modular, you might get started with it and not really enjoy it either, which is a waste of time and money.
Explore low-cost alternatives
My view and approach to finding a new way to produce your music is through low-cost gear or instruments, and a drive to explore less predictable music-making methods. When it comes to knowing how to make music, I always insist that what you should master first is the knowledge of your personal tools and how to get the best of them. It takes time and patience, but this approach starts you on a road to success with controllable results instead of facing a long list of failures resulting from never truly being an expert at any tool you use.
Using live audio recordings in Ableton Live (and other DAWs)
It’s easy to forget that you can totally turn your production methods with Ableton Live (or any DAW, for that matter) upside-down without spending a dime. One of the most powerful aspects of DAWs—though sometimes under-utilized in electronic music—are their ability to process live recordings. “Real”, original audio recordings feel more organic than pre-made samples or boring MIDI blocks. So, how can you go about working with live recordings in an effective way?
Gather your loops for source material to jam with
Pre-made loops
There’s a lot of bad-mouthing out there regarding the use of pre-made loops. If you use them “as-is”, you risk having the same loops as other people’s songs, and perhaps be accused of not being original. However, don’t write-off pre-made loops completely—there are many advantages to using them.
- Search for quality loops. If you hunt for loops, chances are you’ll find some that sound great, and perhaps some will also have at least one sound that you might be interested in. It’s important that you train your ear to what good quality sounds are, and that you are able to see how they are sequenced and processed.
- Slice the loops into smaller pieces. Once you have a loop, right click to use the option of Slice to MIDI. Once sliced, you can trigger the sounds you want to keep and reprogram them.
- Drop the slices in a sampler. Using the sampler, you can also isolate one part of the loop, and by playing a note, you can control its pitch—another way to recycle sounds from pre-made loops.
- Use envelopes. In the clip itself, you can draw automation for gain/volume, and have part of the loop playing while silencing other parts. You can also automate pitch if you want. The fun part in using envelopes is to create automation that isn’t linked to the length to the clip itself—a good way to create strange results or polyrhythms.
- Adjust the length. You can make tiny loops out of long ones, and you can create strange rhythms by having the loop points a bit “off”.
Recording your own loops
If you are one of those people who doesn’t like tweaking things on a screen, of course you can always record organic sounds yourself, and create source material from those recordings instead of using pre-made loops created by someone else. Once you have recordings saved, you can always tweak them in a similar fashion to the methods we just discussed.
How many sounds or samples should you create for your song?
Collecting and creating quality sounds from pre-made loops takes a fair bit of time and research. You need to do part of the sound design yourself in order have decent material to make your song. As an example, below I’ve created a list of what I believe to be “the bare minimum” to create in terms of loops and slices before to have a productive jam. Keep in mind that this is for mostly electronic music, but it could also apply to other genres:
- A 2-bar loop minimum of kick or low end sounds that mark the tempo.
- A 2-4 bar loop of low end material. This can be bass, filtered low synths, toms, etc.
- 3-5 loops of rhythmic elements to be used as percussive material. For percussive sounds, I strongly encourage you to have at least A/B structure, as in 1 bar of sequence and then a variation in the second. The AAAB pattern is also a great way to keep ears interested.
- 1 main idea—as long as you like—which will be your hook. Often this can be a short phrase, a melody, or something one can sing. Main ideas work well if they can evolve and develop.
- 2 sub-ideas to support the main idea. This can be through call-and-response with the main idea, or something in the background. These ideas are secondary to provide support, not to stand out.
I know this seems like a grocery list, and it feels perhaps still very far from the main topic of this post, but keep in mind that if you’re not so found of doing all this, you can also get pre-made loops to practice programming sequences with PUSH.
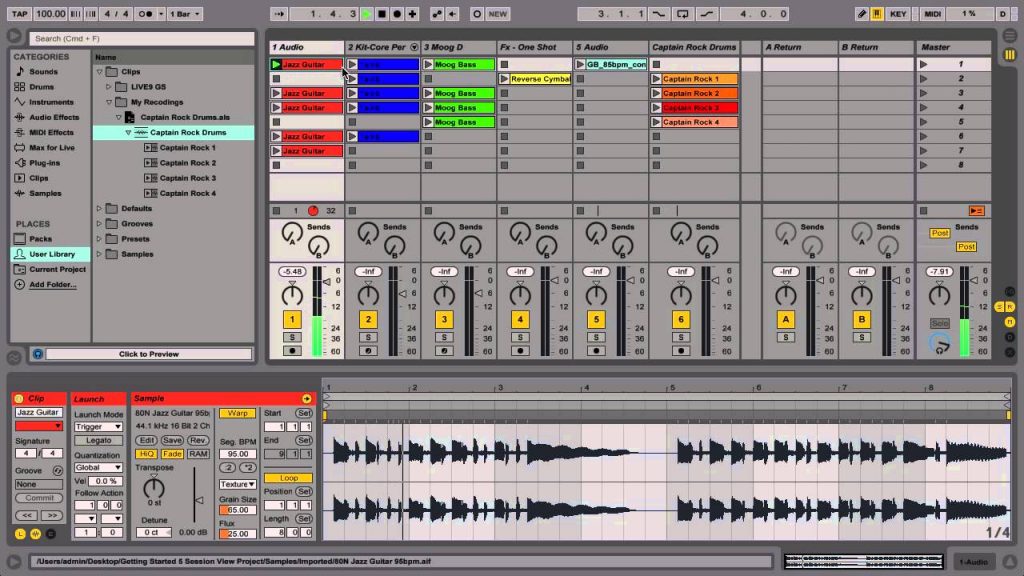
The power of the session view and recording yourself jamming
Often misunderstood and misused, Ableton’s session view is a very powerful panel that allows you to jam, play, improvise and explore.
Start by building scenes, starting with the main idea from your song. Imagine your song and how it might sound right in the middle of it, when everything is playing together. I know it can be a bit confusing to imagine, but this helps you generate ideas. The second row of the session view could, for example, be the same clips as the first arranged differently. Following that, perhaps you add more new ideas, and so on. Just make sure that row X with, lets say kicks, only has kicks—one sound per column. Basically, you want 10 lines of material to jam with; then once you have this, you jam.
Now that you’re ready, hit the record button and record yourself jamming. Don’t aim for perfection, don’t aim to make a song at all, just jam and eventually you’ll end up with great moments you can use.
TIP: Change the global quantization to 1 bar or less and experiment with how it goes.
When you press the record button while in the session view, everything will be tracked and recorded on the arrangement view. Afterwards, you can slice out the best parts of your jam, and then arrange them in a way that makes the song interesting, while avoiding feeling too “on the grid”. You might even end up with material for multiple songs. I strongly encourage you to read about the creative process I use to start and finish tracks, but working out of jams is very pleasing. I often use jams myself when I have a lot of loops and aren’t sure how to use them in a song.
SEE ALSO : Integrating a modular setup with your DAW


Leave a Reply
Want to join the discussion?Feel free to contribute!