Not getting booked for shows? Try this.

If there’s one thing that haunts all artists, it’s entering a phase where you’re not getting booked for shows, or not getting any attention in general. Perhaps you were enjoying a phase of being booked frequently that’s now coming to an end, or perhaps the music ecosystem is changing and you might be out of tune with what’s currently demand.

Not getting booked can actually be a good thing.

When I come into a period where bookings start slowing down (or requests to work with me), I think of this new phase as a sort of “hibernation”; it’s a time to focus on other things that are important for the next time I start getting booked again to re-create upward momentum. Getting booked regularly is sort of like a wave you can surf for a while, but it can end, and you should take a moment to question why the ecosystem isn’t supporting you anymore. Perhaps it needs to be re-energized, or perhaps it’s time to change waves.

Even if your wave fades out, you can still rebuild your momentum.

“Momentum is when you manage to get a certain amount of people to talk about something you created enough to generate a certain level of enthusiasm that reaches other people out of your circle of contacts, organically.”

For instance, you might publish a song on Soundcloud and have a certain number of people who comment, like, repost but you didn’t ask for it. You can view this as the beginning of a wave. The number one mistake people make that hurts their momentum is release a track out of the blue and expect people to listen to and engage with it without any additional preparation or planning; doing this will make you bitter and frustrated.

To remain humble and grounded, let me offer you a few rules I’ve applied throughout my musical life:

  1. You are in no way entitled to have people listening to and liking your music.
  2. It’s not because a track is published online that it will sell, get success, or get attention.
  3. You are work in progress. Your next one will be better.

Through the experience of running my label Archipel for years, as well as other projects, I noticed that what created momentum was the usually initiated through a few diverse actions. The more imaginative you are, the better the results will be. Some of these actions include:

  • Having a really cool picture of yourself online. Artwork is also cool.
  • Uploading a video to Youtube.
  • Sharing positive news regarding something that is not related to yourself.
  • Contributing to someone else’s success.
  • Hanging out with friends and sharing it on social media. Bonus points if you did something fun that people do want to hear about.

Some basic marketing rules also apply here. Apparently, if people see three things you’ve done, it will imprint an impression on their memory. Sharing something positive will leave a better impression. Another general rule is that people enjoy useful information. Helping others or being part of something always strikes a chord in people. Being selfless in most of your online posts vs self-promotion is a critical tone you want to hit on. If you’re constantly posting things that are egotistically and promoting “your brand”, no one will pay attention.

Let’s create a plan that uses all these points in a hypothetical scenario to promote a song you’re releasing. In this hypothetical situation, we will try to create momentum online to have people come and listen to the track. Our goal for this is to get more online followers, widen up your network, and hopefully get a bit of attention from labels and some DJs who might play it out.

Scenario: Release a track on Soundcloud; we’ll take two weeks to build up momentum but the more time you take, the better.

First, try to visualize a number of plays you’d like based on a model track you like. Find a producer you like who produces music similar to you and have roughly equal or a bit more followers than you do. The main mistake people make is to try to replicate plays of far more popular musicians. Let’s say your track has 140 plays, 3 reposts and 14 likes.

A relatively successful track is identified by the number of likes vs the number of plays. I would say that 10% ratio is very good already, but if you make it up to 15 pr 20%, then I’d say the track was a success. The trick to get your ratio in the right zone is to have interested people to listen. If you’re marketing to too many random people that aren’t your target listeners, you’ll end up with many plays, but few likes; this is why reposts are important.

Do not pay for followers and plays. It will make you look really, really unprofessional.

Now that you know all these details, let’s try to create momentum for the self-release:

  • Spend an hour a day on Soundcloud building up your network. People won’t follow out of nowhere. The need a reason to and usually they’re in the same boat as you: they want to connect with people who make music and also need attention. Find music you love, follow as many artists who share the same tastes as you and leave positive comments on their music if you like it. Repost music you really like, reply to comments people address to you. The more you’re present, engaged, active and cultivate good tastes, the more people you’ll attract online. People often feel staying on top of social media like this demanding, but remember that you only reap what you sow.
  • Clean up your social media accounts. For many artists, this is a chore they hate but it’s a necessary evil if you aspire to create momentum online. You need a specific look and feel; i.e having a solid picture of yourself, no posts that make you look unprofessional, etc. Keep it simple and solid, look at the profiles of other artists to get ideas or ask for help from a friend who’s good with social media.
  • Link your Twitter with Soundcloud using IFTT. This will make sure that when you post a new track or like one, a Tweet will be sent. This is a good way to make sure people are aware you are active.
  • Connect with groups on Facebook and connect with others. Contacting someone doesn’t mean sending a none sense message out of the blue saying “bro, check my Soundcloud”, but trying to befriend them. The best promotion is when others promote your music for you but to do that, you need their collaboration and support. That comes over time with social investment.
  • As the release date arrives, be socially active and focus on helping others. The more you focus on others, the better it will be when you need their support. No one has to help you, but it’s more likely they will feel like it if you show interest in what they do, too. This is what I was saying earlier, share other people’s music, or any related news to show interest and that you truly like in them.
  • Prepare a video on Youtube. There’s are multiple free resources out there to do this. Just make one. It can be a full version of the track or not. You can contact Youtubers that share a lot of music to see if they want to premiere it.
  • Have good artwork for your release done. You can check on Fiverr for some help or maybe ask a friend who’s willing.
  • Get the track mastered or checked.
  • Share it with DJs so they can play it in podcasts. Best case scenario, a podcast goes online premiering your track the day before or day it’s released. Perhaps you can delay the date if necessary to work with a podcast creator. If you feel like you can do a podcast yourself with a good series, that can help.

As the release date approaches, have some online presence about 3-4 times a day on different channels. You can post in groups (but not shamelessly about yourself!), share things, comment. Be active. When you want to release the track, you need to get it out in a huge blast.

It’s your time to shine, make it right! Cover all your channels and talk about your release, but stay as humble as possible. When you post it, don’t have a tone that gives the impression that you expect something from someone, but instead that you’re simply happy you finished the track and want to share it.

Releasing music during the beginning of the week at a moment when people can actually listen is a good strategy.

Post-mortem comes usually a week after. Look at your stats and see what worked and didn’t work.

I hope this helps!


SEE ALSO :    Make Your Music Bucket List Happen 

Checklist to see if my song is finished

Lately I’ve been working on a live set, and I realized that I have a personal checklist I use to see if I covered everything to help me decide if a particular song is finished; from little details to bigger things, sometimes it’s easy to overlook important factors. Just like with traveling, you want to make sure everything is ready before stepping out of your project.

This checklist outlined in this article is what I personally use before shifting to the mixing phase. In a past article, I explained the importance of exporting the stems out of your project once the production is done. This frees up CPU usage, lightens up your projct, gives you the option to backup or collaborate, or possibly to do some mixing into another DAW to get different textures. But mostly it’s a way to tell yourself “Ok, time to move on.”

Do you need to cross-check everything in this list to declare your song finished? No, not at all. Below is just a cheat sheet to help you have a better idea of everything that could potentially be covered (and I’m sure I’m missing one or two things here).

Below are what I believe to be the major categories of the “song is finished” checklist in terms of production (mixing is another phase altogether that comes afterwards):

  1. The Hook

The hook is where everything begins and ends, so ask yourself these simple questions to get started:

  • What is the main hook of your song? Remember, the hook is what someone would sing or recall to someone else to explain what the song is about. Your song might not have a main hook, which is okay, but a hook is one of the most important factors to help make a song memorable and timeless.
  • What elements supports the hook? A good hook is often not enough. Supporting it with complementary sounds or little blurbs of secondary melody is very helpful.
  • Are you aiming at a pop structure or more of a repeating mantra? There is also a grey area which combines both of these structures. But whatever your pick is, it helps to have a clear answer to this question in your head.

2. Sound design

Sound design is actually the most important section to me and this is usually where I spend the most time. I have sub-categories here that I will cover.

  • What is the direction and purpose of this song? Is it mainly for DJs or at-home or headphone listening? Vinyl or Spotify? Chill, dancefloor or experimental? This is something that can sometimes be good to keep in mind until the very end.
  • What song or artist would be a similar reference to your track? A reference track can be added in the project itself in a channel. See my past post on how to use a reference track.
  • What is the ratio of organic vs synthetic elements? This is something I sort of think about in the beginning but I am usually also open to revising at the end.
  • What is the main key for my song? This is not always essential, especially if you make atonal music. But it’s a good idea to be aware of a general tuning of bass, kick and melodies.
  • Kick drum: Is the kick in tune with the melody? Is it side-chained with other conflicting sounds? I recommend trying to have a different kick from whatever previous track you were working on. The kick is the last sound to be designed as it is there to support and complement the entire project.
  • Snare/clap: Often equally important to the kick, I usually alternate between more of a clap sound vs. a traditional snare and I also try to have multiple layers. In electronic music, the percussion sound that will go on the 2nd and 4th beat should vary otherwise it sounds a bit monotonous. I personally to try to offer different sound options here for when I play my songs live or DJ them.
  • Bass: Is it in key? Is it side-chained?
  • Melody: This one is a bit difficult but as explained in my non-linear production technique, I like to go back and forth with the track to see if the melody has an impact; if it feels good over time. Finding melody is hard enough, but to make a melody that stands the test of time is an art in itself.
  • Atmosphere: Is there a background to this track? What is in the background vs foreground? I like to use busses for creating atmosphere.
  • Recording: Have I used field recordings for this to add another layer of atmosphere or sound?
  • Textures: Are the textures clear and audible? Or is the song meant to be more subtle?
  • What’s the ratio of repeating sounds vs ever-changing? Some people like to always have the same clap through out the song while in Hip Hop for example, producers often like movement and change. Is this a rule you want to follow? If so, on what sounds?

3. Groove

My “groove” section is a bit less detailed, but is very important, especially if the song is more percussive and dancefloor-oriented.

  • Is the groove borrowed from a song or from a groove template? Or is it custom?
  • What is the time signature? Is it global or different for different parts?
  • Is there a global groove applied or is this song using multiple grooves depending on the part?
  • Export all percussion loops to MIDI to tweak the groove.
  • What is repetitive and what not? Find the healthy balance of sounds being repeated through the song and others that change over 1-2-3-4 bars.
  • Is there sidechain between channels to create subtle or obvious pumping? This can make a difference.
  • What are the sounds that are modulated? This is one of the most important thing to do if you want your song to have a more organic feel rather than synthetic. It’s one thing to select all organic samples but the way you program them will be critical for a general feel. In general, the human ear is very sensitive to movement, even if the music is played in the background; you’ll be surprised of what people notice, and what they don’t.

4. FX/Sends

Using sends is crucial for giving the track a unified feel. One of the most common mistake I see from new producers is to use multiple reverb effects everywhere in the project instead of mainly using one as a send. I usually use multiple sends to create elaborated and sophisticated 3D effects for percussion and melodies. One of the most important point I always remind myself is to use them with care, towards the end of the production phase.

  • Is this song more dry or wet in terms of effects? How much room have you left for reverb?
  • What type of reverb do I want for this track? long or short?
  • What is going to have a 3D effect? What makes the song 3D is the amount of sounds you put right up front vs the ones you put in the background. A healthy combination of both will have a better effect.
  • Use one delay for the project! Which time signature does it have?

5. Structure/Arrangements

I previously referred to song structure as Lego building blocks in a previous post. Blocks are often constructed in the same way; this is why using a reference track can help break out storytelling ideas. I always recommend dropping Markers in the arrangements this way: One at the beginning, one at the end, and one in the middle. Markers will give you perspective, help you see if your general storytelling is balanced, and help you determine if things are properly organized.

From the middle marker, I would drop one additional marker between the very beginning and the middle markers, and then do the same thing in the second half. Your song should have four distinct sections. Sections one and four are intro and outro; the middle part is where your song develops and mostly exists.

  • Does your song have intro/outro? Does the action start immediately or slowly develop?
  • How much space have you left for the DJ to mix the track, if you’re making DJ-friendly music?
  • Are your melodic elements evolving properly through each section?
  • Does your song have at least one anchor point of interest per section? All the sections of your track should be interesting.
  • Does the song have any surprises about two-thirds through its duration ? I always recommend considering this to make your song even more interesting.

These sections cover the main points that I usually think about when determining if a song is finished or not. If I don’t like the answers I come up with to some of these questions, I usually go back and work on the track even more!


SEE ALSO : Is My Song Good? 

Equipment Needed to Make Music – Gear vs. Experience vs. Monitoring

This post follows a previous one I made regarding the minimum equipment needed to make music; due to the popularity of that post and the number of questions I had afterwards, I wanted to dive deeper into my thoughts on this.

I’m often asked what matters the most between equipment, experience, and monitoring, and I  give someone the following advice on those three topics:

The Role of Experience

There is absolutely no doubt at all that someone’s experience, more importantly than anything, will have the biggest impact on the quality of the music he or she makes. A producer with years of experience knows what works and what doesn’t. Even without the proper equipment, he or she will find ways to maximize the tools they are limited to in order to get the make the most of their gear, and sometimes can even turn something very insignificant into a piece of art. What’s also something to understand is that experience can also guide you to make strategic decisions based on past experiences. For example, someone who has made high quality products knows that reaching out to others who can help is a valuable, essential part of the process. Also, if you’re faced with limitations, the internet is filled with information about how to make the best of your situation. Lacking sounds you love? Find a sample pack and buy it. Lacking ideas or technique? Look stuff up on YouTube. There’s an abundance of information that is either free or cheap. Investing in little things like personal connections is not only a great way to build support among people who can help you later, but it’s also a way to stay on top of new and better tools that come out from people who and work with develop them.

Studio Monitors Matter

The biggest mistake I see in people who are just starting out, is to invest in cheap studio monitors because of their budget limitations. I know this one is tricky because many people have small budgets. Monitors are something you want to have for the next 10 years minimum, and you want them to be the best pair you can afford. Though experience is the most important thing to consider, but you can’t start with it if you have none, monitoring is to me, what’s you need to focus on as a close second. Studio monitors are your “eyes” in music making: if you can’t “see” what you do, your music will not be precise and the end result might be difficult to appreciate after it leaves your studio. Having proper speakers is like having access to glasses when you can’t see: all of a sudden, everything is clear and you’ll know exactly what’s not working.

  • Tight budget? I find that if you can’t invest in good monitors, it’s worth waiting. There are many ways to raise money, from getting a loan or asking relatives, or whatever. But investing in cheap speakers will only benefit you in the short run and will be a major problem in the long term. In the meantime, try getting good headphones that feel good for you when listening to your favorite songs. Go in a store and spend some time comparing models. Comfort is also important.
  • What if music production isn’t for you? If you want to produce, it’s probably because you’re a music lover. If you give up on production after buying monitors (note: contact me before doing that!), you’ll still have great speakers to DJ on or to just to listen to.
  • Having a subwoofer is a game changer. To me this is an indisputable fact; you’ll see what I mean if you get one or if you get to hear a setup that makes use of one. Thin walls? Angry neighbors will love you if you get a Subpac instead.

The takeaway here: music equipment is a useful but luxurious tool.

One of my friends came to my home one day and showed me a stunning album he made which totally blew me away. We quickly started talking production and he explained me that he was using Cool Edit (a very simple sound editor which in the early 2000s wasn’t even considered a DAW!) and no equipment whatsoever. None. Everything was made from scratch and with a lot of patience. Honestly, he changed my perspective on gear forever. Every time someone tells me they “need this” or “need that” to start working on their music, I have to yell “bullshit!” because I know and have heard otherwise.

The Role of Additional Gear

“Yeah but I love the feeling of touching knobs to produce!”

So, where should you start if you want to explore the tactile dimension of producing? If you still feel the need to buy equipment beyond a good pair of monitors, I would recommend the following:

  • Explore to know what you love doing and invest based on what you decide you like. Don’t fall for the classic “If I just have the [insert trendy piece of gear name here], then I will be okay.” Try to understand music on your computer first: play with synths, make beats, see what you like, and after a few songs, maybe you’ll notice you love synths that sound like a Moog. Learn to understand what kind of sounds you like, just like how you find out what labels an artist releases with. The more you know, the more you’ll be able to invest properly.
  • Buy used, rent if possible. Or go hang out with someone who has gear you can try. Make a song with their gear to see if it feels good for you.
  • MIDI controllers are always a good investment no matter what but aren’t essential.

Truthfully, there is no such thing as minimum equipment needed to make music, but the things I’ve outline here are things that will help you get started. I hope this helps!

SEE ALSO :  What is the Electronic Music Equipment Needed to Start Producing?   

Free Ableton Live Mixing Template

(Update May 2023: When we moved to the new site, the template was lost. It was obsolete anyway as I’ve learned so much since that I can do better. I did a new one, but it’s more basic. In my opinion, it also does a better job. You can still gather ideas from this post and I will make another one but the basic is at the end of this post. The information below is for the old template, but the one to download is the new version. Sorry for the confusion. I will fix this soon.)

I’ve put together a free Ableton template after receiving feedback that it was very helpful for many people I’ve worked with. The template available on this page is aimed specifically at mixing. I’ve noticed that many aspects of mixing are often misunderstood; I’ve assembled a starting template that has bundled together many useful tools to deal with basic things – this free Ableton template will be useful for those involved in music making!

This template includes:

  • 6 Groups: Kick, Bass/low end, Percussions, Hihats, Atmosphere, Melodic.
  • 3 Busses: Low end (Where kick + bass are routed), Percussion, Melodic.
  • 1 MIXBUS: Where the busses are routed and is actually your pre-master channel.
  • 1 Reference channel: Where you drop the your reference track.
  • Multiple Sends as enhancers.
  • Macro tools on each groups and busses to help you tackle tone and potential issues.

This template looks very close to what pro engineers use like the one Andrew Scheps did for Puremix, but I found Andrew’s template wasn’t really as suitable for electronic music. I’m sure he would disagree but underground music isn’t really handled like commercial music is.


Is this template for producing or just mixing?

You could use this template to start producing with if you feel comfortable with it, but I’d encourage you to export stems from a project and then use this template to mix. Yes, it’s a bit more work, but it will also make free up your CPU and make your project ready for a new phase of production. It’s fun also to put an end to tweaking details and then focus on the mix alone.


How do I use this template?

There are many ways you could potentially use a template like this but I’d like to explain a few things to get you started quickly. First off, grouping your sounds is always a good start. I like to to think of it this way:

  • Kick group: This group is made to hold the different layers of your kick(s); the best way to make full range kick is to have up to 3 layers, but that will be handled by the group’s macro tool that uses compression and saturation. I created another little macro tool to help beef up your kick with a sub generator and a transient enhancer. I included some sounds from my collection for you and feel free to add more. If you balance everything properly, you’ll have beautiful, warm and punchy kicks.
  • Bass/Low end: This group is essentially the same thing as kicks, but to be used as the bass. Include the multiple layers of your bass (sub/mids), and I’d encourage you to also include anything that is below 200hz such as toms, synth, pads. The macro on that group will help balance it out.
  • Percussions: Anything percussive from bongos, claps, snares or percussive synthetic sounds. This group can get busy so don’t be afraid to add multiple new channels in the group itself.
  • Hihats: Hats or anything that is regular in your group and an important part of your groove could be put in this area. In my case, I sometimes include snares. Please note that there’s no right away to use the Percussion & Hihats group and experimenting might get you some interesting results.
  • Melodic groups: These two work hand in hand. One is for anything in the background and the other is for the melodic elements to be forward. The way the macros work, they will help you position properly the sounds and make the best of them. Try playing with the various knobs to see how they influence the groups.

Please note – I’m applying high pass on these groups and feel free to change the steep which can influence the sound in some good ways, sometimes.

The three busses are quite interesting to work with once you get the levels of your groups finished. For instance, you want to find the best relationship between bass and kick that are routed together. Once they are balanced, the bus allows you to control both the bass and kick at once; this can help you more easily decide on the tone of your track by moving the bus up and down.

I’ve also included a reference channel to remind you to use a track that can be used as a mood and reference board. Reference tracks are great to help you to take inspiration from parts of other tracks you like and would potentially like to use in your mix.

The various sends are simple tools to just beef up or open up your sound. Sends are really for finishing touches to your mix and they’re meant to be used as gently as they can be; subtlety can also make things intense.

Thanks to everyone who provided feedback for the development of this free Ableton template; I am glad I can continue to help everyone enjoy making music!

Click to download this free Ableton template: (New version 2023)

Pheek’s template 2.0 for Ableton Live 11.3+

My tracks always have the same song structure

(Cover Photo by Luca Bravo)

One of the common things I often see and also struggle with myself is that sometimes I feel like my songs are always arranged in the same way; my song structure is often the same. While there’s nothing inherently wrong with following a regular song structure, often I feel like I need to have more arrangement variations in my work and new ways to present my music.

ableton live, ableton, structure, arrangements

So, what’s wrong with repeating song structures you already know work?

There are secret ways to consistently get great results with certain arrangements that, for the most part, will always “work”. When I used to DJ hard techno or drum and bass in the late 90s, eventually I became really bored of all the tracks had the exact same structure. Yes, it was extremely easy to mix the tracks together once you understood the “tricks” but at the same time, it was also underwhelming for listeners and DJs with a creative minds who preferred more challenging music and mixing.

It’s important not to fall into repetitive habits and patterns; you might find new arrangement tricks while exploring and experimenting with new song structures.

Before jumping into slice mode to get your arrangements upgraded, let’s outline a few rules that will be very useful to consider before we actually begin editing:

  1. Export a wav file of the last track worked on (any project!), finished or unfinished. Especially if you’re working using my method of Parallel Music Production; this technique will be very useful. Start a new habit of not only saving your project at the end of your session, but also bouncing a wav file of what you have.
  2. Import your file into the current project you’re about to work on. By importing, I’m referring to the arrangement section where you can drop in an empty, dedicated channel.
  3. Use markers for the arrangements as for where there are key points, changes, transition. With these references, you can see if your current project has similar points as your previous wav file, and then you might want to change it up if they are similar.
  4. See if the two projects can be easily mixed by a DJ. This is a good test to see if your track has too much going on, or if things will be fun to mix. I’ve said countless times before that if your music is fun to mix, DJs will carry a copy of your track for all their sets.

Slice your song structure

With your new habits in place, now go into slicing mode and get things started. As I’ve discussed before in a previous article, How to Turn a Loop Into a Song, you’ll need to decide the bpm and length of your track as starting point and build from there. I invite you to refer to the post if you need the full tutorial on that topic.

So let’s say you finally have a structure made up that you’re happy with. Here are the main key points I often use to avoid redundancy:

  1. Find the main sections of your song, and slice off the beginning and the end. A “section” of a song is a part that is different than others for its content. In pop music, we refer to these sections as bridges, breakdowns, choruses, etc. In electronic music, these types of sections might be a bit more subtle or non-traditional, but they’re still there.
  2. With your sections isolated, determine if your perspectives are balanced. By “perspective”, I mean this just like it is used in photography; see if your track has balanced ratio.
  3. Insert empty slices in middle of the parts as well as some random points in the song. Check some “winks” that you might be able to make from the reference track you originally imported. “Winks” are when one song might “talk or reply” another if mixed properly.
  4. Move around your sliced blocks/sections. Try wild swaps and mess with perspective. Be creative. In contrast to the often useful “use your ears not your eyes” advice, in this case I highly suggest working on your structure visually alone without any sound at all so you’re not biased or held back in your arranging experimentation. If you’re new to the idea, make sure you make a backup copy first of your project. Personally, I spend quite some time to make something visually appealing with my blocks even before listening.
  5. Intentionally leave mistakes. Did you move something slightly off the grid? Did you paste a section at the wrong place? Try leaving in it the structure until next time you come back to it.

Try messing with your song structure; let me know how it goes!

SEE ALSO :   Lego Blocks as Song Structures 

Sound design: create the sounds you imagine inside your head

You might never really be able to make the sounds that you envision in your mind 100% accurately using sound design, but I can offer you some advice to build on a good starting point to make something close to it. Just like in painting and cinema, often our imagination will play tricks on us; you might imagine what you think could be “the best idea ever” but once you actually get down to working on it, you quickly realize that there’s a world of difference between your imagination and the final output.

So, is there a way to use sound design to transpose those ideas into something practical?

Yes, absolutely.

Sounds have a structure, shape, and form, and when you “hear” something in your mind, you have to translate this idea into a precise description which will enable you to get you started on actually creating it.

To get a good start in the sound design process, ask yourself the following question:

Can you explain your idea verbally?

The first step is to analyze the physical characteristics of the sound. Keep in mind that sound has multiple axes and characteristics:

  • Time: A sound can be short, long or somewhere in the middle. The temporal aspect of a sound is basically its duration.
  • Envelope: The ADSR (Attack, Decay, Sustain, and Release) envelop trick is what I’m referring to here. Foe example, does your sound start out loud and then fade away, or maybe it does the opposite?
  • Frequency Spectrum: Is the pitch of the sound high or low?
  • Harmonic or inharmonic: Does your sound have tonality or is it more noise based?
  • Position: Is your sound static or panned on a side? Is it moving?

Secondly, you need to identify a source material for your sound and decide how it will be shaped:

  • In a previous post, I talked about layering sounds. One great way to get started is to try to find already existing sounds, and layer them in a way to get to something close to what you have in mind. For instance, layering a tom, a clap and a snap–when glued together–will form a rounded sound that extends up into the highs. When combining your sounds and layers, I recommend using a good compressor of the Opto or Vari-MU type; they are musical and create a great feel to your sound. Check out Native Instrument’s Vari Comp or KUSH’s Novatron that came in strong in 2017 as one of the best tool on the market for a reasonable price.
  • If you’re more into synthesis, you can do something like experiment with a subtractive approach by using multiple Oscillators with a good filter. I usually use Ableton’s Operator but this year U-He’s Repro 5 has been really nice for me in terms of sound design; lovely, creamy sounds. I like to have my low end and mids set to sine and then will shape harmonics set to square or triangle. Experiment endlessly!
  • Another interesting option would be to use field recordings. You might think this approach is a bit odd, but you can even try to make the sound with your mouth, or try to find objects to hit; you’ll always end up with an interesting sound. You’ll also be surprised by how much you can do with recording your own voice. For a great, affordable field recorder, check out any of the field recorders by Zoom, they even make one that can plug into your iPhone, which is quite handy.
Sound design - Native Instruments' Vari Comp

Native Instruments’ Vari Comp


And lastly, once you’ve established your source material, you can then dive into carving your sound:

Time: there are a few things you can do to manipulate the time and duration of your sounds. Pitch-shifting something to slow it down or speed it up is fun. Granular synthesis is always an option as well; one of many options being the Mangle VST. I also enjoy having a dark reverb with a tail to stretch the length of a sound. Any reverb can do a good job here but you can easily experiment with free options found on KVR.

Sound design - The Mangle granular synthesizer

The Mangle granular synthesizer

Envelope: If you have a big chunk of sound that you want to shape, there are again multiple options to shape it. If you’re using Ableton, the easiest way would be to use Ableton’s envelope inside the clip, and draw out the envelope of the volume or gain. There are also a few volume envelope tools out there; one you can look into that I like is Volume Shaper by Cable Guys; really powerful and fun.

  • TIP: If you want a really fast transient on your envelope, try using a Transient shaper. Transient shapers can also help with sustain.
  • TIP2: A VCA compressor with a slow attack can also give you great results.

Frequency Spectrum: As I mentioned, personally I like to experiment with a pitch shifter, but I also experiment with a 3-band EQ and a compressor; mostly a FET one which is a bit more aggressive (I recommend to learn more about different compressor types if you’re unfamiliar with them all). This way you can control specific parts of your sound and manipulate which parts you want to have more emphasis. This is definitely not the only way you can do this; there are so many other creative ways to use an EQ alone (such as the UAD Cambridge),  but I like to combine multiple effects and then play with them as I am searching for the right sound.

Harmonics: Harmonics can often be manipulated with saturation and/or distortion. If you’re looking for a good distortion tool, you can check out the Scream VST by Citonic which offers tons of options. Otherwise, the Saturation Knob by Softubes is a great tool for a range of subtle to drastic changes. I suggest playing with filters as well; they can enhance some part of your sounds, especially if you use them in parallel (through a send/bus track).

Position: Try out any panner. There are multiple panning plugins on the market, but I’d be careful to make sure you aren’t making your sound spin too much in the design phase; you don’t know what the position of your other sounds will be yet and you might end up undoing everything later anyways. Beef up the sound with a chorus or a doubler to manipulate the sound’s position even more, but as I mentioned, try not to go too crazy with the panning when creating just a single sound.

These are just a few sound design techniques and ideas to get you started in creating and designing the sound you imagine inside your head. Have fun!


Bonus: A good way to come up with unexpected design ideas is to use randomization. Here’s an amazing tutorial by my buddy offthesky.


SEE ALSO :  Creating Beauty Out of Ugly Sounds 

Dynamic Sound Layering and Design

Sound layering can be a very complex or very simple technique in music creation and production depending on your goals. In a past post, I gave some really basic sound design tips; I have a lot of readers who are just starting out with mixing and producing, so it made sense to start with something less intense. This second post about sound design, however, will focus on something a little bit more advanced but still very simple: sound layering. It’s actually surprising to me to see so many people who ignore techniques that allow them to get the most out of layering, so I thought I’d write about it.

First off, I would like to discuss Ableton’s groups. Many people use them as the equivalent of busses, where all the grouped sounds will all be treated in a specific ways and yes, that approach works really well indeed. However, I prefer using a solo channel as a bus instead and use groups for sound design or classification. A good example is for kicks or claps, which are usually a combination of up to 3 different samples or sound sources (ex. 2 samples, 1 synth, etc.). Basically, since each sound is a collection of multiple samples, then I could say that they will work best as a group.

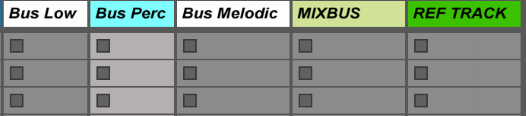
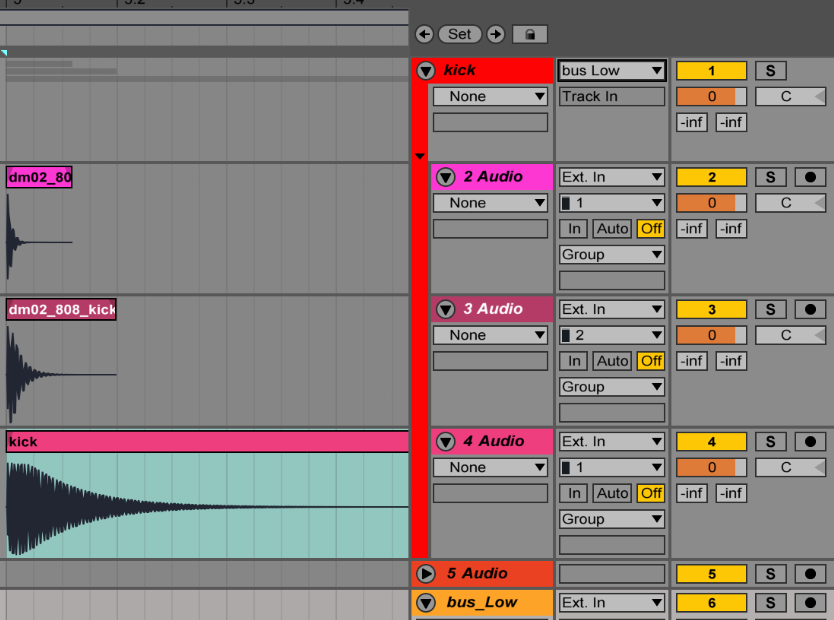
Visually it looks better and is easier to manage, and additionally you can also put effects on the group to glue all the sounds together – generally you’ll need a compressor and one or two EQs for a relatively uniform group. Once I’ve done that, I usually like to have an additional bus for all sounds (eg. groups) that will glue everything else together.

A second point to keep in mind, is that there’s always multiple ways to do sound design. Keep in mind that what I show you here is simply how I do it but there are other people who use different techniques; I try to keep it simple. Two methods Ableton will describe here that I like are the arranger and the drum rack.

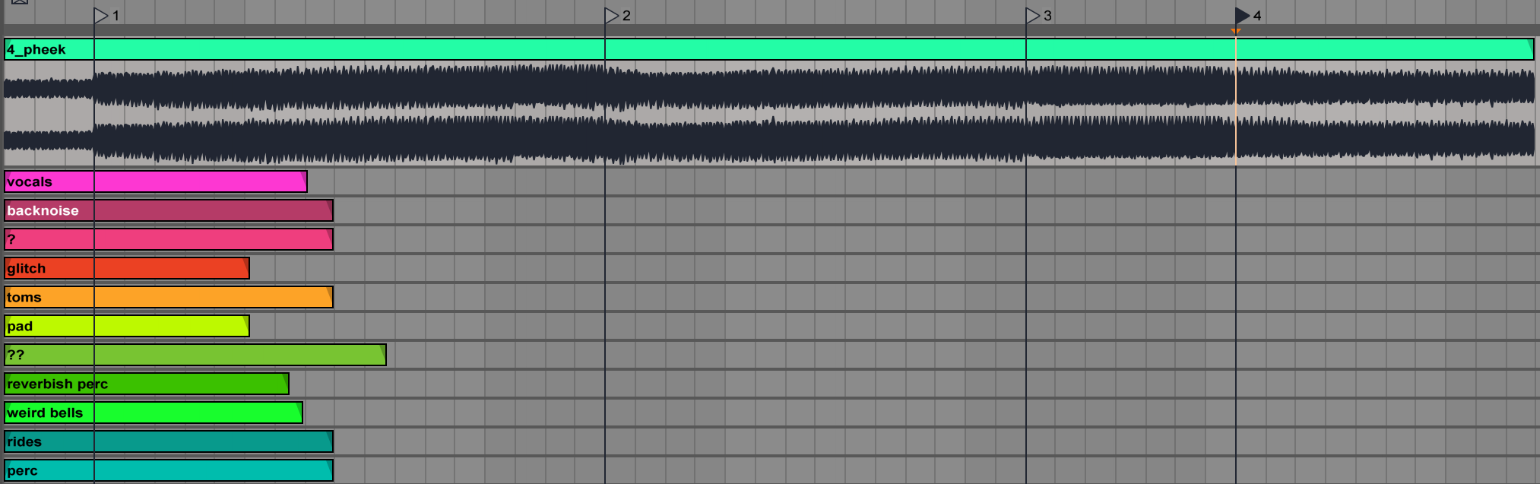
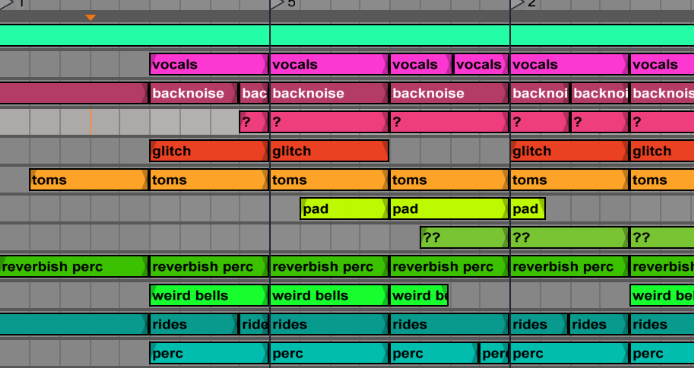
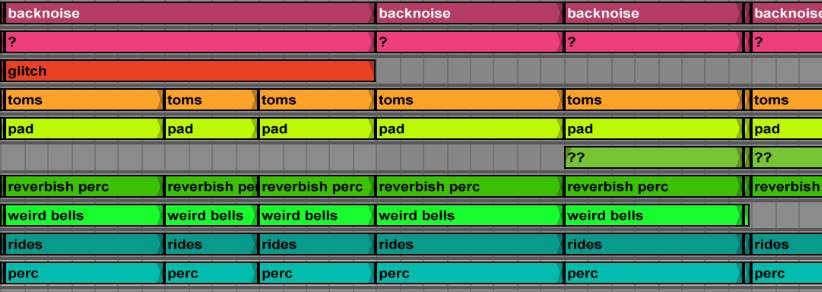
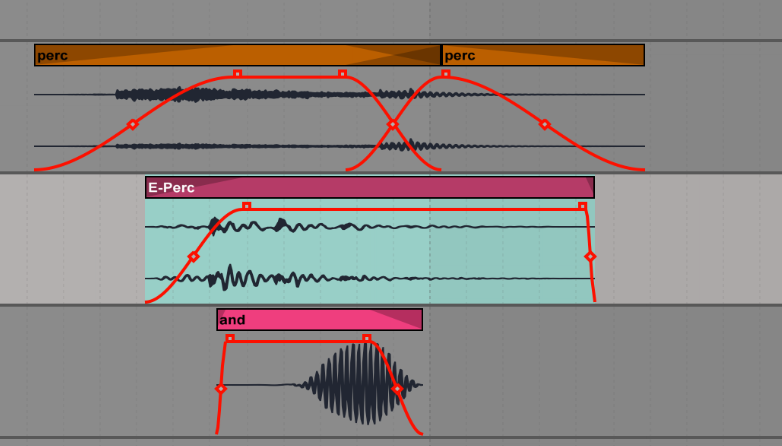
If you work in the arranger, you drop sounds in the channel and it’s an easy way to see the layers. I like turning off the grid to do this so it feels a bit more natural.

You can adjust the volume for each layer and tweak the EQ to get part of the spectrum of one sound, and the complementary part of another.

You can do the same with the attack and release; there are so many options. I really recommend using the faders too for more control. So basically, volume, EQ are your best friends here. Brainworx has an amazing filter I recommend, it’s super solid for sound design.

If you prefer, you could also mainly use the Drum Rack to do the same thing. Load up the same samples in the pads of the tool and then sequence them by MIDI instead of putting them in the arranger. Some people dislike working this way because they can’t easily see the frequency shape of the audio file. But the advantage of this approach is that you get to have access to more options to manipulate your sounds, like the extra controls in Ableton’s Sampler window.

What I think is best in the end is to combine both the sound arrangement layering, with the an extra channel of Sampler use so you can work on constant movements. The main thing you want from your sound design, is a feeling of liveliness and emotion. The sampler has LFOs you can assign to filters, panning, or volume, which is a subtle touch that creates a nice layer of movement and liveliness. In the same way, I’d even add a synth of your choice to give richness to the sound with oscillators working to reinforce the fundamentals with a discrete tone; more complex sound layering.

Finally, on the group of the sound itself, I would add nothing but an EQ and compressor to “glue” everything together, but you could also use reverb to broaden your stereo image. These techniques should help you improve your sound design skills!

SEE ALSO : Sound design: create the sounds you imagine inside your head 

Are online communities replacing labels?

I’ve recently been wondering what will be the future for labels. Are streaming services replacing labels? Or are other communities? I’ve been running my label Archipel since 2004 and I’ve never really made money from it, if you discount using it as a business card for gigs and contacts. The money and time invested in Archipel have been very high, so it’s hard to say if it’s been good on for ROI. The further and faster the digital music world develops, it seems less and less obvious what roles labels will play for artists. Streaming platforms like Spotify give little to no importance to labels, and since basically anyone can start one, running one nowadays doesn’t have the same aura it once did.

In mid 2016, I offered free coaching to everyone who joined my mailing list, and while this turned out to be a success which I didn’t expect, I had to put it on hold until I could find someone who could help manage the work involved. In the meantime, I created a Facebook group for people I’d worked with to join so I could provide them with feedback and support. There are many Facebook and social media groups for producers out there and many have themes and rules. I’m part of a few that I enjoy; I’ve used them to learn tricks and something get informed of certain music related news. So, for me creating a group was an opportunity to give people a place to feel open to share what they’re working on, to get feedback, and provide words of encouragement to anyone else.

The great thing about this initiative was that people started to really participate and interact, even more than I thought they would. It was pretty amazing to see some people join forces and collaborate, and to see others help out by giving advice with regards to where to send music to get signed. This community has become autonomous; it’s doing what I was doing myself before, through email. I’ve been thrilled by it!

Somehow, when I was running my label, I was hoping to create that same sort of synergy, but for some reason it never came. My label manager and I posted regularly through Archipel, trying to come up with ideas, proposals, concepts…but it was pretty much always the same guys that were interested. That was cool, but it was also puzzling me to have such a huge line up of artists (Archipel has almost 200 people who collaborated through years!) but that only 5-6 people were really into it.

I fundamentally believe that most people want to join a specific label to be part of its community and get closer to the artists they’ve worked with.

Of course, the exposure and networking from a label also play an important role in an artist’s motivation to get signed, but the community is another major part of this motivation.

As it stands, I think these types of online groups like the one I’ve described could be as beneficial as a label because:

  • You have people active in the groups whom most likely the same goals, motivations and tastes.
  • It’s much easier to connect with DJs who can play your music.
  • People are open to communication and giving & receiving feedback.


Your music has an impact. A major issue with the current music business is that there’s a huge feeling of hopelessness in the air, which can drain out all the juice we have as artists and creators. Most artists have the energy to build projects or beautiful products, but will their work be something that will remain hidden away on the “bookshelves” of the internet because it doesn’t sell? Are all songs worth being turned into records? Is there that much of a demand to keep working so hard creating?

The ego plays tricks on us. One of the biggest is to believe that our music is worth more attention than it is, in reality. Many artists feel anxious and depressed because of this reality check. We want to share the music but the low hits are depressing us. That said, this major issue can be addressed by being in a community: one of any types of communities that are seemingly replacing labels.

Personally, after years of releasing countless albums and EPs, I’m now more excited to know if my five closest and most trusted friends like my newest song. I know for sure they will listen to it and provide feedback. I’ve decided to share my work with a selective number of people who can echo back the energy I put in it. I’m fed up of running after people and saying, in essence, “listen to my song bro! you’ll like it! leave me feedback!

Labels won’t be replaced as long as the music industry need representatives for the artists. Every artists dreams to be able to live off music full time but it is becoming clear that it’s not once central thing as a label who will make it happen.

This spammy approach does nothing at all for all parties involved. But sharing your music with five people who care is worth 1,500 who were more or less not into it. I really believe that approach as stopped me from crashing into obscure thoughts.

SEE ALSO :  The Changing Dos and Don’ts of Contacting Record Labels 

Intuition for decisions in music production

In a sense, musical intuition is what defines someone who can bring a bit of creative magic into something, in comparison to someone who sticks to truly technical application of software. I’ve often had the chance to watch experienced producers make music, either while I was visiting one’s studio or on the spur of the moment of a jam. For instance, we once had the infamous Narod Niki experience at Montreal’s MUTEK in the early 2000’s where Zip, Villalobos, Dan Bell, Akufen, Cabanne, Dandy Jack, Monolake (even Cassy sang for some minutes) all synced their laptop and gear to improvise a show for us. Our local festival gave us many opportunities to watch, what I would call, masters in what they do, play in front of a crowd to present how to create and perform. The live act itself, when done properly, should sort of represent what the artist is doing in his or her studio, but in a way that can bring the crowd on a journey.

When I state a live set done properly, I refer to something that is partly prepared, partly improvised: a set that relies partly on musical intuition. Musical intuition is the happy combo that allows for “happy accidents” and creates a sense of risk-taking. There are a lot of pre-recorded performances that I don’t get the point of. What interests me here, is the topic of musical intuition. Ever since I started teaching, this one question is often brought up:

How does one teach musical intuition, or intuition at all?

There are 3 points about intuition that we need to discuss first. Intuition can be:

  1. immediate apprehension or cognition without reasoning or inferring.
  2.  knowledge or conviction gained only by intuition.
  3. the power or faculty of gaining direct knowledge or cognition without evident rational thought and inference.

What I refer to by using the word intuition is a bit different from those three points. For me, intuition in music is how someone does something that seems to be random, but is actually done in a very effective way. Partly unpredictable, partly guided by experience, but entirely guided by a personal vision to arrive at a specific result. This is musical intuition.

A notable example would be an artist, during a live show, dropping some sounds or a musical idea that was unexpected but works with what’s happening at the current moment completely. Another example could be a musician proposing a random idea and having that incomprehensible idea make total sense after 2-3 minutes or development.

Can musical intuition be learned or developed in music making?

I firmly believe it can be. Some ways to get there would imply:

  • Listening to a lot of music genres, be diverse in the selection. The best way to get new ideas for one song and bring a wind of freshness into something is to translate an idea from somewhere else. The number of ideas I get from free jazz or Indian music are too large to count, but I find a lot of depth into these genres; they have been around for so long that they have developed so much maturity. Try to dig into realms that seem obscure or spend time listening to folkloric music as a starting point.
  • Knowing your tools. This one is overwhelming as there’s always something to learn. I often say to people, what you need to know about your DAW should be just enough to make blocks and build tracks. The rest of it, you learn as you go. But the main part is that you should be at ease with the DAW, and using it should be second nature to you. Moving blocks around, copying & pasting, and arranging basics must be something you can do fast so you never lose your flow. It’s when you start looking for how to do something very simple when you struggle too much and lose your initial idea. Imagine you couldn’t explain to a friend how to get to the nearest grocery store because there are too many details to explain; it would be confusing for him and you.
  • Be attentive to your routines and things you don’t like. We get caught up in what has previously worked, and will tend to repeat it ad nauseum. While part of what attracts people to our music sometimes one specific sound, if we become a slave to ourselves and to people’s expectations, we will fail to grow as artists. Musical intuition progresses with your personal dedication to grow and stepping outside your comfort zone. The easier it gets for you to explore, the more easily you can express yourself. The sense of becoming fluent in music-making will allow you to become more spontaneous and able to come up with new ideas.
  • Nurture technical curiosity. Spend tons of time reading about music, but also, non-music related topics. I have had so many ideas come to me by reading sci-fi novels, watching dancers, reading about architecture, drawing with my son, running in the woods, etc. Your brain needs to do other things other than spending time in the studio. You can only learn to a certain extent in there, you open yourself up to new ideas by doing other things.
  • Rehearse alone and with others. If you can jam on your own to get comfortable in your art, that is one important thing. But when you can then play with a friend, it becomes very interesting as the dialog forces you to interact/propose/listen/adjust. This will improve your communicative music skills by a few notches.
  • Play for friends. I used to do intimate, living room concerts where I would play for 3-4 friends, sitting on the floor, sipping tea, drawing, dancing, chatting but mostly, listening carefully. Those moments are where I’ve learned the most and this is often overlooked as people think playing in front of a lot of people is where the fun is at; it can be, but it’s not the only option. The advantage of playing for a handful of guests is about getting intimate and instant feedback, which can be a very rich experience.

Experiment with these ideas and you should slowly develop your musical intuition. Let me know if you have questions or join my mentoring service to explore your music more deeply.


SEE ALSO : What Is A Mature Sounding Track? 

Pointers To Define Your Sound

The majority of artists I work with during mastering and finishing your tracks, talk about their desire to define their own sound. It’s important to them because as a music lover many times you’ll hear a just a few seconds of a song and think that’s got to be _____ band, or producer. To achieve this ‘signature style’ there will usually be a particular production style or a sound palate one will use in a way entirely his or her own that is instantly recognizable.
Case in point – there is much talk and celebration of Burial’s album “Untrue” which is now considered to be one of the most influential albums of the last decade.

Why is this album so celebrated?
For starters, the ghostly atmospheres, foley recordings and sound effects of London at night, conjure an atmosphere of a dark, eerie space. The heavy, downtempo vibe of the music is an invitation for listeners to go to their own dark places and reflect on that. Even the titles of his tracks, “loner”, “U Hurt Me”, tap into a feeling of emotional damage, which many people can really connect with. In short, the heavy sound and persona behind the record are instantly Burial.

Taking note of the various elements artists can use to create a sound all their own, let’s analyze some of the fundamentals of what will be influencing your sound.

  • Tonality: this is hugely important as most artists will generally embrace a ‘vibe’ or ‘mood’ in their music such as happy, upbeat, or angry, melancholy. Do you often work in a similar scale or key? Are your melodies basic and straight forward, or do you write complex chord progressions?
  • Genre: picking a genre to work in is perhaps one of the most obvious choices in creating ‘your’ sound, and defining your identity as an artist. Are you embracing an existing one or will you try to fit between two? This can be a hit or miss and to do something original is taking a risk but the reward can be massive.
  • Samples: Are you using samples? Synthesis? Modular? The Orb for example, loved to use samples from specific movies (the 80’s like Flash) and Boards of Canada were famous for recording their synth parts to old tapes and resampling that back into the session. Consider the possibilities of your sound source.
  • Rhythms: Are you more 4 to the floor? Breakbeat influenced? Jazz? Hip-hop? Latin rooted? Take note of where you’re most comfortable and what is your go-to groove.
  • Technicalities: This is where I can help you most and have been helping clients with on their way to creating ‘their sound’.
  • Mistake. Are you going for something slightly sloppy or very tight and quantized? Try to see what mistakes can bring to your music and if something wrong can develop something interesting. Don’t be afraid to try something you might never do as a starting point to your next track. 

The tools and effects you use can also have a major impact on your sound. I’ve covered this before but it’s important to refresh your mind when considering your choice of effects.

Reverb, Delay. You might pick one plugin to work with all the time for consistency. Reverb – maybe you always go for a plate or perhaps you prefer to use huge spaces and long tails. Are you going to use dub delays or short ones to go for a Haas effect?

Compression. Do you want your sound to be compressed or not? This is something think about. Find a compressor that can be your swiss army knife for all occasions, and stick to using that.

The process of defining your sound is much like a designer developing the branding elements for a client.

While not essential but certainly helpful, a designer will tell you which set of colours, fonts, images, and direction to use within all your work.

What I usually do with my clients to create more of a signature sound is take a collection of references and sounds they connect with and then work on a way to replicate similar sounds and ideas. The pad from here, the percussion and swing from there, kicks made this way, hats always that way… and so on. You cherry pick all your preferred sounds from different sources (eg. why not go for a style that is entirely alien to you like afrobeat if you’re into techno?) and make a collection. I can find which synth is excellent at creating that sound, and while playing with it, you’ll often discover so many new sounds you are drawn to that sound original, fresh, and inspiring.

The truth is that trying to define your sound will not come overnight. It’s a process that will be different for everyone, and you truly cannot speed through this and feel right about it because there is no fast track to originality.

That being said, in all honesty, working with someone who has the production and musical experience to guide you in the areas that best represent you is huge and can be a game changer in defining your sound.

As always let me know if you have any suggestions or questions about this post and leave a comment below and tell me what projects you are working on right now.

JP


SEE ALSO : Beats and Melodies

The next big thing?

During a conference I was recently invited to talk at, I was speaking with a group of people @ College Du Montreal and was asked a question I couldn’t answer quickly. The question that came up was what I’d consider “next level”, which I responded by saying “chances are, you’re going to be disappointed by my answer.” And in many ways, it wasn’t the answered they wanted, and I could see that a few were puzzled, hoping to hear about something new, exciting, and truly ‘next-level’.

Now that that moment is behind me, the concept of genres, and what’s the next big thing has had time to linger in my mind and I’ve thought about it more.

Can you remember a time before Soundcloud? Before iTunes playlists, a time where you literally dug deep through record bins and spent time chatting up record store employees about what was new? Have you bought records without even listening to it simply because you connected with the artwork and knew this was something you needed to have?  Whether the music was next level or not you had the feeling you discovered something special.

In many ways, the overwhelming amount of content we’re exposed nowadays can make us lose track of what’s going on. Musicians can post a track the second after finishing it, and the whole world can potentially hear it within minutes. Yet the tidal wave of self-released music is so frequent that it can also be harder than ever to get noticed. If you’re attentive and curious, you can catch people’s new ideas, yet the question now is – how can one really can keep up?

Here’s a fact to keep in mind: One doesn’t know he/she is making next level music until afterward, and it’s seen as next level.

If you focus on making music that sounds good to you, your skills and confidence will naturally grow. If you have fun making music, you’ll fall in that mind state named the zone. In that mindset, you’re able to achieve the best of yourself with little effort. This concept isn’t esoteric or religious, it’s a known experience studied in psychology and a state within the reach of everyone. But this post isn’t about that.

Most commonly new genres are created when an artist creates a bridge linking different musical styles together – think Jungle which brought Jamaican MC influences and sound effects with faster beats, and thundering sub bass. Think about underground mashups and artists like Girl Talk, which can’t be released legally but borrow music from anywhere as long as it works melodically. Think about the latest genres of dance music to emerge with significant popularity – tropical house, future bass, etc.. can you explain to me what those genres represent?

On a sound design level, I think of Serum, a wavetable synth hugely responsible for creating the growling and murderous monster bass sounds in electro/dubstep. Do entirely new sounds or production technique make that music next level?

What is next level, exactly?

For me, next level comes from one’s point of view. My perspective of what’s next level has dramatically changed in the last 10 years. My interest in sound is continually shifting, and what I feel about it today might be different next week. Sometimes I love music with low-production quality but filled with originality, sometimes I love over-produced generic pop for the crazy slick techniques in the mixing and sometimes I go back in time to revisit classics by Miles Davis to acknowledge the true masterful skills he had in performing his art.

To me, the real question is, what and why are you looking for that?

Rarely will my next level tracks make it to my day-to-day playlist I can listen to in my car. Next level music is usually something I can connect to its world/melody/content. I believe this is also what most people are connecting to with once they pick to make a playlist that moves them. It’s not always something big, loud, or obvious, often it’s a musical element already known, just done really really well, or a touch differently. If the arrangement of a song is smart and tight, often time any tricks happening in the mix won’t be the first thing the listener will hear, but more generally will feel as a whole.

To wrap this post up, focusing on sound design is critical to any producer. Your sounds are your words and your voice as an artist and remember that this is what can get the attention of your listeners more than your technique or tricks.


SEE ALSO : Using and Choosing an Alias

When The DIY Becomes An Obstacle

I want to talk about DIY – that is, the do-it-yourself approach to making music. Some people have the desire to begin massive projects where they create everything themselves, from scratch. They hunt for samples, they record bits of this and that, they spend days writing and re-writing melodies, they do everything themselves and more, and it takes forever if they don’t become overwhelmed by it all first and end up scraping the project altogether. This is when the DIY becomes an obstacle.

It reminds me of the video that went around the internet about this guy who decides to make a sandwich from scratch and create all the elements needed all on his own. He’s collecting salt from the sea, milking the cow himself, learning to bake bread. etc. Spoiler alert – when the guy finally eats the sandwich (which cost him nearly $1500 in expenses) the result was somewhat mediocre, and disappointing.

People who specialize do ‘their thing’ better, faster, with better ingredients, tools, finesse, and experience that more than often makes a world of difference. In the studio, it’s the same thing. I’m sure there are areas of music writing and production you don’t look forward to and others you could do all day. If we let every obstacle along the way frustrate us and chip away at our mental energy, the effect can be quite damaging.

The path doesn’t need to be cleared from obstacles. Obstacles are the path. (Buddhist Proverb)

You might have a feeling where I’m going with this as I’m a big fan of collaboration in music and productivity in the studio. It’s a great feeling to push ahead quickly in your productions when one person can lead with his/her strengths in an area and vice versa, so the question is – how do you make the most of your skills while taking advantage of help?

Find what you love doing. Identifying your strengths will make a big difference in the confidence, and understanding of yourself as an artist. It’s a task many people I coach and speak with overlook. Is your thing sound design, mixing, searching for the perfect set of samples? The production-oriented tasks where you’re the most happily active and engaged is where you’ll find your strength. On the flip side, it’s important to understand the areas you’re less happy and skilled at doing, and make a mental note of this when collaborating with others. If you can specialize at what you do best, you’ll be a great asset to anyone who is struggling in that department.

Invest in yourself. In whichever area you are strongest in, consider acquiring the best equipment and knowledge in that specialty. For example, if mixing is your strength, you should definitely follow Pensado on Youtube to learn as much as possible about mixing, and learn about kick-ass plugins used by the pros. Find your role model in that department and study what he/she does, what gear they use, how they use it and also go above them, and find out who are their mentors. If you get to know who influences your role model, you’re gaining critical influences.

Check your ego. Have you ever observed yourself snubbing a technique or tool just because you think it’s not for you? How many times have you counted out something great without even giving it a chance? If you can, think if you’ve been avoiding some plugin such as channel strips or a specific compressor, perhaps even a DAW without any evidence for doing so. Also, if something is considered ‘bad’ it’s important to understand the difference from that which is regarded as good and make your own judgment after accessing the facts. Things I’ve read people shouldn’t use have drawn my attention to tools such as multiband compression, which is one of my favorite tools for sound design now. For some reason, rock producers seem to dislike multiband compression, yet I can’t understand why if you imagine what’s possible in the right hands.

As always I want to hear your opinion and look forward to keeping the discussion open ~

JP

What Izotope’s Ozone Series Doesn’t Consider

It was a great surprise to see the release of Izotope’s new Ozone and Neutron update last week. Since I use both products, often I immediately got started looking for whats new.

There will undoubtedly be a ton of new tutorial and youtube review videos posted of these tools, but I want to approach this post around how I use these plugins, and also mention a larger problem I find all too common within the production of software, and an issue I feel Izotope’s Ozone series doesn’t consider.

But firstly, let’s talk about where Izotope really succeeded.

The sound. I can’t put my finger exactly on it, but to my ears, there is a noticeable improvement of the sound quality in Ozone 8. Perhaps it’s an oversampling issue or something with the filters, but the sound is tighter, bright, and more precise over earlier versions.
The workflow – Ozone 8 comes with several new features that provide a faster way for me to achieve the sound I want. The maximizer now includes a loudness target and the reference addition to comparing the versions via the tonal balance control.

Tonal Balance. A fascinating tool that allows you to visualize the frequency levels of your track, and will enable you to match to eq targets from a specific genre of music. Having visual feedback of where your tonal balance per frequency is, and easy access to eq those levels is a great and fast way to achieve a professional sound. I did some testing earlier today and found the target system pretty accurate, but in the end, I found the target ranges slightly off for the lows and highs (see below in my low points).

Visual Mixer. This is the bomb within Neutron 2, and for that feature alone I’d buy the entire package. The visual mixer allows you to place and position your tracks visually across the spectrum, (volume, pan, and width). It’s a beautiful process, and the edit window looks super sci fi and modern. If you work with multiple channels and often have mono tracks this is simply a killer addition. One of the things that blew my mind was that you can actually automate the panning, which opens the doors to many exciting and beautiful options in sound design.

Improved Mix assistant. I really like the mix assistant by the way. I’ve heard many people mock the process, or are jaded to the idea  that it’s impossible for AI to do a man’s job but honestly if the assistant can pull up all the tools I need and set the table for me to tweak fast, you won’t hear me complain.

Communication between plugins. This feature is really cool. You may adjust EQ from one window on another incoming channel, which is reflected in other instances of the plugin. This is super useful when you want to tame the relation between kick and bass as you want to be EQing side by side, both channels. It works and looks seamlessly.

In the end, I’m really loving the update from Izotope and will be using many of the new and improved features. I also want to take a minute to point out a criticism I have with Izotope.

Generalization of customers – It’s unfortunate that I find many large, corporate companies narrow down potential customers into three simple types – pop, edm, and hiphop. I see how that makes marketing more manageable, but what about producers like me who are creating and working on underground and experimental music? I say this because many of the new tools shipped with Ozone and Neutron are built with presets as starting points to mix and master only three types of music. I my opinion, this is quite limiting, and the fact that you can only refer to 3 types of tonal shapes is, to me, a complete fail. It reminds me of LANDR giving only 3 types of loudness range. It’s disappointing because I feel like this software expects you to be either this or that, which is clear from the design of the genre-specific presets – as if there are no other types of musician in the world??

What Izotope’s Ozone series doesn’t consider is people like me, and many friends and colleagues of mine, who make our living from creating music, and don’t fit into the standard pop, edm, or hiphop category.

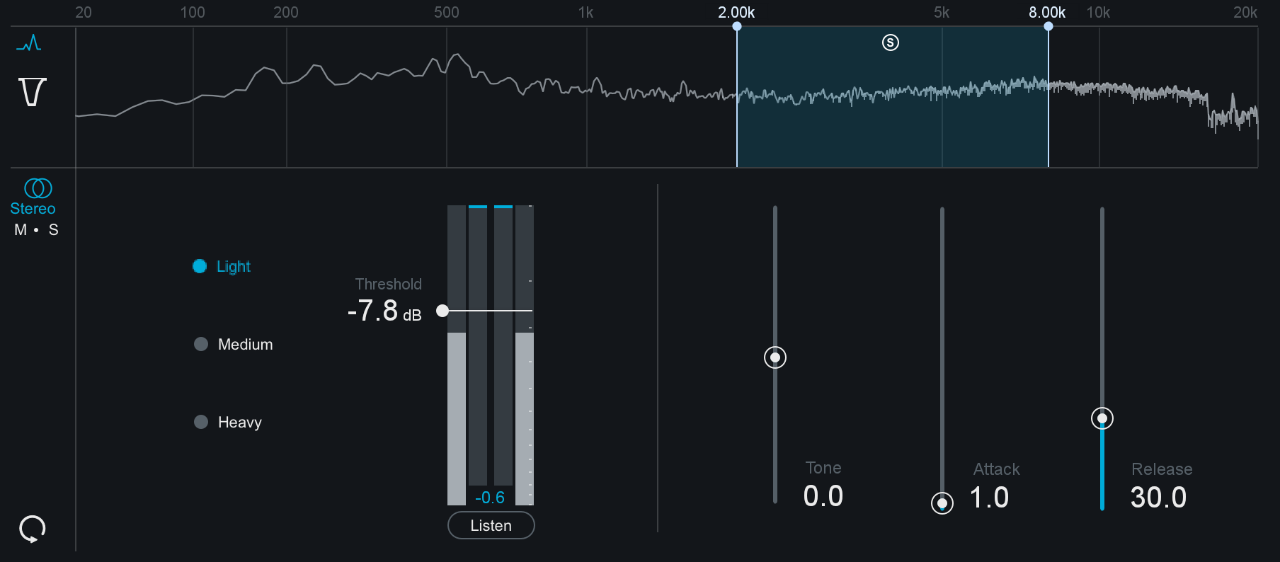
CPU hungry. I have a newish MacBook, fully geared up for performance, and while running several instances of Ozone my entire screen began flickering and making strange glitches. Izotope support claimed it was likely my CPU over-loading, however, I was only using 5 Neutron and 1 Ozone 8 instance, plus visual mixer. If my custom built computer is hit hard with CPU usage imagine how will the average Joe deal with such demands on the processor.

This goes along with the new mastering plugin by Eventide, Elevate that is so power hungry that it’s barely usable. Funny enough, a few days after Ozone 8 came on the market, Eventide droped the price of its plugin by 50%…

Still, in my opinion, the updated Ozone suite is a serious tool to consider having. It really delivers impressive quality sound. As always, I want to hear about what you think about these tools and feel free to leave a comment below and share your opinion.

Cheers,

JP


The Modular Trap

The modular synthesis game is a big one right now, and for good reason. Sound designers and synth heads that want to take their sound design to the next level will find no shortage of fantastic modules to collect, and nothing is stopping you from patching together the tweaked out system of your dreams.
That being said the road to modular isn’t without its problems, and before you rush out and get started building a rig of your own I want to share some insights you might find helpful before you dive into the Modular Trap.

Intellijel Rubicon

I’ve spent a good while lately test driving a modular system of my own. I’ve been using the Intellijel Rubicon, and I can attest to many of the uniquely modular things people get excited about – all the hands-on messy fun that make modular such a unique experience, the unique, fat, and rich sound, the many fun surprises that come along with a somewhat unpredictable modular environment. Even with software like Reaktor, Reason, or Softube Modular, the sounds you can generate just can’t be done the same way without real life patch cords and eurorack modules. In my opinion, these are some of the pros about using a modular setup:
The quality of the sound coming from modular is somewhat different and pure. The Intellijel Rubicon I’ve been using seems to have a unique and pure sound, quite different than that from any sine waves I’ve heard from a soft synth. It’s hard to describe but I can honestly feel it more deeply – just like an analog mixdown will be slightly different than a digital one. If like me, you really are fascinated by sounds, you can easily become seduced by this.
Hands-on material plunges its user in a state of flow that can be addictive –. To get anywhere within Modular setup you must be actively involved in every step – patching one module to another, over and over, in different ways requires your full commitment and attention – it’s very engaging. Time can be lost easily when creating music this way, and being so focused on sound feels amazing, it’s truly addictive.
Community – You don’t have to look hard to find helpful, and engaging modular communities online.  You’ll soon learn how to use your modules in creative ways you hadn’t known were possible. Take the time to be a part of these groups as the knowledge shared within these discussions will be precious to you if you’re just starting out.
Knowledge – In educational terms, I feel working with a modular system of any size is one of the best ways to teach yourself how sound can be altered and modified. With automatic results you will train your ears to understand how one module can significantly affect another, and how combining several modulators can create truly strange and trippy sounds

So far it’s all good and fun, but when the initial buzz wears off, you’ll likely find yourself surprised by a few things you might not have anticipated earlier. Here are a few drawbacks to working with a modular setup.

Cost can be a limiting setback. Building a modular rig of your own can and will get expensive. Just the price of patch cords needed for every module alone could very well make you sweat, and you’ll of course also need a case, output, input, VCAs, modulators, oscillators, LFOs, filters…, and that’s just the beginning.
Time Investment. I can’t complain about losing yourself for hours in synthesis, but it’s pretty easy to do with a cool rig begging for your attention. Like any other tool in your arsenal you’ll want to be productive and useful with it, so knowing how to create the sounds you need quickly will take some getting used to.
Steep learning curve. For many producers used to creating sound entirely within software, getting things up and running can be a little more complicated to set up.
Overwhelming options – with dozens of companies producing filters, effects, and everything in between for Eurorack, you might get the feeling that you’ll never have enough for what you want or need.

All that being said, I recommend taking an opportunity to get hands-on with a modular system. But before you build a rack of your own do yourself a favour and ask yourself this ~

Exactly what you want out of this?

What I mean is, are you performing live? are you a sound designer looking for unique and original sounds for your projects and work? are you creating a rig for your enjoyment during your off hours? Those questions are important to know because you can then begin planning with help from a site called Modular Grid – a website and resource that will prove to be incredibly helpful in answering questions about getting started.

One last note – I feel like there are many ideas about ‘going modular’ that are quite misleading, and not at all true. I often hear

“how much easier it is to make music using modular synths, how you’ll be taken more seriously as an artist, and how so many more opportunities will come to you if you can build the ultimate rig…”

Reaktor Blocks: A killer alternative.

As I pointed out earlier, setting up a modular system is going to take a lot of time, plenty of money, and a steep learning curve you wouldn’t anticipate at first. Look at software systems like Reaktor where you can patch together virtually anything you can do with the same modular components. Reaktor is just $199 usd, and requires a modest computer, that’s it. Many people love the look of their ever-growing systems, but many less so are becoming well-respected musicians using modular gear. There are a few role models out there who have accomplished a lot with their analogue toys yet on the flip side there are way more people who are only spitting out random bleeps and farts, feeling mid-ground between fascination and frustration. That’s all fine if bleeps are your thing but the tidal wave of fan mail probably isn’t coming in as fast as you hoped it would. And lastly, building the ultimate rig is in many ways a never-ending race. As soon as your newest filter or VCA arrives you’ve already decided you need another component to make it even better, and you’re almost never satisfied with what you have.

Other possible alternatives: Softube Modular, Reason, Bitwig, VCF Rack (Free).

The consensus is in – Modular is awesome, addictive, and a great way to learn about synthesis. Its also true that building a rig of your own is extremely pricey and not necessarily more productive in the end. Since this blog is about productivity, creativity and tackling anything that stops us from getting there I hope my impressions about going Modular will help make your experience getting started a positive one.

I want to hear about your experiences, hit me up about your thoughts, impressions, or anything else by leaving a comment below.

Cheers ~ JP

SEE ALSO :   What is the Electronic Music Equipment Needed to Start Producing?  

Music Making Is Problem Solving

Every once and a while the excitement to launch into a session fully inspired, fully motivated, literally can’t-get-into-it-soon-enough hits me, and it’s amazing. Seriously, in my experience there really isn’t anything that gets me pumped like that because when you know your idea is that good, and everything seems to come together perfectly, you know it’s going to be big. It’s different this time. So, you get started, loading the drum kit, mapping out the midi, tweaking the saturation.. soooo gooood….. then, your Facebook beeps, the insurance guy calls, your plugin freezes, and before you know it you’ve completely lost the groove, and the dream is over before it started. Music making requires endless problem-solving. 

Why is inspiration so quick to fade out? Why are there so many obstacles in the way? Does sitting down to make music always have to be this difficult? If you can relate to the experience I painted above you have tasted the sourness of the scapegoat in music.

There will always be a need to solve problems and cut through obstacles, both unexpected and predictable. Yet for better or worse, they come part and parcel with making music. Questions and distractions… Instead of fighting them, we need to minimize their effect on us, and as much as possible reduce the chance of distractions from happening altogether.

Looking back at nearly 100% of any consultations and coaching I do with people, I find there are four main ‘problem’ areas which seem to rotate and steal our attention. While there will always be some form of distraction, if we work to minimize these four main problems we’ll be in much better shape to stay on track during our next session.

We’re talking about a creative solutions to common solving problems.

Problem one: How and where do you get inspiration? I believe that there is a special energy that comes to us when she knows we’re committed to her. When I say her, I mean the work. Professional runners say that the hardest part about running a marathon is simply getting the motivation to put on their shoes, and leave the house. Boom. Just show up and get started – load up your daw, and start making noise, you’ll soon get excited and find something cool to work towards. One of the most important and simple approaches to music production, which I always recommend, is simply making music when you feel great. I’ve read several articles about the importance of rituals – where you design and carry out a pattern that makes you happy inside and out, and within that zone, your mind will enter a very positive space, which is super important when we demand creativity and imagination.

Problem Two: How can I know enough about music production to be a one-man band?
It’s impossible to know everything, and you don’t need to. What you really want to know are the ins and outs of your daw, and instruments you use. If you’ve been buying all the latest synths and each one of them is different, it’s going to take quite some time to know them all 100%, whereas if you are using one or two instruments, read the manuals and learn everything you can about JUST those two synths – you’ll be much quicker to make and achieve the sounds you want by knowing less (less instruments to learn), and focusing more (mastering the ones you use).

Less is more. I watched a video interview of one producer who’s had several track placements with Kendrick Lamar ~ the dude is 18, and records everything into Garage Band on his iPhone. He has a guitar and a phone. That’s it, and he’s making huge strides with his work, even with the most basic equipment.

Find a way to get engaged. Ask yourself what part of music production makes you forget about time, food, and everything else? This is a space where you’re in the zone, fully committed, and nothing else matters. Embrace this process and be aware of when this happens, you may not reach this level of focus and results during other steps along the way. For some, this state will only come to them when Dj’ing, and for others, it will come while locked in a mixdown, etc.. know where you’ll find your flow.

Problem Three: How can I commit to a direction in my music?
While there is no straight answer for this, I’ll simplify things to the belief that – you have multiple options, and don’t have to commit to only one. Record both ideas, and use the ‘save-as’ feature, allowing you to save a second version of the song to work on, and later decide which direction you’ll be happy with.

And lastly Problem Four: What will the afterlife of my song be?

No one can see into the future, so it’s impossible to know. I don’t believe it’s a productive use of your time to dream about what could be one day… without finishing your song, it will stay living on you hard drive forever, which is not what you want. What is important right now is to focus on the important things here:
Making music, Finishing projects, promoting your work, networking with other producers.

(for tips on how to promote yourself as an artist in a way that is personal to you, check this post

To wrap things up, problem-solving can be as complicated or as simple as you want it to be. While a study suggested that in front of anxiety, one of the best things to do is to take a 2 day break, although I’d encourage you to take a week off to start with.

Photo by Oskar Wimmerman on Unsplash

In an excellent psychology related article I read that when one is faced with a challenge, it’s critical to understand exactly what you’re being tested with – that is, you need to know what is the real problem. To know and understand what the problem is you must be able to explain to someone else with clarity, with a clear description. Understand the problem, and understand the options available to you. I read that negotiators who talk to terrorists holding hostages will eliminate many options down to only two in an effort to achieve a quick, yet satisfying resolution. Reduce your options to get moving quickly. Making a decision in haste can also have a negative effect, so don’t feel the need to always make a decision right away – give your self time away from the problem, and trust your brain’s ability to understand that in the background, beneath the surface, at some point a creative solution will emerge, often when least expected.

In the end, to win more, to score more, to get through to the finish line more often, you need to be as creative in finding solutions to problems as you are in every other area of your productions. Set a up a system where you minimize the chance for distractions to happen.

(quick tip– every mac has an app called Automator, where you can assign a chain of commands for whatever you wish to do. Check this video to setup a quick way to close all programs, turn off wifi, launch Live, and kick-start your session fast.


Cheers Guys JP


  SEE ALSOChecklist to see if my song is finished 

Self-Imposed Rules For Arrangements

When you’re up against the wall, pushing forward to break through and get things down can be taxing. It’s a mental game of will and strength against creative effort. What you need to know is this – waiting around for that very brief moment of inspiration and creativity will always lose out to dedicated, and consistent hard work. Does it have to be this hard all the time? Is there a way I can out-smart more difficult and time-consuming tasks? I’ll be the voice you can hear saying yes you can. And it’s easier than you think.

Over the years as a working producer, I’ve never stopped learning from others and finding ways to improve my skills and technique across all areas of music production. One thing I’ll share with you that I wish I’d picked up early is this – creating self-imposed rules for arrangements. Rules? What? I’ll explain.

For many producers, the stage where you arrange your tracks seems to be something you don’t look forward to. I get that, I’ve been there. I’m always hearing that the vibe and soul of your track seem to change in a less exciting way once you sit down and begin laying it out. You’ve told me often that when you get to that block in the road, the party’s over. Listen, don’t stop the music just yet.

I’m successful and prolific as an artist because I get the hard jobs in my day done. I don’t hide from the tasks that I used to avoid doing. I get right to it and start with some of the toughest work first. I beat through them in a way that isn’t painful or tedious anymore. Using rules isn’t like flying on auto-pilot, but a lot of the tough decisions are pre-decided for me.


This might sound too easy, or pure brilliance, yet people all over the world use this process to offload the hard mental work of making decisions to get to the finish line faster. If you want to achieve more consistent and impressive results, read on.

(you know this is a key focus throughout my blog, finding ways to maximize your creativity and efficiency, by organising our workflow to spend less time on the mundane and challenging, and more time on the rewarding and exciting parts of our work)

Let’s talk about imposing internal rules on yourself. My definition of rules would go as: Using certain techniques to create an engaging song structure. And remember – rules can be broken later, but you’ll find it so  much more helpful to get started quickly and make fast progress as opposed to starting slowly from zero.)

It’s given that there are many reasons why a listener might be engaged with your song – the quality of the mix, a great loop, the catchiness of the hook, etc.. Most people will admit to being drawn to a song (or having a song stuck in their heads) by the storytelling structure of the arrangement. Creating a tight and well-sequenced arrangement is one area where many people struggle to achieve properly. Their songs lack correlation, which is to say, the combination of repetition vs change. This is one area of songwriting where rules can help tremendously by pre-defining how each sound can be used.

Here are some examples of rules that I would use:

  1. Direction: is this project for the club, for headphones, for a cinema project? Knowing this will dictate every choice that follows.
  2. Sections definition: this is a critical one, which I’ll define as -a part of the track where one idea is used in a certain way, and you’ll go from one section to another, hearing a clear and noticeable difference.) Depending on the genre some arrangements are tight, verse, chorus, verse, chorus, bridge, verse, etc… Many arrangements stick to a repeating formula, which in this case is a good thing because we listen along and quickly know what to expect. It’s here where you can add and create variations to the sounds which can elevate the intensity in a mighty way for the listener.
  3. The sequence of percussion. Is this sequence the same over 8 or 16 bars? As before you want to create a stable pattern that repeats itself and can sustain the other elements of your track. The benefit to using repeating structures is that only a small change is needed to introduce a big change, which will grab the listener’s ears right away, and create anticipation for the next part. Hats or claps are often used to create this variation.
  4. Block sequence and colour: If there’s variation in the same channel for one sound, I highly recommend changing the block colours to indicate that difference. It’s fun and efficient to place your blocks in a visual pattern,”blue-red-blue-red-blue-orange.
  5. Superimposed blocks: This is the natural follow up to the previous rule. Imagine you have 2 channels, each their own colour sequences, your visual pattern can be created from combining both channels. This is quite useful when you want two different sounds to call/answer one another. You’ll see them one on top of another, as a pair.
  6. Blocks size: I like to make a sequence for my kicks and then grab them to consolidate (+j). That will create a larger block that I’ll duplicate until the end. Now, I can demand that those kick drum blocks won’t change at all, allowing me to focus my energy on creating variations for my shorter percussion blocks. Imposing block sizes is one of the most liberating ways to speed up the arrangement process!
  7. Live Blocks vs static: You’ll find that every track I have will include individual elements that are an audio recording of some live manipulation. For me, those blocks are ‘Live’ while the ones that have no manipulation to be ‘sleepy’. You can decide to have a certain ratio of live ones vs sleepy.
  8. Perspective ratio: Perhaps my favourite. While a ratio in third is the usual (ex. intro, middle, end), you can also have more but each ratio should be the same length more or less. How many sections fit in a moment is really up to you.
  9. Surprises %: Simple right? How many surprises will you give the listener? Too many will lessen impact while too few might not engage the listener enough and they’ll find your track boring.
  10. Silences: Super important element. Silences in music can give great power to the notes played. You’ll need at least a tiny moment where you’ll give air to your mix by adding silences to a part. Think creatively about how to want to create space in your sequence.


As you can see, the rules you can create and apply to your track can be anything you wish. The best part about using rules in your workflow is that you’ll greatly speed things up by off-loading much of the mental guess work to a process that’s already been pre-decided. This all means more fun in the studio, more music finished, which is a win-win from every angle.

SEE ALSO :    The Science Behind Tracky Music 

How to filter your best ideas

I’m always looking for ways to improve upon what I do, and how I can better serve my clients. I’m not taking any breaks on becoming better and better every day. I read a lot and especially enjoy reading words from entrepreneurs to learn from, and help build upon the success of others. When I come across an article that brings up an ‘a-ha’ moment, I want to share it. One of these moments came from one article I read about how to turn a great idea into a business. Across many different fields, music, tech, etc.. one pattern in runs true throughout all of them – sometimes the best ideas come to you in ways you can’t always predict.

Another thing which is true, to generate ideas you start by brainstorming.

In the musical world, I would translate this as jamming. With nowhere particular direction in mind, you begin by tweaking and trying everything. Make sounds, press buttons, turn knobs, listen to the effect of this and that, try new techniques for the first time. In a past article, I’d invited you to use Youtube to find out something new or use a new synth demo and record the outcome.

Jamming freely. It’s known that Prince would spend time in his studio every day making a ton of noise simply to try new things, try new jams, and record these experiments which resulted in a vault of music no one would hear, except him. I’d encourage you to do add this to your daily routine, either very early in the morning or at the end of the afternoon.

Going back to the article that ignited my ‘a-ha- moment, the process of idea generation should involve the following two steps:

  1. Creative session.
  2. Analytical period.

The article states that the brain has a very difficult time creating and analyzing at the same time. In the moment of creation and discovery, our brains use a lot of energy to focus on active listening. In this messy and uncontrolled environment, our brains are set in one direction, we’re in the zone. The missing piece of the puzzle for me was reading that our brains have a very difficult time when asked to create and analyze at the same time. It won’t work both ways.

This is why it’s recommended to separate the two tasks, create freely one day, then analyze the material on the next. This would also explain why we often listen to what we did from our first session and find it mostly garbage. The key word here is – mostly.

It would also confirm my theory that spending too much time in the studio is counter-productive because without a change of perspective you don’t have enough distance objectively evaluate your efforts.

Over time I’ve nearly burnt myself out explaining this process to others who struggle with the process. I’ve also learned it’s sometimes best to let those learn by themselves, at their own pace. This confirms the idea that the creative process is very much a personal one, and that no two people will learn or develop at the same rate.

Session 1: Jam, have fun, explore, fail, win, repeat.
Session 2: review everything that was recorded and isolate the potential ideas that stand out, and are more usable.
Session 3: Go through isolated ideas. Work around one.
Alternate.

In other words, try to alternate between creative flow and analysis, self-criticism and more technical work.

Your brain can only do one at a time and more so, why go analytical when you are creative and why be creative when it is time to be self-critical. The main thing you’ll refer to as your analytical part is to listen to what feels good to you.

Build. Learn. Repeat. Build. Learn. Repeat.

As a child, going out to restaurants with my parents would normally involve using pencils and paper to draw pictures and doddle while we waited for our food. (this was waaaayy before smartphones became commonplace) For me, a blank piece of paper is a license to get messy. Everything is possible, and I always found it easy to get started. Our favorite game was one where one would draw a weird, unrecognizable doddle, and pass the paper on to the other.

The second player would have the challenging task of turning that mess of lines, shapes, and circles into something recognizable like a car, or a bird, or anything that required a bit of time and imagination. Until this day I’ve always thought this exercise was one of the most creative tasks I ever did.

So, here’s another way to approach this: take something totally random, even something you truly don’t want to work with whatsoever and try to make something usable out of it. Make a loop, make a playable sound, take something terrible and push yourself to find something in it that you can do something with. I did a full EP once, a while back where I’d force myself to work with sounds and recordings that made no sense whatsoever. It turns out it’s a good exercise but also very useful as you don’t depend on only good material to be effective with what you have.

SEE ALSO :  The Modular Trap