Tag Archive for: exercises

References From Clients And Exercises

When it comes to making music or mixing, you sort of need to start somewhere and to get inspired by others if often a good way to get started. There’s a lot of misconception on how to use references. While I covered that in a past article, I thought I’d go deeper on the topic. 


While there’s no right or wrong way to use references, I often use references for one thing in it. It can be a sound that intrigues me, a type of sequence, rhythm or concept that tickles my brain into trying to reverse engineer it. While I can most of the time understand what is going on, it doesn’t mean I can reproduce it as is. Some clients that I coach became really good at reproducing what they hear, sometimes with my help or not.


But the idea is to try something out and be open to where that will bring you next.


While I do a lot of production from clients, sometimes people wonder what others are into, who are the artists to follow but also, who are the artists that I personally follow for my own inspiration.


Many times, I have clients who start an idea based on a reference but they struggle to get it “right” as they want. I give here a few things to check first in order to get things started properly (in other words, this is where clients fail).


Load your reference song in Ableton (or other DAW) and you may solo it at first to be able to compare it to your project. I would advise to lower the volume of your reference as it may be mastered while yours isn’t.


There are a few initial points to consider:


  1. The tone: Use either an FFT analyzer (SPAN from Voxengo is free or Fabfilter ProQ3) on the master to see if the tone is similar. Is the curve similar or different from you


  1. Root Key/Scale: You can use a Key detector on your reference to see what is the root key and scale, then check if yours is set properly. While you don’t need to have the same as your reference, some clients don’t realize that their different elements are not in the same key. This will often translate with the feeling that the song doesn’t feel one or perhaps, that is sounds off. Note that it might sound off if you were overexposed and then you got used to it but for a fresh pair of ears, it might be awkward sounding.


  1. Speed and rhythm: Find the BPM of your reference and try to match it to yours. What is the time signature.


Lately I’ve been enjoying Decoda as a full analysis software. You can do so much with it as well as extract melodies in midi. I find it essential to work with demanding clients.


When it comes to artists my clients love the most, I compiled a few and will drop a few words why they are loved.


Ricardo Villalobos

Not a surprise here since he’s one of my favorite artists and a lot of people come to me know that I spent decades understanding his unorthodox style and can explain how certain of his songs are made. Love or hate him, that guy has certainly develop his own persona when it comes to production and his music composition is always opening new grounds to what you can do in music.


Things he has inspired us: 


  • Making super long tracks with more or less structure can be fun.
  • Leaving your songs sloppy has a more human side.
  • Combining really weird sounds all together can work if you keep some elements one can refer to.
  • Not afraid to sample obscure records as the main idea of his songs.


Ricardo is known to have a huge collection of modular synths but compared to many people who have a lot, he records new tests weekly so you can see the wide array of his tools. 


Exercises related to studying to his music:


– Use VCV to try the modular thinking he use and randomize some elements for madness.

– Polyrhythms are the key here with uneven time signature. Also look into Euclidean rhythms.

– Ric uses a lot of granular synthesis on percussion instruments or synths.


Vid


This is another that is often referred to as a reference. People love the simplicity and yet complex songs he makes. As opposed to Villalobos, his songs are quite polished and organized.


Things he has inspired us: 


  • Atmospheric techno is quite fun to make and is both exciting, while meditative.
  • Lush pads over field recordings are hypnotizing.
  • Dark tone gives a more mysterious vibe.


Exercises related to studying to his music:


  • Collect field recordings and ambient space sounds such as a restaurant or a church inside.
  • Grooves and beats that are groovy are worth being studied and I often recommend looking into pre-made loops and then copycat them. Removing a lot of the sustain of percussion to keep them short really helps having a minimal house feel.
  • He often doesn’t have bright elements and keeping sounds low will give a mysterious vibe.


Pablo Bolivar (Or Dub Techno)


Since I have a long background in dub techno, I get a lot of questions on how those pads are made. While it is not necessarily complicated, it still needs a bit of tweaking because what makes the dub techno pads captivating is the always moving side of them. That is coming from modulation or automation. Pablo does a great job of picking some nice sounds, pads and beautiful, lush melodies which makes him a reference for a lot of clients.


Things he has inspired us: 

  • A lot of classic dub techno has a 1 or 2 notes melodies, going full on minimal. Pablo brings in simple melodies but more complex than 2 notes which gives it memorable moments. 
  • Super clean production and mixes. Nothing unnecessary is ever added.
  • Just like Vid, his approach to have dynamic ambient makes it enjoyable for relaxation or dancing.


Exercises related to studying to his music:


  • Use a key root with a minor scale. Minor chords as well to complement the melody. Most of his melodies are 4-5 notes maximum. Consider doing chord progressions.
  • Use field recordings to complement the melodies.
  • Percussion are fairly straightforward here and repetitive. It does a fine job.


J Dilla

I wouldn’t say that anyone contacted me to make music exactly like him but I do have some clients into lofi hip hop, which in my opinion, is a derivative from J Dilla. He’s from the MPC generation where people would sample records and then play with it. His album “Donuts” is considered an innovative album for hip hop and is worth listening to it.


Things he has inspired us: 


  • Sampling blatantly and being bold about it. Sample some music from any source and use short notes of it, either to make your hook or to put an accent on whatever is happening. 
  • Go short. Learn to make songs that are under 3 minutes long. A challenge for techno but for electronic music, it’s an exercise that forces you to be straight to the point.
  • Exaggerate on swing for your percussion. Try to push it to the max to see what happens. 


Exercises related to studying to his music:


  • As stated above, those learning are also things to try. But I would recommend digging some records at a second hand shop and sample obscure parts.
  • Use a midi controller like the PUSH or with pads and try to manually punch in your beats.
  • Within a clip, play with the warp points to create weird stretches and elastic beats.
  • Slice up beats and reprogram them into a new patterns.


Fred Again

I’ve lost interest in pop music years ago and commercial electronic music has always been something I stay away from. But Fred Again has been impressing me for how he makes music and of course, for the end results. The thing about his music is that it’s basically the typical approach from any commercial, standard structure music that is made and good tastes is what matters here.


This means understanding chord progressions and working with key/scale is going to be the main focus. Using plugins like Captain Plugins suite will make a huge difference unless you have a lot of patience to learn music theory.


There are no shortcuts to this kind of music. But the tools you can use will make it easier.


His recent album with Brian Eno is what made me appreciate him. 


Daft Punk


I’ve been following the pair from 1995 until their separation. I don’t think there’s been many music acts that had the impact over their career like these guys did. It’s mostly due to their desire to innovate but also to take ideas that work really well and pull out some solid ideas to give it a new twist. 


In a past article, I was stating that there are 2 main modes when it comes to working on a project: you might want to repeat an idea you love from a song or artists vs you might want to innovate something from what you do.


The things I’ve learned from working with clients who want to get inspiration from them are mostly about, once more, digging for samples and then play with them. It’s sort of like what we covered from Dilla, but with a faster pace and 4/4 time signature. There was a point where the French Touch house/disco was all rage. That music was about using a sample with heavy filtering and the classic pumping/ducking effect. This technique is still used nowadays but with a bit more control where you perceive it less.


Besides filtering, some notable effects they use that you can explore today: Bit crushing, tape saturation, vocoder, heavy chorus/phaser. They also love a good 909 kit.


And to finish up, who are my personal references?


Ada Kaleh, Gigi Masin, Jan Jelinek, Rhythm and Sound, Vladislav Delay, Ricardo Villalobos, Matt Dear, Lawrence… but way too many to name.


How To Have Fun Making Music

Sometimes making music can be a chore. To people on the outside looking in, music seems like an enthralling, exciting, fun experience, but anyone who is a composer knows that making music takes focus, dedication, and frankly, at times, can be pretty boring, and stay boring. That’s why it’s important to know some techniques for how to have fun making music, just in case you fall into one of these creative ruts. What I’m about to share isn’t the definitive way for how to have fun making music, but rather things that I have done for a while that take the pressure off, and just allow me to be creatively expressive without all of the arduous parts. 

Having The Ideal Setup Does Not Guarantee Fun Or Even Ease

I have written about this to death, but it deserves to be mentioned again. So many creatives think that they need the perfect setup in order to have fun. They think they need that new module for their Eurorack, or that new audio interface, or the latest poly-synth, and then, and only then, will they have the ideal creative experience. This is just so, so untrue. Every new piece of gear you get has a learning curve. 

Unfortunately, the world of electronic music is not entirely standardized, so things won’t be immediately intuitive even if they are relatively similar to something you’ve already owned. Chances are that thing you already owned will allow for easier, more fun creative expression since you already know it. But, the cognitive fallacy that new equals good is just that, a fallacy. There is even a term for it in cognitive psychology – “appeal to novelty.” 

Therefore, if you really want to know how to have fun making music, use my first advice would be to use something familiar.


Work With Loops 

Go on Loopcloud and just start grabbing loops. The more complete the loop, the better. The goal here isn’t to make something super original, the goal here is to have a good time making music. Now drop those loops into session view in Ableton, and start triggering loops and see what happens. Maybe MIDI map some basic effects like delay, reverb, flanger, gate, pitch bend, and a filter. Then MIDI map the volume faders on the clip’s channels. Then start triggering loops! Fade the clips in and out, change the wet-dry on the effects, bend the pitch, and make the sound melt. Think of it kind of like DJing, but in a compositional sense.

Loopcloud Makes Everything Easy

Working with Loopcloud makes the process of choosing clips easier, as they have built-in search filters and algorithms that help identify contextually similar loops for you to play around with. All you have to do is click “find similar sounds” and Loopcloud can filter to you either harmonically or rhythmically similar sounds that will work well together. Then, with their native plugin, you can load the samples directly into the DAW without having to download the files, and sort them, allowing for seamless integration, and immediate use. 

Another great thing is that this quick sorting loop function teaches you how to have fun making music that’s not the same as what you’d normally make. Maybe you’re a minimal house DJ, but you have a penchant for disco house – yet not a lot of experience with it. Well, with loops, it’s easy to throw together something that sounds good without the time or practice it takes to create something from scratch. 

THis Isn’t About Art, It’s About Fun

Some people might take artistic integrity into question here, but we’re having fun, not creating our magnum opus. If you can’t get over that, think of it like DJing. When you’re DJing, you’re not only playing your music, your play other people’s music, just like other people made these loops. However, what you create will ultimately be more unique, and also royalty-free. 

You may even like it and use it later in a more serious composition, but for now, the goal is to figure out how to have fun making music.


How To Have Fun Making Music With An Artificial Crowd

An artificial crowd, you say, Pheek? Yes, an artificial crowd! In this day and age, we have access to a plethora of crowds that will dance no matter what we do! How, you ask? Simple, by putting on YouTube videos of dancing crowds, and jamming to them. They don’t care what you do, they’re going to have a good time anyways! So, load up your smart TV, your projector, or even an auxiliary computer screen, load up a long video of people gyrating to some 90’s acid house, put that shit on mute, and start jamming.


Just Start Jamming

Better yet, keep the audio playing on the video of the crowd dancing, load up your favorite gear, and start jamming over it, like you’re just an accompaniment instrument to the mix. If you’re really fancy, you can route the audio through Ableton using a virtual audio cable. You can add fills of effects, tap in drum patterns, play auxiliary basslines or leads, load in some samples from Loopcloud! Basically, whatever your imagination can conjure on the fly, do it! Just make sure you press record.

Then once you’ve recorded all of these, you’ll have a fresh sample bank of new ideas that you can incorporate into fresh productions. Now, all that fun time was actually spent being productive, rather than frivolously. You also got some solid practice in!

I’ve been doing this technique for 15 or so years, and it has lead to a plethora of new material and inspiration. 


Download A Ton Of Plugin Demos

This is a fun one. Basically, download the demos of a bunch of plugins that you would otherwise not use. Then grab a loop, or sound from somewhere, or make one quickly from scratch. Then load in the plugins, and start stacking them on top of each other and see what happens. Start flicking through presets on all of them, adjust knobs, and create massive, cacophonies of sound. Now filter those sounds, and see what happens. Maybe resample them, and then throw more plugins on top, while dropping the pitch. 


How My Follows Have Fun Making Music

lotech/hijack says, “Honestly I find exploring and experimenting makes it fun. Don’t approach it as a process. Just remember that you love music and the feelings you get as a listener. Then go at it with that mindset. Works for me (usually).”

a photo of a facebook post that describes how lotech/hijack has fun making music.

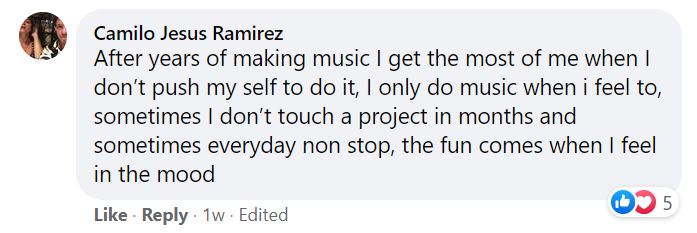
Camilo Jesus Ramirez says, “After years of making music I get the most of me when I don’t push myself to do it, I only do music when i feel to, sometimes I don’t touch a project in months and sometimes everyday non-stop, the fun comes when I feel in the mood”

a photo of a Facebook post saying how Camilo has fun making music. You can read the text in this article above.

Steve Moss laments, “Every time I buy new gear or a new synth I tell my wife: ok now I’m complete. My wife tells me: that’s what you say every time and you’re never complete! Hahaha.”

A Facebook post of how Steve learns how to have fun making music.

Pierre Deniel simply replies, “LSD.” I guess that’s one way too.

Steve knows how to have fun making music - it's with LSD, that psychonaught.


There Are Many Ways To Know How To Have Fun Making Music

There are many ways to have a fun, enthralling musical experience that doesn’t involve thinking too deeply, or seriously about the process. 

To reiterate, it all starts with having something that you don’t have to troubleshoot too much. It’s easy for the fun to be sucked out if you have to spend your time learning, or fixing something. Therefore, start on gear you’re familiar with.

The next step to having fun is to try something without expectation. Don’t be afraid of dabbling in new genres, especially with an amazing tool like Loopcloud which allows you to load in, find, and sort samples in a heartbeat. 

Don’t be afraid to try new plugins either, and do things that don’t make sense. At the end of the day, nobody really cares how you made something, as long as you make it.

The real magic here is that if you record it, you’ll be left with so much unique stuff that you can use in your future work. Never underestimate the usefulness of just having fun.

Transient Shaping

In this blog, I’ve already discussed many ways of playing with your track to create new textures and variations and how to keep your sounds interesting. I’d like to discuss another way of colouring your music: transient shaping; something that can completely change the way a track sounds and feels, depending how you shape your sounds.

To experiment with transients, we will need to play with certain features of Ableton Live which can be very powerful. Alternatively, you could also invest in a type of plugin that is in the category of “Transient Shapers”; there are many out there but some of my favorites are the MTransient by Melda Production and Transient Shaper by Softubes. Both offer quality results at a decent price.

Firstly, if you’re not familiar with transients, they usually consist of the beginning of a sound/sample. If you’re familiar with the Attack-Decay-Sustain-Release (ADSR) envelope of the synthesizers, the attack would be generally manipulating the transient. Sometimes its fast and strong, or other times, it’s slow and smooth. For a kick that punches, you want it to be pronounced and snappy. If you’re after that specific feel, then the transient shaper will really be interesting for you. A plugin will allow you to make the transient more apparent or make it quieter; generally you will also be able to control the sustain of the transient. Sometimes you might want your transient to snap but the rest of the kick to feel quieter; a transient shaper plugin will be able to do that with 2 knobs. I have multiple versions of these types of tools and use them daily – it’s quite captivating what you can do if you exaggerate the attack of sounds which don’t have any transient at all.

In Ableton Live, you can also have fun with a feature integrated in the sample’s detail view. Let’s have a look at how you can manipulate it and how you can have fun with it…

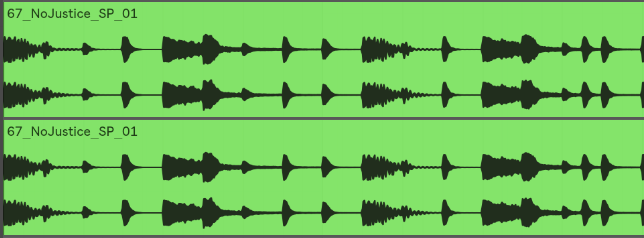
First take a loop sample, and duplicate it in another channel.

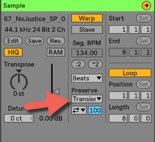
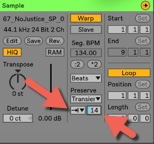
The on the duplicated loop, make sure you set up your details like this. Now turn down the percentage of the transient.

You’ll notice that as you lower down this box, only the transient will remain and the rest of each sounds will disappear. You’re basically trimming each sound to keep just the beginning of it, which is the transient. The new channel can be leveled up and layered with the other: you’ll now notice the transient is louder and you now have certain punch added if there was not enough originally.

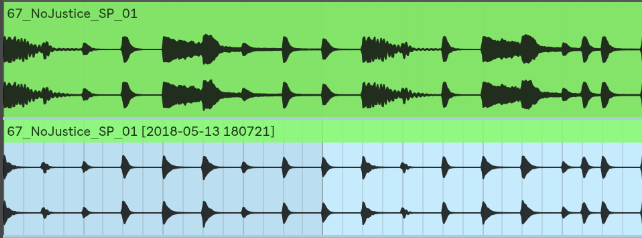
If you flatten or consolidate, you’ll get a new view:

See the difference and what we removed? By layering the beginning, you’re giving more punch.

Tip: try it with a kick loop or a hihat loop.

Now your fun really has just begun!

Here are a few suggestions to try for pushing your sound design even further:

  1. Control/lower the transients of the original loop with a compressor. If you set a compressor with a fast attack, it will control the transient. Play with the release to really tame it down.
  2. Add a reverb or any effect on the transient channel alone. This is really cool because the effect can either affect the beginning or the end of the sounds. I like to put reverb only on the sustain while leaving the transient dry, which gives more precision to your percussion instead of having them lost in a pool of reverb.
  3. EQ the transients to keep only the high end for sharp precision or just the mids for more oomph.
  4. Side-chain the transient with the original sound. Experiment with this one and you’ll achieve some fun results!
  5. Compress both channels by grouping them.

Feel free to share your thoughts about transient shaping!

Music production techniques: Non-Linear Production

It’s been a while since I promised a post about one of a number of music production techniques I use: non linear music production. The very first album I did using this technique and really sticking to rules of it was Intra; and then I recently went deep in to produce multiple EPs in the same vein of non linear production, which were made between end of December 2017 until March 2018. While Intra was an album of 23 songs made over nine months, my last experiment produced 19 tracks over 3 months. I think I’m getting better at it, mostly because it’s becoming clearer in my mind.

Out of the 19 recent tracks, I kept 8 for this album – which you can hear above – I named Returning Home; a statement about home being a state of mind and not necessary a physical place. I’ve been making techno/dance music since 1998, and after diving into more electronic soundscapes, experiments, and ambient music, it just felt good to return to my roots. A funny thing also – I tried working with some other labels to find it a new spot as I wanted to keep my label Archipel for more down-tempo stuff, but I kept getting refusals or complicated compromises. I’m too stubborn to change things and since this album was made based on a very solid concept, I didn’t want to go back and change what felt good.

But back to the non linear production technique. I’ll cover how the process went, from the beginning of where I started from scratch until the end.

I know some people who are like, “but I don’t need a technique as I just do music.” Sure, that is not for you then. But this technique can bring benefit if you’re looking to expand your production. It surely contributed to make me more prolific through time.

Non-linear music production – A concept

This concept (which has been around for decades according to some research I did), encourages the producer to explore working on multiple songs at once, in a non-linear way.

This means that:

  1. You aren’t working on a song’s beginning first to bring it to its end, before starting a new one.
  2. Each track is approached individually for its needs but you also work globally. Keep in mind that what you did in the previous track should differ on the next.
  3. The technique is about repeating the same phases/rounds until you get a solid core. Then there’s the finalization to get ready for mixing.

It’s called “non-linear” because you constantly circle up in a series of rounds, on multiple tracks, all at once.

Note: A non-written rule also implies that working on a track should be done in short periods such as 20-30 min at a time on a song, then stop, save and move on. Why? Because it keeps you fresh.

For many people I explained this to at first, it felt unsettling and confusing. There’s some kind of embedded belief in people that when you go make music, you should find your idea, absolutely stick to it, and build it into a song; beginning at start and bringing it to an end. I usually see people’s projects having a few blocks right at the beginning of the track and then they get lost.

The number one thing I hear all the time: “I can make a great loop but don’t know what next.”

I’ve written a post in the past about this. However the non-linear technique is really aimed at making the loop issue something of the past, because it’s all about transforming small ideas into bigger concepts.

But where does it start? How do you begin?

Before diving into producing, let me explain the rounds of the non-linear music production technique, as this is what it’s all about:

  1. Content creation, generating ideas.
  2. Filtering ideas into a concept.
  3. Building a core loop.
  4. Template structure.
  5. Arrangements.

When you decide to create your project, the first thing you should do is decide on your project type. Is it an EP (3-4 songs) or LP (5-10 tracks)? Perhaps you just want to make a bunch of tracks; I personally believe that we should never make just one track at a time. If you have no precise project, invent one, such as “I’ll make 5 tracks for fun and want them to be mainly techno.” Once this has been decided, you’re ready for content creation. I usually spend a considerable amount of time in content creation and idea generation.

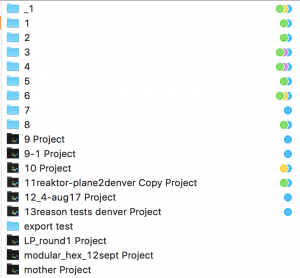
You can also start from unfinished tracks that you want to apply the idea to. The idea is to work on multiple projects in parallel. I usually it works best if you have at least five on the go, but there’s no limit of course. To newcomers, start small though to see if working this way works for you. The technique is about to bring your track from a simple idea to a finalized but unmixed, song. The mixing is not part of this. I find the mix down works better if you don’t do early, it but perhaps it can. Don’t hesitate to build a reference folder where you put songs that inspire you.

Content creation, generating ideas

From all the years of listening to music, running labels, doing mastering and DJing, I’ve come up with a theory: a solid song is – in general – a single, solid idea, supported with two others. The main idea can be a loop, a motif or even a sound. I remember Hans Zimmer describing a motif by saying it has to have an emotional impact on you, that it reappears in your mind later on. He was saying that the Batman motif he did was a simple two notes, but very powerful. You’ll play them and you’ll automatically think of Batman. The two other ideas are necessary because a song usually needs a development and a “surprise.” That said, in this production technique, you need to create fresh ideas. Lots of them.

I made a very long post about how to come up with new ideas but I’ll sum how I did mine:

  • Recycling older ideas: I have countless samples that I’ve used or never touched. I like to process them into new sounds.
  • Recording radio or other spaces with a microphone: When I’m in a creative mood, I’ll spend a lot of time recording sounds around me from that period of my life. I’ll leave the recorder somewhere for an hour to see what comes up.
  • Try demos: I love getting demos and try to see what I can come up with it by sampling them. Some have limited time or others are in days. It forces you to resample the hell out of the work and get something. Sometimes I end up buying it of course.
  • Pure sound design: Layering sounds from different takes is a great way to generate rich sounds. I do this a lot but its time consuming.
  • Jamming with the sounds: When I have plenty, I’ll generally put the sounds in a sampler and jam them with a midi controller or PUSH. I’ll record everything I do into a project.

A project that has many ideas will be recorded with the date of the day for the jam. It might turn out that I have a few hours of material which means there’s hypothetically 3-4 ideas in there.

The definition of done (DoD) of this phase is when you have a project with 3-4 ideas ready to go. I usually do one session per track needed for the project.

Filtering ideas into a concept

This phase is one that you need to do outside of jamming. Why? Because when you jam, you’re in your creative state (right brain) and have tons of ideas but your judgement is off. You can’t be a judge then. You need to feel free and explore without boundaries. This second phase is about going into a more analytical side where you will be curating your crop.

  1. Go through all recordings you’ve made and loop part of it. The question is, can you listen to a loop and feel inspired? If yes, you have something to hold on to.
  2. Use different size loops like 1, 2, 4 bars. Compile different ideas.
  3. Use the session view to make scenes of loops you like.
  4. Try to see if certain loops, once layered, make unexpected motifs.
  5. (optional) Add a kick & hihat to give you an idea of the groove and adjust the timing of the loop.

The definition of done (DoD) of this phase is when you have a few scenes in your session view that feel solid.

*Note that you may go back to create more ideas (Round 1) to complement what you have. You may also create a pool for all ideas of all sessions and then make ideas from that. No rules here, only possibilities.

Building a core loop

At this point, you should have X number of projects (based on your project definition you decided on at the beginning, i.e. EP, LP, whatever), each with material that has been organized into 2-3 ideas. Now comes the moment to put it all together.

The loop you’ll build here is the middle part of your song so it should have all the bells and whistles.

  1. Add a foundation. The fundamental part of your song is the low end and the bass. From the main idea, add a bass that either supports or responds to the idea. Adjust it so it’s in key.
  2. Add percussion. Complementary to the bass, you may add kick, percussion, or anything complementary of what will create the groove. I usually start right away to decide what groove template I’ll use on this core part.
  3. Add melodic touches if needed. Decide how long your melody will be and how it progresses (if it does).
  4. Create a background and space if desired. This is usually the reverb and textures. However, this can also come later on.

The definition of done (DoD) of this phase is that you have a main loop that you can place in the arrangement window, right in the heart of your song (which means you need to know roughly how long it has to be). A good loop is one that is centered around your motif where if you solo that part, it would be what someone would talk about to describe your song.

In the process of working through the core loop, you might need to go back to create more content or you may import some from other sessions.

Template structure

Now that you have the core part of the song, it’s easier to build out the remaining structure. In the arrangement view, create three sections: a beginning, middle and end. You will now lay out your structure to have an idea of what you can do with your core idea.

  1. Copy the elements from beginning to end  that will be present the whole time through the track.
  2. Work backwards by deconstructing the timeline of what comes in first and so, until you get to the middle part.
  3. Do the same process until the end. You may repeat some elements.

The definition of done (DoD) of this phase requires that you have a temporary structure from beginning to end. It might take you a while, I encourage you to do sprints of 30 minutes at a time. The problem with working too long on this phase is that you lose perspective regarding the strength of your song. I usually want some sort of structure to come out of this phase, but I may go back and forth with the other phases until I am happy with it.

Arrangements

This is the final phase. You might need to come back to it as everyone has different needs that will arise in this process. Arranging – in simple terms – is creating the story-line of your song, but also between songs for your project! How do your tracks relate to each other? I have songs that have brothers and sisters, while some are from a completely different family.

After working on the arrangement of song, the last thing I do is export what I’ve done so far. When I switch to another track, I import the last session in the arrangement to see what I did and compare. I adjust the arrangements so all my tracks don’t have the same structure; beginning, breaks, and punches. I adjust them so they can be fun for DJs to mix too.

Arranging is a massive topic that I will detail in a future post and is involved in most music production techniques – but this explanation is a full conceptualization of how I work. Hopefully it helps you somehow too!


SEE ALSO :   Non-Linear Music Production 

Adding life to sounds: movement in electronic music

Creating movement in electronic music

One of the most misunderstood concepts in electronic music is movement. By movement, I am referring to the way that each sound constantly evolves throughout a song. I was once talking with someone who is very into modular synthesizers and he was saying that he cannot stand recorded sounds such as samples because according to him, those sounds are “dead”. With modular synths a sound can be repeated for minutes and it will never be exactly the same because the hardware components constantly give the sound slight variations. A recorded sound is frozen just like a picture. Since we don’t all have the luxury to own a modular synth, let me explain how we can use software tools to make sounds feel “alive” and develop some movement in our own electronic music.

First, let us agree that movement in electronic music is about having some elements that are in “motion”. There are a variety of different ways to create that feeling:

1. Changes in volume (amplitude)

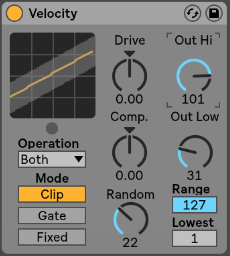
Volume change in percussion are often associated with groove and swing. Both can alter the volume of the sounds. That said, you can apply a groove template not only to percussion, but also to melodies and basslines. If that’s not enough you can also use the midi effect velocity which can not only alter the velocity of each note, but in Ableton Live it also has a randomizer which can be used to create a humanizing factor. Another way to add dynamics is to use a tremolo effect on a sound and keep it either synchronized, or not. The tremolo effect also affects the volume, and is another way of creating custom made grooves. I also personally like to create very subtle arrangement changes on the volume envelope or gain which keeps the sound always moving.
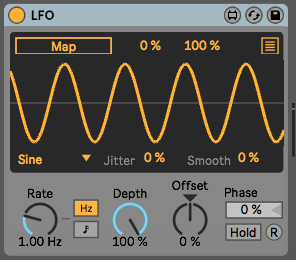
In general, using LFOs – such as what is offered in Max patches – can be used to modulate anything, and they will automatically create movement. For each LFO, I often use another LFO to modulate its speed so that you can get a true feeling of non-redundancy.
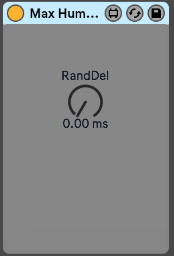
Tip: Combine the use of LFOs and manual edits and then copy sequences until the end of the song. I suggest you try stepping out of 4/4 and regular blocks structure to step out of a “template feel.”

2. Filter

Another great way to create movement is to have the sound always changing its tone. Using a filter in parallel mode is a very efficient way to create colours. The important part is to make sure that both the frequency and resonance are constantly in motion by using either LFOs or envelopes. By being in parallel the sound always appears to be the same but will have some added body to it because of the filter. What many people don’t know is there are different types of filters, so you can try different types of filters into different send channels and then your song will feel like its moving. While filters are great for subtle changes, you can also do the same trick with an equalizer but still in parallel. Adding an envelop on the filter so it detects incoming signal and change the the frequency is also a very nice way to keep things organic sounding.

Tip: Try comparing how a Moog filter can differ from any regular ones.

3. Textures

Background textures or noise is another great way to emulate analog gear. There are many ways to do that, but the one that I recommend is to get a microphone for your iPhone and then record a part of say, your next visit at the coffee shop or restaurant, or even in your house where we don’t realize that there is still a very low level of noise. Adding that recording at low volume to your song automatically adds a layer of every evolving sound. if you want, you can also convert certain noise into a groove pattern which creates a form of randomization on your sounds. Some high quality effects such as saturation used on certain sounds will add a form of texture that prevents your samples from sounding stale.

Tip: FM modulation on a filter or oscillation can create gritty textures.

4. Stereo and Panning

For this point there are different effects that play with the stereo image and – while you should be cautious – it’s good to have at least one or two sounds that have these kinds of effects. Some of these types of effects include of phaser, chorus, flanger, delay, reverb and auto-pan. They can all give the sounds movement if the modulation is unsynchronized and if the wet/dry is constantly being slightly modified.

Tip: Just be careful of what effects you use as overusing can create phasing issues.

5. Timing

A sound’s position in a pattern can change slightly throughout a song to create feelings of movement; a point people often overlook. This effect is easier to create if you convert all of your audio clips to midi. In midi mode you can use humanizer plugins to constantly modify the timing of each note. You can also do that manually if you are a little bit more into detail editing but in the end a humanizer can do the same while also creating some unexpected ideas that could be good. Another trick is to use a stutter effect in parallel mode to throw a few curve balls into the timing of a sound every now and then.
Tip: turn off the the grid locking in the arrangement section to intentionally be imprecise.


SEE ALSO :   Dynamic Sound Layering and Design 

Playing Electronic Music Live – How to Prepare Your Live Set (Part 3)

After the first two parts on this series of posts about playing electronic music live, we arrive at our final topic: clip arrangements, song organization and sound preparation.

Clip Preparation

I hope you did your homework from part two where I asked you to take your arrangements and turn them into an Ableton Live session. If you’ve done this, you’ll see that this task is pretty demanding and can be confusing, because you might feel your song(s) aren’t the same anymore, or perhaps they don’t make any sense. But trust me, even if you feel like you have failed in arranging your sessions, it will start to make more sense as we continue. What really matters is that you now have material loaded into the session view.

What if my track is so simple that I have only a few clips in the session view?

That’s not a problem, the idea is to have something. Part of the beauty of a live set is that once you have all your tracks in the session, you’ll shape them into a longer set. A live set isn’t like a DJ set, where you focus on transitions and track selections; it’s way more flexible and involves constant shaping to create a bigger picture.

1st To Do: Import all Your tracks into one big project

For the sake of this exercise, please start by creating a blank new live set that you’ll name “My Live Set” where you’ll have 12 channels to start with.

Next we will import all songs into that project. There are two ways to do this and it’s up to you to decide what is the best for you. I personally like to open a track, grab all clips in the session, copy (cmd+c), then open your “My Live Set” project and paste. You can also copy through the browser and should you be more comfortable using that method, do it that way.


One of the great new features of Ableton 10 is that groups now appear in the browser; which could be a good way to organize your work to re-import later on.

You should also consider copying audio leftovers over from each track. These unused pieces are more precious than you think, in a live context. A leftover is anything in your track that was created but didn’t make the final cut. It could be a variation, some weird FX, vocals, whatever – basically, anything will do. The idea behind leftovers is to create material for your live version to make it differ from the original song; it will add an edge.

Once you have all your tracks imported, you have a better idea of your whole session.

“How many tracks do I need for a 1h set?”

The answer here is hard to figure out until you’ve rehearse and determine your natural flow. After years of playing and recording my sets, I’ve figure that each of my tracks average a rough 6 to 8 minutes in a live context. This also includes the transitions (i.e two songs overlapping for 1-2  minutes, to make things smooth enough like a DJ would).

The total time of the tracks is not necessarily important to figure out. If you’re creative, you might even play the tracks in a random order.

2nd To Do: Name and color all clips appropriately

People often overlook this part but trust me, the better the organization, the less stress you’ll have in a live context. Never believe yourself when your mind says “oh I’ll remember what this clip is.” This is why names are important, but also, the clip color. All kicks should be the same color, basses and so on. My personal coding colors have been:

Kicks: red (grabs my attention)

Low end, bass: brown

Percussions: yellow

Claps/snare: Orange

Hihats: grey

Melodic elements: Blue, in various tons as some are different.

One thing about colors that helps is if you’re playing a track while in transition to another one, you can see the color of the other clip that you can’t see on screen.

Please note that I don’t necessarily recommend putting all of the same sounds in the same channels. You might want to mix, for instance, hihats of track A with the ones of track B. If both track’s hihats are in the same channel, you won’t be able to mix them and one will play after the other (only one clip can be played in a channel at a time).

Scene organization

Organizing your scenes is time-consuming, and it will also be what you’ll be reworking the most. It will also get your songs to have more of a live feel. For this section, I’ll use an example of one of my latest live sets to explain what I did, and why.

This song starts at the second row (scene).

Channel headers: As you can see, header colors aren’t important to me so much but there is a section all in white. This is because I use two MIDI controllers for controlling the volumes and the second section is for the second controller. This is also why they’re numbered so I know which slider they refer to on the actual controller.

3rd To Do: Map your channels to the appropriate elements of your controllers

Think of how you want to control your set on a base level, which is the channels in most cases. This is the most important part to pin down, because as you prepare your set, you’ll need to control volume sliders. Map your channels to the appropriate elements of your controllers. If your controller has buttons, I’d also map them to the mute buttons. Mutes are very important.

Buffer rows: As you can see, alternating rows before and after each busy row have scene of empty clips. You can also see that they have the “stop” square in them. I create “buffer rows” for two reasons: the buffers help know where the song starts and begins, but they also serve as a quick way to toggle a clip to stop playing if necessary.

4th To Do: Add 1-3 buffer rows between each song

The first scene/row of each track: The first row, to me, is the most important one. Over years of playing, I’ve settled on a super minimalist version of my live set where I play mostly loopy music with variations which really enforced the importance of the first row of the set.

The first row has various various roles:

  • It is the introduction of your song: It will be used in the transition from the previous track.
  • It is the core idea of your song: All sounds that are playing from beginning to end of your song should be placed here and remove everything below. In my case, the kick will be the same from beginning to end. The length of the kick will be 4 bars long and include variations. Some people like to add multiple clips underneath as variations to trigger, so that is always another option, but think that whatever remains the same throughout should be there.
  • Tension relief: If you noodle around, create an improvised breakdown or start removing sounds. You can use the right side play to then trigger all sounds at once to come back to the song’s full intensity and main idea. This point is very important if you think you’ll be exploring and improvising as you’ll need an anchor.

5th To Do: Make a solid core

Supplementary/following scenes: There are multiple ways to use the scenes that follow your initial introduction. To “play it safe” you could simply have each scene play as the track evolves. The good thing about this approach is that by having all scenes on hand, you can deconstruct the timeline of your song by playing them in different orders. My favourite way of doing this is to have variations of a scene, such as one line with hihats, one with none, one with two playing and a clap, etc, same for melodies. This way I can play variations but I can also trigger one entire line and have a “ready-to-go” new take. If you look at my live set screenshot above, you’ll also see that under one sample “Tommydrum”, I have the same clip three times using variations in timing or tweaks in the versions. I can toggle between them as I need them.

Last To Do: Plan your follow-up lines/scenes and decide what you use.

In the next post, we’ll discuss rehearsing, sound calibration and advanced clip settings!

Pointers To Define Your Sound

The majority of artists I work with during mastering and finishing your tracks, talk about their desire to define their own sound. It’s important to them because as a music lover many times you’ll hear a just a few seconds of a song and think that’s got to be _____ band, or producer. To achieve this ‘signature style’ there will usually be a particular production style or a sound palate one will use in a way entirely his or her own that is instantly recognizable.
Case in point – there is much talk and celebration of Burial’s album “Untrue” which is now considered to be one of the most influential albums of the last decade.

Why is this album so celebrated?
For starters, the ghostly atmospheres, foley recordings and sound effects of London at night, conjure an atmosphere of a dark, eerie space. The heavy, downtempo vibe of the music is an invitation for listeners to go to their own dark places and reflect on that. Even the titles of his tracks, “loner”, “U Hurt Me”, tap into a feeling of emotional damage, which many people can really connect with. In short, the heavy sound and persona behind the record are instantly Burial.

Taking note of the various elements artists can use to create a sound all their own, let’s analyze some of the fundamentals of what will be influencing your sound.

  • Tonality: this is hugely important as most artists will generally embrace a ‘vibe’ or ‘mood’ in their music such as happy, upbeat, or angry, melancholy. Do you often work in a similar scale or key? Are your melodies basic and straight forward, or do you write complex chord progressions?
  • Genre: picking a genre to work in is perhaps one of the most obvious choices in creating ‘your’ sound, and defining your identity as an artist. Are you embracing an existing one or will you try to fit between two? This can be a hit or miss and to do something original is taking a risk but the reward can be massive.
  • Samples: Are you using samples? Synthesis? Modular? The Orb for example, loved to use samples from specific movies (the 80’s like Flash) and Boards of Canada were famous for recording their synth parts to old tapes and resampling that back into the session. Consider the possibilities of your sound source.
  • Rhythms: Are you more 4 to the floor? Breakbeat influenced? Jazz? Hip-hop? Latin rooted? Take note of where you’re most comfortable and what is your go-to groove.
  • Technicalities: This is where I can help you most and have been helping clients with on their way to creating ‘their sound’.
  • Mistake. Are you going for something slightly sloppy or very tight and quantized? Try to see what mistakes can bring to your music and if something wrong can develop something interesting. Don’t be afraid to try something you might never do as a starting point to your next track. 

The tools and effects you use can also have a major impact on your sound. I’ve covered this before but it’s important to refresh your mind when considering your choice of effects.

Reverb, Delay. You might pick one plugin to work with all the time for consistency. Reverb – maybe you always go for a plate or perhaps you prefer to use huge spaces and long tails. Are you going to use dub delays or short ones to go for a Haas effect?

Compression. Do you want your sound to be compressed or not? This is something think about. Find a compressor that can be your swiss army knife for all occasions, and stick to using that.

The process of defining your sound is much like a designer developing the branding elements for a client.

While not essential but certainly helpful, a designer will tell you which set of colours, fonts, images, and direction to use within all your work.

What I usually do with my clients to create more of a signature sound is take a collection of references and sounds they connect with and then work on a way to replicate similar sounds and ideas. The pad from here, the percussion and swing from there, kicks made this way, hats always that way… and so on. You cherry pick all your preferred sounds from different sources (eg. why not go for a style that is entirely alien to you like afrobeat if you’re into techno?) and make a collection. I can find which synth is excellent at creating that sound, and while playing with it, you’ll often discover so many new sounds you are drawn to that sound original, fresh, and inspiring.

The truth is that trying to define your sound will not come overnight. It’s a process that will be different for everyone, and you truly cannot speed through this and feel right about it because there is no fast track to originality.

That being said, in all honesty, working with someone who has the production and musical experience to guide you in the areas that best represent you is huge and can be a game changer in defining your sound.

As always let me know if you have any suggestions or questions about this post and leave a comment below and tell me what projects you are working on right now.

JP


SEE ALSO : Beats and Melodies

Bouncing stems and mix

Recently I’ve been weighing the benefits of focusing on just one part of my production process exclusively, or, working on all the steps of a production simultaneously – arranging, mixing, pre-mastering, etc.. Very often producers ask me to explain a perfect workflow recipe and the truth is, there really isn’t a one size fits all answer.

But in theory, there are 2 main approaches I’ve been seeing in production to make a song.

  1. Classic way. Which involves taking one phase at a time but with the option to roll back to go fix something.
  2. Modern way. You go from one phase to the other in no particular order, as your needs change. You’ll mix as your arrange, change sounds of the percussion to match a melody, add saturation for aesthetics, etc.

One of Ableton’s feature that I find killer is the option to export all channels as separate stems. It really is great for so many reasons but also allows your to really divide the production from the mixdown, which you could do in another DAW.

There are many reasons why you’d like to do your mixdown into another DAW. One of the reason is, you’re basically blending, what I call, software grains. Think of the various apps on your smartphone that offer various filters for your images, where you can go from one to another, taking advantage of each strength. I would say it’s the same for DAWs.

  • Workflow. Each DAW has its own workflow, appearance, feel. Sometimes, just a change of platform is enough to, psychologically, feel your track in a different way. There are countless researches that have been done in between DAW, to which has the best sound, but in terms of summing, if you take a file with nothing on it and bounce it, they will all provide the exact same file. Where there will be a difference is on automation, interface and that alone can make you behave differently in a mix situation. There’s also all the macros and gizmos they all offer too.
  • Native plugins. Again, this might be a game changer. This of an any DAW, they will offer different plugins doing different things. Now, just for compression and EQ, it becomes a serious business. Mostly because there’s a big difference between what you see and hear, plus no one really does things the same way.

That last point is crucial here. You can take the same compressor concept (ex. FET compression), but it will sound different from one company to another. There are no real universal standards on how to approach compression or EQing. An EQ can show you a curve but the filter in the back might slightly be different to give a color, for instance.

So, when it comes to Ableton, I now export all channels as stems to do the mixdown. No more mixing as a arrange. I put a wall between the 2 phases. Some of the reasons are:

  • It liberates CPU usage. No surprises here. When you deal with a heavy load of VST’s and plugins it can often be a lot to manage. The act of bouncing out and mixing stems will force you to focus on only mix related plugins such as EQ and compression. No more delays, chorus and reverb adjustments. At this stage, you’ll focus on the volume levels alone.
  • It put’s an end to the endless adjustments you can make to every sound. You’ll have the option of correcting that little hihat detail that’s been bothering after hearing your track 100 times, but honestly, someone who has just heard your song for the first time will interpret that sound as part of the track, not as a mistake. It’s good to put an end to endless changes and adjustments and move on to finishing your production. Professionals keep their eye on the prize and get things done.
  • The audio summing seems to reveal imperfections. I’m not sure what’s happening here but sometimes, when you bounce the stems, things are just slightly different. I can’t pinpoint why and in theory, it’s not supposed to be but sometimes, it does sound slightly different. In fact, once you bounce it, that’s when you know exactly how it will be so it’s interesting to bounce all channels apart.
  • Ability to use other DAWs. As described earlier, this is the ultimate way to move from one platform to another. You’ll be to leverage the strength of each DAW.
    Build live sets or NI Stems. Having stems on hand can be useful to create live sets. Native Instruments offers a technology for creating a stems release to be played in Traktor, which is really cool, and super in demand by many of the world’s top dj’s.
  • Backup and remixing. Having stems is the ultimate way to have a real backup of your music. In 10 years time no one can predict what technology will be available, but having stems will prove useful as a way to be used with any new technology.

All an all, try it and see for yourself. Bouncing stems can only bring advantages to your workflow and I’d love to hear about it.

SEE ALSO : Use a main project for organizing yourself 

Is My Song Good?


I can’t tell you how many times I’ve been asked that question, and asked myself the same thing – is my song good? With experience releasing my own records and working on amazing projects that inspire me nearly every day, I know what I like in a song to call it good or know it’s potential. But what defines that exactly?


I believe there are 3 ways to look at your track to determine if your song is good.

  • Your personal feeling about the track. Can you listen to your track from beginning to end with your eyes closed? This is usually what many people (myself included) do to test it, some people swear by a car ride listen. In the end no matter how cliché this sounds, what YOU think is really important.
  • Feedback from others. I’ve been talking about the importance of your network and how to connect with other producers you can trust. Share your track with 5 closely trusted people and take in their feedback.
  • Professionals’ (real world) views. If you can find one to two guys that can play your tracks in real events or in podcasts, this is will be precious feedback. Playing your music among others will make little difference truly know – perhaps one sound is too loud or the arrangements is too wonky to mix. Listen to what they have to say.


Sometimes a change in mindset is key to breaking through barriers. Starting today, let’s re-shape your way of making and sharing your music.

I’ve seen some interesting success behind the concept I’ve been sharing with those I coach and will share it with you in this post. Before I do that I want to say that if your intentions are to get signed to a labelposting a full song on Soundcloud is a bad idea.

Even if your song is really good most labels don’t like that a track has been available or overheard before they’ve released it. In an ideal world, labels want to be the first ones to hear you and discover you. But the truth is, we all know how frustrating it is to reach out to them and never hear back.
Posting a snippet of about 1 minute 30 (to 2 minutes, maximum) is a good and safe bet.

With this preview you’ll show what your track has going for it, and your skills as a producer will be front and center.

Why not focus on making and developing ideas of 1 minute 30 that you expose and share on Soundcloud?

If this idea sounds like a bad one to you, try this experiment for a few weeks. For sure you’ll soon see what tunes get people’s attention and make a buzz. For sure you’ll find out that your assumptions might very well be wrong. Then go revisit any of those projects that were appreciated by the most people.


What you are doing here is very similar to A/B testing, a commonly used process in marketing for testing out different products to see how people like one from another. In this case we’re posting music, watching what get’s more attention, focusing on what listeners seem to want more of, and then finishing those tracks.
It’s all about presentation. Dress for success right?
You can go so far as to create enigmatic, invested EP of your own with great artwork. People definitely love that kind of presentation and it WILL draw attention. In the best case scenario (that I’ve recently seen happen) a label may notice this full package, and sign the project as is. If a label comes calling be sure you make them wait too long 🙂

The thing that makes a success isn’t one specific thing, it’s the combination of various assets: doing the right thing, at the right time, presented to the right people.

If Micheal Jackson released Thriller today, the odds of that album having the success it had back then would likely never have the same impact.
Another thing that’s important to consider is the question of what are people usually looking for in a new song?

  • Quality samples, effects.
  • A good balance of new ideas with something they can relate to.
  • Overall, tight arrangements, mixdown, (this can make a difference but don’t bet on that alone to save a pale idea).

In the end, it’s most important to remember this –
Don’t let other’s decide if your music is good.
Don’t let commercial results determine the success of your track.


As always I want to hear your thoughts and comments about this post. Feel free to share with your friends, and leave me a comment below.

JP –

SEE ALSO : Checklist to see if my song is finished

Creating Beauty Out of Ugly Sounds

This post is inspired by one of the most useful experiences I’ve ever had for my personal development as a producer. I’ve made it into an exercise that you can try.

Back in the early 2000s, when Montreal’s MUTEK festival was just getting started, our community of electronic music producers was blooming. People were spending as much of their time developing concepts as finishing tracks. I remember one sunny summer day, when Tim Hecker and I were sitting outside of my friend Mitchell Akiyama’s home, and we were discussing sounds. We had this interesting debate about what made some sounds “ugly,” and what the word meant for us. We felt that maybe it was cultural, or maybe it was producers using sounds the wrong way. At one point, we got to talking about how the guys of Porter Ricks recycled ugly rave sounds into what they do best, a kind of deep, mysterious techno.

https://www.youtube.com/watch?v=Wu9SEr8ST7c

A new concept was born: how to transform ugliness into beauty. Suddenly, the art of recycling meant that anything was possible, no matter the sources.

Tim worked on some of his albums using granular synthesis. He used sources like Van Halen or other weird heavy metal sounds. He even used burps for one installation…

Mitch and I went in to the studio. We loaded some rave samples from CDs and started playing around with them. By the end of the session we had 2 IDM-oriented songs that lacked any hint of a rave sound.

It was a great experience. I’d throw out some ideas, which Mitch would then apply to what he was doing to the best of his understanding. The directives I gave were descriptive rather than technical, and there was a lot of room for interpretation. It often wasn’t what I had in mind, but whatever emerged would be great as it was.

The only references we worked with were ugly sounds and some general, non-technical ideas.

The thing is that producers will often come to the studio with their minds already full of preconceived ideas and expectations on what’s nice or not. This doesn’t leave much room for mistakes, discoveries, oddities, or for your subconscious to express itself spontaneously.

So what is the exercise?

  1. When you’re picking sounds for your track, just go for the worst, ugliest sounds you can find on your hard drive or in your presets.
  2. From those sounds, discover how you can transform them. You can use filters, pitch shifting, EQ, and any other effect that might help. Reverb, even a little, can add a dramatic feel to a sound. So try to play with these 4 elements, plus resample yourself while doing so. You will then be able to play again with the new modified sounds. Each time you experiment tweaking the sound and record it, we call that “a round.”  To create a new, beautiful sound, you will need to re-process your sounds into 2 to 4 rounds.
  3. Detach yourself from any preconceived notions or expectations you have about where the track can or should go. Just try to explore and see where it takes you. You can take a look at my recent post on experimental music too.

Another thing that can be done is to use randomizing options to see what kind of crazy results emerge.

And be sure to have fun!


EDIT: Bjork seems to share the same idea.

SEE ALSO : Create Your Own Concept Album