Experimentation in music: how far can you go?

If you’re a regular read of this blog, you know that I encourage people to indulge in experimentation in music and to think “outside-the-box”; to try out new ideas in their music. That said, sometimes it’s difficult to judge how experimental one can get, and to understand the potential downfalls of going too far off into the experimental world. As someone who’s been running a label in which we constantly take risks and avoid shallow trends, I am familiar with the effects of being too experimental.

Recently, I had my friend Stereo_IMG in-studio for a session and he was talking about how hard it is these days to get any attention from labels. We have an EP finished and it seems like wherever we send it, we are not getting very much feedback at all (not even a rejection)—just no information at all. The mixing and sound design are solid, and on paper, to me it seems like there are no technical issues with our work. However, I think that we might be taking some risks that labels might be afraid to embrace.

I got some really interesting insights from an article I read last week about how people deal with novelty. The article discusses how people are attracted to familiarity; humans are more at ease when they can recognize things. According to this article, we look for familiarity in our lives, which explains why routines and rituals are often very popular and have been passed down through generations. We also look for patterns in our lives, and when we decode a series of things that make sense to us, we will even see it as a message—something that we can comprehend; a part of a system we use to learn. No wonder repetition is a good way to get familiar with something!

If we apply these concepts of familiarity to electronic music, it’s fairly simple to see how electronic music is directly linked to this process. Certain genres have recognizable sounds, patterns, and techniques. These patterns aren’t just for DJs who mix, but for people to be able to identify a style. Compared to DJs who mix tracks seamlessly over the course of an evening, top 40 DJs get away with going all over the place without smooth mixing because they’re playing music people can recognize (I’ve never understood the idea of going out to hear music you know, but that’s just me). The commercial music these DJs play is very formulaic; each song differs little from the next. People who are mostly familiar with commercial music are seeking that specific vibe within the boundaries they’re familiar with.

I was at the park over the weekend and there were these two young ladies nearby, drinking, smoking, and listening to Spotify on their phones. They were talking the whole time, never really listening to what was actually playing. They were listening mostly to indie pop; stuff that didn’t feel new and that was very similar to music I heard from other cars driving by. The only time they stopped talking was when Spotify accidentally played a song not in the playlist because it had reach the end. “This is not good”, said the phone owner after hearing just a few seconds of an unexpected track. “Spotify is buggy”, she added, but to my ear, what was now playing was exactly in the same tone and style as the previous song, though she had probably never heard it. Her reaction to “unknown” music was very strong, and it made me smile.

I had played a gig the night before this experience in the park; I had a great time improvising music from material I had prepared. I noticed that people were also talking for the duration of my set, but most people were also dancing, whistling, and cheering. The moments when people would pay more attention to the set were when I’d throw in some weirdness (Pheek TM). These moments of novelty felt like they were suddenly grabbing the audience’s attention. In these moments, I’d also include positive bass-lines and funky percussion to make them feel “safe”. It seems to me like there’s a good ratio to respect when you’re experimenting, and if you don’t overdo it, you can get away with almost anything.

However, I can’t use weirdness and novelty the whole time because then their feelings of familiarity—according to the “mere-exposure effect”—will be ruined. If you over-expose people to something new, they will get bored. This is why in the most exciting sets you reach experimental plateaus where the audience’s minds can wander, but then they’re brought back on track to something familiar. Without the release of the familiar into something unfamiliar and vice-versa, you can’t create this attention-grabbing effect. In other words, “you can’t connect if you’re not divided first.”

This battle between familiarity and discovery affects us “on every level,” Hekkert says—not just our preferences for pictures and songs, but also our preferences for ideas and even people.

My personal conclusion about experimentation is to start by being really aware of whatever style you’re working in. I feel it’s important to really familiarize yourself with the leaders in that style, and then understand the are leaders: why what they do works, and why people like it. One of the reasons why an artist’s peak begins to fade has to do with the theory of over-exposure, after which people’s interest dulls and they will start looking for something new. A good way to remain “interesting”—not only in one song or album, but over years—is to keep yourself on a trajectory; not showing your hand all at once, but instead revealing your novelty in small amounts. Restraint is an important feature of good music that listening to podcasts can help you understand reveal: how do artists distinguish themselves in what they do?

I find that people who often innovate in a very popular ways are people who came from an external community into a new one (say from punk to techno, for example), intentionally or unintentionally adding cross-influences into what they make. To them, this mix of styles sounds new to both themselves and people who are into that particular scene. This was one thing that Petre Inspirescu did so well; he brought his love for classical music into minimal house—and it worked perfectly.

Setting rules for yourself to create “familiarity” for listeners in the style you’re working in, while also searching for what perhaps hasn’t been done within that style, is a great way to determine the amount of novelty you might be able to include in your work. People seem to be put-off by setting rules in creative work, but limitations you impose on yourself give you a creative jump into something more organized. Without these rules, you might end up like Stereo_IMG and myself: creating material that is too “outside-the-box” to fit anywhere.

SEE ALSO : Using Quad Chaos

Workflow Suggestions for Music Collaborations

One of the most underestimated approaches to electronic music is collaboration. It seems to me that because of electronic music’s DIY approach people believe they need to do absolutely everything themselves. However, almost every time I’ve collaborated with others I hear them say “wow, I can’t believe I haven’t done that before!” Many of us want to collaborate, but actually organizing a in-person session can be a challenge. In thinking about collaboration and after some powerful collaboration sessions of my own, I noted what aspects of our workflow helped to create a better outcome. I find that there are some do’s and don’ts in collaborating, so I’ve decided to share them with you in this post.

Have a plan

I know this sounds obvious, but the majority of people who collaborate don’t really have a plan and will just sit and make music. While this works to some degree, you’re really missing out on upping the level of fun that comes out of planning ahead. I’m not talking about big, rigid plans, but more so just to have an idea of what you want to accomplish in a session. Deciding you’ll jam can be plan in-itself, deciding to work on an existing track could be another, or working on an idea you’ve already discussed could be a more precise plan.

Personally, I like to have roles decided for each person before the session. For example, I might work on sound design while my partner might be thinking about arrangements. When I work with a musician, I usually already have in mind that this person does something I don’t do, or does it better that I can. The most logical way to work is to have each participant take a role in which they do what they do best.

If you expect yourself to get the most of sound design, mixing, beat sequencing, editing, etc., all at once, you’re probably going to end up a “Jack of all trades, master of nothing”. Working with someone else is a way to learn new things and to improve.

A good collaborative session creates a total sense of flow; things unfold naturally and almost effortlessly. With that in mind, having a plan gives the brain a framework that determines the task(s) you need to complete. One of the rules of working in a state of flow is to do something you know you do well, but to create a tiny bit of challenge within it.

Say “yes” to any suggestions

This is a rule that I really insist on, though it might sound odd at first. Even though sometimes an idea seems silly, you should say yes to it because you’ll never know where it will lead you unless you try it. I’ve been in a session where I’ve constantly had the impression that I was doing something wrong because we weren’t following the “direction” of the track I had in my head. But what if veering off my mental path leads us to something new and refreshing? What if my partner – based on a suggestion that made have seemed wrong at first – accidentally discovered a sound we had no idea would fit in there?

This is why I find that the “yes” approach is an absolute win.

Saying yes to everything often just flows more naturally than saying no. However, if the “yes” approach doesn’t work easily, don’t force it; it’s much better to put an idea aside and return to it another day if it’s not working.

Trust your intuition; listen to your inner dialogue

When you work with someone else, you have another person who’s also hearing what you’re hearing, and will interact with the same sounds and try new things. This new perspective disconnects you from your work slightly and gives you a bit of distance. If you pay attention, you’ll notice that your inner dialogue may go something like “oh I want a horn over that! Oh, lets bring in claps!” That inner voice is your intuition, your culture, and your mood, throwing out ideas; sharing these ideas with one another can help create new experiments and layers in your work.

Combining this collaborative intuition with a “yes” attitude will greatly speed up the process of completing a track. Two people coming up with ideas for the same project often work faster and better than one.

Take a lot of breaks

It’s easy to get excited when you’re working on music with another person, and when you do, some ideas might feel like they’re the “best new thing”, but these same ideas could actually be pretty bad. You need time away from them to give yourself perspective; take breaks. I recommend pausing every 10 minutes. Even pausing for a minute or two to talk or to stand up and stretch will make a difference in your perceptions of your new ideas.

Centralize your resources

In collaborating, when you reach the point of putting together your arrangements, I would say that it’s important to have only one computer as the main control station for your work. Ideally you’d want an external hard-drive that you can share between computers easily; this way you can use everyone’s plugins to work on your sounds. One of the most useful things about teaming up with someone else is that you get access to their resources, skills, materials, and experience. Make sure to get the most out of collaborating by knowing what resources you can all drawn upon, and then select a few things you want to focus your attention on. It’s easy to get distracted or to think you need something more, but I can tell you that you can do a lot with whatever tools you have at that moment. Working with someone else can also open your eyes to tools you perhaps didn’t fully understand, were not using properly, or not using to their full potential.

Online collaboration is different

Working with someone through the internet is a completely different business that working together in-person. It means that you won’t work at the same time and some people also work more slowly or more quickly than yourself. I’ve tried collaborating with many people online and it doesn’t always work. It takes more than just the will of both participants to make it work, it demands some cohesion and flexibility. All my previous points about collaborating in-person also apply to collaborating online. Assigning roles and having a plan really helps. I also find that sharing projects that aren’t working for me with another person will sometimes give them a new life.

If you’re a follower of this blog, you’ll often read that one of the most important things about production that I stress is to let go of your tracks; this is something very essential in collaborating. I usually try to shut-off the inner voice that tells me that my song is the “next hit” because thinking this way usually never works. No one controls “hits”, and being aware of that is a good start. That said, when you work with someone online, since this person is not in the room with you and he/she might work on the track while you’re busy with something else, I find works best to be relaxed about the outcome. This means that if I have a bad first impression with what I’m hearing from the person I’m working with, I usually wait a good 24h before providing any feedback.

What if you really don’t like what your partner is making?

Not liking your partner’s work is probably the biggest risk in collaborating. If things are turning out this way in your collaboration, perhaps you didn’t use a reference track inside the project, or didn’t set up a proper mood board. A good way to avoid problems in collaboration is to make sure that you and your partner are on the same page mentally and musically before doing anything. If you both use the same reference track, for example, it will greatly help to avoid disasters. If you don’t like a reference track someone has suggested, I recommend proposing one you love until everyone agrees. If you and your partner(s) never agree, don’t push it; maybe work with someone else.

The key to successful collaborations is to keep it simple, work with good vibes only, and to have fun.

SEE ALSO : Synth Basics

Using Quad Chaos

I’m proud to announce the release of our first patch – Quad Chaos. I met Armando, the programmer, on the Max/MSP group on Facebook and his background was exactly what I was looking for and we got along very well. Quad Chaos is basically a patch version of what this blog is about: finding ways to have innovative sound design through modulation and chaos.

Speaking of chaos, the only “rule” for using Quad Chaos is to resample everything you do, because we intentionally wanted it to be something that works ephemerally; something you can’t really control and just have to go with. There are many tools out there you can use to do anything you want, but we wanted to create something experimental that can be fun and creative at the same time.

Make sure these knobs are up!

The first thing that appears when you load up Quad Chaos is a screen in which you can add up to four samples. If you hear nothing when you load in a sound, you probably need to raise the volume, direction, or panning. In the demo video, Armando has used short samples, but I find that the magic truly comes together when you load up longer files such as field recordings, things that are four bars long, or even melodic content. I don’t really find that Quad Chaos works well if you load a sample that has multiple instruments in it, but I still need to explore it more and I could be wrong about that. My advice is to start with one sample that you load into Quad Chaos, and then with your mouse, highlight a portion of it. Personally, I like to start with a small selection based on the waveform content I see. I’ll try to grab one note/sound, along with some silence. Once you make a selection, you’ll hear a loop playing that might sound like something in a techno track…but this is just the beginning.

While it’s very tempting to load in all four samples at once, if you do things this way, Quad Chaos will get out of control quickly; I like to start with one layer and then build from there.

Once you isolate a section that loops to your taste, it’s time to engage the modulation. One trick that I like to do with any synths or gear is to move one knob to its maximum and then minimum, quickly then slowly, to simulate what an LFO could do. When I find something I like, then I’ll assign an LFO or envelope to it and start my tests.

For example, in Quad Chaos you can assign the first modulator to a direction; you click on “dir” and you’ll see numbers underneath, which represent the modulation source. To access to the modulation section, use the drop down menu and pick “mod” and you’ll see the first modulation.


Depending on how you set it up, you’ll start hearing results as your sound now has modulation on and in full effect. I know the lack of sync in the plugin might seem odd, but to repeat myself, a lack of sync is needed to create “chaos” and this approach gives more of an analog feel to what you make; you can get some pretty polyrhythmic sequences because of this as well.

As I mentioned earlier, how I start my sound is usually just with an LFO set to sine curve and the I explore slow/fast oscillation to see what kind of results I get. I’ll find a sweet spot somewhere in the middle or something, then I’ll try all the different oscillations to hear other results. I’m very much into the random signal just because it will create the impression of constantly “moving” sonic results. Afterwards, I have a lot of fun scrolling through the recorded results of these experiments and then from them I pick one-bar loops/sections. I find that the random signal is always the one that gives me pretty interesting hooks and textures.

Once you’re happy with the first layer you’ve created with the first loop, you can use the other loops to create complex ideas or simply to add a bit of life to the first one. I’ve seen a few artists using Quad Chaos already and everyone seems to comes up with really different use-cases and results. One thing I often see is people dropping some important samples of a production they’re currently working on into the plugin to get some new ideas out of them. My friend Dinu Ivancu – a sound designer that makes movie trailers – tried out Quad Chaos and had some very lovely feedback of his own:

I love it JP!

[Quad Chaos] is a fantastic tool. I would love it even more if it had a few quality live options. Still though, as is, it’s an amazing tool to generate live and organic sounds out of ordinary samples. I’ll send you something I made with it and just two soft-synths. It’s fantastic. That reverb is AMAZING! Congrats – you guys did a great job. I’ll try to help [Quad Chaos] get to a wider audience as it’s very, very good for film work!

Dinu Ivancu

I think what Dinu is excited about here is the creation of small-but-detailed organic, improbable textures that are difficult or laborious to make in a very stern, organized DAW. Breaking down the strict boundaries of your DAW opens doors to creating sounds you’d hear in the real world that are completely off-sync and un-robotic. Quad Chaos also includes a built-in reverb to help create space for your sounds (and there are other effects included as well!).

Jason Corder, “Offthesky”, sent us a neat video of himself working with Quad Chaos. Jason shows us how you can record a song live, only using the plugin. It’s very spontaneous; he’s using the macros to create external automation to keep a minimum structure. This approach is something I didn’t initially think of, but seeing Jason do it makes me think that I’ll explore that avenue next time I use it!

You can get a copy of Quad Chaos here and if you make songs or videos, I’d be more than happy to see how you use it!

SEE ALSO : Creating tension in music

Choosing a genre for your music

Every now and then I encounter people I work with who have trouble choosing a genre to produce in because they like a wide variety of different genres and have too many ideas. I’ve also experienced this myself in my early years of DJing, and it was a bit of an issue for my sets. Given my early experiences, I’m well situated to understand how it can feel to have too many ideas and to have trouble settling on a specific genre or style. I’d like to discuss how you can deal with this problem in your own music-making.

As a DJ in the late ’80s and early ’90s, I was very much interested in emotional music and techno. There was some commercial dance music that I would dig and mix with techno in my sets, but the reactions I’d get when I’d do this were often not very good. There are legendary DJs like Laurent Garnier who are masters of surfing different genres in a single set, going from one to another seamlessly and having people love it, but this is an art in itself. To understand how to do this, you have to understand how the music you’re playing is made and how it works, in terms of rhythms and harmonies. But once you do, anything is possible. Now, software like Traktor or Mixed In Key can help with this type of mixing; the flexibility we have now with modern technology provides us with many options to constantly reinvent ourselves.

But what about music-making and producing as opposed to DJing? How can you choose a genre to make if you are interested in many?

I like to have a very open mind about producing in terms of taking influences from multiple genres and styles; I’d say that it can actually be something positive once you understand how your brain works. Many people feel that cross-breeding genres will end up a mess, but just like DJing, it can work. Let me discuss how:

One genre, one alias

A very simple way to approach producing in multiple genres is to use the Uwe Schmidt (Atom) approach where you make and explore making music in one genre, under one alias. Schmidt has a ridiculous amount of aliases he’s been using to make all the music he’s inspired to. He doesn’t hold back, he just makes music and will do whatever he feels like doing in-studio. He might make techno some days, but also has a funny salsa-flavoured house project under the alias Senor Coconut. I’ve always felt that making music should be comparable to an ultimate feeling of freedom. If you don’t feel free, your brain is stuck on something. I think that easiest way to approach solve feeling stuck is to make music using my parallel production technique. When you save your projects, make sure to have folders or categories so you know what project sounds like what.

The advantages of working in parallel this way include:

  • You’ll never run into limitations or lack inspiration.
  • Learning techniques from multiple genres can be a very enriching experience.
  • You get to play with different sounds and tools in each session which will never be boring.
  • Exploring different genres can ultimately lead you to new breeds of styles, spawned from mixing two worlds together which creates your own original identity.
  • Perhaps you’re not aware that you are very good at making a specific genre until you’ve explored it.

However, there are also disadvantages to working on multiple styles in parallel such as:

  • It might take longer to get recognition in one genre if you’re all over the place. “Jack of all trades, master of nothing” holds true.
  • You might never get really solid at working in any genre. Each genre has different approaches and techniques which can take time to master.
  • Getting gigs might become confusing for promoters.
  • Managing multiple accounts/identites on Soundcloud or elsewhere can be a bit of an issue.

So, where should you start with deciding on your genre(s)?

I’ll speak for myself and say that for me, things started to make sense once I saw Plastikman do a live set in 1998 (I’ve said this in countless posts, sorry). I realized that what happened that day was a barrage of multiple personal insights:

  • His set was so inspiring, sounded so new, innovative, and different than everything else, that I fell in love with the sound. It was some sort of deep minimal, with a dub approach. My mind had a reaction of “OMG when this set is over, where am I going to hear this again?!” Back then, when a show was done, it was over. Insight 1: After this show, my brain felt I needed to make music to feed itself.
  • One of the other things that inspired me was how he was using panning and the stereo image to have sounds move in the space in real time. It was truly an exciting experience to hear movement. I felt that I had not heard this enough before and not in a live context. Insight 2: My inspiration came from seeing and hearing this creativity and exploration of new sounds.
  • A last point that’s important here was that this event was well attended and people really understood what was going on and dancing and enjoying the set. I was in awe to see that. Some events I play, people are on the dance floor talking the entire time which drives me bonkers. Insight 3: I wanted to be part of this community of people who liked exploratory music.

When you decide on a genre, there are different things to keep in mind: what are you making? Who are you making it for? Why are you making it? If you’re making music in multiple different genres, your purpose might not be clear, but once it is, it will make more sense for you to trim your genres of interest down to only a few (ideally, just two). I like to encourage people to be interested in two styles because you might get bored of one, or it will become difficult to introduce new elements to your routine.

There’s another important thing to keep in mind when choosing a genre to work in: before you get really good at it, that genre might go “out of style.”

Is working in an outdated style a bad thing, though? Well, when you love something deeply, you usually don’t care if it’s less popular because that genre is you in the end. However, if your goals are releases, bookings, etc., it might get tricky. When minimal techno’s popularity started waning around 2009, many DJs and producers all jumped on the house bandwagon – sometimes not even liking it – they felt they needed to make house if they still wanted to get booked.

To summarize, I think that if you’re not yet set on one or two genres, there’s a part of you that’s still searching for your style. It might take time to figure it out, but I believe that going out and really enjoying music, then listening to it at home, will help you narrow down your search.

SEE ALSO : Experimentation in music: how far can you go?

Synthesizer Basics

I’ve realized that using synths is a bit of an esoteric process for many (for me it definitely was for a while), so I’d like to share with you some synth basics. I used to read things online in-depth about synths, but didn’t feel like it was really helping me do what I wanted to exactly. Synths can create certain sounds, but the ability to shape these sounds into something you like is another task. When I dove in the modular rabbit hole, I felt like I needed to really grasp how to use them. After years of working with synths, presets have a actually provided me with many answers as to how things are made, and I’ve ended up learning more with presets than with tutorials. It’s probably useful for some to understand some basic concepts with regards to how to use synths in order to create lush or complex sounds, and in order to develop your own set of synth sounds. I’m not going to explain every synthesis concept, but I’ll cover some synth basics.

My personal go-to tools when I get to work with synths are Omnisphere, Pigments, and Ableton’s Operator. They all have different strengths and ways to work that I feel fulfill my needs. When people talk synths, they often discuss which ones are “best”, but I find that these three are pretty powerful, not only for the sounds they create, but for how they work. Speaking of workflow, if a synth doesn’t create something I like quickly, I usually get annoyed as I want to spend time making music and not just spend an hour designing a sound. In the case of these three, they all have several oscillators that can quickly be tweaked in a way you want.

Oscillators

Imagine the oscillator as a voice (I’ll explain polyphony another time which is a slightly different topic). The oscillator can shape sounds in various ways by creating a waveform: sine, square, triangle, saw, etc. The waveform has certain characteristics and difference waveforms have more or fewer harmonics. If you play a note, you’ll first see that it will create a fundamental frequency (as in, the note played has its own frequency), followed by the harmonics. Sine waves, because of their simplicity, will have basically no harmonics, but a saw wave will have a lot.

The sine wave is a fundamental frequency and has no harmonics.
A saw wave is different. The red arrow shows the fundamental frequency, and the green, the harmonics.

As you can see, sine and saw waves create different results, and you can combine them to create richer sounds. When there are more harmonics, the human ear tends to hear them as a sound that is richer, as it covers more frequencies (yes, this simple explanation for a more complex topic but I’ll leave for another time).

So what should you take away from this? Well, when you see a synth with multiple oscillators, realize that you can combine them in sound designing. One basic synth exercise I give to students is to start with one oscillator, like a sine wave, and then add a second one, pitched a bit higher (one octave) using a triangle wave, and use a 3rd oscillator that is a saw, pitched up again. If you play the same note, you’ll see the content is altered because the harmonics now interact to create new “sonic DNA”.

This simple starting point should pique your interest in exploring the combinations of different ways to set the oscillators in order to shape different sounds. Like I explained in past article, sounds are combinations of layers that create different outcomes; same goes for synths and oscillators. Synths are a rougher approach and it takes time at first to feel like you’re getting somewhere, but the more you practice, the better you get, and then you can event use a synth to bring richness to samples you layer. For example, I frequently use a low sub sine to give bottom to wimpy kick.

Envelopes

After deciding on the oscillator content of your synth, next comes shaping it. This is done with an envelope ADSR (Attack, Decay, Sustain, Release). The envelope tells your synth how to interact with the input MIDI notes you’re sending it. It waits for a note, and then depending on how the envelop is set, it will play the sound in a way that will shape both the amplitude (volume) and timing. For example, a fast attack means the sound will start playing as soon as the key is pressed, and a long release will let the sound continue playing for a little while after you release it. Each oscillator can have its own envelope, but you could have one general envelope as well. The use of envelopes is one of the best ways to give the impression of movement to a sound. I’m addicted to using the Max envelope patch and will assign it to a bunch of things on all my sounds, but I had to first learn how it worked by playing with it on a synth. While the envelope is modulating the amplitude, it can also be used to shape other characteristics too, such as the pitch.

Filters

You might already be familiar with filters as they’re built into DJ mixers; filters allow you to “remove” frequencies. In the case of a synth, what’s useful about filters is that most synths have filters that can be assigned by oscillator, or as a general way to “mold” all oscillators together. If you take a low pass filter, for example, and lower the frequency, you’ll see that you’ll smooth out the upper harmonics. In case of pads, it’s pretty common that multiple oscillators will be used to make a very rich sound but the filter is the key as you’ll want to dull out the result, making your pad less bright and defined.

LFOs

LFOs are modulators, and as you know, are one of my favorite tools. I use them on many things to add life and to give the impression of endless, non-repetitive changes. I’ll even sync them to a project and use them to accentuate or fix something. In most synths you can use LFOs to modulate one or multiple parameters, just like envelopes. What’s fun is to use a modulator to modulate another modulator; for example, I sometimes use LFOs to change the envelope, which helps give sounds different lengths for instance. Using LFOs on filters is also a good way to make variations in the presence of your harmonics, creating different textures.

Noise

One of the most misunderstood points in synthesis the use of noise. Noise is a good way to emulate an analog signal and to add warmth. One of the waveform types an oscillator can have is noise; white noise or other. You can add it in the high end or have it modulated by an envelope to track your keys. I like to keep noise waves very low in volume, and sometimes filter them a bit. But that said, I use a noise oscillator in every patch I design. Even a little bit of noise as a background layer can create a sense of fullness. If you record yourself with a microphone in an empty, quiet place, you’ll notice there’s always a bit of background noise. The human ear is used to noise and will be on the lookout for it. Hearing noise in a song or sound creates a certain sense of warmth.

Why do I love Omnisphere and Pigments?

Both Omnisphere and Pigments are very powerful for different reasons. Omnisphere is one of the most used software tools in the sound design industry, as well by composers who write film scores. Hans Zimmer is known to use it, among others. It has more oscillators that Operator, not just in quantity, but also in emulations of existing synths. Fore example, you could have your lower oscillator to be emulating a Juno, then add a Moog for the middle one and end up with an SH-101. I mean, even in real life, you can’t possibly do that unless you own all three of those synths, but even then it would be a bit of a mess to organize those all together. Plus, Omnisphere’s emulators sound true to the originals. If this isn’t convincing enough, Omnisphere also comes with a library of samples that you can use to layer on top of the oscillators, or import your own. Add one of the best granular synthesis modelers and you are set for endless possibilities.

Pigments by Arturia
Pigments by Arturia

Pigments is made by Arturia, and it was made with a very lovely graphical approach, where you have your modulators in the lower part of the UI and the sound frequencies in the upper part. You can then easily and quickly decide to add modulation to one parameter, then visually see it move. It’s one of those rare synths that has modulation at its core. This is why I love it; it provides me with numerous quick sounds resulting from deep or shallow exploration.

SEE ALSO : Using MIDI controllers in the studio

Balancing a Mix

Balancing a mix is simple “mixing 101” theory; it’s usually fast and simple to do. I could go into a lot of detail about mix balancing, but the point here is to provide you with some quick information that you easily can put to practice to get quick results yourself. Hopefully this will also make you more curious about balancing and you will research it more on your own.

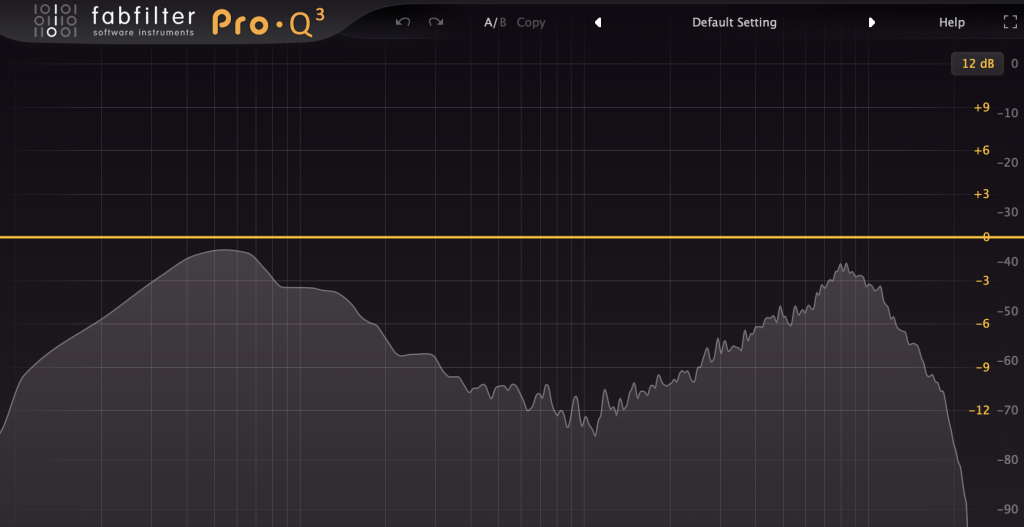
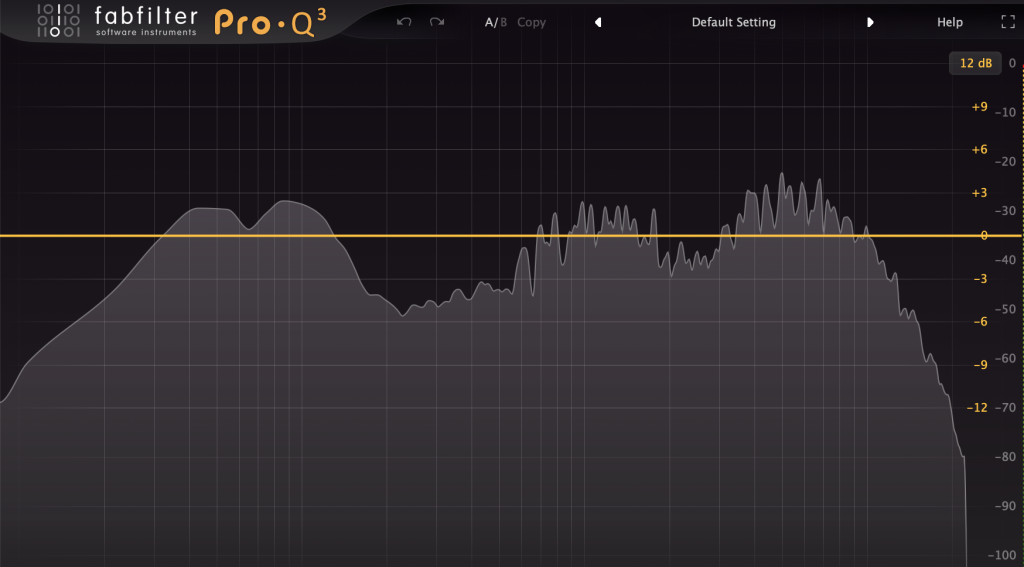
One of the very first things I do when I create a new project or mix for a client, is to drop Fabfilter Pro-Q3 on the master. Not only do I love how the FFT looks (the frequency graphic analysis), but I also love that I can make cuts, or even dynamic cuts, that react to the incoming signal. The problem with the Spectrum Analyzer from Ableton is that it’s ugly and can be a bit confusing; other than displaying information, it doesn’t do anything. The Pro-Q3 needs no adjustments; you drop it on a track and it’s ready to be used. With Pro-Q3, if you hover your mouse pointer over the graphic, you’ll be also shown the peaks with the precise frequency target. It’s hard to go wrong here.

That said, let’s say your track is about 85% done, and you’re about to switch to mixing mode to see how the track will turn out. At this stage, you know you need to have one thing in mind: balance. People who use a reference track find that there might be a tone that seems to be right to emulate, such as a very bassy or bright track. However, I find that when it comes to a rough mix, balancing the mix before referencing will give you a more objective outlook of your work so far. When I work with clients who are in this stage of their project, this is what I advise: if you’ve been working on something that’s too bright (eg. high frequencies being pushed over 0db), you’ll lose perspective of how piercing that might feel in a club. Darker mixes (eg. high frequencies below 0bd) will sound more organic, mysterious. Human ears tend to get excited by bright mixes at first, but in a loud environment, they get tired. Engineers often get “tired ear syndrome” at the end of a day because of over-exposure to bright sounds.

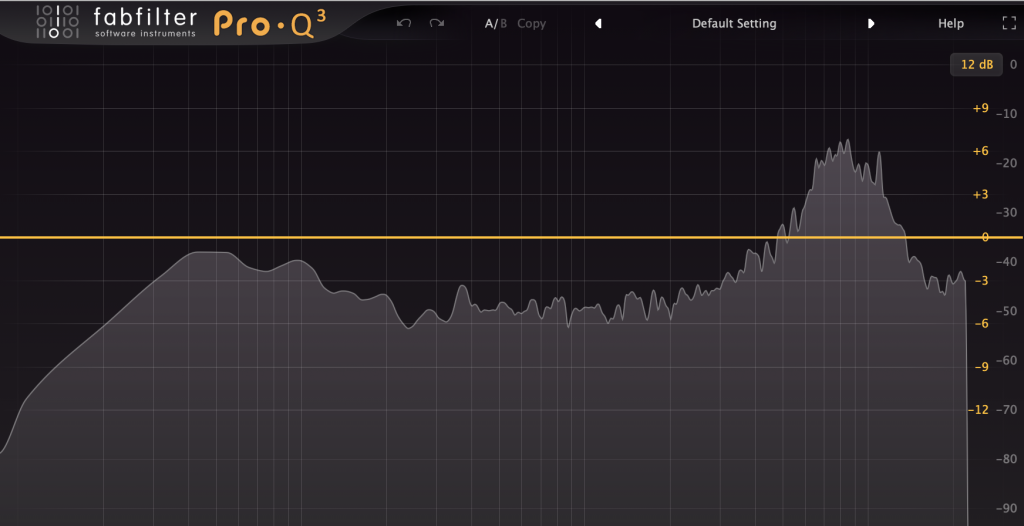
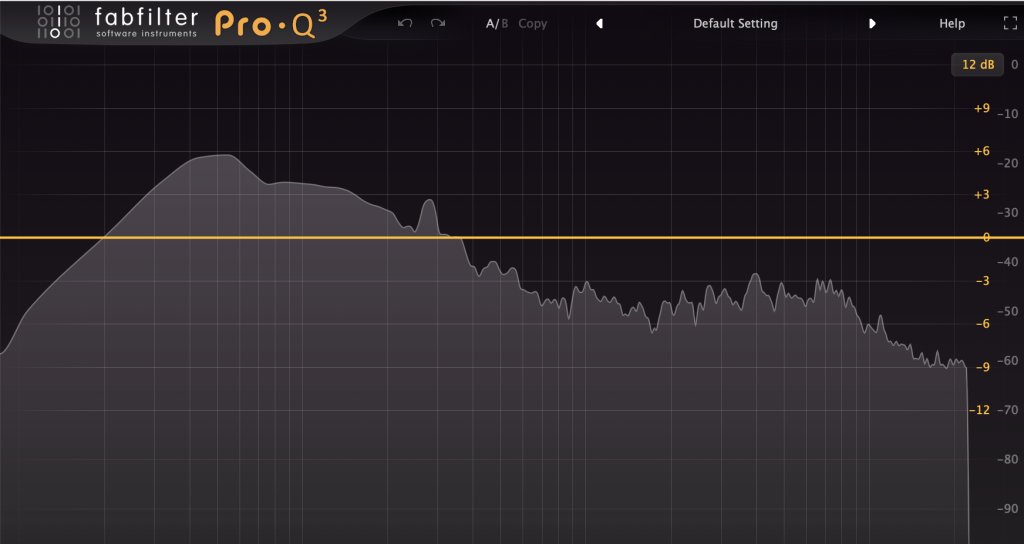
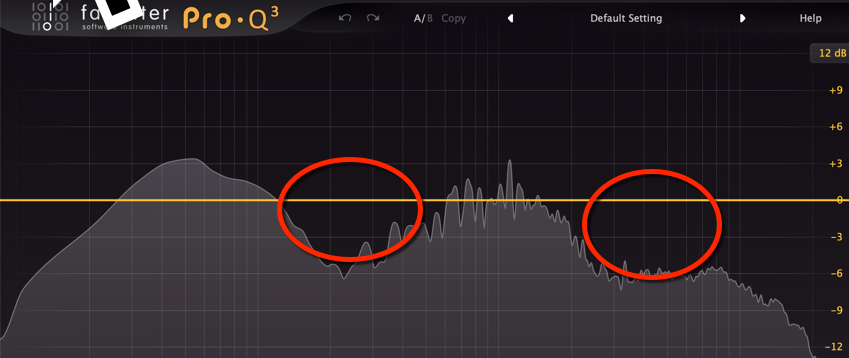
If you play your track and then a reference track (which should be inside your Project, in a channel that is muted unless you want to AB your mix), you might see some very different EQ curves on the graphic analyzer comparatively. In the middle of the graphic, there’s a line that points to zero dB. Ideally, you want your signal to remain under that throughout the entire frequency spectrum; by doing this you’re creating a mix that’s considered balanced. You will most likely see some “holes” in your mix or some sounds that jump over the zero line (spikes).

The circle points a hole and the arrow points to a potential overload.

One of the things that people sometimes do is boost everything to reach the zero line, but engineers go about this a different way. We will lower the louder zones with a shelving EQ and – using the gain on that plugin – we’ll raise the volume, which will automatically adjust the lower frequencies to reach the 0dB line. This simple trick alone can save you tons of time and headaches. In the case above, I’d lower everything above 3k, raise everything by 3dB and probably give a nudge at around 1k with a wide resonance.

But will this alone solve all your balance problems? The answer is no, it won’t.

The idea of using this technique is not to get into the habit of relying on EQs or tools on your master track to fix things, but more to help you understand how to balance the sounds in your mix as you go. One of the most valuable things you can do is solo each channel and look at the analysis graphic to see what’s truly going on with that sound alone. I usually take some time to fix a channel’s content with its own EQ so that it falls under 0dB on the master. If you do that with each channel, you’ll have a good base to start working from.

What about frequency spikes that go over 0dB? Well, it depends, really. I’ve heard some really good sounding songs where there’s a spike or two somewhere. Usually, spikes can work if they’re not too resonant and if they don’t go beyond 3-6dB at the most. Keep in mind that spikes will really stick out of a mix, and at loud volume they could be imposing if the quality of the system isn’t best.

One of my favorite plugins to put on a track is a channel strip, and there are many out there for you to choose from. Neutron 2 sticks out to me as one of the best out there, based on all the options provides. It also allows each instance of the plugin to “talk” to one another, so you can do useful side-chaining between numerous channels. I’d suggest trying out a few different channel strips, but make they have at least a 3-band EQ as you want to be able to do shelving to balance out your channel(s). Balancing a mix is one of the simplest things you can in the early stages of mixing, and it makes a world of difference!

Let me know what you think and happy mixing to you.

SEE ALSO : Common mindsets of musicians who have writer’s block and how to solve them

Common mindsets of musicians who have writer’s block and how to solve them

We’ve recently restarted group coaching after a few month hiatus. The initial idea for group coaching is to explore the participant’s current intentions and obstacles in their work, including overcoming writer’s block in music-making. Passionate producers spend a lot of time music-making; it’s a central part of their lifestyle, which means that when things don’t go so well, it can be a very frustrating experience.

While many join the group coaching sessions to get technical tips, often we spend time discussing how we approach music-making and try to understand the mindset(s) that we have towards the craft. I can give you all the technical tips in the world, but if you approach music-making with a foggy mind, you might not be able to apply any of them. This is why music producers often have patterns of creativity that include peak highs and extreme lows. But what causes this pattern exactly? There are a few common cases of lows I’d like to share with you from what I hear and see most often in working with clients.

“I can’t finish projects.”

This is a pretty familiar theme I see on a daily basis. Sometimes people have no issue sitting in studio and are excited to start a new idea. They’ll build it up for a while, but after a few sessions the magic is gone and it feels more appealing to them to start all over with new, fresh ideas. If you recognize yourself here, realize that your brain is in search of a dose of dopamine and starting a new track is instant gratification. I can tell you that finishing a track will provide an even bigger dose of dopamine, but the anticipation of finishing something can kill your momentum and will make you lose focus. Some people also fear messing up the project or have the impression that the more they work on it, the less impressive the track becomes, which often results in feeling like they’re not in control of what they’re doing.

Solution: Under the influence of a big dose of dopamine from creating a new and exciting idea, you build up expectations in your head for your track to become your next masterpiece. Usually, when I notice I’m thinking this way I usually just stop everything and do something else for a moment. Building up expectations that you’re working on something grandiose is a way of setting up yourself for inaction and lack of drive down the road. Here are some music-making habits I have to help keep myself from falling into this trap:

  • In idea-creating sessions, I’ll focus on working on several different ideas and will not elaborate on any of them until a future session. This helps in not getting too excited about anything specific, and the break away from the idea(s) also helps me in understanding the real potential of the track.
  • I never, ever, think of a track as a potential hit. I’m more focused on finishing it and moving on. Finishing something gives the mind clarity, and will give you a sense of accomplishment and build self-confidence.
  • I never forget that because a track has been declared “done”, that this won’t stop me from reopening the project in a few months to change something. Many songs can have multiple versions, and sometimes you need to test it in a club or show it to others for feedback.

“I need perfect conditions to start working.”

This one is also pretty common and I’ve seen it in friends for years. Some people will always say that they can’t be making what they want because they’re either missing something in their setup or because something is stopping them. You often see this in people who constantly buy new gear or plugins but don’t spend much time exploring the real potential of any of their tools.

Solution: To make music, you don’t need much. You need a DAW such as Ableton Live, a computer, and a pair of headphones. That’s pretty much it. If you can’t make something using only this minimal setup, expect to be very frustrated down the road; the more options you have, the more you might become confused in how to use them all together. I often recommend for beginners to try to get the most out of their DAW alone using tutorials (you can learn basically everything on YouTube). You’ll be surprised with what you can create by limiting yourself. “Yeah, but it won’t sound the way I want“. This is what I call a brain distraction. It’s more important to get your skills together and to find ways to sound better later. There’s also nothing wrong with using or buying presets to see how things are made so you can get inspiration from various sources. Here’s how you can avoid getting caught up in waiting for the right conditions to work on music:

  • Realize that there will never be a perfect setup or time to make music. Great sounds and ideas are created while working and exploring, not while you’re imagining how you’d do if you had this or that.
  • How you use your time is up to you. When I had my son, I maximized the little time I had by squeezing in power sessions here and there, sometimes in a 5-minute spans. When you work within a limitation like that, you get crazy productive and don’t get stuck on time-sucking details. When someone tells me they “don’t have time”, I wonder how much time they’re actually setting aside for production.

“I need musical recognition from others.”

This is a complex one. Recognition is often something people chase for a big portion their time. They’ll try different things to get recognized such as releasing music by themselves, asking others for feedback, or sending music to blogs/magazines/etc. Whatever you’re chasing, there are good chances you might not get what you want anyways. Asking for approval is basically saying “I give X the power to decide if what I do is good.” Sometimes we place a lot of importance on one person to give feedback because of their reputation or talent. Even if someone you are pursuing for feedback listens and doesn’t like your work, they could be wrong because they might not be in the right state of mind or right person to listen.

Solution: Usually, the main piece of advice I give to a person who chases recognition is to be aware of their intentions. Sometimes there’s relationship between external feedback and internal feedback. “Are you making music for yourself?” This is the one thing I ask people in this mindset. Sometimes people are so lost in music-making that they forget the initial root of their relationship with music, which was often simply to have fun. If you’re not having fun making music, do you think other people will have fun listening to it? This is why I find it’s important to celebrate music we love in order to understand what we love and why we love it.

“I need to get to the next level of quality in my production skills.”

Very often, people will feel they’ve learned a lot with production – enough to make music – but that something is still lacking. This usually comes after some years of music-making; sometimes when you’ve had a few releases and you perhaps start repeating yourself multiple times in the genre of music you’re making.

Solution: Try to achieve specific goals for yourself. If you’re not reaching the level you’re aiming for, perhaps you’re not pulling your information from sources that actually solve your problems. But there could be nothing wrong with where you are at the moment. I have moments where I’m making music and notice that I’m repeating myself, feeling limited in what I do, but that’s just where I happen to be at that moment; I just continue doing it with what I have. Feeling like you’re stuck on a plateau in your musical or production development is not a problem, but making a big deal about it is, because it stops you from actually working.

I hope this was helpful!

SEE ALSO : Self-Sabotaging Your Music Career

Social Media for Musicians

I’d like to reiterate what many have been saying lately: social media for musicians can be a curse. Most people are aware that platforms like Facebook have become more controversial than ever before; Attack Magazine, for example, has written about how difficult it has been lately. I’ve been asked to comment on social media use for artists since many readers felt that I have been using these platforms “properly” (glad you think so by the way!), so let me share with you some of my views and observations on this topic.

For those of you who complain that it’s been difficult to build a following or audience on social media, it’s true that you’re up against a large number of other people who are trying to do the same thing. You’re basically fighting the whole wide world to be seen and heard. On top of that, people’s attention spans are limited, and being in the right place at the right time is challenging. Nils Frahm recently announced that he was deleting his artist page on Facebook and his online presence as well to be more present in the “real” world. It’s great that bigger artists can do this, but what about smaller artists? Is that doable?

I’ve been careful in coming up with my own theories, recipes, and routines that could make a difference with regards to how to approach social media. Things change quickly; what worked for years may at any time, fail. There are no consistent guarantees of anything.

This reminds me of an an old debate in the electronic music scene in which one side is represented by artists that want to play the “mysterious artist” card, and on the other, by artists who want to be visible everywhere. There are a number of people who’ve succeeded using both approaches and end up becoming an inspiration or norm for everyone trying to create a similar response. Is one approach better than the other? I honestly have no idea, but if you embrace either side, do it 100%.

What you want to do first as an artist is to figure out your initial “marketing” intentions: will you be low key, or accessible? The position you take has to be one that feels natural, and a good match with your personality and values. I’ve seen very social and outgoing people wanting to be mysterious, but then struggle in not being able to connect with people who want to get in touch. Honestly, with the way Facebook is running its algorithms, we’re all back to square one anyways and have fallen – without our consent – into the position of becoming more low key than ever. Just before writing this post, I spent a good hour on Facebook to see if any news from artists I follow would pop in my feed; no artists or labels I follow showed up. I needed to make a change in my following options to “put first” on music pages in order to get any news at all. So in a way, what’s the point?

The only platforms where I was actually fed some news from artists I follow automatically were Soundcloud, Spotify and Instagram.

Following an artist’s personal page on Facebook is a bit more useful; I see information as it’s posted. I’m just confused sometimes as to why people post a constant flux of self-promotional content – this is exactly why I will unfollow them. When someone is complaining that his or her online presence isn’t generating any traction, I often have the impression that there might be some online etiquette that hasn’t been respected and the person’s online behaviour might be characterized as annoying by other people.

Before social media, promoting your music was more confusing, but there were things you could still do. That said, it wasn’t easier than today (trust me), and the idea of reaching out the world was very daunting. Even still, there were ethics regarding promotion even back then; these rules seems still seem applicable to social media today. Here are a few pieces of advice about promoting yourself based on some of those rules:

Start small and go where it resonates. I frequently see people asking friends to listen to their music and then feel resentment because there’s no interest. The question is, why would friends bother? I know this sounds harsh but it’s true. It’s not because you make music that you’re entitled to attention. Making music is easier than ever, and many people are also DJing now. Even though this is good and can help artists meet many other producers, it still doesn’t make an artist special. Is that depressing to you? If yes, you’re in for a lot of frustration. Starting small is the best thing you can do. Back in the 90s, making a tape as a demo was a big deal and I’d make copies for friends who’d ask; no more. The great thing about tapes was that people would play them in their homes and cars. Other people would hear the tape and ask how they could get a copy for themselves. Things would flow organically to the right ears, and the people who would come to you would be the people you’d want to invest in; the same thing still applies today. Social media is an illusion that you can grow fast and with random people, but in reality the percentage of people that will really engage with you is still extremely small; your organic reach. Once in a while you’ll see someone do something brilliant and it will go viral, but this is usually the result of being in the right place at the right time. “Going viral” is similar to writing a hit song, as I explained in a past post. You can’t really control or predict hits, but if you focus on immediate, interested people, they might relay it to others, increasing your chances of success.

Social media is a distraction. If you spend a lot of time on social media to try to make an impact on your career, I’d encourage you to spend more time on Youtube instead, learning music production techniques. “Yeah, but that’s not going to get me bookings”, I hear you say. Of course it won’t, but maybe you need to focus on your craft first, and once it’s easy to sell, the bookings might be automatic. I’ve been working in one-on-one coaching with people, and we’ve been focusing and really nailing down all the important things one person needs to have top performances and solid productions. Afterwards, I often hear people say “I feel embarrassed I spent so much time wanting attention when I wasn’t ready for it at all.”

Forget people who are close with you as being reliable sources of support and understanding. This one was hard for me, but once I understood it, I felt way more at peace with my life. What this means to me is that I don’t ask people for anything. I don’t force-feed anyone about what I do, and I’m never pushy either. I tell people what I do, and if I have a gig, I’ll mention it. One thing I’ve learned over time is that most of the people who say they’ll come to see me play rarely do, and that the ones who show up are usually random people I don’t expect. Same goes for feedback about music I make that I share with my loved ones. I honestly appreciate their feedback, but also take it with a grain of salt.

Over the years, I’ve realized that what really made sense for me was to build a small circle of 5 reliable people. Not just for feedback but also for action. There are other people who could help but they are slow to reply or just ghost on me. I have no time or energy for these folks unfortunately. I focus on people who focus on me, and we all grow and get results, together.

Is there reliable advice then regarding how an artist should use social media?

Yes and no. I would say that maintaining a social media presence is important, but without making it an obsession or attaching too much importance to the numbers behind it. Yes, labels and promoters look at social media numbers and interactions, which could make a difference. But most people are looking for content, integrity, and originality. This is why I think Instagram and Soundcloud are important; they’re mostly to connect with others who share the same passion as opposed to trying to market to random people that you have some “unique talent”. Appreciation for your work will come from the music you put out, and if done right and with patience, your music will create its own results.

SEE ALSO : Choosing a genre for your music

Learning how to make melodies

One of most difficult things for a self-taught musician to get the hang of is writing melodies. Even for a trained musician I believe melody is still a challenge; using theoretical knowledge to come up with the right melodic vocabulary to really express what one wants to express can be difficult. When I started to make music more seriously, I was hanging out with a few friends like Mateo Murphy, Mitchel Akiyama, and Tim Hecker. At the time, Mitch taught music theory and piano. I once asked him if he could teach me as well, because I wasn’t feeling confident with melodies at that time. Learning more theory really felt it was the right thing to do; if I was going to write music, I thought more theory would be for sure be an essential part of improving.

Mitch loved my music and after thinking about it, said:

There’s nothing wrong with your melodies. I understand you might not like them, but learning more music theory doesn’t mean that you’ll like them more. I think [music] classes would pull you in the wrong direction and I’m more interested to hear what you’ll do on your own in the years to come.

This is one of the most surprising things I’ve probably been told, even in the time that’s passed since Mitch gave me this feedback. At first I was confused if Mitch’s answer meant that I already knew enough “naturally”, or that I had a “beginner’s mind” which was lucky or naively interesting to him. In art, having a naive approach can have certain charm but can also be awkwardly odd. I read a quote from Picasso during my studies in arts that has stayed with me (I did theater and stage comedy for years before making music). Picasso once said “it took me four years to paint like Raphael but a lifetime to paint like a child.”

Children create and express themselves in a very spontaneous way, and I believe that Picasso was referring to their state of mind. Tim Hecker had the same kind of vision, and if you listen to his music, you’ll hear a lot of letting go in how things happen, but his approach is still controlled. While he was doing a lot of granular synthesis in metal music, I was dealing with melodies coming from a sound source or sample.

The beauty of electronic music is how we sample music to reinterpret it into a different form. Some will use a sample as-is, others prefer changing it a bit, and then there are the people who change it completely. In all cases, working from a source gives an artist healthy limitations in working with other tones and notes that must all work together.

One thing you can do is use Ableton’s Sampler and slice out parts from a musical loop you like, then with the MIDI notes you can change the order around and you’ll automatically have something new. If you don’t like the sound (say a piano) but you like the notes, then you can bounce the new melody and use Ableton’s melody extractor to have new MIDI to send to a synth or sampler using a different sound.

Next comes the need to add extra notes, but what if they’re off? What if they’re completely messing everything up? Again, what seems to most people like the best answer to this problem lies in learning more music theory.

There are multiple ways in which knowing more theory would potentially help, but let’s first consider some facts.

First off, if you like electronic music or more low key music, I’m sure you all know some songs that have very little musical content. Some songs are made on 2-3 notes/chords and can still pull it off. So why not try to see how far you can go with whatever material you already have before making it more complex? You’d be surprised sometimes that less might actually be better. The clearer the message, the more powerful the bond you can create with the listener, and sometimes this implies to reducing melodies to essentials.

However, some people think that if you stick with only simple content, you’ll never really evolve as a musician. I don’t believe this. I could say the same thing about sound design, synth design, mixing, and mastering. You can’t expect to know everything so fast and that you’ll instantly be great at it. But the more you work with one thing, the more comfortable you become. Once you have a good base skill set, you start to take risks that intuitively lead you to the results you are looking for. Same thing goes for percussion design. People often think that using a sample is not being creative, but it actually makes you study the best sample for a particular percussive element, and when you find great ones, then you’ll want to know how they’re made. If you start by designing sounds before sampling, you are venturing into territory where your references might be poor. And again, this also goes for melodies and production.

In other words, it’s more important to practice and actually finish songs; keep it low key and constantly be on the lookout to find inspiring references or source material.

Again, some will say that music theory would do no harm in helping. Of course it won’t, and if you dig, you can find multiple music theory classes or tutorials online. There are also plugins like Scaler that can help you with propositions. But for me, I find myself agreeing with Mitch and encourage people to try to approach melodies more personally.

One of my current musician buddies is Bryan Highbloom who is a jazz musician who I’ve collaborated with. With his 40+ years of playing, he’s seen a lot of shows and explored many different approaches [to music], so I often like to ask him questions to hear his views. Yesterday I asked him about the importance of progressions, theory, and such.

The most exciting time of my life when I started to learn to play was when guys like Coltrane came up with something that was completely different from anyone else. He had his own vocabulary. At the time, people were really fed up of doing the same progression, scales, and routines. It felt like we were making music for others to get, not music the way we want to make it. Coltrane was fresh. He knew what he was doing, but it was also because he wanted to break rules and get out of the cage. I’m a free jazz guy. I like to try new things all the time. I feel like I see more that way and then it gives me ideas for the next jam based on what was inspiring me. But the thing is to be in the moment and to record yourself, all the time.

Though he didn’t mention it specifically, listening to past sessions we’ve recorded, he liked to have a melody frozen in time, something you don’t catch and have to let go. But with MIDI, we usually trim out the parts we like less and move them around. So in a way, to get interesting content you need to spend a lot of time in the arranger and move things around. Trust your ears – they should know when something is off. If you’re unsure, use Ableton’s Scales and you know you’ll be in tune.

From my circle of friends, Mateo was on the other side of the spectrum with his approach to melody. His view was that it was important to have structured melodies and that it would have to “work” harmonically speaking. His background and main interest at that time was DJ’ing, so melodic and harmonic structures were essential to help him achieve his sets. I like to have one person I talk to that has a different view, because it keeps me structured in my work and stops it from being too all over the place. Mateo’s and my common interest for DJ-oriented music has always been there, and having that always in the back of my head made me think about pushing my boundaries somewhere between Mitch’s vision and something more accessible.

This is why I learned about progression and theory only when I felt I needed to have one point clarified when I really needed it. But not to create an entire melody, all at once.

I once had a contract where I was asked to finish a melodic song. The first thing that I noticed was that the melody was out of tune and sounded very off. But the client loved it as it was. I showed him that just by adding scales, we could “remove” off keys so he sees the real tones of his phrase. But of course, this would change the vibe completely, which was not what he wanted. We both asked a few people to validate the track, and while everyone pointed out that there was a problem, the client wanted to keep it the way it was.

The moral of this story is, if you’re in doubt about a melody, ask around. If you’re tone deaf, it’s important to learn this about yourself sooner rather than later, and work to improve it. But then again, if you actually love dissonance that’s all well and good, but be ready to face a lot of frowns. Not being good at writing melodies doesn’t mean you can’t get anything done, maybe you have other strengths that you can focus on!

SEE ALSO : A Guide to Percussion

A Guide to Percussion

If you’re into energetic music production, you know that percussion is one of the most central parts of your work; having solid percussion will be what will makes or breaks your song. For a veteran producer, there are some very obvious things to avoid or to do when it comes to percussion, but while going through tracks submitted through my coaching group, I noticed some people needed some percussion advice.

One thing I often see in new producers is how there’s a lack of “planning” in handling percussion.

Also please note, you don’t need to do all of these. This is a compilation of everything I personally look into when I handle percussion and sometimes, it might be an overkill.

Accents

One of the reason a robot voice sounds inhuman is partly because there is no articulation or accents. Take any language – you’ll hear a certain musicality in words with multiple syllables. Sometimes the emphasis will be on the second part of a word and it might even involve a certain pitch variation. For example, take the word “tremolo.” When you pronounce it, there’s emphasis on the the treMOLo. There are plenty of other examples, but this is to show you that a robot voice would simple say the word without any different emphasis on any of the syllables.

In music, it’s pretty much the same. If your musical phase has no articulation or accents, it will sound dull to the ear and be difficult for the listener to really feel engaged.

In a phrase you can have have accents which are points in your phrase that are slightly louder or emphasized. A good example is in house music where there’s often an accent on the beat 2 and 4 of a 4 bar loop. On those beats, there’s often a snare, clap or other percussive element. The melody often will also respect that emphasis by following it, or sometimes responding to it.

Is it essential to have a clear accent? No, not at all but it does help having something that people will describe as “groovy.” In techno, this isn’t always emphasized, and sometimes there’s no accent which makes the music feel more linear (but that’s another approach). An accent can add a very interesting color. For instance, if your first kick is slightly louder it will give your loop a more “assertive” mood.

How do you plan out percussion accents? Try experimenting beforehand to decide where the accent for a percussive element will fall, and if the melody/bass has its own or similar accent(s); this will help you to decide on the groove.

Tip: Not sure where to start? I often just throw Soundtoys’ Tremolator over a loop and try different presets as a starting point and then tweak my groove in. This plugin is pure magic. You can also use a groove from Ableton’s groove pool, I don’t get as impressive results with it compared to with the Tremolator.

Tip 2: Apply the Tremolator to a loop of hi-hats and do a freeze/flatten in Ableton. You can drag the new clip to the groove pool and you’ll have your own groove for the future.

Call and Response

In percussion–just like in melodies–the call and response technique is very useful and helpful for the listener. Once you have your accent(s) figured out, see if you can have something “answering” the sound that is being accented. In this way, a snare can reply to a clap, which can then talk to a bongo, and so on. I’ve always felt that this concept works very well once you have your melody mostly finished. The percussion can also answer the melody’s call.

Planning out a call and response: I like to have a call and response that is transformative in the track. What do I mean by that? Start out with a strong emphasis on it and then perhaps save a surprise for later on.

Tip: Use colors on your clips to know which clip is talking to which

Timing

Often I hear percussion that’s all “on the grid“, which automatically gives the song a mechanical swing. I think that out of all rookie mistakes, this might be the one that makes me cringe the most. Although this is very common with people who use modular drum machines, it’s also very common that people do a fast pass by not adding a groove to their loop. If you think of live musicians, they never play the same sound at the very same timing – they don’t play “on the grid”. Little imperfections make a loop feel a little more human, unexpected, fun, alive.

How can you make your rhythms feel less robotic? When you program your MIDI notes, try shifting some notes a tiny bit before or after the actual grid indicator. I usually do this on claps or hats using a rule such as “let’s do a timing variation ever 5th hat.” Picking an odd number makes things feel a bit more human. When I do this in my MIDI programming, I’ll duplicate the loop on and on, adding slight variations, to the initial variation so it isn’t always the same.

Tip: Ableton’s groove pool also has a timing option and a randomize that can help with that. I’m never fully happy with what comes but it can be a quick fix to a dull idea. If you want something more intricate, try James Holden’s max patch here.

Variation/modulation

Another great tip to polish your loop(s) with is the addition of variations. Variations can be applied to different properties of a sound such as: pitch, tone, volume, and panning. Adding a little bit of change to one of these parameters throughout the track makes it feel more alive. You can easily do this by using an unsequenced LFO mapped to Live’s utility that give you access to volume, panning, Stereo/MS and even the mono option. Try automating them randomly to see how it feels!

How can you plan out variations and modulations? If you don’t like the idea of giving an LFO this responsibility, then you may draw automation on the elements to give them changes, and then duplicate the envelope until the end of the track.

Tip: Use muti-effect plugins and test a preset to find a starting idea and after adjusting it to your tastes, resample the result. As this is a “wet” version of your loop, you can blend it in and out with the original loop until the end of your track.

Repetition

If you make a one bar loop and copy it until the end of your song, you’re really missing out on the opportunity to give your song an edge. Repetition in time is common in electronic music, but how about adding a simple little variation at the end of every 4 bars? Or 8? Or maybe 4th and 6th? You get the point. You can add variations here and there as they really help focus the listener’s attention. In general, humans pick up on a percussive pattern and then once they can follow it, will move their attention to another sound. If you include slight variations, you mess up the listener’s expectations, in a good way. But if a sound or pattern changes too often, you might simply lose them. Repetition with balance can be extremely useful.

I’ve noticed that a 2-bar loop in percussion is very efficient in supporting a melody. I know this sounds formulaic, but a 2-bar loop for each piece of percussion gives you a lot of options. Once you set the foundation of the core of the percussion in 4-times-4 bars, you have a repeatable pattern that will not feel redundant.

How can you use repetition effectively? I find that every percussive sound can have 1 main bar and then another with a variation. That’s really the least you can do.

Tip: Beat Repeat is a fun, useful tool for repetition.

Blurring the lines

This is one of my obsessions. What I mean by “blurring the lines” is, there’s nothing that’s more of a turn-off for me then to listen to a track and to be able to clearly hear where the block/clips in Ableton have been placed, with no editing whatsoever. Is this technique wrong in itself? No, not at all. You can get away with it, but it just feels… novice. Enter the idea of blurring the lines; more precisely, those clips’ lines.

How can you blur the transition lines of these sections? With time and patience.

  • Start by cutting out blocks’ edges with Ableton’s fades.
  • Duplicate a channel and then move clips a tiny bit “off”.
  • Chop off the beginning/ending of a block.
  • If a block has been repeated multiple time, try muting one or adding a variation.
  • Try moving a block off-beat to see what happens.

Tuning

Every now and then I get asked if I tune my drums, specifically my kicks. I don’t, but I do rely on my ear to tell me if it works in a mix. I know artists like Prince would always tune everything and of course his music is legendary. Tuning won’t do any harm, but it’s not always what will turn a bad loop into a good one either. I find that if you do tune your percussion, I would say kick, claps and hats would make a big difference. There’s no good or bad way to pick your samples, but there are some advantages to picking some that will use the whole frequency spectrum of your song. I first pick the ones in the mids and then move up.

Non-harmonic percussive elements, such as some noise-based sounds, will always work no matter what. If there’s a tone/note in the sound, it’s important to consider how it interacts with the main idea. Is it melodic or not?

One thing that can be fun is to articulate the pitch to make your percussion sing. This can be done with a sampler or with a pitch shifter. Some really great tracks have simple percussion “singing” as the main idea and really pull it off.

Tip: Try using a tuner to see if your percussion has a root note and then you can tune it the root of your main melody.

Tip 2: Consider tuning your kick at the very, very end of your song production. I usually play with the pitch of the kick then, as all elements are in place and it’s really impressive to see how adjusting the pitch can dramatically change the mood of a song

Decay

How to handle the decay of your percussion is a bit of an art, but when you know beforehand how to use it, then some really good things can come out of it.

  1. I always pick/create sounds with a longer decay by default. To have longer sounds allows me to have different options when deciding on the length.
  2. Usually when I program my percussion, I will trim down the sound to a very short duration.
  3. As the percussion loop takes shape, I’ll play with the duration to find the sweet spot for each element.
  4. I like to have variation on the length of certain sounds as the song progresses. Extending the length of a sound in a break is a great way to create excitement and tension.

Tip: If you have a short sample you love and wish it were longer, throw a reverb on it and play with the decay to add a tail. That’s one of the main uses of reverb plugins!

Panning and space

Positioning in space seems to cause a lot of confusion for people. Let’s keep it short and simple:

  • You main percussion sound (ex. snare, clap playing the whole track) should have strong presence in the mono field, which is straight in front of you. Why? It will have a better impact.
  • Any decorative, supporting percussion sounds that are playing from times to times, can be positioned on the sides.
  • If you use auto panning, make sure it’s only on 1 or 2 sounds max to avoid phasing issues.

Now when it comes to position and depth, I’d suggest to make some sounds that are in front of you, some in the middle, and some in the back (back as in, if they were playing behind your monitors). This can be done by high passing your sounds and lowering the volume. Keep 3 or so in front and then position the rest around.

Sound levels/dynamics

Dynamics create realistic and interesting patterns. While I could write a whole blog post on this, I’ll keep it simple again:

  • Your main “in front” percussion sounds should be at 100% of their gain level.
  • All the secondary sounds should be about 50-75% of their original volume, which will give power to the louder ones.
  • All the minor elements should be a low volume. I like to have what they call “ghost hits”, which are percussion at very low volume to fill spaces.
  • Use LFOs to change the levels as the song evolves.

If you have questions, let me know, as always!

SEE ALSO : Making a hit

Making a hit

The title of this article might be misleading: if you came here in hopes of learning how to make a hit step-by-step, you’re going to be disappointed. The good news though is, I can shed some light on how – based my experience – a track becomes a hit.

I frequently hear people – including promoters, agents, DJs, and fans – talking about hits. What is a hit, anyway?

There are many ways a song becomes a hit, including:

  • Influential DJs playing the song in their set.
  • People having the song in their streaming playlists and listening to it frequently.
  • The song is featured in charts and becomes a top seller.

A song can have different levels of success, but in the industry many people think that if a song picks up traction and/or a reaction when played and this happens regularly, that this particular song is a song maybe worth trying to sell. DJs who catch on to early hits get popular, producers who make hits become more in demand, and everyone else around the song will ride its success…while it lasts.

“Why not just try to make hits then?”, someone once asked me.

Thinking this way implies that myself or other producers are only putting in a sort of half-effort into their work. Asking that question implies that a musician might go into the studio and say “today I’m going to make something just OK, and something that totally won’t sell!” A musician doesn’t decide if what they’re making is a hit or not. Hits are a lottery, and most of the time, they’re accidental.

If you analyze a song that was a big success, sometimes you’ll notice that the track itself is not something spectacular, but that the song’s success was really a matter of timing. It was made by the right person, the right way, at the right time. That person also probably had a good network with all the right elements in it to help make the song succeed.

You can take the biggest hit you can think of, give it a better feel and sound, and nothing would guarantee that it would work again. This is why you see so many mediocre copies of great songs; when people start to understand how a successful song was made, they try to replicate its success.

I’ve said this many times, but the illusion of control usually leads a musician to thinking they can make a hit. This is wishful thinking or day dreaming. Of course, we all think that “it would be great to find success with this song”, but this thought process is actually a distraction from making music.

That said, not all hopes one might have making a hit are bad. Let’s focus on one thing a musician actually can control, which is the quality of their music. There are some rules a musician can start using to make sure their music has originality and can reach a proper audience. Here are a few of them:

  1. Innovate. Stay away from gimmicks but spend time developing one technical skill to a very high level of quality. Try to see who else uses the same tools and see what you can bring to the table that could be new.
  2. Be the same but different. When picking references for a song, examine what characteristics they all have in common that you like, and see if you can bring a little touch of this common thread into your own work to make it similar sounding, but more refreshing. It’s common for many tracks to share some of the same sounds, timbres, notes, and effects, but for listeners interested in something fresh, they’ll look for novelty.
  3. Hook. A hook is what makes a song memorable, and a good one makes it popular and memorable. A hook can be just a few notes, usually something fun and easy to understand, and a hook is a good way to reach to larger audiences.
  4. Have an evolving song structure. Listen to your song and whenever you feel something could be changed because it feels too repetitive, consider adding a new element. Personally, I divide my songs into 3 sections and usually have 1-2 elements per section; this keeps the listener on the edge of their seat.
  5. Keep it simple. Focus on one idea with 2 supporting ideas. Focus on one emotion, one groove, one atmosphere (my music is the opposite of this, but that’s because I’m not interested in making hits).
  6. Keep it short. Hits are often, in the electronic dance scene, under 6 minutes.
  7. Include a surprise. An Easter egg in a song is a good way to make someone think “I want to hear it again just for that one part!” If someone says this, you know you’ve succeeded.

All this advice aside, I personally gave up on “making hits.” I tried many times with my label, my own music, and some of my artists to really push certain songs because I was sure they’d be a hit. I’d say that every single time, I failed. Always. I once invested 1,000 euros into the promo of a song and it was huge flop. For me, that experience was the hardest lesson I learned from trying to promote a hit. On the flip side, I had a few songs of my own that got some attention and with each of them, I never expected that they’d get much love in the first place.

Hits happen or they don’t. You can’t control them. Otherwise everyone would be constantly “making hits” and there would be a shit load of hits out there which wouldn’t make any sense. Hits do happen sometimes, but it’s always really hard to understand why a song became a hit and another similar song didn’t.

The most important thing you can do as a musician is make songs you love and finish them as soon as possible, then move on. The fate of a song becoming a hit is not in your hands, and the process of letting that go is a huge challenge.

SEE ALSO : Balancing a Mix

Self-Sabotaging Your Music Career

I was working on a track and it was going so well; people were leaving me a lot of great comments. I continued working on it for a while but started hating it. I deleted it and blew myself up…I often do.

In many past posts I’ve mentioned that many people work so much on a piece of music that they start to hate it. This was one of the reasons why I previously suggested using the non-linear production technique to prevent song fatigue, and to make sure you don’t destroy your best ideas via self-sabotaging.

So, what is a self-sabotage? Is it the same thing as getting sick of your own work?

When you start hating your music, it’s a sign that you’ve been ignoring your personal limits regarding what you can handle in terms of creative energy. Self-sabotage is similar; it’s doing things that are destructive instead of productive. In self-sabotage, you’re not really conscious of the fact that you’re disrupting your efforts to achieve long-term goals.

Here are a few examples of self-sabotage I’ve seen among clients, peers, and friends:

vinyl records, store, shopping

Goal 1: An artist wants to get signed to a label.

Case 1. An artist sends music to a label or contact too soon. This is something that happens way too often. Someone has a good starting point for a song and thinks its a great idea to upload the loop online, then send it as a demo. OK, so in the event that the label might bite, it replies with enthusiasm but says “hey, the track isn’t done yet.” All of a sudden, pressure comes in. Working on the track becomes a chore and it’s not fun anymore. Once sent again after finishing the track under pressure, the label probably won’t like it anymore. This can even result in burning bridges with the contact.

Case 2. An artist sends music to a label he/she loved years ago without knowing what the label is doing now. “I’m sure they’ll love it as they used to release music like this”, he/she might think, but they might be completely wrong. Do your homework, listen to the latest releases and perhaps get in touch with them if your music feels like a good fit.

So, how should an artist go about getting signed?

If an artist’s goal is to be signed by a specific label, the number one thing they should know beforehand is that most labels nowadays will only sign people they know. I’m don’t really mean artists with followings, but people they’ve been in contact with before. Rushing a demo is by far the best way to make a bad first impression. The most beneficial thing an artist can do is either get to know other artists who are a part of the label or meet the label person face-to-face (I’m serious). It may seem difficult, but it’s by far the most down-to-earth way to become a part of a network and community.

Goal 2: An artist wants more people to listen to his/her music and to build traction and recognition.

Case 1. The artist takes self-promotion seriously but does it by flooding social media with pictures and constant “hear my new track!” status updates, alongside images of artwork related to his/her music. This behavior has the exact opposite effect as intended; nothing is special anymore and people get to a point of simply ignoring the posts and music, even if it’s good, because it feels like spam.

Case 2. The artist sends out private streaming links or Ableton projects and asks people on Soundcloud to leave feedback. This behaviour also has the opposite effect as intended. How can people who are receiving the music know anything about it or care about it if the artist doesn’t talk about it and they have no connection to the artist? I find that sending your music to anyone without connecting with them first is a huge no-no.

So how can an artist get more people listening to his/her work?

When I started diving into the music world and meeting other musicians at events, we would talk about music of course, but there were also some unwritten conversational rules that I thought really paid off. Firstly, avoid orienting all discussion towards music, especially anything related to your own success (eg. releases, gigs, tours), nowadays I might already know about them via social media, and in the end, what does this really give back to other people? Secondly, with non-musicians, talk about your music only if the person/fan asks about it. And finally, the Bill Murray rule as I call it (in relation to the amazing documentary on Netflix). Make sure that you “give” something to your contact by talking with them; it can be a tip, a good laugh, a hug, a confidence…something that will make the talk memorable for both of you. Humans love connection and if you want traction and people to pay attention to you, make sure you pay attention to them first.

Goal 3: An artist wants to tour and play more live shows.

Case 1. Say the artist has a really live great set or DJ skills, practices a lot and when he/she DJs, things go well. So why aren’t the bookings coming? What’s with the lack of returns from other promoters? Well, in many cases, people being really great at what they do is not enough. Artists need a network, and these networks need to be “fed”. This is the part of being an artist that many people dread, and sometimes will sabotage their career via social procrastination. Another thing I see a lot is artists directing all their energy towards a specific person, promoter, scene, or club, snubbing others. This lack of social openness can sabotage an artist when their network gets tired of them, because then the artist won’t have a plan B.

Case 2. Some artists have really great sets but put themselves into a difficult situation by always trying to play a different set, or by doing the exact opposite and only playing the same set repeatedly. In the first case, if an artist always starts a fresh set, he/she will never know how to perfect their live work or how to unleash the real power of their music in a live setting. Conversely, if an artist always plays the same thing, people will get bored.

So how can an artist get more gigs?

The name of the game is networking, and he/she will succeed if they have something of high quality to share. There’s nothing more disappointing than connecting with another artist but not connecting to his or her music, as this will create a very uncomfortable situation. Similarly, if an artist’s work is amazing but they aren’t fun to be around, why would people book them? Artists can avoid this type of sabotage by building networks around people they’re comfortable with and remaining open to anything.

Goal 4: An artist who wants a pro studio to become a professional in the music industry/audio field.

Case 1. The classic case of someone pursuing this goal is the person who notes all the gear his/her favorite artists uses and goes out and buys it all. “If I have it all, I should succeed” is a very common thought process I see people following, and sadly many people end up selling all the gear they bought later on because their skills never develop enough to use their tools effectively.

Case 2. Emulating a favorite artist’s career step-by-step should work, no? I have bad news for you, it doesn’t work this way. A huge part of success and becoming a professional is partly through luck and opportunities. Everyone’s quite different, so one artist’s path to success might not work for another artist.

Then how can an artist become an industry professional?

The advice I would give to an artist who wishes to become an industry professional is: understand what you love to do versus what you do best. Start by understanding your natural talent; invest everything to get those skills to a very solid level and learn to love them, then develop your skills even further. The problem with doing what you love instead of doing what you do best is–though this may sound harsh–you might not be good at what you love. If you have a skill for something and you do it well, that skill set could provide you with the opportunity to grow professionally.

starting a label

Goal 5: An artist wants to finish an EP or album.

Case 1. The artist works too much on the tracks. This will lead the artist to disliking their own work and disrupting the creative flow of music-making. It makes the creative process feel like Photoshopping a model to perfection.

Case 2. The artist rushes the project using shortcuts.

Case 3. The artist starts new songs over and over, scrapping existing material.

How can an artist get things done to finish a body of work?

An artist can get things done by:

  • setting a deadline. This always helps!
  • selecting a few tracks and only working on those, allowing themselves to use material from the other unused songs.
  • taking many breaks. Imposed periods of rest helps productivity!
  • using a reference track.
  • asking for help with mixing! (shameless self promotion 😉 )

SEE ALSO : Social Media for Musicians

More tips about working with samples in Ableton

Recently I was doing some mixing and I came across multiple projects in a row that had some major issues with regards to working with samples in Ableton. One of them is a personal issue: taking a loop from a sample bank and using it as is, but there’s no real rule about doing this; if you bought the samples you are entitled to use them in any way you want.

While I do use samples in my work sometimes, I do it with the perspective that they are a starting point, or to be able to quickly pinpoint the mood of the track that I’m aiming for. There’s nothing more vibe-killing than starting to work on a new song but losing 30 minutes trying to find a fitting sound, like hi-hats for instance. One of my personal rules is to spend less than 30 minutes tweaking my first round of song production. This means that the initial phase is really about focusing in on the main idea of the song. The rest is accessory and could be anything. If you mute any parts except the main idea(s), the song will still be what it is.

So why is it important to shape the samples?

Well basically, the real answer is about tying it all together to give personality to the project you’re working on. You want it to work as a whole, which means you might want to start by tuning the sample to the idea.

Before I go on, let me give you a couple of suggestions regarding how to edit the samples in ways to make them unique.

I always find that pitch and length are the quickest ways to alter something and easily trick the brain into thinking the sounds are completely new. Even pitching down by 1 or 2 steps or shortening a sample to half its original size will already give you something different. Another trick is to change where the sample starts. For instance, with kicks, I sometimes like to start playing the sample later in the sound to have access to a different attack or custom make my own using the sampler.

TIP: I love to have the sounds change length as the song progresses, either by using an LFO or by manually tweaking the sounds. ex. Snares that gets longer create tensions in a breakdown.

In a past post, I covered the use of samples more in-depth, and I thought I could provide a bit more in detail about how you can spice things up with samples, but this time, using effects or Ableton’s internal tools.

Reverb: Reverb is a classic, where simply dropping it on a sound will alter it, but the down side is that it muffles the transients which can make things muddy. Solution: Use a Send/AUX channel where you’ll use a transient designer to (drastically) remove the attack of the incoming signal and then add a reverb. In doing this, you’ll be only adding reverb to the decay of the sound while the transient stays untouched.

Freeze-verb: One option you’ll find in the reverb from Ableton is the freeze function. Passing a sound through it and freezing it is like having a snapshot of the sound that is on hold. Resample that. I like to pitch it up or down and layering it with the original sound which allows you to add richness and harmonics to the original.

Gate: So few people use Ableton’s Gate! It’s one of my favorite. The best way to use it is by side-chaining it with a signal. Think of this as the opposite of a compressor in side-chaining; the gate will let the gated sound play only when the other is also playing, and you also have an envelope on it that lets you shape the sound. This is practical for many uses such as layering percussive loops, where the one that is side-chained will play only when it detects sound, which makes a mix way clearer. In sound design, this is pretty fun for creating multiple layers to a dull sound, by using various different incoming signals.

Granular Synthesis: This is by far my favorite tool to rearrange and morph sounds. It will stretch sounds, which gives them this grainy texture and something slightly scattered sounding too. Melda Production has a great granular synth that is multi-band, which provides lots of room to treat the layers of a sound in many ways. If you find it fun, Melda also has two other plugins that are great for messing up sound with mTransformer and mMorph.

Grain Delay, looped: A classic and sometimes overused effect, this one is great as you can automate pitch over delay. But it is still a great tool to use along with the Looper. They do really nice things when combined. I like to make really shorts loops of sounds going through the Grain Delay. This is also fun if you take the sound and double its length, as it will be stretched up, granular style, creating interesting texture along the way.

Resampling: This is the base of all sound design in Ableton, but to resample yourself tweaking a sound is by far the most organic way to treat sound. If you have PUSH, it’s even more fun as you can create a macro, assign certain parameters to the knobs and then record yourself just playing with the knobs. You can then chop the session to the parts you prefer.

I hope this was useful!

SEE ALSO : Learning how to make melodies

Creating organic sounding music with mixing

I’m always a bit reluctant to discuss mixing on this blog. The biggest mistake people make in mixing is to apply all the advice they can find online to their own work. This approach might not work, mostly because there are so many factors that can change how you approach your mix that it can be counter-productive. The best way to write about mixing would be to explain something and then include the many cascades of “but if…”, with regards to how you’d like to sound. So, to wrap things properly, I’ll cover one topic I love in music, which is how to get a very organic sounding music.

There are many ways to approach electronic music. There’s the very mechanical way of layering loops, which is popular in techno or using modular synths/eurorack. These styles, like many others, have a couple main things in mind: making people dance or showcasing craftsmanship in presenting sounds. One of the first things you want to do before you start mixing is to know exactly what style you want to create before you start.

Wherever you’re at and whatever the genre you’re working in, you can always infuse your mix with a more organic feel. Everyone has their own way, but sometimes it’s about finding your style.

In my case, I’ve always been interested in two things, which are reasons why people work with me for mixing:

  1. While I use electronic sounds, I want to keep them feeling as if they’re as organic and real as possible. You’ll have the impression of being immersed in a space of living unreal things and the clash between the synthetic and the real, which is for me, one of the most interesting things to listen to.
  2. I like to design spaces that could exist. The idea of putting sounds in place brings the listener into a bubble-like experience, which is the exact opposite of commercial music where a wall of sound is the desired aesthetic.

There’s nothing wrong with commercial music, it just has a different goal than I do in mixing.

What are some descriptions we can apply to an organic, warm, rounded sound?

  • A “real” sounding feel.
  • Distance between sounds to create the impression of space.
  • Clear low end, very rounded.
  • Controlled transients that aren’t aggressive.
  • Resonances that aren’t piercing.
  • Wideness without losing your center.
  • Usually a “darker” mix with some presence of air in the highs.
  • Keeping a more flat tone but with thick mids.

Now with this list in mind, there are approaches of how to deal with your mix and production.

Select quality samples to start with. It’s very common for me to come back to a client and say “I have to change your kick, clap and snare”, mostly because the source material has issues. Thi is because many people download crap sounds via torrents or free sites which usually haven’t been handled properly. See sounds and samples as the ingredients you cook food with: you want to compose with the best sounding material. I’m not a fan of mastered samples, as I noticed they sometimes distort if we compress them so I usually want something with a headroom. TIP: Get sounds at 24b minimum, invest some bucks to get something that is thick and clear sounding.

Remove resonances as you go. Don’t wait for a mixdown to fix everything. I usually make my loops and will correct a resonance right away if I hear one. I’ll freeze and flatten right away, sometimes even save the sample for future use. To fix a resonance, use a high quality EQ with a Q of about 5 maximum and then set your EQ to hear what you are cutting. Then you lower down of about 4-5db to start with. TIP: Use Fabfilter Pro-Q3, buy it here.

Control transients with a transient designer instead of an EQ. I find that many people aren’t sensitive of how annoying in a mix percussion can be if the transients are too aggressive. That can sometimes be only noticed once you compress. I like to use a Transient designer to lower the impact; just a little on the ones that are annoying. TIP: Try the TS-1 Transient Shaper, buy it here.

Remove all frequencies under the fundamental of the bass. This means removing the rogue resonances and to monitor what you’re cutting. If your bass or kick hits at 31hz, then remove anything under that frequency. EQ the kick and all other low end sound independently.

Support the low end with a sub since to add roundness. Anemic or confused low end can be swapped or supported by a sine wav synth that can be there to enhance the fundamental frequency and make it rounder. It make a big difference affecting the warmth of the sound. Ableton’s Operator will do, or basically any synth with oscillators you can design.

High-pass your busses with a filter at 12db/octave. Make sure you use a good EQ that lets you pick the slope and high-pass not so aggressively to have a more analog feel to your mix.

Thicken the mids with a multiband compressor. I like to compress the mids between 200 and 800. Often clients get it wrong around there and this range is where the real body of your song lies. The presence it provides on a sound system is dramatic if you control it properly.

Use clear reverb with short decay. Quality reverbs are always a game changer. I like to use different busses at 10% wet and with a very fast decay. Can’t hear it? You’re doing it right. TIP: Use TSAR-1 reverb for the win.

Add air with a high quality EQ. Please note this is a difficult thing to do properly and can be achieved with high-end EQ for better results. Just notch up your melodic buss with a notch up around 15khz. It add very subtle mix and is ear pleasing in little quantity. TIP: Turbo EQ by Melda is a hot air balloon.

Double Compress all your melodic sounds. This can be done with 2 compressors in parallel. The first one will be set to 50% wet and the second at 75%. The settings have to be played with but this will thicken and warm up everything.

Now for space, I make 3 groups: sounds that are subtle (background), sounds that are in the middle part of the space, and space that are upfront. A mistake many people make is to have too many sounds upfront and no subtle background sounds. A good guideline is 20% upfront as the stars of your song, then 65% are in the middle, and the remaining 15% are the subtle background details. If your balance is right, your song will automatically breathe and feel right.

All the upfront sounds are the ones where the volume is at 100% (not at 0db!), the ones in the middle are generally at 75%, and the others are varied between 50% to 30% volume. When you mix, always play with the volume of your sound to see where it sits best in the mix. Bring it too low, too loud, in the middle. You’ll find a spot where it feels like it is alive.

Lastly, one important thing is to understand that sounds have relationships to one another. This is sometimes “call and response”, or some are cousins… they are interacting and talking to each other. The more you support a dialog between your sounds, the more fun it is to listen to. Plus it makes things feel more organic!

SEE ALSO : More tips about working with samples in Ableton

Becoming a professional musician

Back in 2002, I received a government grant for a European tour. For me, this was the beginning of the process of becoming a professional musician. A lot of Canadian arts and music are funded by the government; if you’re organized and a resourceful, you can get funding. I was lucky enough to be one of those people. Every country has their own grant programs and some are better than others, but I know there are many other places in the world where governments offer this type of financial support; it’s simply a matter of knowing where to search.

That said, this opportunity was served to me on a silver platter, and without it I’m not sure I would have ever been keen enough to make the jump from semi-pro to full-time musician. Many people ask me how I did it, and while I don’t really like to tell the story or explain to people how they themselves can do it, I thought I’d discuss it in a blog post.

The main reason why I’m cautious to talk about this topic is because the music business world is extremely spontaneous and unpredictable; I could tell you step-by-step how I think you can “make it” but it still might not happen. Same goes for how to get signed to a label or how to write a “hit”. There are steps you can follow, but luck is usually the deciding factor.

However, networking quite heavily might influence your chances by creating more opportunities for luck.

A student I was mentoring for a few months once said to me “I work about 5 hours a day on music and I still don’t get noticed or get signed…” My response was that the harsh reality is that the world doesn’t care what you do, how you do it, or why you do it. Things happen or they don’t, and you have very little control over that. Unfortunately this response sort of ended our working together; I had broken his hopes.

I’m not trying to be pessimistic but I really try to invite people to be as realistic as possible about music to remain mentally sane, and not burn out like I did in 2007. Working in the domain of “The Arts” demands a lot of resilience and it’s always an intense roller coaster ride.

I know I might sound grumpy or negative, but I also have some good news: I’ve seen many people succeed and many fail, and I have noticed recurring characteristics that can make a person succeed or fail. In an effort to share with you the most helpful points, I’ve summarized these characteristics below.

With regards to who I’ve seen succeed directly, I hate to name drop, but I can tell you I’ve seen artists like Maayan Nidam, Ion Ludwig, Seth Troxler, Sean Reaves, Deadbeat, Akufen, Guillaume and The Coutu-Dumont, Mike Shannon, Lee Curtiss, Ryan Crosson, and even Luciano, who I first saw in Barcelona while he was still relatively unknown and have followed him since, grow exponentially.

So, what do some of these people who have succeeded have in common?

  •  They had a financial back-up plan. Some people don’t have a financial plan and in that case, they are totally okay with living poorly to be able to do what they love. I’ve been there. However, I was fortunate to have two back-up plans for money: a strong professional background with a university degree in the social sciences and teaching. In times where I wouldn’t tour, I would teach part-time in schools or in private. Plus my parents were totally okay with helping me with some investment for my studio. But at first, I hated the struggle. If you want to become a professional musician, know that they first years are really, really rough, financially speaking. You’ll need to be working part-time at something you know you can do for money. Many DJs/producers I know work at restaurants, and honestly not making music all the time is actually a very good thing.
  • They were ready to move to get closer to opportunity. I’d say that pretty much all artists I know who went big moved to where they needed to be. In the early 2000s, we saw a huge exodus of producers worldwide to Berlin because it was cheap but also a huge hub for opportunity. Everyone was there. When Richie Hawtin moved there around that time, it was clear that it was the thing to do. Honestly, if you’re physically far from opportunities, you’re making it harder on yourself. The chances of becoming a “Soundcloud rapper” are probably less than one in a million.
  • They built a solid portfolio of work. If you’re a DJ, your goal is probably to get the most prestigious gigs in the scene you’re in. Find your niche, see who are at the top and where they play, then use that as your model. If you’re a producer, find people who could be similar, then see who they work with, what they use and try to see if you can emulate. It’s not very original and it might not work but you’ll learn in the process and understand what you should do going forward.
  • They understood they couldn’t do it alone. Again, if you can be physically close to all your influences and scene, it can be a very strong move. For instance, in Montreal for a while a lot of producers were hanging out a local bar called Laika; going there once a week was important to hang out, connect, share questions, hear people’s point of view, all things that changed my life personally. Now I get the same thing with MUTEK; producers from all over the world attend. With a bit of luck, I cross people’s paths and connect with them. It’s also important to be in these types of places to be available to people who want to reach out to you. Even if it doesn’t lead to anything, it can sometimes bring you opportunities you didn’t expect.
  • They understood what they did best and used that skill as leverage. Whatever you want to do in the world of arts, it’s essential to understand that it’s not because you’re passionate about something that it means you have a talent for it. Same goes for if your friends say you’re good at it. Professional validation is fundamentally important. You might have a special talent that many other people can benefit from. Maybe you’re amazing with visuals or sound design. Perhaps you’re strong in understanding how to patch cables and you can make modular synths work amazingly. In reference to my previous point, find what you do best and connect with people who recognize, appreciate, and need your skill.
  • They were/are outgoing. I’ve never seen someone that is not outgoing succeed. For instance, I first met Seth in 2006 in Detroit. After spending a few minutes with him, it was clear that this guy was someone everyone would love. Natural charisma, funny, super friendly and also, talented. But what if you’re not outgoing or remain unknown, like Burial? Yeah… right. Burial had to connect with someone to get signed. It didn’t just happen magically. Connecting is important and essential. You create more opportunities for things to happen.
  • They never stopped looking for opportunities and said yes as much as possible. Follow your model. Be in the places that person might go to, and connect with people there. Being a social butterfly can bring you into contact with people who share the same dreams. The number one myth people think about with regards to music is “competition”, and they may become selfishly competitive themselves. If you understand that competition is just an illusion, you’ll want your peers to succeed too because if they do, everyone wins. Trust me on that one.
  • They were reactive and responsive. When you work with people, don’t stall on communication and action. Act quick, almost impulsively. Make things happen. Work on tons of projects, collaborate, and never think of the outcome as in a success or failure. Make sure you don’t go broke in the process, but focus on making quality projects. If you become prolific in creating amazing things and make them for a while, it is almost impossible that no one will hear about one of them. But this takes time and resilience.
  • At times they compromised, but kept their integrity. This means, yes, you have to do some things you don’t want to do.

So how did I, Pheek, do it?

  1. I took on a few model artists and labels as my mentors.
  2. I connected with many of them at MUTEK. I was never pushy. I was more interested in having them know who I was and what I did. No one likes opportunists or pushy behaviour. You want to befriend your mentors with no expectations.
  3. Eventually I became known for the music I was doing and started to be in demand because I was releasing music people liked.
  4. I was saying yes to almost everything that made sense for me.
  5. I understood that downtime or lack of interest in my work didn’t mean I wasn’t in demand, but that I needed to go back to the studio and work harder.

Nowadays, I know that my personal leverage is in audio engineering, understanding people’s ideas, and helping their music make more sense. This now also my backup plan. I would say that I work on my own music about 10-20% of my time and I prefer it this way, because when I do it, I don’t need to make it in order to have it sell. I’m done trying to convince people to book me or sign me. I make music with the pure intention of making something I love and there are no compromises.

This is sort of what I recommend to everyone. Never lose your voice, no matter what happens. I’ve seen artists crash after a while and it was always because they lost themselves at one point. That is the only thing all people who fail have in common, is that their initial intention was succeed with no plan and they jumped on a trendy bandwagon. There’s a price to being ephemeral.

Music experiments: creating your own inspiration

In this post, I discuss using music experiments in your workflow and inspiration in general. I don’t know if it’s just me, but lately I’ve noticed how software companies have been using “inspiration” as the key work to sell anything and everything. I’m seeing this in other fields too, not just music production.

Limitless inspiration with this tool!

Never miss inspiration ever again when you use (this thing)!

Inspiration is not needed to make music. If you wait until you feel inspired to make something, you might wait a long while before you do anything at all. We often wait for the perfect conditions to make music, but these conditions rarely present themselves on their own. I’ve been asked a few times to share details about how I make music: where does it start? What do you do to be productive?

Here are my little secrets:

  1. Don’t wait for the perfect moment – Just do it. This is my main motto. I’ve been reading so often that great inventors or artists would set a time to work and would do so in that time. I find the idea of preparing the brain to be able to work will make things even better than doing something out of the blue (which is also nice but can be very tricky). For instance, I try to make music for myself at the end of the day and especially on Fridays. I find the importance reinstating music as a hobby for pure fun to be essential in my creative flow.
  2. Diminish your technical limitations. Preparation is the name of the game and this is why I’ve been explaining many times that using the technique of the Mothership as the most useful tool. This idea is that when making music, you don’t spend time debugging, troubleshooting and fixing issues. You want to make music. This involves preparing your session in advance; deciding which project you’ll work on and what direction you’ll take. It doesn’t mean you have to stick to the plan, but it means you have a backup plan if you feel like you’re not sure what to do. I also love to do multiple flash-sessions of 15-30 minutes each day on music, and then spend a good few hours on full-blown creating on Fridays.
  3. Be aware of distractions. Close Facebook, your smartphone, and make sure you won’t be interrupted. To reach your “state of flow”, you need to be focused.
  4. Listen to music before creating. For a long time, my favorite time to make music was in the morning. At other times, I would fail miserably, especially at night. Nowadays, I prefer to work at the end of my day, mostly because I work on everyone’s music during the day and my brain accumulates ideas. If you’re not working in the audio field, I would highly recommend that you find a moment where you can listen to a podcast before working on music.
  5. Make sure your primary human needs are fulfilled. This might sound funny for some, but make sure you’re in a moment where you won’t be sleepy, hungry or prepare snacks, drinks and whatever you need to not stop your session.
  6. Start small. If you’re not sure of anything but feel like making music (e.g. as I type this, I do feel like making music, but don’t have any plans in mind), start with a little experiment. I find the idea of starting with little experiments to be more effective than sitting trying to make an interesting melodies. Experiments allow you to discover how things are made. How? Start with a question such as “what would happen if I use an LFO on both feedback and decay of a delay?” All experiments start with a question you’re not sure about. A question will bring many more other questions and some answers, but many failures too. But all you need is a new sound or discovering something to give you wings to continue.
  7. Stop when it doesn’t feel right. I think I’ve mentioned this the most out of anything on this blog but I’ll say it again: if the song you’re working on feels like it’s demanding to work on, then something’s not right. Stop, take a pause or switch song. Distance will tell you what went wrong.
  8. Find a random tutorial to practice. This goes hand in hand with experimenting. There are many video producers out there and this one here is a good starter.
  9. Create chaos. Creating chaos is not new in music and it’s definitely needed. How does one create chaos? There are tons of ways, but for example, use LFOs on your static plugins, use randomizers as much as possible, and add more sounds than you need. Ask yourself if the chaos is too much, and if it’s yes, then you know you’re overboard and try to see what sticks out most, so that from that chaos, some ideas emerge.
  10. Harmonize chaos. Following a dose of chaos, it’s time to stick to your best ideas so that your song really has one main idea supported with two others. Any extra or old material that you feel is good can be moved into the next song you’re working on.
  11. De-clutter. One of the best way to de-clutter is to go through each sound, one by one, and see which relationship of “call and response” they have. For instance, a vocal could appear for a few seconds, and the “response” to that could be a few notes from a synth. A song can have a few responses such as in the main melodic part, the percussion and the bass. You can go very deep into this but don’t forget that the listener will usually only give you a limited amount of attention at a time and a lot of people dislike music that is too “loopy”.

Music experiments, I think are the most important thing I’ve mentioned here. I’d like to propose you a few starters that can be seeds for future sessions. To me, experiments are where 99% of my best sound design ideas came from. Below are some questions for you to explore. There are no right or wrong answers, and they can be revisited multiple times.

  1. What effect/plugin you use the least? Try creating a loop with multiple instances of it.
  2. What happens when you pass a very short sample into 5 different plugins?
  3. Create an effect progression that evolves over more than 1 minute.
  4. Double a sample on multiple channels and change the parameter of each sample (ex. pitch, lenght, gain, etc).
  5. What is a “bad practice” rule you believe in; can you can try to make it work?
  6. What happens to a sound when you take a plugin and automate every parameter?
  7. Use record to move parameters and have the automation be based on that. Do this on each parameters of that plugin.
  8. Make a song using a maximum of 3 sounds.
  9. Make a song using a maximum of 3 channels.
  10. Only use sounds recorded in your apartment for one song.

I’m sure you can come up with other experiment ideas and I’d love to read them!

SEE ALSO : Creating organic sounding music with mixing

Design Thinking for Music Production

If you work in a field concerned with visual design, you probably have been reading a lot about Design Thinking. In this post, I will describe how I use design thinking for music. If you haven’t heard about design thinking before, here’s a definition:

Design Thinking is a design methodology that provides a solution-based approach to solving problems.”

Design thinking for music is relatively simple and I’d like to show you how you can apply its concepts to music to get the same benefits as visual designers. This is complementary post relating to my previous post about the importance of having a mind oriented on building a system; they go hand-in-hand.

Empathy/Attention

I was have been working with a student in a private sound design class. When the student comes for multiple sessions, we get to a point where we do critical listening; this is probably the most difficult part of sound design. I don’t mean in terms of how-to, but more with regards to technically listening to music you love to break down the “magic” you love about it. If you know exactly how a piece of music is made, it’s sometimes difficult to appreciate it again. It’s the curse of knowing how things are made, such as movies, music, food, etc. It’s good if you want to know how to make it yourself, but it also can make you jaded.

Anyhow, to get back to my story, we were listening to some experimental music and I was asking these questions to my student:

Quickly focus on the overall view of the song and try to seize what is static vs what is not. What is grabbing your attention at first and why?

Focus on a sound that you like. What do you observe in its shape? Is the pitch changing? Is the length of sound changing? Are the frequencies being altered?

Basically, you need to empathize with the sound and examine how it behaves, and determine what makes it attractive to you. The more you connect to the sound and learn how it moves on these axes, then you’ll be able to create a concept to replicate it. I usually try to name the sound in my own terms and see if I can hear it in multiple other songs. For a long time, even now, I’d be very attracted to sounds that felt “wet”, watery and bubbly. It was difficult for me to give a technical term so I’d refer to them as bubbles. I love them for how they make a song alive.D

Define the sound

Being able to describe exactly what is going on is where a lot of people get stuck. The idea here is partly to understand the axes of the sound and which one are used, how. Those axes are:

Time: Is the sound short or long?

Pitch: Is the sound high pitched or low?

Frequency: Is the sound using certain frequencies in general?

Amplitude: Is the sound low or high volume?

Position Left/Right: Where is the sound in the space?

Position far, close: Is the sound right in front of me or far ahead?

Modulation: Is the sound changing on any of those axes over time?

It might be overwhelming, but analyzing sounds this way can really help create a concept, or an idealization.

Ideate and Prototype

At this point, your sound should be defined as best you can. We then take all of the axes of the sound, one-by-one, to see how certain effects can make a difference.

Time: Think envelope. When, for instance you’re using a synth, the envelope determines if the sound is short or long, depending how you set the Attack/Decay/Sustain/Release. If the sound constantly changes length, it means the envelope is being modulated.

Pitch: This one should be pretty straightforward, pitch is simply tonal frequency shifting. If your sound changes pitch quickly or slowly, it’s likely an LFO or an envelope altering the pitch.

Frequency: By overall frequency I mean more EQ or filter related, not pitch. If the sound is muffled, there might be a filter applied. If the sound feels rich, it could be a shelving EQ applied in the mids. Playing with an EQ can dramatically alter a sound in many ways. It’s important.

Amplitude: This is controlled with the utility, more specifically gain. You can change the amplitude this way. I would recommend that when you do sound design, that you use your DAW’s utility plugins to control gain. It becomes much easier to see and understand when you re-open a project.

Position – Left/Right: Again, using a utility plugin adjust the panning, left and right.

Position – Close or Front: This position is a bit more difficult to understand and achieve. Basically, this is EQ related, but also has to do with filters. By applying an high-pass filter to a sound, the more you filter out the low end, the more you’re pushing away the sound from you. You can also lower the gain to make things feel farther away, or use a reverb to add a bit of dimensional movement.

In this prototyping phase, I usually gather together the tools I need to make a sound, and will also gather the appropriate modulators (Envelope, LFO). This approach is very modular-oriented. People who own a modular synth often proceed this way. You think of the sound, what will alter it, and determine the sources of modulation.

In your prototype development, you’ll be creating a chain of effects as a macro in Ableton. Those effects will be modulating, changing, and altering the sounds that will pass through them. This takes time to nail down correctly, but the fun part is about passing a whole range of sounds through your macro, be it generic synth sounds, percussion, or random field recordings. You might discover that your original concept might be doing something completely different than what comes out in your prototype, but the end result might be even more interesting.

Stay open to the outcome of your sound even if it’s different than the original sound you were trying to imitate. Record everything. Save your macro and start using it in old unfinished songs to recycle some of your old work.

SEE ALSO : Music experiments: creating your own inspiration