Tag Archive for: workflow and organization

Music production techniques: Non-Linear Production

It’s been a while since I promised a post about one of a number of music production techniques I use: non linear music production. The very first album I did using this technique and really sticking to rules of it was Intra; and then I recently went deep in to produce multiple EPs in the same vein of non linear production, which were made between end of December 2017 until March 2018. While Intra was an album of 23 songs made over nine months, my last experiment produced 19 tracks over 3 months. I think I’m getting better at it, mostly because it’s becoming clearer in my mind.

Out of the 19 recent tracks, I kept 8 for this album – which you can hear above – I named Returning Home; a statement about home being a state of mind and not necessary a physical place. I’ve been making techno/dance music since 1998, and after diving into more electronic soundscapes, experiments, and ambient music, it just felt good to return to my roots. A funny thing also – I tried working with some other labels to find it a new spot as I wanted to keep my label Archipel for more down-tempo stuff, but I kept getting refusals or complicated compromises. I’m too stubborn to change things and since this album was made based on a very solid concept, I didn’t want to go back and change what felt good.

But back to the non linear production technique. I’ll cover how the process went, from the beginning of where I started from scratch until the end.

I know some people who are like, “but I don’t need a technique as I just do music.” Sure, that is not for you then. But this technique can bring benefit if you’re looking to expand your production. It surely contributed to make me more prolific through time.

Non-linear music production – A concept

This concept (which has been around for decades according to some research I did), encourages the producer to explore working on multiple songs at once, in a non-linear way.

This means that:

  1. You aren’t working on a song’s beginning first to bring it to its end, before starting a new one.
  2. Each track is approached individually for its needs but you also work globally. Keep in mind that what you did in the previous track should differ on the next.
  3. The technique is about repeating the same phases/rounds until you get a solid core. Then there’s the finalization to get ready for mixing.

It’s called “non-linear” because you constantly circle up in a series of rounds, on multiple tracks, all at once.

Note: A non-written rule also implies that working on a track should be done in short periods such as 20-30 min at a time on a song, then stop, save and move on. Why? Because it keeps you fresh.

For many people I explained this to at first, it felt unsettling and confusing. There’s some kind of embedded belief in people that when you go make music, you should find your idea, absolutely stick to it, and build it into a song; beginning at start and bringing it to an end. I usually see people’s projects having a few blocks right at the beginning of the track and then they get lost.

The number one thing I hear all the time: “I can make a great loop but don’t know what next.”

I’ve written a post in the past about this. However the non-linear technique is really aimed at making the loop issue something of the past, because it’s all about transforming small ideas into bigger concepts.

But where does it start? How do you begin?

Before diving into producing, let me explain the rounds of the non-linear music production technique, as this is what it’s all about:

  1. Content creation, generating ideas.
  2. Filtering ideas into a concept.
  3. Building a core loop.
  4. Template structure.
  5. Arrangements.

When you decide to create your project, the first thing you should do is decide on your project type. Is it an EP (3-4 songs) or LP (5-10 tracks)? Perhaps you just want to make a bunch of tracks; I personally believe that we should never make just one track at a time. If you have no precise project, invent one, such as “I’ll make 5 tracks for fun and want them to be mainly techno.” Once this has been decided, you’re ready for content creation. I usually spend a considerable amount of time in content creation and idea generation.

You can also start from unfinished tracks that you want to apply the idea to. The idea is to work on multiple projects in parallel. I usually it works best if you have at least five on the go, but there’s no limit of course. To newcomers, start small though to see if working this way works for you. The technique is about to bring your track from a simple idea to a finalized but unmixed, song. The mixing is not part of this. I find the mix down works better if you don’t do early, it but perhaps it can. Don’t hesitate to build a reference folder where you put songs that inspire you.

Content creation, generating ideas

From all the years of listening to music, running labels, doing mastering and DJing, I’ve come up with a theory: a solid song is – in general – a single, solid idea, supported with two others. The main idea can be a loop, a motif or even a sound. I remember Hans Zimmer describing a motif by saying it has to have an emotional impact on you, that it reappears in your mind later on. He was saying that the Batman motif he did was a simple two notes, but very powerful. You’ll play them and you’ll automatically think of Batman. The two other ideas are necessary because a song usually needs a development and a “surprise.” That said, in this production technique, you need to create fresh ideas. Lots of them.

I made a very long post about how to come up with new ideas but I’ll sum how I did mine:

  • Recycling older ideas: I have countless samples that I’ve used or never touched. I like to process them into new sounds.
  • Recording radio or other spaces with a microphone: When I’m in a creative mood, I’ll spend a lot of time recording sounds around me from that period of my life. I’ll leave the recorder somewhere for an hour to see what comes up.
  • Try demos: I love getting demos and try to see what I can come up with it by sampling them. Some have limited time or others are in days. It forces you to resample the hell out of the work and get something. Sometimes I end up buying it of course.
  • Pure sound design: Layering sounds from different takes is a great way to generate rich sounds. I do this a lot but its time consuming.
  • Jamming with the sounds: When I have plenty, I’ll generally put the sounds in a sampler and jam them with a midi controller or PUSH. I’ll record everything I do into a project.

A project that has many ideas will be recorded with the date of the day for the jam. It might turn out that I have a few hours of material which means there’s hypothetically 3-4 ideas in there.

The definition of done (DoD) of this phase is when you have a project with 3-4 ideas ready to go. I usually do one session per track needed for the project.

Filtering ideas into a concept

This phase is one that you need to do outside of jamming. Why? Because when you jam, you’re in your creative state (right brain) and have tons of ideas but your judgement is off. You can’t be a judge then. You need to feel free and explore without boundaries. This second phase is about going into a more analytical side where you will be curating your crop.

  1. Go through all recordings you’ve made and loop part of it. The question is, can you listen to a loop and feel inspired? If yes, you have something to hold on to.
  2. Use different size loops like 1, 2, 4 bars. Compile different ideas.
  3. Use the session view to make scenes of loops you like.
  4. Try to see if certain loops, once layered, make unexpected motifs.
  5. (optional) Add a kick & hihat to give you an idea of the groove and adjust the timing of the loop.

The definition of done (DoD) of this phase is when you have a few scenes in your session view that feel solid.

*Note that you may go back to create more ideas (Round 1) to complement what you have. You may also create a pool for all ideas of all sessions and then make ideas from that. No rules here, only possibilities.

Building a core loop

At this point, you should have X number of projects (based on your project definition you decided on at the beginning, i.e. EP, LP, whatever), each with material that has been organized into 2-3 ideas. Now comes the moment to put it all together.

The loop you’ll build here is the middle part of your song so it should have all the bells and whistles.

  1. Add a foundation. The fundamental part of your song is the low end and the bass. From the main idea, add a bass that either supports or responds to the idea. Adjust it so it’s in key.
  2. Add percussion. Complementary to the bass, you may add kick, percussion, or anything complementary of what will create the groove. I usually start right away to decide what groove template I’ll use on this core part.
  3. Add melodic touches if needed. Decide how long your melody will be and how it progresses (if it does).
  4. Create a background and space if desired. This is usually the reverb and textures. However, this can also come later on.

The definition of done (DoD) of this phase is that you have a main loop that you can place in the arrangement window, right in the heart of your song (which means you need to know roughly how long it has to be). A good loop is one that is centered around your motif where if you solo that part, it would be what someone would talk about to describe your song.

In the process of working through the core loop, you might need to go back to create more content or you may import some from other sessions.

Template structure

Now that you have the core part of the song, it’s easier to build out the remaining structure. In the arrangement view, create three sections: a beginning, middle and end. You will now lay out your structure to have an idea of what you can do with your core idea.

  1. Copy the elements from beginning to end  that will be present the whole time through the track.
  2. Work backwards by deconstructing the timeline of what comes in first and so, until you get to the middle part.
  3. Do the same process until the end. You may repeat some elements.

The definition of done (DoD) of this phase requires that you have a temporary structure from beginning to end. It might take you a while, I encourage you to do sprints of 30 minutes at a time. The problem with working too long on this phase is that you lose perspective regarding the strength of your song. I usually want some sort of structure to come out of this phase, but I may go back and forth with the other phases until I am happy with it.

Arrangements

This is the final phase. You might need to come back to it as everyone has different needs that will arise in this process. Arranging – in simple terms – is creating the story-line of your song, but also between songs for your project! How do your tracks relate to each other? I have songs that have brothers and sisters, while some are from a completely different family.

After working on the arrangement of song, the last thing I do is export what I’ve done so far. When I switch to another track, I import the last session in the arrangement to see what I did and compare. I adjust the arrangements so all my tracks don’t have the same structure; beginning, breaks, and punches. I adjust them so they can be fun for DJs to mix too.

Arranging is a massive topic that I will detail in a future post and is involved in most music production techniques – but this explanation is a full conceptualization of how I work. Hopefully it helps you somehow too!


SEE ALSO :   Non-Linear Music Production 

Playing Electronic Music Live – How to Prepare Your Live Set (Part 4)

Following up on the previous post in this series, I’ll outline some final tweaks and advanced clip settings for your live set. There’s a lot to cover here but I’ll try to condense it down to the essentials.

Final Tweaks

As your set is likely now taking form, you should have different songs organized into scenes. You can think of this as the minimum you will need to play live but if you want the best result, there are still things to tweak. Personally, when I listen to a live set, I really want it to feel live; the artist can interact with the energy of the room and build around it. You should avoid playing each scene one after the other, without surprises. Again, this is my opinion and you might think otherwise, but what I’d like to explain is how to add a bit of “live” life in the last tweaks to your set.

1st – Rehearse and record.

This is pretty much the ultimate test to see if your live-lab is working properly. You’ll need to rehearse, play with your session, move things around, and test, again and again.

Don’t ever fall back on the idea that what you have is ready for the big show without rehearsing, because trust me, you’ll learn the hard way that if wait until being in club to test your set, it will hurt. That said, hit the record button and then start playing the clips, try to take you time as well to create a proper intro, then see how it goes when you launch scenes, fade-in some sounds, and add effects. The most important part of rehearsing your set is recording what you do.

You can then listen to see what you recorded and if you like a part of a moment, you can then drag it back into your set.


Since you only have two hands but you want each of your clips to have a feeling of “live”, you can pre-record certain subtle details you want to be played while you tweak other knobs. You’re not totally playback everything as-is, you’re interacting with other played elements you recorded. This can be particularly useful for creating unique and complex moment or breathtaking breakdowns.

You can also use +J (ctrl+J on Windows) to consolidate moments you like.

2nd – Add variations.

In my sets, I rarely have one scene repeating without having variations of it. The variations can be used for many things, such as having a more energetic variation of the same scene, one that has a little pause, or space for inserting a fill. Here are a few quick tips you can use to make creating variations easier:

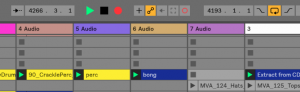
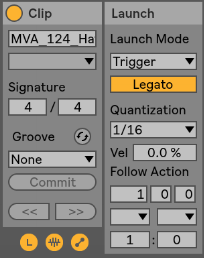
Legato: This is probably the most useful thing to activate for clips in variation. Basically, the Legato option will let the selected clip to take over the one that was previously played, based on the quantization you have set. So for instance, let’s say you play a hihat clip, then press the first clip of the variation. It will stop the activated clip and immediately switch to the other one you just started. On the image, I have set it to 1/16, meaning it will be played on the next 1/16th, keeping it on tempo. Keep in mind that the variation clips are “in sync” with the one playing so that it will continue at the same position in the clip. If legato wasn’t activated, it would start at the beginning of the clip.

Follow Action: Once played, what do you want the clip to do? You could just play that clip but it could go back to the first clip or even randomly play something else. I suggest you experiment with this and find ways to surprise yourself. Don’t forget to record yourself playing them as you can go back to the arrangement section to seize the best part and create new ideas you didn’t even know of.

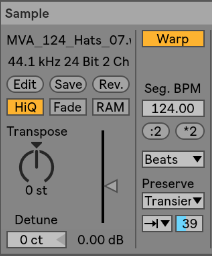
Intensity Variation: If you want to quickly go from open hihat to closed one, one of the fastest way is to play with the “Preserve” section and set it as in this image. Playing with the percentage will let you adjust how much of the end of each sound can be preserved. Having it at 100% is fully open and let’s say 25% is more closed, building tension. So one variation can be set low at first and then the other ones can be more open. If you see the need to boost the energy quickly, then you can go in one of the variation.

Reverse: this one can be fun but in a live context, if you do it at the wrong time it’s awfully awkward; perhaps introducing it in a variation instead would be a safer idea.

Transpose: This can be nice for melodies and basses. You can have them move in pitch in a variation.

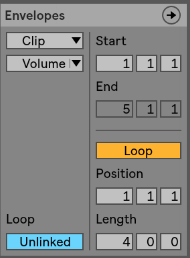
Envelopes: Super useful for variations as well because you can create automation on a very small scale or a longer one. Many artists will use this on EQ to give life to a clip and making sure it feels like it is alive. The important part is to make sure that the envelope isn’t linked and then you can decide of the length of the automation, on one attribute. Tip: make sure you select “Clip” in the first drop down to make sure the changes are made in the clip itself.

Try: Using this with a filter to create fun swooshes.

Also try: Use this technique to create melodies and textures out of a stall pad.


3rd – Transitions.

This part is the final preparation needed to play live but is also the trickiest one. Mainly because this task will imply some practice. My approach and advice here might not totally work for you because your music is different than mine. In other words, doing transitions is something personal and each musician tends to develop his or her own way to do it based on what feels like the best flow possible.

How do transitions work?

In theory, a transition from one song to another is exactly like a DJ mixing one track into another. The puzzle with live transitions is – whereas the DJ only has one fader and EQ to do the trick – you have multiple channels to blend one into the another.

Whenever I teach people how to play live (yes, I do Ableton Live training), a first exercise I give them is to create a playlist with a few DJ sets they like and tell them to study the track transitions. Some people like very fast and abrupt mixing (i.e Jeff Mills-like), while others prefer something more subtle and blurring the lines one where a song starts and the other stops.

The other thing to know beforehand is if you want your live set timeline to be fixed and fluid, or if you will chunk which tracks to play as you go. This can also be a huge factor in how you prepare your transitions. Personally, I want to have the entire flexibility to be able to play track X as an intro then switch to track Z. No order will be established until the last minute when I hit the play button to start my live set.

Once this is clear, you’ll be able to decide how to bridge songs. The first row of each song is your intro bridge and the last one most probably your outro, but you could also start mixing the next track at any moment if you want. Here a few rules of my own for transitions:

  • Only one kick at a time is played. For a while I was mixing the kick of the first track and the other, but the results weren’t so great. I decided to stick to one channel for the kick and would switch when appropriate.
  • One bass unless its a call/response. Same as kick, 2 basses is most usually a set up for disaster so I’d play one or the other. Some bass have only a few notes, especially in dub techno, so it could work that I have one bass of a track talking to another (eg. call/response).
  • Bridge is usually atonal. I would try to stick to rhythmical elements but if I would use a melodic element, I thought it could be tricky as it can clash with the bass or other elements.
  • The bridge can be a song in itself. This one is interesting but not a necessity. But if you can play with your variations well enough, you can create a new song out of two songs. This is basically the techno approach of 1+1=3 (Listener hears track A, B but also a third track which is the meeting of both). I often would record my sets and sometimes noticed that the strong moments were sometimes when I’d bridge two songs.

Because of the number of channels you have in Ableton, you might be stuck with the fact that only one instrument at a time can play. This problem led me to organize bridges differently on occasion. For example, if I want 2 layers of hi-hats, I would have to “cheat” and have a layer of hats in the clap channel.  Quite often I found myself organizing this while playing, and it’s not the best because you can get lost easily in the arranging. I prefer having a few options in the intro with extra layers of claps, hats, percussion. Sometimes even some duplicates in different channels.

In the next post, we will talk about sound checking and performing, which will also conclude the series!

Checklist to see if my song is finished

Lately I’ve been working on a live set, and I realized that I have a personal checklist I use to see if I covered everything to help me decide if a particular song is finished; from little details to bigger things, sometimes it’s easy to overlook important factors. Just like with traveling, you want to make sure everything is ready before stepping out of your project.

This checklist outlined in this article is what I personally use before shifting to the mixing phase. In a past article, I explained the importance of exporting the stems out of your project once the production is done. This frees up CPU usage, lightens up your projct, gives you the option to backup or collaborate, or possibly to do some mixing into another DAW to get different textures. But mostly it’s a way to tell yourself “Ok, time to move on.”

Do you need to cross-check everything in this list to declare your song finished? No, not at all. Below is just a cheat sheet to help you have a better idea of everything that could potentially be covered (and I’m sure I’m missing one or two things here).

Below are what I believe to be the major categories of the “song is finished” checklist in terms of production (mixing is another phase altogether that comes afterwards):

  1. The Hook

The hook is where everything begins and ends, so ask yourself these simple questions to get started:

  • What is the main hook of your song? Remember, the hook is what someone would sing or recall to someone else to explain what the song is about. Your song might not have a main hook, which is okay, but a hook is one of the most important factors to help make a song memorable and timeless.
  • What elements supports the hook? A good hook is often not enough. Supporting it with complementary sounds or little blurbs of secondary melody is very helpful.
  • Are you aiming at a pop structure or more of a repeating mantra? There is also a grey area which combines both of these structures. But whatever your pick is, it helps to have a clear answer to this question in your head.

2. Sound design

Sound design is actually the most important section to me and this is usually where I spend the most time. I have sub-categories here that I will cover.

  • What is the direction and purpose of this song? Is it mainly for DJs or at-home or headphone listening? Vinyl or Spotify? Chill, dancefloor or experimental? This is something that can sometimes be good to keep in mind until the very end.
  • What song or artist would be a similar reference to your track? A reference track can be added in the project itself in a channel. See my past post on how to use a reference track.
  • What is the ratio of organic vs synthetic elements? This is something I sort of think about in the beginning but I am usually also open to revising at the end.
  • What is the main key for my song? This is not always essential, especially if you make atonal music. But it’s a good idea to be aware of a general tuning of bass, kick and melodies.
  • Kick drum: Is the kick in tune with the melody? Is it side-chained with other conflicting sounds? I recommend trying to have a different kick from whatever previous track you were working on. The kick is the last sound to be designed as it is there to support and complement the entire project.
  • Snare/clap: Often equally important to the kick, I usually alternate between more of a clap sound vs. a traditional snare and I also try to have multiple layers. In electronic music, the percussion sound that will go on the 2nd and 4th beat should vary otherwise it sounds a bit monotonous. I personally to try to offer different sound options here for when I play my songs live or DJ them.
  • Bass: Is it in key? Is it side-chained?
  • Melody: This one is a bit difficult but as explained in my non-linear production technique, I like to go back and forth with the track to see if the melody has an impact; if it feels good over time. Finding melody is hard enough, but to make a melody that stands the test of time is an art in itself.
  • Atmosphere: Is there a background to this track? What is in the background vs foreground? I like to use busses for creating atmosphere.
  • Recording: Have I used field recordings for this to add another layer of atmosphere or sound?
  • Textures: Are the textures clear and audible? Or is the song meant to be more subtle?
  • What’s the ratio of repeating sounds vs ever-changing? Some people like to always have the same clap through out the song while in Hip Hop for example, producers often like movement and change. Is this a rule you want to follow? If so, on what sounds?

3. Groove

My “groove” section is a bit less detailed, but is very important, especially if the song is more percussive and dancefloor-oriented.

  • Is the groove borrowed from a song or from a groove template? Or is it custom?
  • What is the time signature? Is it global or different for different parts?
  • Is there a global groove applied or is this song using multiple grooves depending on the part?
  • Export all percussion loops to MIDI to tweak the groove.
  • What is repetitive and what not? Find the healthy balance of sounds being repeated through the song and others that change over 1-2-3-4 bars.
  • Is there sidechain between channels to create subtle or obvious pumping? This can make a difference.
  • What are the sounds that are modulated? This is one of the most important thing to do if you want your song to have a more organic feel rather than synthetic. It’s one thing to select all organic samples but the way you program them will be critical for a general feel. In general, the human ear is very sensitive to movement, even if the music is played in the background; you’ll be surprised of what people notice, and what they don’t.

4. FX/Sends

Using sends is crucial for giving the track a unified feel. One of the most common mistake I see from new producers is to use multiple reverb effects everywhere in the project instead of mainly using one as a send. I usually use multiple sends to create elaborated and sophisticated 3D effects for percussion and melodies. One of the most important point I always remind myself is to use them with care, towards the end of the production phase.

  • Is this song more dry or wet in terms of effects? How much room have you left for reverb?
  • What type of reverb do I want for this track? long or short?
  • What is going to have a 3D effect? What makes the song 3D is the amount of sounds you put right up front vs the ones you put in the background. A healthy combination of both will have a better effect.
  • Use one delay for the project! Which time signature does it have?

5. Structure/Arrangements

I previously referred to song structure as Lego building blocks in a previous post. Blocks are often constructed in the same way; this is why using a reference track can help break out storytelling ideas. I always recommend dropping Markers in the arrangements this way: One at the beginning, one at the end, and one in the middle. Markers will give you perspective, help you see if your general storytelling is balanced, and help you determine if things are properly organized.

From the middle marker, I would drop one additional marker between the very beginning and the middle markers, and then do the same thing in the second half. Your song should have four distinct sections. Sections one and four are intro and outro; the middle part is where your song develops and mostly exists.

  • Does your song have intro/outro? Does the action start immediately or slowly develop?
  • How much space have you left for the DJ to mix the track, if you’re making DJ-friendly music?
  • Are your melodic elements evolving properly through each section?
  • Does your song have at least one anchor point of interest per section? All the sections of your track should be interesting.
  • Does the song have any surprises about two-thirds through its duration ? I always recommend considering this to make your song even more interesting.

These sections cover the main points that I usually think about when determining if a song is finished or not. If I don’t like the answers I come up with to some of these questions, I usually go back and work on the track even more!


SEE ALSO : Is My Song Good? 

Playing Electronic Music Live – How to Prepare Your Live Set (Part 2)

After deciding the direction your live set will take, we will now discuss how to prepare a live electronic set in terms of how we approach each individual song, or moments as I call them. This article is the follow up to Playing Electronic Music Live – How to Prepare Your Live Set (Part 1)

Before continuing, make sure you have read the article linked above; after which you should have a better idea the style you’d like to play live. Since most electronic musicians are software users, we’ll start with that approach which is easier and allows for playing both at home for fun or in a club. A common mistake I often see from new artists who want to perform live is to make things too ambitious and overly complicated; the preparations become too demanding and actually playing the set loses its fun.

First idea in preparing your set: turn your tracks, finished or not, into moments to be played live.

In a previous post, I said that making many loops is something that eventually pays off. When you want to play live, it’s always best to have a lot of options on hand that you can trim, to see what works together and then turn these perhaps unfinished loops into new songs.

For years, I always had a main project file for playing live in which I would test drive any new ideas I would worked on done over a given period of time. This live set was like a laboratory for experimentation; it was where new ideas would sprout, where loops became completed tracks, and where some sounds were replaced or remixed into another track. In other words, I recommend turning your unused arrangement loops into a scene in Live, play them, and record the output. Rinse, repeat.

But where and how do I start? 

For example, let’s take this simple arrangement and see what we can make out of it. Let’s say you have a track in the works or done, partially set up in an arrangement view (Note: Any DAW, in arrangement, not just Ableton); firstly, you’ll need to know how the track is structured.

Figure 1 – Arrangement view with markers


Do you want to play the track like your arranged it or do you want to have the parts so you can improvised with the different section?

As you can see in the above screenshot, I have inserted markers in my arrangement which represent the main changes between sections; everything is mostly organized in blocks. You’ll need to slice out these blocks to trigger them, and also what will become important is how you decide to play them. If some parts are heavily chopped, I would recommend that you either turn that section into an entire block, or if you want to jam those sounds you could add them to a Drum Rack. It depends if you want to do some jamming in your set or not. The point here is to have a better view of how your blocks exist so that when you are in the session view, the parts are easy to see.

1st TO DO:

  • Stretch the little blocks that repeat to create bigger blocks that cover the area where they should be repeating (note: make sure the clip is in loop mode) .
  • Use cmd+j to consolidate chopped blocks into bigger block. If some blocks have changes in them, consolidate them as is.
  • Use colors to clarify where the blocks have changes. Say a block is repeating until a given time but then changes pitch; you could change the color of the one where the pitch is changed to symbolize this change.

Figure 2 – Consolidated vs. Unconsolidated blocks

In Figure 2, the left section has been consolidated, and the right side hasn’t. You can the Duplicate left section to the right after consolidating this way.

This may appear time consuming, but it’s not that much extra work and it will pay off once you move everything to session view.

When you’re finished here, you need to bring the new blocks into the session view.

If you have groups, I’d suggest to ungroup them. The reason is that it is not only inconvenient to use groups in session view, but there are chances that your groups differ from one song to another, and in the end it might be more confusing than helpful. If you have grouped FX, I’d suggest you export the entire channel as a stem and decide later how to use it in a live context. You could perhaps decide to use FX during the live and so, not to bounce the channel. It’s hard for me to tell you what to do here.

2nd TO DO:

  • Grab all clips using cmd+a, click to grab, press Tab and then drop them in the session view.

    cmd+a, click to grab, press Tab and then drop them in the session view

  • You might have a really large amount of clips. After moving things to session view you’ll see that some “scenes” are made up of the same clips. You’ll need to delete all scenes that are the same; you don’t need them. In the end, you might go from 60 possible scenes, to about 5 (!). In live situation, you want everything in front of you, and the simpler things are, the faster you’ll be able to get in the zone. You can also go from Scene A to B, to C to D in any order, which gives you the option to remix your music on the fly.
  • Some people might have a huge number of channels grouped in 5-8 groups. Groups make things difficult to play live as they add a lot of complexity. I’d suggest you perhaps export the track’s stems for the groups and then chop them in sections as I explained above. This might also eventually invite you to reconsider how you use channels – I often feel like people use too many. I never use a single channel for a one hit that happens once in a song. I’ll have a reserved channel where I drop all the one-hit sounds. This can be a game changer for you if you use many as smaller projects are easier to understand and you’ll feel more focused (and use less CPU!)


Regarding the number of channels to use, you’ll need to do tests on your own set up before deciding how to do this. In the previous post on this topic, I was advised to be careful with the number of channels/tracks you use. Ideally you want to deal with a max of 12. To trim down the number of channels you are using in the event that you are already using more, you’ll need to mix down a few that are similar or combine channels that don’t have much going on. For example, I’d have a channel that would be a longer loop that would combine all FX and random hits. Playing it as a longer loop as opposed to a shorter one creates more of a live feel that isn’t as “loopy”.

Rehearse your session by hitting certain clips or triggering a scene to see what happens. Once you have removed the redundant scenes and trimmed down the number of channels, you’ll start having a first real glance of what your song looks like in terms of playing it live.

Of course, you’ll deal with the existential question of if you want to play the track “as is” or have a special version just for a live context.

Personally, I think it’s a bit boring to not offer something different in a live set, Two ways you can change things up are through pacing and jamming. jamming will be touched on more in part 3 as it is a very important part of preparation and can also be something that can also forever change your approach regarding how you make music.

Pacing will be the last part of the preparation of your live set. I will cover most of the preparation phase of pacing below, and the following blog post will be more concerned with how to play your live set.

I think my best live sets were good mostly because they had a core to work around that had some preparation, but also had a lot of room to improvise, dependent on how the actual event turned out. These sets were versatile; I could open an evening with them or play peak time, mostly because of how flexible they were. These sets were more or less made up of the same songs but the variations would be so easy to perform on the fly that I could really just follow what felt good to me in that moment in time. I’ve never really understood the point of having an overly prepared set. I’ve tried the prepared approach before and it just made the whole experience boring, because there would be no risk-taking; it also felt out of sync with whoever was listening. For example, imagine that your track has been built to have a drop, breakdown at one precise point and a moment of tension after, but if the dance floor is just starting to warm up when you drop, you might lose people’s attention or it might feel out of place.

A well prepared set has moments for building tension, others to release, variations, and material to raise the intensity if needed, without it being a fixed bunch of parts that aren’t easily movable. Each songs need an intro and outro so that you can move from one song to another in a very flowing way, just like a DJ would do.

Last TO DO (3):

  • Try to decide on the first scene of your songs. They shouldn’t be too busy but usually, you want a solid groove plus some teasers of the melody to come. Establishing the groove is always important to get people’s–what I call–dancefloor trust. That trust usually comes from kick-low end that is clear and precise, which people can relate to, no matter what happens in other parts of the frequency spectrum.
  • Your intro should have openness and space. If you have a melody, try muting a part of it. This will allow the possibility of mixing a part of the melody of another song with the current song; they will be “talking to each other” by echoing. This happens when the first few notes of a melody are answering the last few notes of another melody. DJs love that in a song and by playing live, you’ll see why; you’ll discover “dialogs” between your tracks which could even teach you the good and bad of your track’s arrangements.
  • Define the hook. The main hook of your song will follow the intro. It doesn’t mean you’ll drop the hook right away, as you can build towards there.
  • Set two variations of the hook with some complementary percussion. If you listen to a DJ set, especially techno or loop based music, you’ll see that it’s mainly a loop with variations. Try to have variations in your percussion, melody or bass. That way you can toggle between the hook and this part. I really really encourage you to listen to DJ sets to get ideas.
  • Create one tension-making moment. This can be a breakdown or a moment where something happens. I always loved to define this moment to be a scene where effects and atmosphere to create something exciting.
  • Release the tension. This scene is basically what would be played after the breakdown or tension-making moment and it’s usually the hook with some more intensity and or variations. This scene should be the most important one.
  • Outro. This is similar to the intro but it should be slightly different.

In the next post, we’ll go into more detail about the actual clips and how to create the perfect little “laboratory” for you to jam with. I’ll propose some ways to jam that will open doors to finally playing live and having all the fun that comes with it.

SEE ALSO : Playing Electronic Music Live – How to Prepare Your Live Set (Part 3)  

Self-Imposed Rules For Arrangements

When you’re up against the wall, pushing forward to break through and get things down can be taxing. It’s a mental game of will and strength against creative effort. What you need to know is this – waiting around for that very brief moment of inspiration and creativity will always lose out to dedicated, and consistent hard work. Does it have to be this hard all the time? Is there a way I can out-smart more difficult and time-consuming tasks? I’ll be the voice you can hear saying yes you can. And it’s easier than you think.

Over the years as a working producer, I’ve never stopped learning from others and finding ways to improve my skills and technique across all areas of music production. One thing I’ll share with you that I wish I’d picked up early is this – creating self-imposed rules for arrangements. Rules? What? I’ll explain.

For many producers, the stage where you arrange your tracks seems to be something you don’t look forward to. I get that, I’ve been there. I’m always hearing that the vibe and soul of your track seem to change in a less exciting way once you sit down and begin laying it out. You’ve told me often that when you get to that block in the road, the party’s over. Listen, don’t stop the music just yet.

I’m successful and prolific as an artist because I get the hard jobs in my day done. I don’t hide from the tasks that I used to avoid doing. I get right to it and start with some of the toughest work first. I beat through them in a way that isn’t painful or tedious anymore. Using rules isn’t like flying on auto-pilot, but a lot of the tough decisions are pre-decided for me.


This might sound too easy, or pure brilliance, yet people all over the world use this process to offload the hard mental work of making decisions to get to the finish line faster. If you want to achieve more consistent and impressive results, read on.

(you know this is a key focus throughout my blog, finding ways to maximize your creativity and efficiency, by organising our workflow to spend less time on the mundane and challenging, and more time on the rewarding and exciting parts of our work)

Let’s talk about imposing internal rules on yourself. My definition of rules would go as: Using certain techniques to create an engaging song structure. And remember – rules can be broken later, but you’ll find it so  much more helpful to get started quickly and make fast progress as opposed to starting slowly from zero.)

It’s given that there are many reasons why a listener might be engaged with your song – the quality of the mix, a great loop, the catchiness of the hook, etc.. Most people will admit to being drawn to a song (or having a song stuck in their heads) by the storytelling structure of the arrangement. Creating a tight and well-sequenced arrangement is one area where many people struggle to achieve properly. Their songs lack correlation, which is to say, the combination of repetition vs change. This is one area of songwriting where rules can help tremendously by pre-defining how each sound can be used.

Here are some examples of rules that I would use:

  1. Direction: is this project for the club, for headphones, for a cinema project? Knowing this will dictate every choice that follows.
  2. Sections definition: this is a critical one, which I’ll define as -a part of the track where one idea is used in a certain way, and you’ll go from one section to another, hearing a clear and noticeable difference.) Depending on the genre some arrangements are tight, verse, chorus, verse, chorus, bridge, verse, etc… Many arrangements stick to a repeating formula, which in this case is a good thing because we listen along and quickly know what to expect. It’s here where you can add and create variations to the sounds which can elevate the intensity in a mighty way for the listener.
  3. The sequence of percussion. Is this sequence the same over 8 or 16 bars? As before you want to create a stable pattern that repeats itself and can sustain the other elements of your track. The benefit to using repeating structures is that only a small change is needed to introduce a big change, which will grab the listener’s ears right away, and create anticipation for the next part. Hats or claps are often used to create this variation.
  4. Block sequence and colour: If there’s variation in the same channel for one sound, I highly recommend changing the block colours to indicate that difference. It’s fun and efficient to place your blocks in a visual pattern,”blue-red-blue-red-blue-orange.
  5. Superimposed blocks: This is the natural follow up to the previous rule. Imagine you have 2 channels, each their own colour sequences, your visual pattern can be created from combining both channels. This is quite useful when you want two different sounds to call/answer one another. You’ll see them one on top of another, as a pair.
  6. Blocks size: I like to make a sequence for my kicks and then grab them to consolidate (+j). That will create a larger block that I’ll duplicate until the end. Now, I can demand that those kick drum blocks won’t change at all, allowing me to focus my energy on creating variations for my shorter percussion blocks. Imposing block sizes is one of the most liberating ways to speed up the arrangement process!
  7. Live Blocks vs static: You’ll find that every track I have will include individual elements that are an audio recording of some live manipulation. For me, those blocks are ‘Live’ while the ones that have no manipulation to be ‘sleepy’. You can decide to have a certain ratio of live ones vs sleepy.
  8. Perspective ratio: Perhaps my favourite. While a ratio in third is the usual (ex. intro, middle, end), you can also have more but each ratio should be the same length more or less. How many sections fit in a moment is really up to you.
  9. Surprises %: Simple right? How many surprises will you give the listener? Too many will lessen impact while too few might not engage the listener enough and they’ll find your track boring.
  10. Silences: Super important element. Silences in music can give great power to the notes played. You’ll need at least a tiny moment where you’ll give air to your mix by adding silences to a part. Think creatively about how to want to create space in your sequence.


As you can see, the rules you can create and apply to your track can be anything you wish. The best part about using rules in your workflow is that you’ll greatly speed things up by off-loading much of the mental guess work to a process that’s already been pre-decided. This all means more fun in the studio, more music finished, which is a win-win from every angle.

SEE ALSO :    The Science Behind Tracky Music 

How to filter your best ideas

I’m always looking for ways to improve upon what I do, and how I can better serve my clients. I’m not taking any breaks on becoming better and better every day. I read a lot and especially enjoy reading words from entrepreneurs to learn from, and help build upon the success of others. When I come across an article that brings up an ‘a-ha’ moment, I want to share it. One of these moments came from one article I read about how to turn a great idea into a business. Across many different fields, music, tech, etc.. one pattern in runs true throughout all of them – sometimes the best ideas come to you in ways you can’t always predict.

Another thing which is true, to generate ideas you start by brainstorming.

In the musical world, I would translate this as jamming. With nowhere particular direction in mind, you begin by tweaking and trying everything. Make sounds, press buttons, turn knobs, listen to the effect of this and that, try new techniques for the first time. In a past article, I’d invited you to use Youtube to find out something new or use a new synth demo and record the outcome.

Jamming freely. It’s known that Prince would spend time in his studio every day making a ton of noise simply to try new things, try new jams, and record these experiments which resulted in a vault of music no one would hear, except him. I’d encourage you to do add this to your daily routine, either very early in the morning or at the end of the afternoon.

Going back to the article that ignited my ‘a-ha- moment, the process of idea generation should involve the following two steps:

  1. Creative session.
  2. Analytical period.

The article states that the brain has a very difficult time creating and analyzing at the same time. In the moment of creation and discovery, our brains use a lot of energy to focus on active listening. In this messy and uncontrolled environment, our brains are set in one direction, we’re in the zone. The missing piece of the puzzle for me was reading that our brains have a very difficult time when asked to create and analyze at the same time. It won’t work both ways.

This is why it’s recommended to separate the two tasks, create freely one day, then analyze the material on the next. This would also explain why we often listen to what we did from our first session and find it mostly garbage. The key word here is – mostly.

It would also confirm my theory that spending too much time in the studio is counter-productive because without a change of perspective you don’t have enough distance objectively evaluate your efforts.

Over time I’ve nearly burnt myself out explaining this process to others who struggle with the process. I’ve also learned it’s sometimes best to let those learn by themselves, at their own pace. This confirms the idea that the creative process is very much a personal one, and that no two people will learn or develop at the same rate.

Session 1: Jam, have fun, explore, fail, win, repeat.
Session 2: review everything that was recorded and isolate the potential ideas that stand out, and are more usable.
Session 3: Go through isolated ideas. Work around one.
Alternate.

In other words, try to alternate between creative flow and analysis, self-criticism and more technical work.

Your brain can only do one at a time and more so, why go analytical when you are creative and why be creative when it is time to be self-critical. The main thing you’ll refer to as your analytical part is to listen to what feels good to you.

Build. Learn. Repeat. Build. Learn. Repeat.

As a child, going out to restaurants with my parents would normally involve using pencils and paper to draw pictures and doddle while we waited for our food. (this was waaaayy before smartphones became commonplace) For me, a blank piece of paper is a license to get messy. Everything is possible, and I always found it easy to get started. Our favorite game was one where one would draw a weird, unrecognizable doddle, and pass the paper on to the other.

The second player would have the challenging task of turning that mess of lines, shapes, and circles into something recognizable like a car, or a bird, or anything that required a bit of time and imagination. Until this day I’ve always thought this exercise was one of the most creative tasks I ever did.

So, here’s another way to approach this: take something totally random, even something you truly don’t want to work with whatsoever and try to make something usable out of it. Make a loop, make a playable sound, take something terrible and push yourself to find something in it that you can do something with. I did a full EP once, a while back where I’d force myself to work with sounds and recordings that made no sense whatsoever. It turns out it’s a good exercise but also very useful as you don’t depend on only good material to be effective with what you have.

SEE ALSO :  The Modular Trap   

Besides music, labels are searching for these traits

If your productions are tight and ready to go, and you have been looking for ways to get labels to sign your tracks, the natural next step would be to send out a ton of demos to labels and wait for them to call you back with a deal. It’s time to start living the dream right? You’ve done all your homework and followed the advice you’ve read online about how to get the attention of label reps. The thing is, and I hate to break it to you, there is another bit of info you probably don’t want to hear, but it’s important that you know.

Labels don’t want you to contact them. 

Many labels won’t come out and actually say, stay away don’t bother, but before you throw in the towel let me try to explain what this means in the most helpful, and constructive way. I’m also speaking from experience here, so please don’t assume this is standard for every label.

artist, electronic music, demos, label

Photo credit John Hult.

With the enormous and ever increasing stage called social media, a never-ending flood of new artists emerging daily, all wanting the same thing – your attention. With free and new tools available to make marketing and promotion easier by the day, the credibility of the ‘artist’ has become diluted from the perspective of the consumer.
Whether you believe this is good or bad, a new impression has been created which is:

  • Everyone is a producer, and,
  • They all seek some level of attention because they’re not getting in touch. Ironically, people want to listen to music more than ever, but the vast flood of new music leaves many listeners overwhelmed by it all. It’s the same experience for labels.

After such an onslaught of new artists sending in demos many labels become numb to the possibility of finding something great. This makes it harder for those who are truly deserving of attention and recognition.

Does this all mean to give up and stop sending in demos? I would say not necessarily. I’ve covered this topic in previous posts, but I’ll cover this point a more in depth here.

There is one important statement I’d like to point make out about our industry though: The whole concept of promotion has become obsolete and alienated. I’m talking specifically about the promotion from artists to label, artists to fans, artists to promoters as well as labels to DJs and labels to fans.

But still, labels will always find quality music and prefer if they find you. This is a fact. Think of Perlon for instance, they largely release music from their circle of friends and the track to be released will need to be tested by the core of the label (Zip mainly, but Ricardo too) in multiple contexts to see how well it’s received by the crowd. Serious label owners have a very particular vision of their sound platform, and your music will (in many cases) need to follow their established sound to get signed.

In my honest opinion: if you want to be on a label’s radar, you will get better results by getting played by DJs. 

Besides music, labels are searching for these traits in you:

Patience. this is perhaps the most prized trait a label will appreciate from you. In this fast paced world, patience is not only rare but it is also a quality that we all need to work on. It’s about having trust that things will work out in the end and that one’s results will be something that happens in some distant future. Parallel to patience, this goes hand in hand with trust. One goes with the other. It means to be able to have a bigger picture of things, that perhaps somewhere down the road, something great will be happening. Maybe not… but to not lose patience over delays is critical as these are common in the music industry.

Get organized. Being organized is super important and will make everything easier. An organized artist should have a solid promo kit on hand – professional photos, your music project and files in order, ready to be retouched or fixed in case of a problem. There’s nothing more annoying than having to go back to fix a sound, but if you’re all over the place, you might cause delays which then moves the entire schedule, or can even destroy your opportunity for exposure. It’s helpful to start off your productions right, follow these mixing and production tips and save yourself headaches later.

Reactivity. Fast replies to emails, answering promptly, precision with your communication will make you pretty awesome to work with. Busy people appreciate this, and it goes a long way.

Flexibility. This is the opposite of being finicky. Things will never be perfect so let’s try to make the best of it.

In the end, it’s up to you to put in the work, which can be made easier when you step back and look at the big picture. What are your goals? Work backward and determine what action needs to be taken in order to achieve your goals. Take a minute and check out my guide to shameless self-promotion here. Add in a little good luck, some magic here and there, and consistent focused daily efforts. Best of luck to you ~

JP

SEE ALSO :    Are online communities replacing labels? 

Use a main project for organizing yourself


Over the years I’ve talked with dozens and dozens of people from various backgrounds that would love to begin producing music but simply don’t know how or where to start. On the other hand, if you’ve already been creating music but lately have become overwhelmed with too many sounds, too many vsts, and are less productive in the studio, this post is for you. We’ll focus on using a main Ableton project to organize your sessions, which will make for a productive and efficient time in the studio.

For your studio time to be productive and enjoyable, it’s essential that you are organized, and have a solid grasp on your sounds and tools.

DJ’s who’ve listened to hundreds of top quality, finely mastered tracks, will often complain that the quality and sound of their first efforts in the studio will clash with the loudness and polish of the music they’re used to hearing. This frustration is predictable, but also preventable, and it’s one reason I strongly encourage beginners to start by using pre-made loops or simply remixing the tracks they already have. To keep things organized and productive, select just two tracks with the sound and style you’d like your own productions to have, and work on just one project at a time.

Speaking of bought loops – I want to debunk the myth or opinion that using pre-made loops is cheating. This is 100% wrong, and counter productive to making music.

I believe the perfect mindset to approach music production is very much like that of a moderator, you must work with that which is in front of you.

This idea requires a lot of openness and humbleness, but using this approach will make you much stronger at being resourceful in the face of adversity.

The internet is an endless source of tools and options, and it’s critical at one point to stop consuming ideas and make the best out of the material you have. My rule: never buy a new VST until I have gotten a true and complete hold of the ones I already have. That being said, if you need a tip to help organize yourself, I highly recommend to create one main Ableton project that will be your mothership, your sound compendium, your personal lab for growing ideas.

  • Buying new effects for our synth: to truly get a hand of what your new effects can do, just drop your new effects in one channel and experiment. I highly recommend you record the entire session of exploration as wav file but also as a session where automation and knob movement will be recorded.
  • Gathering leftovers: Whenever you finish a song, there will be sounds you haven’t used. You can copy and paste theses into your main project. Using your audio leftovers is an excellent way to create fast and great sounding starting point ideas for your next song.
  • Building macros: Building macros can be time-consuming. Some macros I like to build are usually ones that involve a good use of the macro knobs because when I’m recording a session, I can just drop them on a channel and quickly controller parameters using PUSH which has the excellent automap feature.
  • Gathering new sounds: Because I don’t have the time and energy to record all the sounds I want I’ll just buy the few that I need. I’ll also purchase sounds that I don’t have resources to make such as sounds from a plane. Some sounds that you’ll use often will be a great investment, but there’s also many that are available for free.
  • Building drumkits: This one area where I often spend a lot of time. When I start an idea, I want to be able to throw in a good combination of percussion. With the huge selection available to me choosing the right sound can take forever. Check out this nice video here that shows how to create a tool to test many sounds at once. This is great but you still need to make your kits.
  • Creating layers: This is a bit of the following logic from the previous tip. Once you have multiple kits, you can work on assembling them in a drum rack in order to create layers. As you probably know, in sound design, one sound is very often made of up many sounds that have been layered correctly. It’s a good idea to make multiple kits in advance, organized well, and ready to perform when the session gets rolling.
  • Making categories with your channels: Each channel should have sounds of the same family. So perhaps, you can make one channel that has pads and another channel with kicks. This is useful because when you go in Ableton’s browser and open your main project, you have access to all the sounds from each channel, which makes it much faster to find a specific sound. Another big benefit in doing this is exporting your channels as stems will make for efficient mixing later on. (Read more about that article here – Bouncing Stems)  

When I look at how I work, I often see that I spend way more time preparing my music session than producing a track itself. The better your organization, the easier it gets in your workflow.

JP

SEE ALSO : Music Production Tips: How To Start A Track 


Templates As Seeds

As a producer, you’re likely trying to balance several tasks all at once while working on your music. If you’re spending time to look through four or five reverbs in search of the perfect sound, setting up buses and groups to pre-mix your tracks while you arrange it, or just feeling frozen looking at a blank project screen and finding it hard to get going, it’s no wonder you aren’t as productive as you’d like to be.

Good news, this post is all about setting yourself up to win before you begin. Begin to see your templates as seeds. 

Many DAWs can be setup to load a template as an initial starting point. Reason will propose a pre-made environment, and Studio One will propose if you’d like to setup a project for mixing to speed up your getting started time. Ableton Live doesn’t have that feature by default, but you can easily change that to open a custom startup project.

Even though most DAWs have this helpful feature, that wasn’t enough for me. But it felt like I could do better.

In one way this is a follow-up post to the previous Bonsai Technique that I shared a few weeks back. It was super popular, and many people sent in comments about how it really helped them develop tracks from little ideas. Now, I’d like to follow up with this idea as I realized that many people are missing out on the fun of using a template to get their projects started. Also, there are a few things we can add in that will also be valuable for your next productions. Let’s have a look at the techniques to get rolling fast.

I’m going to suggest something simple in essence, but it’s very effective to get new projects sounding great right from step one.

Start your next project using the last song used. I heard about this technique from Matthew Herbert’s manifesto, and it got me inspired. Herbert would pick up the mixing board where he left things off from the last session. Why is this a good idea?
Starting from the last mix would provide a faster workflow but also, the random EQs, compression, effects, would be set to something he would never have set up beforehand. I thought this concept was brilliant and began doing this myself. Very often I would start with the last project loaded but would make the next song right after the end of the previous one. The same configuration and settings for the kick, percussion etc… were the same, which often led me into directions I didn’t expect at all. This is a big advantage. 

Consider keeping the effects on each channel as is, but drop your new clips into existing channels at random. In some situations, I also would copy the arrangement of one song and paste it into another song’s arrangement view. Very strange results would come up, often leading to unexpected yet very usable sound design results. I often have one “mother” project which will be a safe place for me to develop and grow these ideas. Then I will copy some loops into another project’s arrangement view, and sometimes move the clips between channels to see which one fits the best. I even did the exercise of dropping a full arrangement into another project keeping it as intact as possible. From there I wouldn’t even listen to it before bouncing it out. I’d then listen to it weeks later and get blown away. I made a handful of tracks from my album Intra or White Raven this way.
Next, challenge yourself to keep your bus routing and groups intact. It’s great to have pre-made sends channels or busses that you can re-use quickly. Of course, an easy way would be to be to assemble a macro of the chain of effects you’ve used, but I like the idea of opening a template and have no idea what effects would be awaiting me. I will sometimes swap my most used effects with others I newly acquired or some I’ve forgotten about. It’s often nice to dig up older, legacy plugins that can bring up a particular grain to your sound.

Clear your finished project from the clips and save it as a template.

One exercise you can start applying today would be:

  1. Create a folder for your templates.
  2. Each time you finish a song, you do a “save as…” to that folder. You’ll then clean it from the clips in the Arranger view. I will often leave what I call ‘leftover’ sounds that weren’t used in the project. I’ll set these clips in the session view in a channel named “Leftovers.” Doing this allows you to re-purpose those sounds, which may be a perfect fit in your new project.
  3. Midi clips could be left there as well because it is usually interesting to have on hand some midi material you can quickly throw new sounds onto and see what it gets that sounds like.

Now, an extra tip, which is to make a template for the design of an EP/LP. As you know, it’s always great to have a common feel for an entire release, and one of the things I would recommend would be in the way you apply your effects.

  • Reverb. Either you pick a reverb from one specific company (ex. Altiverb) and use some presets to get started, or you try to remain in the same family of space such as Plates.
  • Delays. Using the same plugin but changing the delay speed.
  • Saturation. Try to pick one type and stick to it. I recommend applying this through a send channel where you have more control over how each sound is colored.
  • Compression/EQ. Some apply a distinct color and are more or less transparent. It can be a good idea to keep the same type of combination through your channels.

As always I want to hear your feedback on anything mentioned in this post. Feel free to share this post or leave a comment below and tell me how these creative, and time-saving techniques are working for you. 


SEE ALSO :  Pointers To Define Your Sound

Bouncing stems and mix

Recently I’ve been weighing the benefits of focusing on just one part of my production process exclusively, or, working on all the steps of a production simultaneously – arranging, mixing, pre-mastering, etc.. Very often producers ask me to explain a perfect workflow recipe and the truth is, there really isn’t a one size fits all answer.

But in theory, there are 2 main approaches I’ve been seeing in production to make a song.

  1. Classic way. Which involves taking one phase at a time but with the option to roll back to go fix something.
  2. Modern way. You go from one phase to the other in no particular order, as your needs change. You’ll mix as your arrange, change sounds of the percussion to match a melody, add saturation for aesthetics, etc.

One of Ableton’s feature that I find killer is the option to export all channels as separate stems. It really is great for so many reasons but also allows your to really divide the production from the mixdown, which you could do in another DAW.

There are many reasons why you’d like to do your mixdown into another DAW. One of the reason is, you’re basically blending, what I call, software grains. Think of the various apps on your smartphone that offer various filters for your images, where you can go from one to another, taking advantage of each strength. I would say it’s the same for DAWs.

  • Workflow. Each DAW has its own workflow, appearance, feel. Sometimes, just a change of platform is enough to, psychologically, feel your track in a different way. There are countless researches that have been done in between DAW, to which has the best sound, but in terms of summing, if you take a file with nothing on it and bounce it, they will all provide the exact same file. Where there will be a difference is on automation, interface and that alone can make you behave differently in a mix situation. There’s also all the macros and gizmos they all offer too.
  • Native plugins. Again, this might be a game changer. This of an any DAW, they will offer different plugins doing different things. Now, just for compression and EQ, it becomes a serious business. Mostly because there’s a big difference between what you see and hear, plus no one really does things the same way.

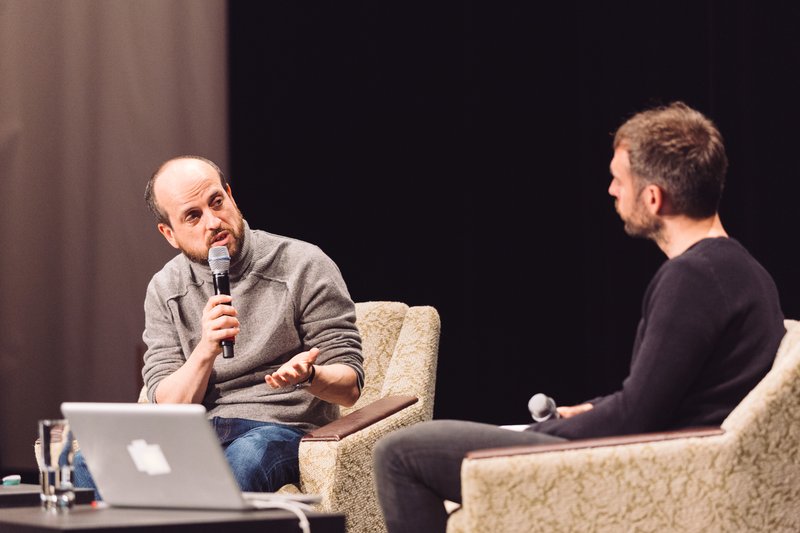
That last point is crucial here. You can take the same compressor concept (ex. FET compression), but it will sound different from one company to another. There are no real universal standards on how to approach compression or EQing. An EQ can show you a curve but the filter in the back might slightly be different to give a color, for instance.

So, when it comes to Ableton, I now export all channels as stems to do the mixdown. No more mixing as a arrange. I put a wall between the 2 phases. Some of the reasons are:

  • It liberates CPU usage. No surprises here. When you deal with a heavy load of VST’s and plugins it can often be a lot to manage. The act of bouncing out and mixing stems will force you to focus on only mix related plugins such as EQ and compression. No more delays, chorus and reverb adjustments. At this stage, you’ll focus on the volume levels alone.
  • It put’s an end to the endless adjustments you can make to every sound. You’ll have the option of correcting that little hihat detail that’s been bothering after hearing your track 100 times, but honestly, someone who has just heard your song for the first time will interpret that sound as part of the track, not as a mistake. It’s good to put an end to endless changes and adjustments and move on to finishing your production. Professionals keep their eye on the prize and get things done.
  • The audio summing seems to reveal imperfections. I’m not sure what’s happening here but sometimes, when you bounce the stems, things are just slightly different. I can’t pinpoint why and in theory, it’s not supposed to be but sometimes, it does sound slightly different. In fact, once you bounce it, that’s when you know exactly how it will be so it’s interesting to bounce all channels apart.
  • Ability to use other DAWs. As described earlier, this is the ultimate way to move from one platform to another. You’ll be to leverage the strength of each DAW.
    Build live sets or NI Stems. Having stems on hand can be useful to create live sets. Native Instruments offers a technology for creating a stems release to be played in Traktor, which is really cool, and super in demand by many of the world’s top dj’s.
  • Backup and remixing. Having stems is the ultimate way to have a real backup of your music. In 10 years time no one can predict what technology will be available, but having stems will prove useful as a way to be used with any new technology.

All an all, try it and see for yourself. Bouncing stems can only bring advantages to your workflow and I’d love to hear about it.

SEE ALSO : Use a main project for organizing yourself 

Making and breaking genres in your music

Friends and clients of mine who listen to a wide variety of music (often very different genres) have mentioned feeling a real struggle to come up with ideas once starting a new project in their DAW. After putting together a decent beat and melody or two – many of my colleagues found no clear direction in their song, and struggled to make any progress with that project from there.

This reminded me of a something I saw online recently that very well summed this up.

If you don’t understand french, what the illustration is saying is, “this is what the music industry, as well as music genres are doing to music.”  I truly believe this statement, and I’ll explain why now.

Let’s rewind and look at jazz music. If you don’t listen to jazz you might simply think jazz is jazz, but actually there are many different forms of jazz- big band, ragtime, be-bop, free jazz, hard bop, fusion, etc.. Such labels were created by media to label and categorize music, making it easier for people to find and buy music within a certain genre. Think about the evolution of rock – hard rock, light rock, punk rock, alternative rock, the list goes on.

For electronic music, I guess we can say that some of the very first, most popular genres to emerge were originally Hip Hop (some of the early 80’s hip hop was very electronic focused), House and Techno. The reason why it keeps going under various umbrellas comes from the needs of the industry’s standards.

Our ears get excited when we hear something we know doesn’t fit the mould.

A musical term you’ve likely heard before is mashup, which refers to a song made up of other songs from completely different genres, (which is is a little like a remix). You may hear a melody being played by a distorted AC/DC guitar riff mixed with vocals from a country-western song, and a bumping disco drum beat keeping the groove. Great mashups are known to use music that would never otherwise work together, which is the reason why mashups often lead to really exciting and interesting music.

Take a minute and check out mashup artist Girl Talk creating a mashup in 2 minutes here ) and Girl Talk again, performing live mashups at Coachella here :

It’s common to think “if it worked well for x, who does x genre, I might as well do like him to imitate his/her success” syndrome has also been one of the main reasons why so much music is produced and formatted in a specific way.

This is how certain genres follow a very specific sound, using strict arrangements with very predictable techniques. There is good and bad to this, but if you listen to the top 10 of any genre, you’ll quickly understand what musical elements represent that genre.

• Genres help you reach a market, certain labels, clubs and be part of a community.
• If you are innovative, you can always input refreshing new ideas to a genre. Done right, you can get a lot of attention. People are always searching for new ideas, but you need to understand the rules of a genre, first.

So how does this apply to you, once in music mode and struggling with genres?

  • You can make multiple genres out of one melody. What is stopping you from making different versions? There’s no rules here. If you have a melody you love, you can make 10 different takes out of it and decide later which one you prefer. Slower, fast, trance version, dub version, beatless, really, there’s no reason for you not to explore.
    • You can define yourself challenges of embracing fully one genre on specific projects. A good way to approach the genre problem is to start by a genre you are 100% comfortable with and then keep your production in that genre fully. Then, as I suggested earlier why not take your melodies and write it for in a second genre? Personally, I have some ways I do it. For instance, I never make beats-oriented songs in the evening and rarely I do ambient in the morning. It’s sort of a personal rule and you can invent your own that work for you.
  • Incorporating hybrid styles can be the road to new growth. New genres are often born by someone coming from a specific scene and trying to apply ideas from another. I’ve heard really different variants for dubstep for instance or house (tech house, dub house, minimal house, break house, chill house). If you’re torn between genres, combine the elements from several genres and listen to what happens.
  • Use sample loops to get ideas. One major asset of using pre-made loops is to have a quick glance of the different directions your track could go and explore quickly from there. A tool like Splice lets you access royalty free loops from breaks to jungle, minimal, ambient, techno with a killer integration for Ableton. It’s then really easy to combine some minimal techno grooves with reggae sounds and get a feel for what’s working fast.
  • Focus on one artist or label. If you have a goal to be signed to a  specific label or get attention from an artist you like, it’s good to  have productions and reference tracks that will get his/her attention. Sometimes that means your music must follow a very specific sound, think pure techno – there isn’t much room for trombones there. That said, sometimes your roots will guide you to where you should be going. That’s wh y when I’m a bit lost, I go spend some time listening to influential music to bring me back to my flow.

You will create more original sounds by combining wider musical influences, and in doing so your music will not only sound unique within a specific genre, but it will also more closely represent your authentic voice as an artist. Win-win.


What sounds are you really excited about right now? Be sure to leave a comment below with your own ideas about mixing influences and styles, and as always I want to hear what you’ve been producing lately and music you’re sharing with the world.

JP.

SEE ALSO : Where to Get Fresh New Ideas for Tracks  

Lego Blocks as Song Structures

Have your productions become a bit predictable lately? To stand out as an artist/producer you have to create music that is unique. So much of electronic is structured around a repeating 4/4 pattern, which means it’s really important to create surprising sounds and unique arrangements that keep your track interesting. How do we do that?

I’m going to share a simple way to create a real and true sense of spontaneity into your music making that you might not have considered before. *this is a pro-tip you can use right away to bring a little magic into your tunes.

Before I get into that I want to share the backstory. Recently my son and I were building structures with legos and I noticed the colours and patterns we made together looked exactly like a track in Ableton’s arranger view. When I worked on my album Intra, I had created a few rules and challenges during the recording process and one of them was to work visually with the blocks (or clips). Initially each song would be recorded live but afterwards I would chop the blocks into smaller blocks and start sculpting the others around each one depending on the rule I had set out for that song.

The result of this meant that my Ableton arrangement soon needed to also be visually appealing and organized. This brought some results:

  • Unexpected results. If you work with a visual based reference for assembling your blocks, you might discover new ways of making your sounds evolve in a visual chaos that is also a form of organization.
  • Cleaner transition. Putting your blocks together can help making your transitions smoother as you can really put attention to a sequence of sounds, and the grid. I know you’re probably already using the grid, but perhaps you have never paid attention to how your transitions happen. If you pay more attention to your block order, you might observe patterns that are more efficient.
  • Logical progression. Using coloured blocks is really helpful to organzine big projects. People use it to identify where the verse, chorus, buildups are, and you can use that same approach.

At this point, you may be wondering if this technique will really make a big difference in your productions. I can say with confidence that creating rules to apply to your arrangements can have huge benefits. Try it on your next production.

Song structures like Lego blocks. A simple technique like this can open the door to something great and surprising when you’re tired of the mechanical feeling in your tracks.

Here’s a few tips on how you can approach your arrangements with this new perspective.

  1. Define yourself some rules. This is really for inducing fun and making your own music interesting. Think about using rules such as, “every 4 blocks, make a change” or “never leave a hole with a smaller block in the upper channel.” There’s no good or wrong way to do this but the more you give yourself a solid set of rules, the better and faster the workflow.
  2. Avoid clean blocks organization. When I work with students, I often see their final arrangements to be looking very simple, very clean and to me, this automatically make their music highly predictable, mechanical, soul-less and out-of-the-box feeling.

Ableton, arrangements, live, techno, clean

I find that electronic music is already heavily subject to a machine feel and I value doing anything that can go against that. I find breaking your blocks and messing up the arrangements is an absolute must.

TIP: Try to chop off your blocks where all the others start or end, create little offsets, and create holes in the blocks from time to time. This mutes and removes sounds so that when they are back the sound will feel welcomed and unexpected. Sometimes to appreciate a sound better you need to remove it for a while.

ableton arrangement, techno, music production tips

3. Work from bottom to top

ableton arrangements, organization

Arrange your lower sounds from the bottom up and higher one’s up in the order.  Visually it will often create a pyramid-like structure that is interesting to move around and modify.

4. Use patterns as a mosaic.

One thing I like a lot is to create a sequence of blocks and then repeat it. I will revise variations later on based on mathematical formula or ratio aspect. I try to see where this block will fall if I repeat it 4 times, in parallel to this sequence repeated 5 times. Sometimes this helps create a moment I would have never thought of, at around 2/3 of the track.

ableton arrangement, techno, music production tips

5. Give your clips room to breathe. When consolidating your clips (Use cmd+j) leave empty space before or after in the clip. The lack of sound in your clips allow space for other sounds to be heard, which you likely already do, however launching clips with silence built in will help make your arrangement more unpredictable and interesting.

lego blocks as song structures

Use cmd+j to consolidate them and make sure to leave space too as this can be useful.

ableton arrangement, techno, music production tips

The takeaway – Once you begin to apply structural shifts and apply rules to your productions your music will definitely begin to sound more interesting. Arranging your tracks by rules will force you to make adjustments you likely wouldn’t have made yourself. Another huge benefit you’ll find in working this way is speed – using pre-defined rules will take away much of the time consuming guess work in creating key differences in your productions, which makes it faster to finish your tracks, and have more people hear your music. Win-win.

As always feel free to leave a comment with me below if you like the ideas in this post. I want to hear what music you’ve been working on using any of the techniques I’ve shared with you here, and look forward to hearing those soon!

JP.

SEE ALSO :  Finishing Your Projects 

The Art of Keeping People on Their Toes

You know when you discover music that breaks the mould, and you can’t stop listening to it? When there’s just something special about it that keeps you playing it on repeat? There are actually certain recipes for giving music its power, and a lot of it has to do with keeping people on their toes. Here are some techniques for keeping your music fresh and innovative.

Known and new anchors

Genres are largely distinguished by a specific set of sounds, rhythms, or structural arrangements. For instance, deep dub techno has its signature rich pad sounds that you won’t really hear in, say, trance music, which is more known for the heavy use of arpeggiated synths. Some deep house uses the same pads as techno, but you can still differentiate the two because of its structure and percussion samples.

When producers want to create in a specific genre, they’ll sometimes repeat what has worked before by getting all the sounds right. If you stick to the tried and true though, you’ll need to really up your game to get noticed because you’ll be repeating the same old formula.

Introducing sounds that are less common to the genre can be a great way to shake things up. You could bring in foreign percussions that aren’t usually associated with the style, or samples that might throw people off. New anchors, or a sense of novelty, always create interest for listeners.

Technological novelty

I follow a few sites religiously to keep up with the latest news about new effects, DAWs, and the like. Keeping current lets you get ahead of the curve and stay fresh and innovative. This might sound like a silly example, but people like Cher in her hit “Believe”, or Daft Punk with “Around the World”, showed how using forward-thinking technology at the right time can help you make it huge. You might go “meh” at those songs today, but when they came out, it was a big deal.

https://www.youtube.com/watch?v=yca6UsllwYs


Balancing surprises

If you browse the web for information on what makes music addictive, you’ll read that the brain seeks out elements that balance predictability with a sense of surprise. If you’re kept just slightly off balance, but still feel you’re on stable ground, you can get the dramatic sense of venturing on some sort of journey while facing obstacles you can overcome. Many people experience a sense of travelling when listening to music, and it’s even been shown that music can produce some of the same hormones as ingesting drugs.

If you’re creative with them, these common production-related tips will help you generate tons of new ideas:

The 1-2 punch technique. I’ve been doing theater for years, and this popular trick is used to surprise people or make them laugh. I’ve noticed how it’s used in movies, advertisements and of course, music. The idea is simple: you produce a cool idea, trick or sound that pleases or surprises the audience. This sound or idea should be one of the main elements of your song. After a certain while, you’ll repeat it a second time, which generates a sense of satisfaction in the listener. Wait a little while longer, and on the third time, when the listener is expecting it to repeat again, you deliver either a different sound or a new variation to throw them off. This usually never fails.

Repetition and counter-rep. In the same vein, when you build the  structure of your song, you’ll need to order the sounds in a specific way to give your audio vocabulary some logic, which brings you into a conversation with the listener. Repetition lulls the listener into a comfort zone. It’s where things are smooth, predictable, even hypnotic. Now, in your repetition, it’s fun to play with timing and counter-balance. One sound will appear, then another will reply or echo the first sound, but as an offset element. Usually, the echo can be off and playful, which gives you a lot of room to build layers that add colour and intrigue to your song.

Be wild. This is a favourite of mine. To get the most out of it requires that you get inspiration from other genres that you might not listen to. In my case, I’ve sometimes listened to contemporary classical, weird jazz, or bluegrass to see what and how things are made. Then I try to apply an element or principle into my own music, either pertaining to the structure, percussions, breakdown, or intro. There’s a lot to be learned from other genres.

SEE ALSO :  Creating Timeless Music

How to Turn a Loop into a Full Song

By far one of the biggest topics I’ve covered in my coaching in the last year has been how to turn loops into full songs. A lot of producers get a thrill out of making a loop. But they often get stuck there, as if a psychological block of some kind were stopping them from going further. That’s why I wanted to write about a method I’ve been using that can help you get past this hurdle and move from loop to finished track.

Let’s say you have a loop you really like. I believe a good loop alone, if well arranged, can be enough to carry you through a 5-6 minute track. In theory that loop will contain an idea, either in its sounds or in its melody. There are no rules about whether the idea should come before or after the loop, so you could want to make a loopy track just for the fun of it.

Once you have your loop, drag it into the arranger part.

How to turn loops into full songs: drag your loop into the arranger

Now there are 2 options. I always recommend that you first import a reference track into your session. This is not about copycatting, but about giving a direction to your track. It’s useful for both the mixing and the arrangements.

Now you need to develop a rough idea of how long your track will be.

  1. You can use your reference track to decide the length of your track.
  2. You can choose an end point but change it later.

Drop a marker at the end of your track. Zoom out, and you’ll see the whole project.

From loop to finished track: screenshot of track in Ableton

Now, let’s turn that loop into a block. It’s up to you whether you want the loop to start your track or not, but for the purposes of this tutorial, we’ll say it comes in later. A block is a version of your loop, but on a 4 x 4 structure. If your loop were short, like a 1-bar loop mostly, then we’d make this 4 bars.

Note that melodies loop over longer periods due to their complexity. That is normal.

So, one block equals 4 bars.

If the block repeats 4 times, you have a section.

The most important thing to keep in mind is to be consistent in how you organize your sounds. For instance, if a clap happens at the same precise moment every 2 bars, then keep it that way throughout the entire track.

What makes a track hypnotic is the steady time reference in the listener’s mind, mixed in with fun and unexpected sounds.

When building your block, always start by what is constant, and then build around it. For example, the the lows (kick, bass, toms) are the foundation of your track. That is what remains the most constant the whole way through.

Use variations, and replicate that loop over four bars.

turning loops into finished tracks: screenshot of loop replicated over 4 bars

Bring that main idea into the middle of your track. This is the heart of your song, and you could duplicate it to double its length.

Now that you have the heart of your track, it’s time to deconstruct the song from the beginning to there.

You might get ideas from the reference track about where to put key elements. This also a nice way to know if your track is DJ-friendly.

I could delve into more detail about how to build your track, but this simple tutorial is all you need to unblock you and get you using all those loops sitting idle in your hard drive.

Just keep in mind that until you finish the structure of your track, you shouldn’t bother with the mixdown. That will come later once everything else is mostly settled.


A Day in the Life of a Music Producer

I’m a music producer, and I know many others. I’d call myself an audio producer more broadly, because I also run a label and do sound engineering. My main focus is on electronic music as you probably know already. I wish I could give you a simple outline of the daily routine of a music producer, but the truth is that there is no typical day.

First, inspiration isn’t something you can just summon on command. It has to come by itself. You can tell yourself you need to be in the studio at 9am to start working on a track, but sometimes you’ll get there and find that your brain just isn’t ready to make music. Some days aren’t for creative output. That’s why after 5 years of trying to make music every day, I burnt out (2007). I learned that it’s better to devote your time to other things on those creative down days, because the space between sessions is essential for creative rejuvenation.

There are also days when it works. But before I dive in to those, I need to clarify a few myths about music production:

Myth 1: You start a new song from the beginning and keep working on it until it’s done.

Myth 2: You only work on one song at a time.

Myth 3: Every song should be finished.

Myth 4:  You can work on music for hours. (You can, but you’ll be unproductive.)

You see, music production is a kind of dynamic chaos that evolves, regresses, progresses, and dies — or not — everyday. (I’ve written about these myths a lot before, especially herehere, and here)

So with all that being said, within the life cycle of a track, you’ll go through:

  • Ear workout. Listen to music of any genre and let ideas come. Your ears will be freshest in the morning, but they also need to be calibrated to how the music should sound. This can last from 1 to 3 hours.
  • Research and development. Which DAW to use? What gear to explore? Which synth will fit? Do I have what’s needed, or do I need to try out a demo or buy something new? This is basically the moment where you try to slot your initial idea into the production routine. This phase is ongoing, but I rarely spend more than 1h. There will be a number of sites I visit daily, with my favourites being:
    • Resident Advisor. To get industry news in general and listen to music. I also like to check out the music reviews to get an idea of what’s trending.
    • Attack Magazine. Because it has nice technical articles.
    • KVRAudio. To get the latest news about plugins.
    • My Soundcloud feed. Because I want to see what the people I follow have been into lately.
  • Sound design/recording. This is where you collect all the sounds needed to start your track. It’s very time-consuming.
  • Production. This will take the largest chunk of your time. That’s unavoidable, but you’ll want to space the production sessions out by a day. If you spend too much time working on a track at once, your judgment will blur and you’ll lose sight of the idea you began with. If you come back to your track with fresh ears, you’ll be able to stay focused on the core idea and to assess your work with a clearer perspective.
  • Mixing. This phase is time-consuming too, and you might want to ask another sound engineer to do this for you as a second pair of ears can really help.

So overall, a full day’s work at the studio involves only about 2-3 hours of actual music production. A lot of my time will be spent on tweaking, searching, checking references, checking emails, and taking many breaks that might appear as procrastination.

Why such little time? Mostly because I want to be at the top of my game, and I know that my peak attention is condensed into short spurts. Of course, sometimes I will spend a good 5 hours on a track because there’s a lot of cleaning up and tweaking to do, but it’s mostly micro-editing.

In my case, I arrive at the studio at 9am and leave around 5pm. Lunch is usually 1–2 hours.

I love to have the people I coach over at the studio, and sometimes friends will visit too. The time I spend with others in studio is extremely valuable, because I’m nourished by the ideas we exchange and the music they share.

Being able to do this full time is a privilege and I embrace every single day with full dedication. It is possible to do it but it demands a lot of discipline too.

SEE ALSO : Useful Music Producer Skills For All

Spending Long Hours in the Studio

Every now and then I’ll see people boasting in some online producers’ forum about how they spent 5 to 8 hours in the studio working on a song. The same thing sometimes goes for when I’m with fellow Ableton users, who will claim they have spent 3 days on a song. It’s a common perception that the longer you work on a song, the better it must be. Yet from my own experience and reflections, I believe it’s actually the opposite.

crazy in studioIf you’re unconvinced, consider this: how does the producer’s experience level impact on studio time? Might it differ depending on the music genre? Does it change if gear is involved? You see, the amount of time you spend in studio can depend on many factors, and these are just a few of them.

Just think of the long list of artists who wrote their hits in very little time, from “Hotel California” to tunes from Jamie Jones, Seth Troxler or Samim. The minimal movement in contemporary music is another important example of this. By “minimal” music, I’m not referring to minimal techno but to music by the likes of Philip Glass or Steve Reich. The common denominator among these many artists and genres is the understanding that songs are built around one core idea, which is then fully supported throughout. That central concept or component is what people will hum or sing to their friends. It’s what people remember.

So that’s the ideal. But here are where the problems start:

  • You’re not focused on the idea itself. It should speak for itself, you don’t need 4 different layers to do it.
  • You’re distracted by non-essential supportive elements. Because unless you’re a producer, no one really cares if your kick is analog or not.
  • Your ears are tired. Ears get tired after a while and it will become impossible to mix properly. Give them a rest.
  • Your brain is tired. If you’ve played your tune over and over again, you’ve almost certainly lost the plot. To regain a firm grip on your initial idea, you need to take a break and refresh your perspective.
  • You’re forgetting the track’s lifespan. If your track is short, the idea is played for only a moment, and that will be enough. It’s not worth weeks of your time.

spending too long working on a track can ruin even the best ideasThe crucial thing to remember is that the longer you expose yourself to the track you’re working on, the more you’ll lose your sense of what you’re making. You see, humans have evolved with an amazing skill called adaptability, which has helped our species to survive over hundreds of thousands of years, often in the face of impossible odds. This innate trait has an impact on us in the studio. For example, if you listen to something that you mildly like for a long time, you will eventually learn to either love or hate it — and then either want to alter it (to expand its longevity) or delete it completely (because you get fed up). Either way, even if your initial idea is awesome, being overexposed to it might completely ruin it.

So how to solve this?

There are many things you can do, but the main thing I recommend is to simply limit your time in studio. (Though of course, if you’re in the studio jamming away and having fun, it can still be cool to go for long hours.) Here are some other things I suggest:

  • Try my Non Linear Production Technique. To sum it up, don’t work on one project for a long time. Try to work on multiple at once — say 10 at a time — and then rotate between them, spending up to an hour max on each.
  • Swap computer for gear and vice versa. Move from one to another to get a flow.
  • Give yourself some moments of silence to relax your ears.
  • Learn to spot the distractions vs. the essential parts. Do you need to buy a new synth to finish a track? Probably not. Learn to ask yourself these questions: is there something I have already that would do the trick? Is this new idea that popped into my head worthwhile, or is it a distraction? Is there a utility to it, is am I getting carried away?

One of the most important things is to reserve a moment in your calendar for music production. Prioritize it, and learn to respect that moment and not move it. Some professional musicians dedicate one day a week to production and use a routine that is super important to the creative process.

SEE ALSO : When Do You Know A Track Is Finished?

Riding the Grooves in Ableton

Have you ever felt that your music’s rhythmic structure lacked a certain human touch? This seems to be the general consensus among producers, yet there is a simple solution to this hitch in the road. It’s caused by what I believe is the biggest drawback to producing music within a DAW: the musician tends to pigeonhole himself or herself by needing everything to sound perfectly aligned to the grid.

From experience, however, I think I can affirm – with a reasonable degree of certainty – that this method does not reflect how humans operate. We are not precise, monotonous machines, and we are most definitely prone to error when jamming live with acoustic instruments. There is even a certain beauty in this rawness, as music perfused with slight imperfections tends to appeal to the ear as more natural and groovy.

In order to achieve this particular “effect,” Ableton Live allows the producer to import a collection of rhythms, called grooves, into any MIDI or audio track, so as to either alter the current rhythm already written or to add an element of surprise or randomness to the audio.

The Ableton Core Library has a myriad of classic grooves that you can choose from, from MPCs to Latin percussion to hip-hop. However, in this tutorial, we’ll get really advanced and show you how to get creative by making your very own grooves.

Step 1: Record any percussive sound

I’ve recorded myself rattling my keys using nothing but a Macbook (you don’t need to get fancy).


Your recording will most likely sound like crap, so feel free to cut out excess noise with gates or tame peak transients with compressors.

Step 2: Modulation (Optional)

Add a creative effect that will automate the gain (volume) of your signal. You can draw automation curves or pump (sidechain) it with Ableton’s Autopan. The point is to create as many dynamics as possible by playing with the volume so that it translates into the clip’s velocity once we extract the groove. You shouldn’t have to do this if your signal is already very dynamic.

Step 3: Bounce

Consolidate the clip and its effects by either resampling it onto another track or simply freezing and flattening the track (by right-clicking the track).

Consolidate the clip and its effects by either resampling it onto another track or simply freezing and flattening the track (by right-clicking the track)

Step 4: Extract groove

Right click on your consolidated audio sample and select Extract groove.

Step 5: Groove pool

Open Ableton’s groove pool by selecting the wave in the lower left side. Your groove should appear in this box.

Step 6: Add groove

soundpicture2You can consult the Live manual or other tutorials to better understand what things like “base” and “quantize” mean, but make sure the timing is set really high (i.e., how much the groove pattern will affect the clip). Drag the groove name onto any audio/MIDI sample or loop track, preferably something percussive like a drum loop. Notice how the rhythm of your track has changed, and how certain transients sound louder or quieter, or appear later or earlier. If you increase the velocity of your groove, your signal will respond heavily to the volume changes in your original signal (which is why I used the Autopan to create dynamics).

Press “Commit” in the clip view, to destructively write the current groove settings to your sample. This means the sample’s pseudo-markers will move in accordance with the quantization setting, and your transients will translate the rest of the settings you selected in the groove pool.


Original:

Processed:

Step 7: Layering

Hopefully, you’ve saved your original percussion loop so that you can play it with your newly made rhythm. Notice how there’s percussion a bit everywhere now, and that it’s a little bit off. Yet I’ve still opened doors to new possibilities that I couldn’t have predicted by simply drawing in MIDI notes. I even got a wonderful slap-back delay on the snare, which I can edit to my liking.

I’ll go so far as layering the two sounds with a reversed sample of my new groove, which gives me this:


I’ve then added back the original keys rattle sample, and simply applied sidechain compression to get this beat:


Although it sounds a little all over the place, I can always go back and edit it how I want, or even apply some effects! Note how it sounds more human now and not perfectly cut to grid.

soundpicture3

Bonus: Step 8

Go back to Step 6, and drag your groove to an empty MIDI channel instead of an audio or instrument track. An empty MIDI clip will appear with notes matching the groove you created. Drag an instrument onto it to hear how it sounds. Although it will probably sound awful, you can always edit the MIDI notes to your liking!

soundpicture4

Bonus: Step 9

You can even get away with layering organic textures such as strings, or pad with grooves. Make sure to apply different groove settings to each layer by duplicating the groove (CTRL+D/CMD+D) and dragging it onto the track that you want. You can control all the different grooves together with the Global Amount value at the bottom right of your groove pool.

Examples:

SEE ALSO : Background vs forefront to create dimension