
Reverse Engeneering Sounds
Every now and then, you might be like me and stubble on a song that either wow or confuse you for the different sounds it has or for a particular effect. You might be spending a few hours or days listening back to the song wondering how it was done, perhaps search online. But then you face your first limitation: your vocabulary. Yes, that part of yourself that hear a specific sound, might not know exactly how to name it. Then, this creates a gap in how you can explain it to someone or search for its nature, through search engines. In my case, I’m lucking enough to know enough about sound processing to be able to name it and so many times, someone booked me for an hour to ask me about a specific sound but then felt disappointed that I explained it in less than 2 minutes. I swear this happens a lot. But then I see them feeling a relief that what they thought impossible becomes something they can now add to their song in the making.
The first rule of audio reverse engineering is to be curious and open. But also, persistent and patient.
The second is to not be afraid to ask for help.
The third is to understand that it often takes 9 fails (in average) to succeed (the 10:1 ratio).
That said, It took me a while but I compiled how I work when I try to reverse engineer sounds so that you can consider this as a way of understanding more how you work. The more you understand sounds, the more control you’ll have over your own sound design.
Understanding the Sound
As simple as this sound, understand the sound starts with paying attention, isolating a moment within a song and be able to name which family it belongs to. In terms of families, there are a few that I use, which are related in how I label sounds (or how most online sample stores as Splice or Loopcloud use).
Drums: kicks, snare, hats, claps, toms, cymbals, breaks, fills, acoustic. These can be electronic based or acoustic. You’d see them on drum machines quite often.
Percussion: Shakers, conga, tambourine, bongos, djembe, bells. This is mostly the large amount of world traditional percussion related sounds.
Synths: Pads, stabs, chords, leads, arp, analog, fx, plucks. Basically, the sounds are the results of synthesis from a synth through sound design.
Vocal: All the types you can imagine and think of, that aren’t synthesis related.
Effects: Noise, risers, sweeps, impact, textures, atmosphere, field recordings. In general, they don’t really have a tone/recognizable root key but they might have one.
Brass/Woodwind: Sax, trumpet, trombone, flute, harmonica. Wind based instruments, mostly not synthesis related.
Guitar: Electric, clean, acoustic, distorted, riff.
Keys: piano, electric piano, wurtlizer, organ, classic, organ. Anything sounding close to a piano.
Bass: Sub, acoustic, analog, synth, wobble, saw, distorted, acid. Anything mid-low or low in frequencies.
Strings: Violin, cello, orchestral, staccato.
Some family overlaps, especially in electronic music, as many of the sounds can be created with a synth in one way or another but to name the base, perceived family is usually where it all starts.
Listening Carefully: The audio engineer will first listen to the sound repeatedly to understand its characteristics. This includes identifying the pitch, timbre, duration, and envelope (attack, decay, sustain, and release phases) of the sound.
Once you have the family, you need to define it’s nature through these characteristics. These will be helpful to either recreate or modify a specific sound. Whenever you start by designing a sound, these elements are the basis of where you start.
Example: Simply zoom on the isolated sound to start with can reveal some of those details: duration and envelope are very clear.
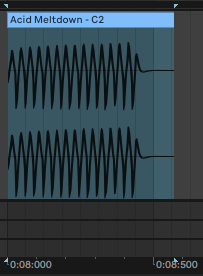
In this example, we see this sound has a fast attack, pretty high decay and sustain but super short release (as there are no tail).
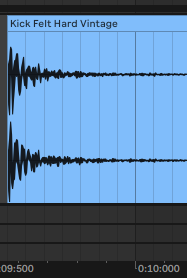
This sound also has a fast attach and a high decay, the sustain is fairly short and it seems the release is mid point. We see there is some sort of texture on the sound as there’s some noisy looking texture that stretches. This could mean that this sound was made by adding a layer to the original sound design.
Spectral Analysis: Using spectral analysis tools, the engineer can visually inspect the frequencies present in the sound. This helps in understanding the balance of fundamental frequencies and overtones.
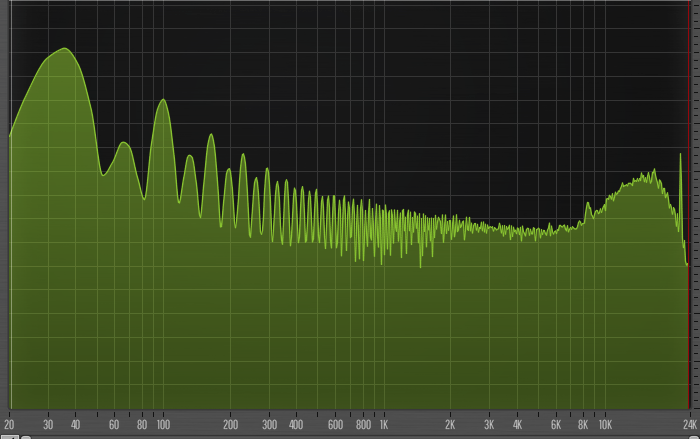
In this example, the sound has a root key of C1 that is this huge bump in the low end area. After that bump, we see the complexity of the harmonics and overtones.
Understanding the overtones and harmonics is a strong indication of the content of the sound. It’s also telling us that this sound isn’t filtered. If it is, it might be in parallel otherwise we wouldn’t see the harmonics going up all the way there. If you don’t have a good one, I’d recommend getting the free SPAN.
Replicating the Sound
Identifying the Source: The engineer tries to determine the source of the sound. Is it a natural sound, a synthetic sound from a synthesizer, or perhaps a processed sound with effects?
This is where it gets complicated, especially if you’re new to sound design. Whenever I teach sound design, I encourage people to spend some time testing different oscillators and synthesis method. Each companies who build synths also work on having a particular sound and sometimes it’s just not possible to find out what it is. So the best attitude possible at first is to remain open and to try multiple iterations. But it won’t be possible to understand the sound if you haven’t exposed yourself to many of them. Spending a lot of time playing with various synths, emulations and checking online demos of synths can be a very essential activity to train your ears.
Using an oscilloscope is also super useful to “see” the sound if the wave form wasn’t clear enough from the file itself.
Consider foleys! This type of sound is what you see with sound artists that create the effects for movies by manipulating items in order to create a new sound. Perhaps you could be creative and use items in your kitchen to recreate the sound or even with your mouth, try to “say” or imitate the sound in order to see how it sounds like. Maybe you’ll feel silly but it can be pretty interesting in the end.
Synthesis: If the sound is synthetic, the engineer may use synthesizers to recreate it. This involves selecting the appropriate waveform (sine, square, triangle, sawtooth), setting the envelopes, and modulating the sound using LFOs (Low-Frequency Oscillators) and filters.
We saw on this blog that LFOs and envelopes are related to movement in sound so once your have worked on finding the possible sound source, the next is to hear the movement in it. This will let you know how to organize your movement settings.
One of the most useful and powerful tool you can use for modulation is Shaperbox. It has all the different tools for modulation. It has provided me a lot of insight on modulation and sound just by playing with it so it is not just useful for sound design, it is also educational.
Sampling: If the sound is natural or too complex to synthesize from scratch, the engineer might resort to sampling. This involves recording the sound, if possible, or finding a similar sound and then manipulating it to match the original.
Sometimes sampling the sound you want to replicate and play with it within a sampler can reveal details that you initially missed.
Processing the Sound
It’s rare that a sound as is gets our attention. It often is the case that it will have a color. We can process the sound by adding some effects that can twist the phase or open up the spectrum.
Effects Chain: The engineer will then use an array of effects to process the sound. Common tools include equalization (EQ) to adjust frequency balances, compression to manage dynamics, reverb and delay for space and depth, and possibly distortion or saturation for character.
Handy tools are multi-effect tools. Lifeline is one fun effect that can drastically or subtly alter the dull sound into a new one.
Layering Sounds: Often, the desired sound is a combination of several layers. The engineer might blend multiple sounds together to create a complex sound.
When it comes to layering, I like to use the arrangement side of Ableton to do it. You can also use an envelope follower to use the envelope of your desired target and apply it to the sound layers you’re working on. When layering, EQs and filters are your best assets.
Iterative Tweaking
A/B Testing: Throughout the process, the engineer will frequently compare their recreated sound to the original (A/B testing), making small adjustments to get closer to the desired outcome.
Some useful tool to understand the composition of the sound can also be an oscilloscope. Melda has one here for you for free otherwise, again in Shaperbox, you can find one which is very useful to have hands on the design.
Resampling over and over: The engineer might create “feedback loops”, where the processed sound is re-recorded into the system and processed again for more complex effects. What we mean here is not a literal feedback loop which is pretty hard on the ear but more of a resampling of a resampling into something new. This approach is a good way to hunt down variations of what you work on and go further down the rabbit hole of variations.
Final Comparison and Tweaking
After doing A/B testing for a while, you should at some point closer to the target in mind. One thing in mind as for searching for your ideal replication is to come up with something close and also be open to variations to it. Save as many presets as possible by turning multiple effects into a macro. You want to be able to recall your processing into future sounds and if you applied some processing, that is “make-up” that you can apply to other sounds of yours, which will open a new array of possibilities.
Fine-Tuning: Even once the sound seems close to the original, additional fine-tuning is often necessary to capture the nuances that make the sound unique. Sometimes that means to swap some effects (swap reverb X with another) to get subtle new outcomes. Even a musical EQ can change the identity in a little way. A lot of the best outcome is the sum of multiple tiny tweaks.
Environment Matching: The engineer also considers the environment in which the sound will be used. A sound in isolation might seem perfect but could require adjustments to fit into a mix or to match the acoustics of a particular space. Using a convolution reverb can be giving an idea what the sound could be like elsewhere.
Reverse-engineering a sound is as much an art as it is a science. Audio engineers need to have a keen ear, a deep understanding of audio synthesis and signal processing, and patience to iterate until the sound matches their goal. It’s a challenging but highly rewarding process that often leads to the creation of innovative sounds and effects.


Leave a Reply
Want to join the discussion?Feel free to contribute!