
Tips for better clarity in your mixes
Clarity in mixes is not something people understand or perceive well when they first start mixing, but it’s a magical part of a song that often distinguishes professional mixes from amateur mixes. Clear-sounding mixes instantly grab your attention because they feel precise, open, airy and easy to understand. While clarity in a mix might seem easy to create, it’s actually very difficult to achieve.
I can say that I’m starting to better understand clarity myself. If you’re familiar with my music, you know I like busy music and my songs are generally quite full, with multiple layers of sounds. It’s a challenge for me to get a clear mix because of the number of sounds I use, but for me this is also the best way to practice mixing clearly, as it’s more difficult than if I were only using a minimal amount of sounds.
Here are some of the things I’ve learned when creating clarity in my own mixes.
Less is more, and less is clearer
The less you have going on, the clearer your song will be. Nothing clashes and there’s less to try to find an appropriate spot for. When mixing, you need to find a fitting place for every sound you use. If you have 5 hihats, 3 claps, and 5 melodies, this can become quite a challenge.
How can you clean up a mix and make it clearer?
I see a lot of clients struggle with cleaning up their mixes. Most artists suffer from a strange thought process that goes something like “I’m afraid the listener is going to get bored, therefore I will fill my mix with as much as possible so the listener never feels let down.” To this I would reply that there’s a remedy in your DAW…the mute button! Let me explain:
1 – Loop a section of your song, the part where it’s the busiest.
2 – Mute everything, then start by un-muting your essential sounds. What are the fewest number of sounds that can communicate your song’s idea clearly? Toggling mute on parts of a song sometimes create interesting perspectives and can reveal things you didn’t realize about your arrangements—it often takes fewer sounds to create a clear mix. This can mean no fills, no decorations, no backgrounds, just the essentials.
3 – Are your essential sounds sharing space in the frequency spectrum?
Technically, if you have less, sounds are most likely to occupy less space and clash with one another less frequently. Generally, there are a few areas where your sounds can clash:
- Frequency: If you divide the spectrum into 4 or 5 bands, you want each band to have the same number of sounds. Low-end would be under 100hz, then 100 to 1k for mids, 1k to 3k for high mids and then 3k to 10k for highs, then 10k+ for the air/transients. If you have a hard time muting your sounds, you can also isolate a few different sounds in different bands.
- Amplitude: Also known as volume, amplitude is often not understood properly. People want everything LOUD and are afraid that secondary sounds won’t be heard. Everything gets heard in a mix and sometimes, things that are less loud are way better. Some sounds should be the loudest, then the others should be mixed in relation to those. The greater the amplitude distance you have between your sounds, the more they’ll feel like they’re breathing instead of fighting. This is your dynamic range, a concept that’s often misunderstood. I would recommend playing with levels here and there as well. Having modulation on the amplitude of a sound is a good way to create a breath of fresh air in a mix. You can use a tool like MTremolo to give you a hand with that.
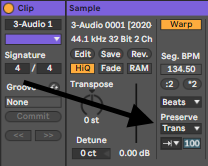
- Sample length: This is something many overlook but is very important when it comes to samples. In many cases, samples people use are too long (too much decay) and that can cause a lot of noise, especially once compressed. Take kicks, for instance; people love big, badass kicks but don’t realize how problematic a long kick is in the low-end, especially in mastering. It bleeds in the bass and everything becomes mushy. I often use Transient Shaper (by Softubes) to shorten kicks or other percussive elements. You’d push the attack if you want and reduce the decay. You can also reduce the decay of a sample in Ableton if you go in the “Preserve” to be switched to “Trans” and then make sure it’s one-way, and play with the percentage to remove the decay.
- Stereo space: I’ve explained this before and will refrain from repeating myself, but stereo clarity is crucial. If your sounds are spread wildly, you might get into phasing issues which means, you’ll end up with holes and sounds ghosting when they should be heard. I know that discovering phasing issues might be a bit of a mystery to many new producers, but with a good metering, you can see them. You can also listen to part of your song in mono to see if everything is coming out properly.
Chaos-inducing mixing errors
There are a number of tools and habits that can create chaos in a mix—I run into them often, and here are a few I see regularly that I can provide some advice for:
1- Using loop samples: There’s nothing wrong with using a pre-made loop or sampling something from source, but you won’t be able to access the loop’s sounds individually, and can get trapped dealing with issues that already exist within the loop or sample. If you’re using a loop, make it the centre of your song and make sure that you work the other samples around it. Tip: Using busy loops can be a bit of a problem, but you can use a multi-band compressor to control them, or put them in mono and use a multi-band stereo tool like the Shaperbox 2 to decide on the position of each sound.
2- Auto-panning nightmares: Making things move can feel exciting, but it doesn’t help mix clarity if you overdo it. Using multiple auto-pan effects on sounds can be cool, but the human ear can only handle a certain number of complex things going on. If on the first listen, one can’t understand the movement clearly, there are chances the modulation isn’t helping. TIP: Use just one auto-panning effect per song, max.
3- Delays and reverb: Reverb and delay multiply or make sounds longer, songs busier, and therefore, potentially more confusing. Reverb can be useful, but a type like Hall can make things sound a bit messy. I would recommend to have your reverb set to a short decay and low wet/dry. Darker reverb can also help preserve the highs in your song. Tip: Using reverb with a Chamber/Room at the beginning can help to know how much you should use. Also, if you can use a delay instead of reverb for creating wider sounds, use an EQ to tame the clashing frequencies.
4- Intense compression: Compression glues and adds body to sounds, but a compressor with a slow release and high ratio can also mess up the precision of a sound. Keeping some transients intact can really help a sound to pop out of a mix. If you compress, perhaps using the magic 1:1.5 ratio with slow attack to help the transient snap. TIP: Parallel compression is always useful for clarity.
My last general tip is to always check your mix in mono…it really helps!
I hope this was useful.


Leave a Reply
Want to join the discussion?Feel free to contribute!