Synthesizer Basics
I’ve realized that using synths is a bit of an esoteric process for many (for me it definitely was for a while), so I’d like to share with you some synth basics. I used to read things online in-depth about synths, but didn’t feel like it was really helping me do what I wanted to exactly. Synths can create certain sounds, but the ability to shape these sounds into something you like is another task. When I dove in the modular rabbit hole, I felt like I needed to really grasp how to use them. After years of working with synths, presets have a actually provided me with many answers as to how things are made, and I’ve ended up learning more with presets than with tutorials. It’s probably useful for some to understand some basic concepts with regards to how to use synths in order to create lush or complex sounds, and in order to develop your own set of synth sounds. I’m not going to explain every synthesis concept, but I’ll cover some synth basics.
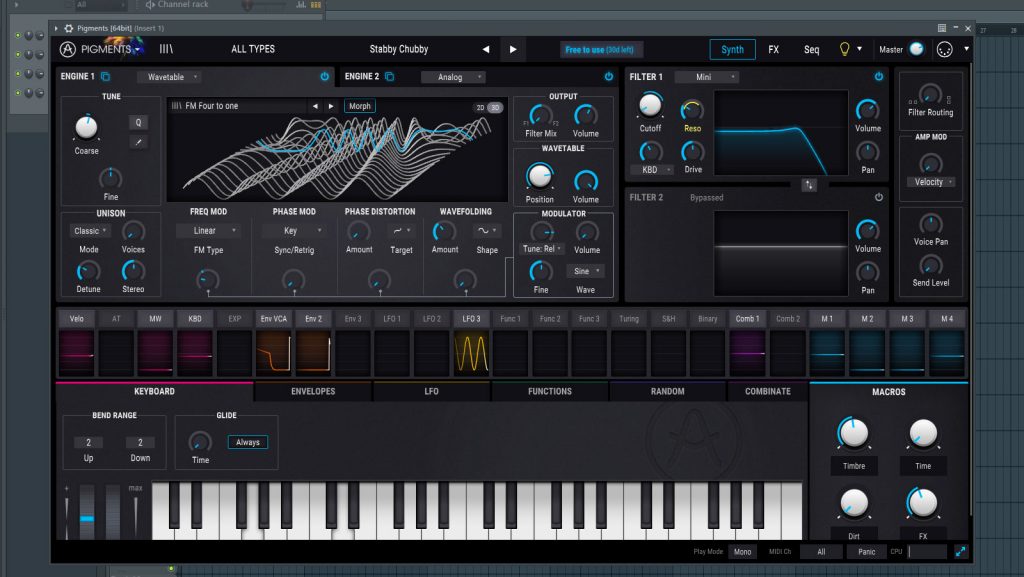
My personal go-to tools when I get to work with synths are Omnisphere, Pigments, and Ableton’s Operator. They all have different strengths and ways to work that I feel fulfill my needs. When people talk synths, they often discuss which ones are “best”, but I find that these three are pretty powerful, not only for the sounds they create, but for how they work. Speaking of workflow, if a synth doesn’t create something I like quickly, I usually get annoyed as I want to spend time making music and not just spend an hour designing a sound. In the case of these three, they all have several oscillators that can quickly be tweaked in a way you want.
Oscillators
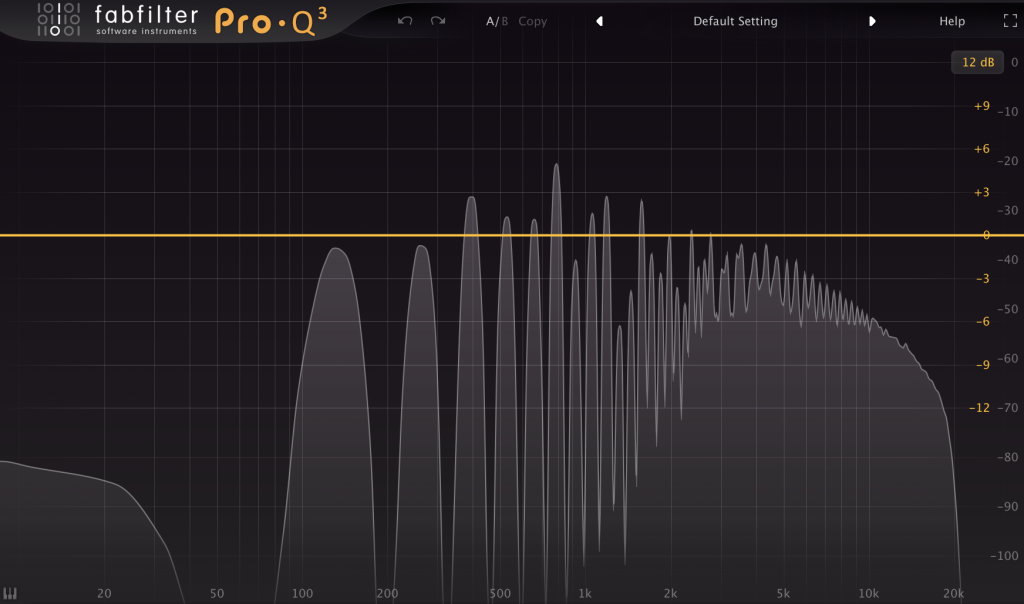
Imagine the oscillator as a voice (I’ll explain polyphony another time which is a slightly different topic). The oscillator can shape sounds in various ways by creating a waveform: sine, square, triangle, saw, etc. The waveform has certain characteristics and difference waveforms have more or fewer harmonics. If you play a note, you’ll first see that it will create a fundamental frequency (as in, the note played has its own frequency), followed by the harmonics. Sine waves, because of their simplicity, will have basically no harmonics, but a saw wave will have a lot.
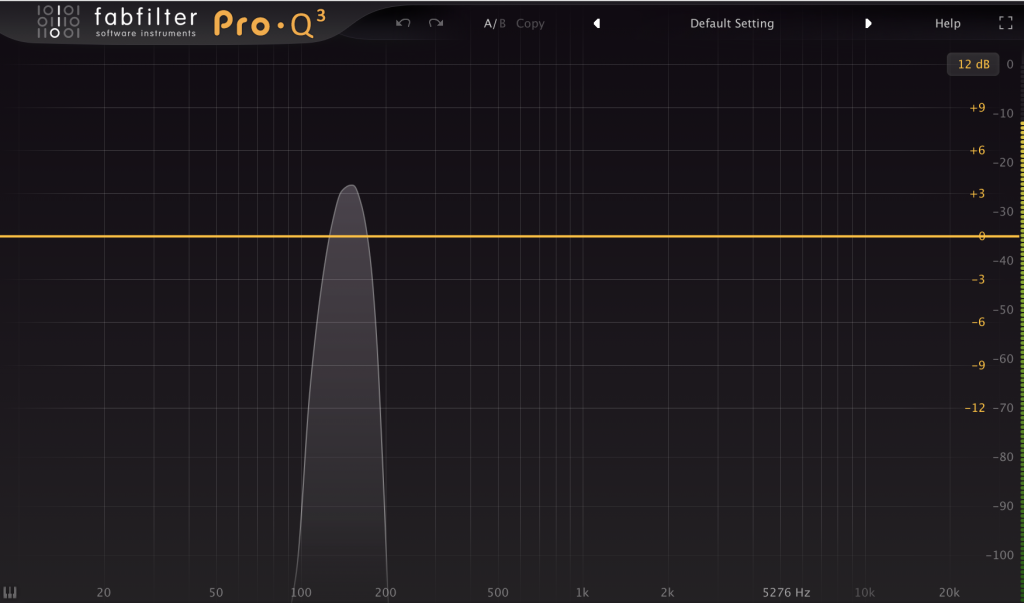

As you can see, sine and saw waves create different results, and you can combine them to create richer sounds. When there are more harmonics, the human ear tends to hear them as a sound that is richer, as it covers more frequencies (yes, this simple explanation for a more complex topic but I’ll leave for another time).
So what should you take away from this? Well, when you see a synth with multiple oscillators, realize that you can combine them in sound designing. One basic synth exercise I give to students is to start with one oscillator, like a sine wave, and then add a second one, pitched a bit higher (one octave) using a triangle wave, and use a 3rd oscillator that is a saw, pitched up again. If you play the same note, you’ll see the content is altered because the harmonics now interact to create new “sonic DNA”.

This simple starting point should pique your interest in exploring the combinations of different ways to set the oscillators in order to shape different sounds. Like I explained in past article, sounds are combinations of layers that create different outcomes; same goes for synths and oscillators. Synths are a rougher approach and it takes time at first to feel like you’re getting somewhere, but the more you practice, the better you get, and then you can event use a synth to bring richness to samples you layer. For example, I frequently use a low sub sine to give bottom to wimpy kick.
Envelopes
After deciding on the oscillator content of your synth, next comes shaping it. This is done with an envelope ADSR (Attack, Decay, Sustain, Release). The envelope tells your synth how to interact with the input MIDI notes you’re sending it. It waits for a note, and then depending on how the envelop is set, it will play the sound in a way that will shape both the amplitude (volume) and timing. For example, a fast attack means the sound will start playing as soon as the key is pressed, and a long release will let the sound continue playing for a little while after you release it. Each oscillator can have its own envelope, but you could have one general envelope as well. The use of envelopes is one of the best ways to give the impression of movement to a sound. I’m addicted to using the Max envelope patch and will assign it to a bunch of things on all my sounds, but I had to first learn how it worked by playing with it on a synth. While the envelope is modulating the amplitude, it can also be used to shape other characteristics too, such as the pitch.
Filters
You might already be familiar with filters as they’re built into DJ mixers; filters allow you to “remove” frequencies. In the case of a synth, what’s useful about filters is that most synths have filters that can be assigned by oscillator, or as a general way to “mold” all oscillators together. If you take a low pass filter, for example, and lower the frequency, you’ll see that you’ll smooth out the upper harmonics. In case of pads, it’s pretty common that multiple oscillators will be used to make a very rich sound but the filter is the key as you’ll want to dull out the result, making your pad less bright and defined.
LFOs
LFOs are modulators, and as you know, are one of my favorite tools. I use them on many things to add life and to give the impression of endless, non-repetitive changes. I’ll even sync them to a project and use them to accentuate or fix something. In most synths you can use LFOs to modulate one or multiple parameters, just like envelopes. What’s fun is to use a modulator to modulate another modulator; for example, I sometimes use LFOs to change the envelope, which helps give sounds different lengths for instance. Using LFOs on filters is also a good way to make variations in the presence of your harmonics, creating different textures.
Noise
One of the most misunderstood points in synthesis the use of noise. Noise is a good way to emulate an analog signal and to add warmth. One of the waveform types an oscillator can have is noise; white noise or other. You can add it in the high end or have it modulated by an envelope to track your keys. I like to keep noise waves very low in volume, and sometimes filter them a bit. But that said, I use a noise oscillator in every patch I design. Even a little bit of noise as a background layer can create a sense of fullness. If you record yourself with a microphone in an empty, quiet place, you’ll notice there’s always a bit of background noise. The human ear is used to noise and will be on the lookout for it. Hearing noise in a song or sound creates a certain sense of warmth.
Why do I love Omnisphere and Pigments?
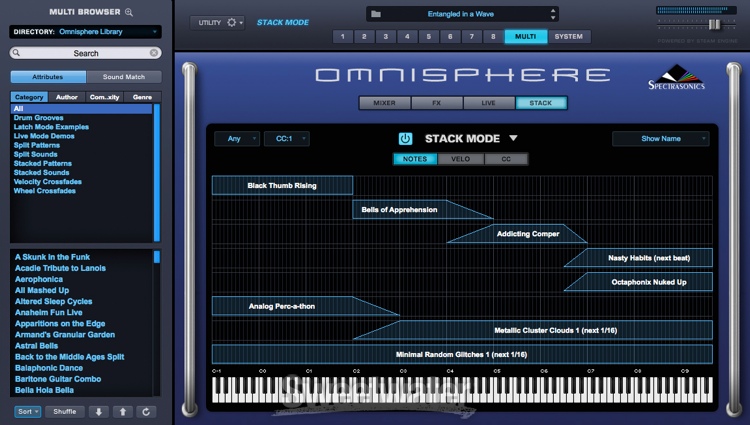
Both Omnisphere and Pigments are very powerful for different reasons. Omnisphere is one of the most used software tools in the sound design industry, as well by composers who write film scores. Hans Zimmer is known to use it, among others. It has more oscillators that Operator, not just in quantity, but also in emulations of existing synths. Fore example, you could have your lower oscillator to be emulating a Juno, then add a Moog for the middle one and end up with an SH-101. I mean, even in real life, you can’t possibly do that unless you own all three of those synths, but even then it would be a bit of a mess to organize those all together. Plus, Omnisphere’s emulators sound true to the originals. If this isn’t convincing enough, Omnisphere also comes with a library of samples that you can use to layer on top of the oscillators, or import your own. Add one of the best granular synthesis modelers and you are set for endless possibilities.
Pigments is made by Arturia, and it was made with a very lovely graphical approach, where you have your modulators in the lower part of the UI and the sound frequencies in the upper part. You can then easily and quickly decide to add modulation to one parameter, then visually see it move. It’s one of those rare synths that has modulation at its core. This is why I love it; it provides me with numerous quick sounds resulting from deep or shallow exploration.
SEE ALSO : Using MIDI controllers in the studio


Leave a Reply
Want to join the discussion?Feel free to contribute!